Mobile authentication
The Mobile Identity module offers a mobile authentication mechanism in a user friendly and secure way. You can for instance take advantage of mobile authentication to add second factor authentication to your product, that can be used to improve the security of selected actions like logging in to your website or accepting a transaction payment.
The mobile authentication feature is an extensive feature that has a number of different possibilities. For example, there are different ways that mobile authentication is triggered or received on a mobile device.
With a One-Time-Password (OTP), the user provides an OTP in order to confirm a mobile authentication transaction. Since the OTP is long, it is likely that the OTP is transformed into a QR code and the user scans this code with their mobile device.
The application has the following responsibilities:
- Passing the mobile authentication request received from the initiator to the SDK
- Responding to the confirmation request
- (optionally ) Displaying a dialog box to the user when their confirmation is required
- Sending the user response back to the SDK
- Handling the completion of the mobile authentication request
Setup and requirements
Configure the IDAAS-core to support this functionality. When the IDAAS-core is configured, you can enroll and handle mobile authentication requests using the SDK.
Enrollment
The enrollMobileAuthentication method enables the basic mobile authentication feature. Mobile authentication with OTP is possible after you enroll the user.
Successive invocations of enrollment for mobile authentication will re-enroll the device only if the mobile authentication override is enabled in the IDAAS-core configuration.
Note
We recommend performing the enrollMobileAuthentication step as soon as possible in your application as it is quite resource intensive because it generates a private key and certificate. The SDK requires an authenticated user to enroll for mobile authentication. The user can enroll for mobile authentication on every device that they installed your application on.
OneWelcomeSdk.enrollMobileAuthentication()
  .then(() => {
    console.log('Mobile Authentication enabled!')
  })
  .catch(error => {
    console.error('Mobile Authentication failed: ', error.message)
  })
Request handling
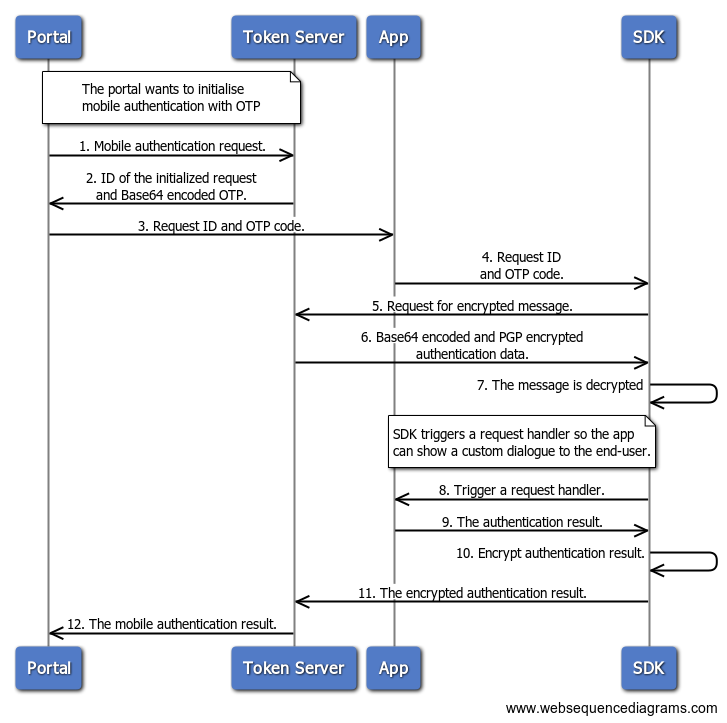
The Mobile Identity module offers the ability of mobile authentication with a One-Time Password (OTP). Mobile authentication with OTP provides users an easy and secure way for two-factor authentication or single-factor authentication where no passwords are required. A good use case is, for example, letting a user log in to your web application using their mobile device by scanning a QR code displayed within a browser. This essentially allows the user to authenticate using their mobile device. It is also not relying on third-party services like APNs or FCM. All of the communication stays between app, web application, and IDAAS-core.
An example implementation could work like this: A web application fetches the OTP from the IDAAS-core and displays it on the login page in the form of a QR code. Then the user opens your mobile application and scans the QR code with their camera and is automatically logged in to your website.

As you can see from the diagram above, the application has the following responsibilities:
-
Passing the mobile authentication request received from the initiator to the SDK
-
Responding to the confirmation request
-
(optionally) Displaying a dialog to the user when his confirmation is required
-
Sending the user response back to the SDK
-
-
Handling completion of the mobile authentication request
When you have retrieved an OTP in your application, you need to hand it over to the React Native SDK in order to let the SDK process it. Use handleMobileAuthWithOtp for passing the OTP code.
OneWelcomeSdk.handleMobileAuthWithOtp('base64 encoded OTP')
  .then(() => {
    console.log('Authentication successful')
  })
  .catch((error) => {
    console.error('Authentication failed: `, error.message)
  })
The SDK returns two event actions that notify you about the status of the OTP authentication.
StartAuthenticationreturned when the authentication has started but has not yet been accepted. You can use themobileAuthenticationRequestobject, obtained from the event, to display some info to the user and ask for their permission to continue.FinishAuthenticationreturned when the authentication has completed, you can use this event to close any dialogs that you have opened.
const listener = OneWelcomeSdk.addEventListener(
  Events.SdkNotification.MobileAuthOtp,
  (event: Events.MobileAuthOtpNotificationEvent) => {
    switch (event.action) {
      case Events.MobileAuthOtpNotification.StartAuthentication:
        setMessage(event.mobileAuthenticationRequest.message);
        setVisible(true);
        break;
      case Events.MobileAuthOtpNotification.FinishAuthentication:
        setVisible(false);
        break;
    }
  },
);
Responding to the authentication request
To finish the authentication, you need to either accept or deny the authentication request. This can be done with acceptMobileAuthConfirmation() and denyMobileAuthConfirmation().
After calling one of these functions, the original promise that you received from calling handleMobileAuthWithOtp will resolve and Events.MobileAuthOtpNotification.FinishAuthentication will be fired.
<Button
  name={'OK'}
  onPress={() => {
    OneWelcomeSdk.acceptMobileAuthConfirmation();
  }}
/>
<Button
  name={'CANCEL'}
  onPress={() => {
    OneWelcomeSdk.denyMobileAuthConfirmation();
  }}
/>

