
Setting up the project
Introduction
This section describes the first steps to integrate the Android SDK with an existing Android project. In this sample we'll integrate the SDK into a sample Android application: Example App, using the Android Studio IDE and Gradle build automation system.
Requirements
The Android SDK supports apps running on API level 23+ (Android Marshmallow and newer), so make sure, that your project also aims API level 23. You can find more information about minimum API level requirements in the Getting started topic guide.
For example, your app's configuration in module build.gradle file could look like this:
android {
  defaultConfig {
    minSdkVersion 23
    __ ...
  }
  __ ...
}
__ ...
android {
  defaultConfig {
    minSdk = 23
    __ ...
  }
  __ ...
}
Disable allowBackup attribute in Android Manifest
For security reasons, project implementing SDK is not allowed to use android:allowBackup="true" attribute in Android Manifest. Read more about allowBackup here. If declared, we recommend to delete mentioned attribute from your AndroidManifest.xml as SDK explicitly sets it to false in its own Manifest.
Adding dependency
In order to use the SDK you need to add a dependency to the module level build.gradle file.
If project uses different place in order to declare repositories, such as settings.gradle, be sure to place SDK repository in the same place as the other ones.
This is by far the most preferable option. The main reasons being that it involves the least number of manual steps when adding the SDK to your project or updating it to a newer version. The second reason is that it will automatically resolve any third-party dependencies that the SDK has. So if OneWelcome decides to update one of the SDK dependencies you don't have to worry about using the correct version because Gradle will take care of this for you.
In order to obtain credentials, navigate to https://onewelcome.atlassian.net/servicedesk/customer/portals and submit a request for access.
Assuming, that you have gained access to the OneWelcome Artifactory repository, you can set up the repository usage according to the example below:
allprojects {
  repositories {
    if (project.hasProperty('artifactory_user') && project.hasProperty('artifactory_password')) {
      maven {
        url "https:__repo.onewelcome.com_artifactory_onegini-sdk"
        credentials {
          username artifactory_user
          password artifactory_password
        }
      }
    } else {
      throw new InvalidUserDataException("You must configure the 'artifactory_user' and 'artifactory_password' properties in your project before you can build it.")
    }
    __ ...
  }
  __ ...
}
allProjects {
      repositories {
        with(project) {
            if (hasProperty("artifactory_user") && hasProperty("artifactory_password")) {
                maven {
                    url = uri("https:__repo.onegini.com_artifactory_onegini-sdk")
                    credentials {
                        username = findProperty("artifactory_user").toString()
                        password = findProperty("artifactory_password").toString()
                    }
                }
            } else {
                throw InvalidUserDataException("You must configure the 'artifactory_user' and 'artifactory_password' properties in your project before you can build it.")
            }
        }
        __ ...
      }
  __ ...
}
You need to set your artifactory_user and artifactory_password in the gradle.properties file in your Gradle home directory (e.g. ~/.gradle on
Linux/OS X).
Next add the dependency itself. Please check latest release version.
dependencies {
  implementation('com.onegini.mobile.sdk.android:onegini-sdk:X.X.X@aar') {
    transitive = true
  }
}
dependencies {
  implementation("com.onegini.mobile.sdk.android:onegini-sdk:X.X.X@aar") {
    transitive = true
  }
}
Any third party dependencies that the SDK depends on will be automatically resolved (and downloaded) by Gradle. The full list of dependencies can be found in Getting started. In case of a dependency conflict you should try to resolve it following the official App build dependencies doc.
Please note, that adding a lot of dependencies to the project can lead to a build exception that indicates your app has reached a limit of the Android app build architecture. In such case you should use multidex.
Token Server configuration
Before you can start configuring the client (or App) side, we should first prepare the server side. Follow the Token Server documentation in order to define your app's platform, configuration, pin policies, SSL certificates, etc.
Configuring the app on the TS will also allow you to download a configuration ZIP file for the mobile client, which will make the next step a lot easier.
Client configuration using the SDK Configurator
When you have the proper configuration done on the server side, you can provide a matching configuration to the client (SDK).
The SDK expects, that the app will provide a proper configuration in a class, that implements the OneginiClientConfigModel interface. Also, must provide a
server's SSL certificate in order to perform certificate pinning. You can do both steps manually as described in the configuration section.
Sounds too complicated? Luckily, you can use a tool called the OneWelcome SDK Configurator that will make it a lot simpler.
Downloading configuration file from the Token Server
Start with downloading a configuration ZIP file from the Token Server. Make sure, that you're downloading the correct configuration - in particular the platform and app version must be correct.
Example configuration that can be downloaded from the Token Server

Running the SDK Configurator
Next download and run the SDK Configurator. You will be asked about a path to the ZIP file and src
directory of your project. You will be also asked to verify the SSL certificate and to override OneginiConfigModel - if there's already one in your project.
Verifying
When the configurator finishes the task, you should be able to find a new keystore file in your project's assets, that contains the SSL certificate. You should
also notice a new class in your sources called OneginiConfigModel - that's the generated config class.
Sample OneginiConfigModel generated by the SDK configurator
public class OneginiConfigModel implements OneginiClientConfigModel {

  private final String appIdentifier = "ExampleApp";
  private final String appPlatform = "android";
  private final String redirectionUri = "oneginiexample:__loginsuccess";
  private final String appVersion = "2.0.0";
  private final String baseURL = "https:__demo-msp.onegini.com";
  private final String resourceBaseURL = "https:__demo-msp.onegini.com_resources_";
  private final String keystoreHash = "910638c3e6c17ec9ab2a74969abab06b34470d29c21d8ad8a65af243a1ccb69f";
  private final String serverPublicKey = "355C555820D47CB2010F601D96CB134A3026BFEC7F23732E0890CD5E62AB2D24";

  @Override
  public String getAppIdentifier() {
    return appIdentifier;
  }

  __ ...
}
class OneginiConfigModel : OneginiClientConfigModel {
private val appIdentifier = "ExampleApp"
  private val appPlatform = "android"
  private val redirectionUri = "oneginiexample:__loginsuccess"
  private val appVersion = "7.5.0"
  private val baseURL = "https:__demo-msp.onegini.com"
  private val resourceBaseURL = "https:__demo-msp.onegini.com_resources_"
  private val keystoreHash = "99e629cc3f8a50316123bab1fdc1caeaa98e557ebafce89e41d96c2e536816dd"
  private val serverPublicKey = "BBFFCC164C1AC014069B6C2C96E012E434D064F1EB736EF0E2470EFF15410D9D"

  override fun getAppIdentifier(): String {
    return appIdentifier
  }

  __ ...
}
Configurator will also state that you need to specify data scheme in AndroidManifest.xml in the intent filter section. It's going to be baseUrl of declared redirectionUri in OneginiConfigModel class.
<manifest>
  __ ...
    <application>
      __ ...
        <activity>
          __ ...
            <intent-filter>
              <data android:scheme="oneginiexample" _>
              __ ...
            <_intent-filter>
        <_activity>
    <_application>
<_manifest>
Specifying data scheme in AndoridManifest.xml is only needed if you are using external browser during the registration process. This way the browser can redirect user back to the app after finished authentication.> > If you are using WebView component for the browser registration you need to handle the redirection yourself.
Application thumbprint
Since version 11.2.0 the Android SDK uses a SHA-256 fingerprint of the app signing key to let the application proof it's identity to the Token Server. This approach provides additional security protecting an app against tampering/modification. See the application integrity chapter to learn how to obtain your signing key certificate. The calculated hash must be entered into the Token Server's configuration. Read more about that topic in the Token Server documentation.
Working with the SDK during development
Please note that Android SDK has an ability to detect if the app works in debug mode or with debuggable environment and this feature is enabled by default. When debug mode detection is enabled and debug is detected, then the SDK will not allow to execute any security related flow. To disable this feature during development please follow the security controls guide.
Attaching Javadocs to the SDK
If you use Android Studio, you can easily add the SDK Javadocs to your project in order to see them in your IDE and get more explanation about the SDK functions and it's parameters.
Follow the steps below to add the Javadocs to your project:
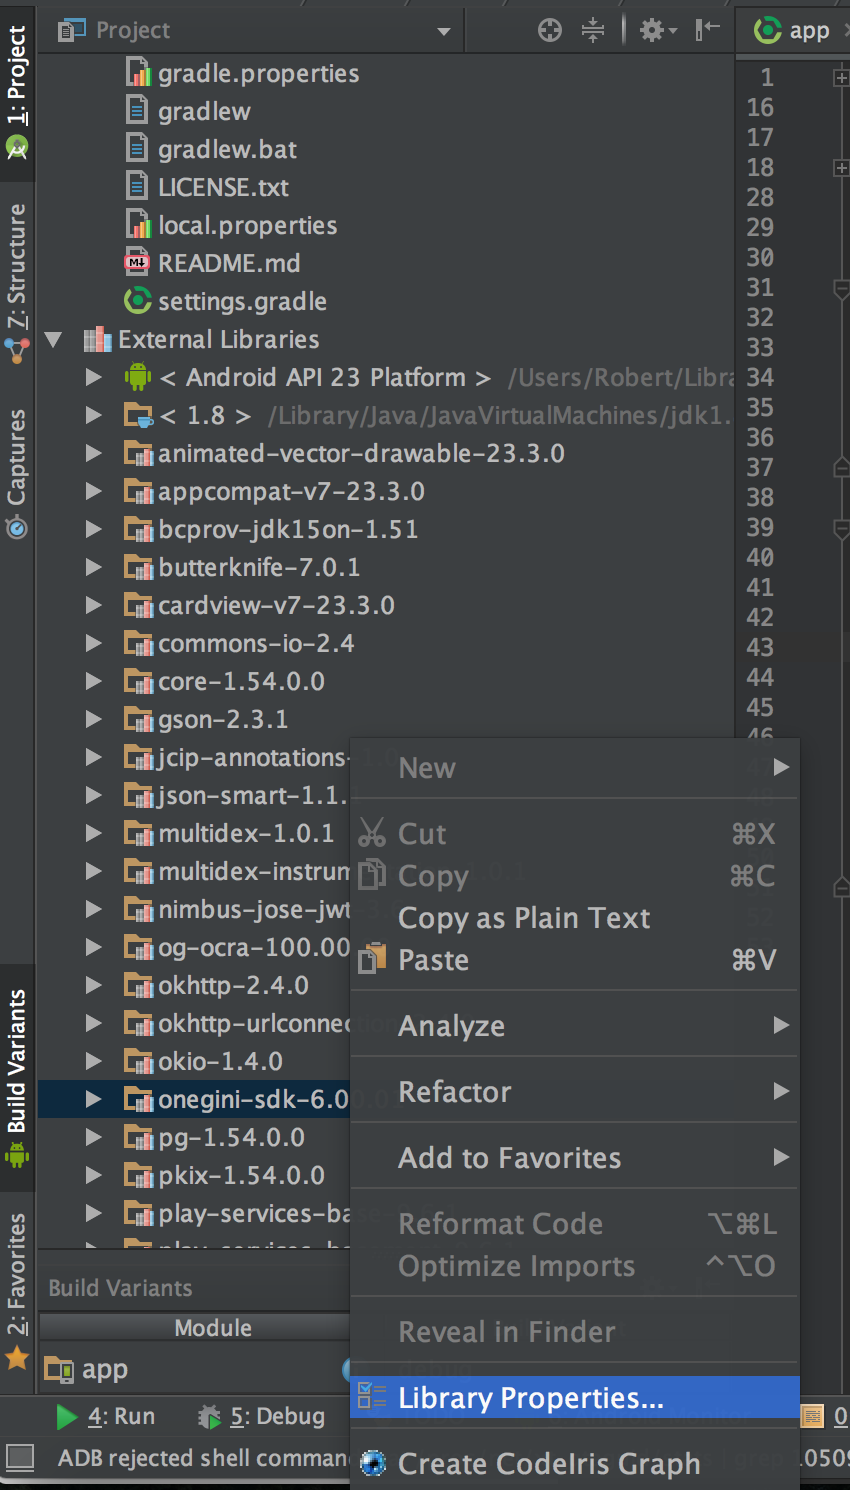
- In the Project view expand "External libraries", right click on the SDK and select "Library Properties...":
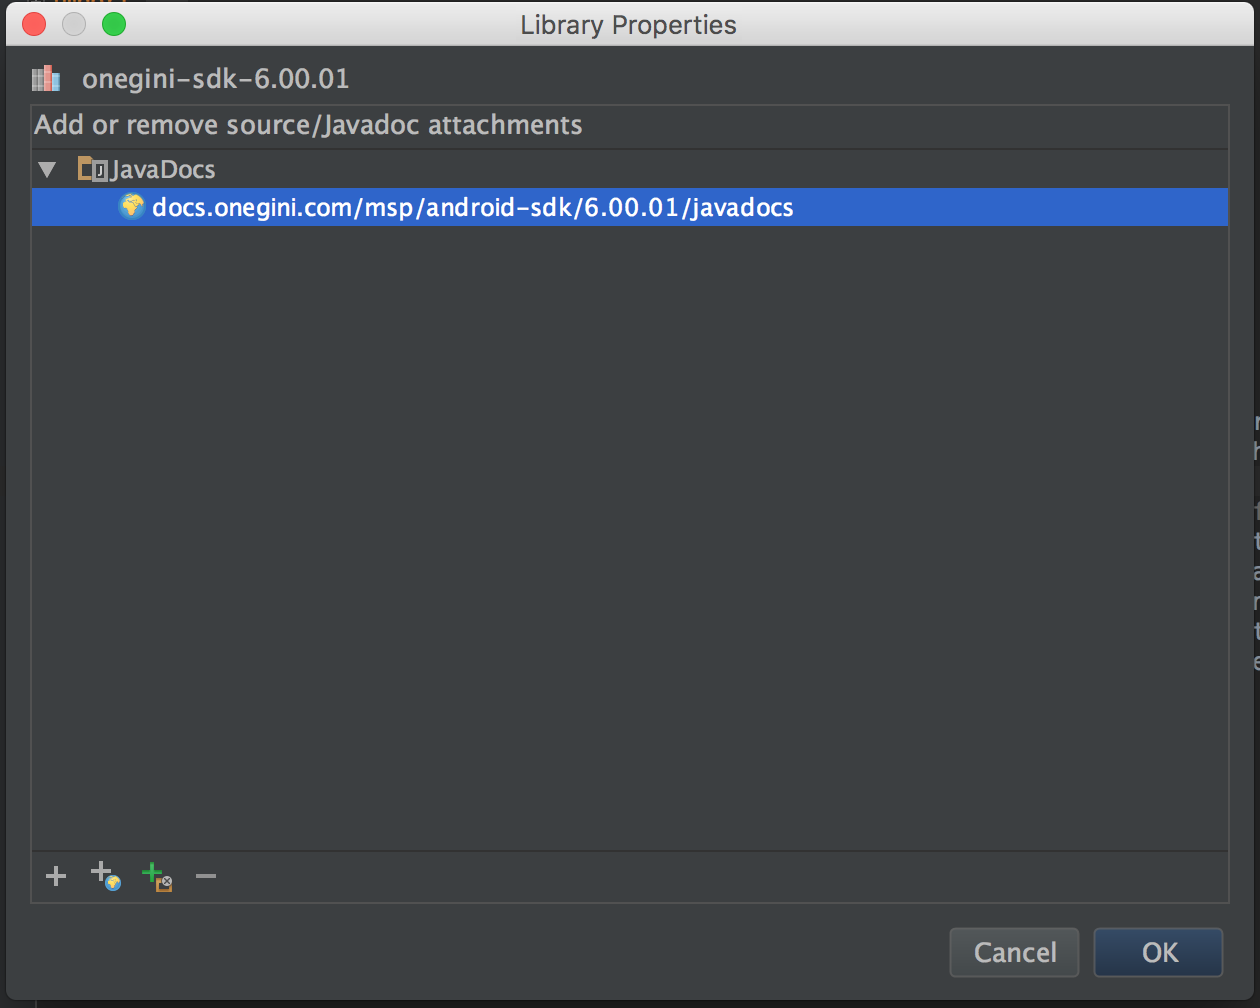
- Click "Specify Documentation URL" and provide an URL to a local javadocs file (when downloaded from Artifactory) or simply paste the URL to the proper page, for example https://docs.onegini.com/msp/android-sdk/6.04.00/javadocs/index.html to get javadocs for the
6.04.00version of the SDK. You can also use the following link https://docs.onegini.com/msp/latest/android-sdk/javadocs/index.html to automatically keep up-to date with the Javadocs but doing so remember to always use latest stable release of the SDK to have them inlined.
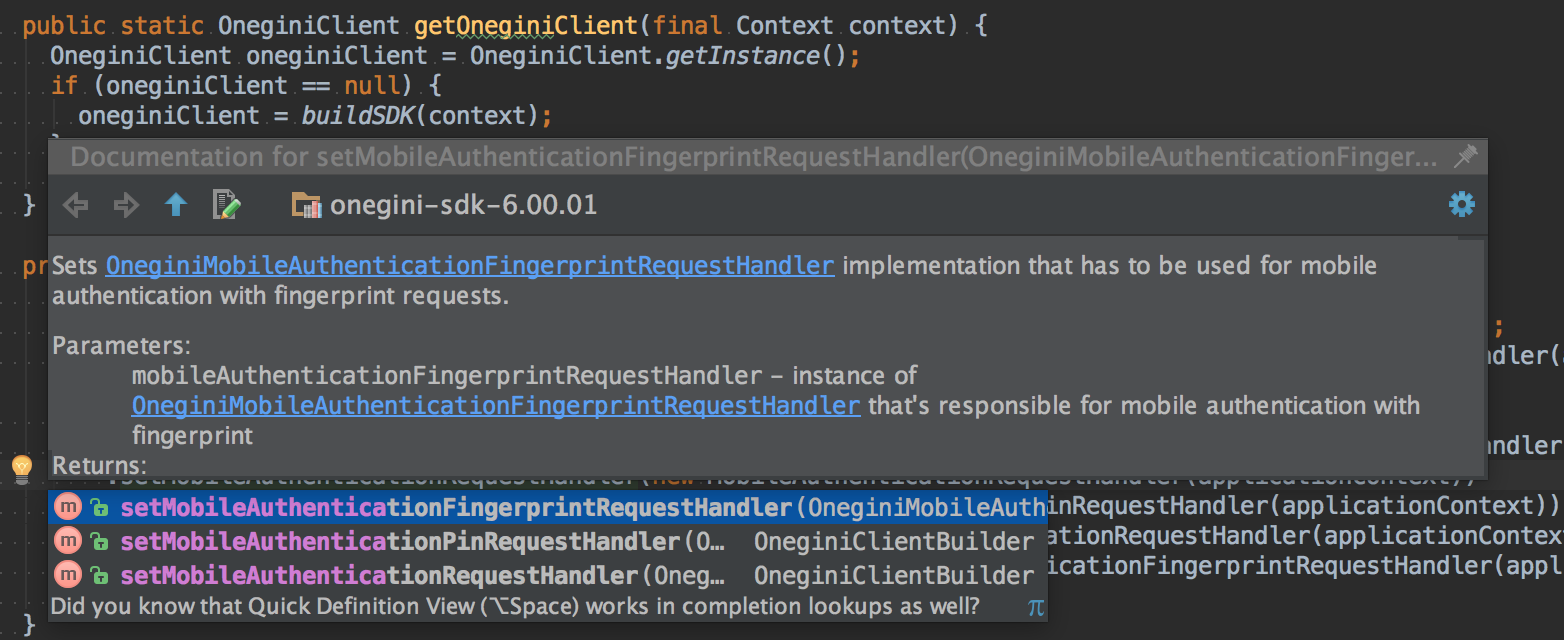
- After that you will be able to see Javadocs for the SDK in Android Studio:
Compiling the app
That was a basic setup of the SDK. In order to verify that everything worked as expected you should try to compile and run your application.