
User registration
Before you add user registration to your application, the Android SDK must already be added to your application.
The Android SDK uses the OAuth 2.0 protocol to authorize the device to access protected resources. To support this protocol, the Android SDK acts as an OAuth 2.0 client.
Prerequisites
For registration to work, OneginiBrowserRegistrationRequestHandler and OneginiCustomAuthenticationRequestHandler must be set in OneGiniClientBuilder.
To initialize authentication, client credentials are required. Client credentials are generated using Dynamic Client Registration (DCR). DCR is included by default in the Android SDK. For DCR, it is mandatory that the time on the device is equal to the time on the Mobile Identity module.
DCR errors are reported back to the Android SDK via the event handler. DCR requires that the application authenticates itself to the IDAAS-core by sending the identifier, version, and platform of the application.
Initializing registration
The UserClient offers the registerUser method. The registerUser() method should be used when a user wants to register. Calling the UserClient#registerUser() for an already registered user results in a reregistration. The registerUser method requires the following three arguments:
OneginiIdentityProvideris the identity provider to use for registration.String[]lists the scopes that authentication is requested for. When no scopes are requested, the default scopes of the application are used.OneginiRegistrationHandleris the registration handler to return the authentication result to.
User registration starts with enrolling a user on a device using a selected identity provider (IdP). A primary (default) IdP and the list of available IdPs for an app are configured in the IDAAS-core.
After enrollment with the selected IdP, the Android SDK receives a refresh token and initializes a PIN creation request to get the user's PIN. The PIN is used to store the refresh token encrypted on the device. Depending on the setting chosen by the app developer, the user can confirm the entered PIN. To specify the PIN creation request handler, the app developer sets it on the OneginiClientBuilder.
After successful PIN creation, the Android SDK calls the onSuccess(UserProfile userProfile, final CustomInfo customInfo) method from the OneginiRegistrationHandler.
In the event of user registration failure, the Android SDK calls the onError(OneginiRegistrationError error) method. You can handle errors that are relevant to you differently. To accomplish this, compare the OneginiRegistrationError#getErrorType() value with the OneginiRegistrationError error type definitions. The OneginiRegistrationError also contains an additional error description for debugging and possibly a Throwable object that you can get with the getMessage() and getCause() methods.
Example: registration of a new user profile with a default IdP
OneginiSDK.getOneginiClient(this).getUserClient().registerUser(null, new String[]{ "read" }, new OneginiRegistrationHandler() {
    @Override
    public void onSuccess(final UserProfile userProfile, final CustomInfo customInfo) {
    // show user is registered and authenticated
    }

    @Override
    public void onError(final OneginiRegistrationError error) {
    // check error reason and handle it or explain it to the user
    }
}
oneGiniSDK.userClient.registerUser(
null,
arrayOf("read"),
object : OneginiRegistrationHandler {
    override fun onSuccess(userProfile: UserProfile, customInfo: CustomInfo?) {
    // show user is registered and authenticated
    }

    override fun onError(error: OneginiRegistrationError) {
    // check error reason and handle it or explain it to the user
    }
})
Initializing registration with a selected IdP
To register a user using a different IdP than the one set as default on the IDAAS-core, you can provide a OneginiIdentityProvider instance as a parameter. The (Set<OneginiIdentityProvider>) list of available IdPs can be checked by calling the UserClient#getIdentityProviders() method.
Example code: fetching a set of possible IdPs
```java
val identityProviders: Set<OneginiIdentityProvider> = OneginiSDK.getOneginiClient(this).getUserClient().getIdentityProviders()
```
The platform supports two main types of IdPs: browser and custom API. Both types of IdPs can be defined and configured in the IDAAS-core. All IdPs that are configured by the app are returned by the Android SDK as a OneginiIdentityProvider interface.
Example code: registration of a new user profile
OneginiSDK.getOneginiClient(this).getUserClient().registerUser(identityProvider, new String[]{ "read" }, new OneginiRegistrationHandler() {
    @Override
    public void onSuccess(final UserProfile userProfile, final CustomInfo customInfo) {
    // show user is registered and authenticated
    }

    @Override
    public void onError(final OneginiRegistrationError error) {
    // check error reason and handle it or explain it to the user
    }
}
oneGiniSDK.userClient.registerUser(
identityProvider,
arrayOf("read"),
object : OneginiRegistrationHandler {
    override fun onSuccess(userProfile: UserProfile, customInfo: CustomInfo?) {
    // show user is registered and authenticated
    }

    override fun onError(error: OneginiRegistrationError) {
    // check error reason and handle it or explain it to the user
    }
})
Registering with a browser-based IdP
To support registering with a browser-based IdP, the Android SDK must request an access grant from the IDAAS-core using the browser. The Android SDK can accomplish this using the OneginiBrowserRegistrationRequestHandler.
/**
* Interface to handle user's registration action.
*/
public interface OneginiBrowserRegistrationRequestHandler {

/**
* Method called when user has to authenticate in a web browser.
*
* @param url                  {@link Uri} url that was opened
* @param registrationCallback instance of {@link OneginiBrowserRegistrationCallback} to send browser response back to the SDK
*/
void startRegistration(Uri url, OneginiBrowserRegistrationCallback registrationCallback);
}
/**
* Interface to handle user's registration action.
*/
interface OneginiBrowserRegistrationRequestHandler {
    /**
    * Method called when user has to authenticate in a web browser.
    *
    * @param url                  [Uri] url that was opened
    * @param registrationCallback instance of [OneginiBrowserRegistrationCallback] to send browser response back to the SDK
    */
    fun startRegistration(url: Uri?, registrationCallback: OneginiBrowserRegistrationCallback?)
}
The handler should be then passed to the Android SDK with the OneginiClientBuilder#setBrowserRegistrationRequestHandler method.
final RegistrationRequestHandler registrationRequestHandler = new RegistrationRequestHandler(applicationContext);

return new OneginiClientBuilder(applicationContext, createPinRequestHandler, pinAuthenticationRequestHandler)
    // add a browser registration handler
    .setBrowserRegistrationRequestHandler(registrationRequestHandler)
    .build();
val registrationRequestHandler = RegistrationRequestHandler(applicationContext);

return OneginiClientBuilder(applicationContext, createPinRequestHandler, pinAuthenticationRequestHandler)
    // add a browser registration handler
    .setBrowserRegistrationRequestHandler(registrationRequestHandler)
    .build();
In the event that browser registration is requested, the Android SDK notifies the application using OneginiBrowserRegistrationRequestHandler#startRegistration(). The application should then use the provided URL to ask for the access grant in a web browser.
public class RegistrationRequestHandler implements OneginiBrowserRegistrationRequestHandler {

// ...

@Override
public void startRegistration(final Uri uri, final OneginiBrowserRegistrationCallback oneginiBrowserRegistrationCallback) {
    // we can store the callback in order to pass the registration result later on
    CALLBACK = oneginiBrowserRegistrationCallback;

    final Intent intent = new Intent(Intent.ACTION_VIEW, uri);
    intent.addFlags(Intent.FLAG_ACTIVITY_NEW_TASK);
    intent.addFlags(Intent.FLAG_ACTIVITY_NO_HISTORY);

    context.startActivity(intent);
}
}
class RegistrationRequestHandler : OneginiBrowserRegistrationRequestHandler {
    // ...
    override fun startRegistration(
        uri: Uri?,
        oneginiBrowserRegistrationCallback: OneginiBrowserRegistrationCallback?
    ) {
        // we can store the callback in order to pass the registration result later on
        CALLBACK = oneginiBrowserRegistrationCallback
        val intent = Intent(Intent.ACTION_VIEW, uri)
        intent.addFlags(Intent.FLAG_ACTIVITY_NEW_TASK)
        intent.addFlags(Intent.FLAG_ACTIVITY_NO_HISTORY)
        context.startActivity(intent)
    }
}
If the client credentials are correct and the user gets their access granted, the IDAAS-core redirects the user back to the app. Because the app is a layer on top of the Android SDK, the Android SDK cannot handle this redirect itself. It is the responsibility of the app to handle the redirect and delegate it to the Android SDK. When delegating a redirect, the Android SDK verifies whether the redirect has the right syntax and whether it should be handled by the Android SDK.
The app can handle a redirect by specifying a scheme in the AndroidManifest.xml of the application. Ensure that you set the same scheme in both the OneginiConfigModel and the MIDAAS-core configuration.
If the client credentials are invalid, the IDAAS-core is not able to redirect the user back to the app. The Android SDK validates the client credentials and refreshes them before redirecting to the IDAAS-core to receive an access grant.
If user authentication in web browser failed or was canceled, you can abort the registration action by calling OneginiBrowserRegistrationCallback#denyRegistration().
Example code - AndroidManifest.xml
<application>
 <!-- ... -->
  <activity
      android:name=".view.activity.LoginActivity"
      android:launchMode="singleTask">
    <intent-filter>
      <action android:name="android.intent.action.VIEW"/>
      <category android:name="android.intent.category.DEFAULT"/>
      <category android:name="android.intent.category.BROWSABLE"/>

      <data android:scheme="oneginiexample"/>
    </intent-filter>
  </activity>
 <!-- ... -->
</application>
On success, the Android SDK begins using the received authorization grant. Based on this authorization grant, an access token is requested for the specified set of scopes. When the client has the refresh token grant type, a refresh token is returned with the created access token.
Example code: to handle a registration callback
@Override
public void onNewIntent(final Intent intent) {
    super.onNewIntent(intent);
    handleRedirection(intent.getData());
}

private void handleRedirection(final Uri uri) {
    if (uri == null) {
    return;
    }

    final OneginiClient client = OneginiSDK.getOneginiClient(getApplicationContext());
    final String redirectUri = client.getConfigModel().getRedirectUri();
    if (redirectUri.startsWith(uri.getScheme())) {
    // here we can call the OneginiBrowserRegistrationCallback stored in previous step
    if (CALLBACK != null) {
        CALLBACK.handleRegistrationCallback(uri);
        CALLBACK = null;
    }
    }
}
override fun onNewIntent(intent: Intent) {
    super.onNewIntent(intent)
    intent.data?.let { handleRedirection(it) }
}

private fun handleRedirection(uri: Uri) {
    val client: OneginiClient = OneginiSDK.getOneginiClient(applicationContext)
    val redirectUri = client.configModel.redirectUri
    if (uri.toString().startsWith(redirectUri)) {
        // here we can call the OneginiBrowserRegistrationCallback stored in previous step
        if (CALLBACK != null) {
            CALLBACK.handleRegistrationCallback(uri)
            CALLBACK = null
        }
    }
}
Registration with a custom IdP
To support registering with an IdP that has a custom API, the Android SDK must use the custom registration functionality delivered by the application using OneginiCustomIdentityProvider and OneginiCustomRegistrationAction. To use a custom IdP, it must be enabled and configured on the IDAAS-core side and implemented in the application.
One-step registration
The Android SDK asks the app for optional registration data. The data is sent to the IDAAS-core, where the custom registration script is executed. The result of the custom script (status code and optional data) is sent back to the Android SDK and the registration result is propagated to the application.
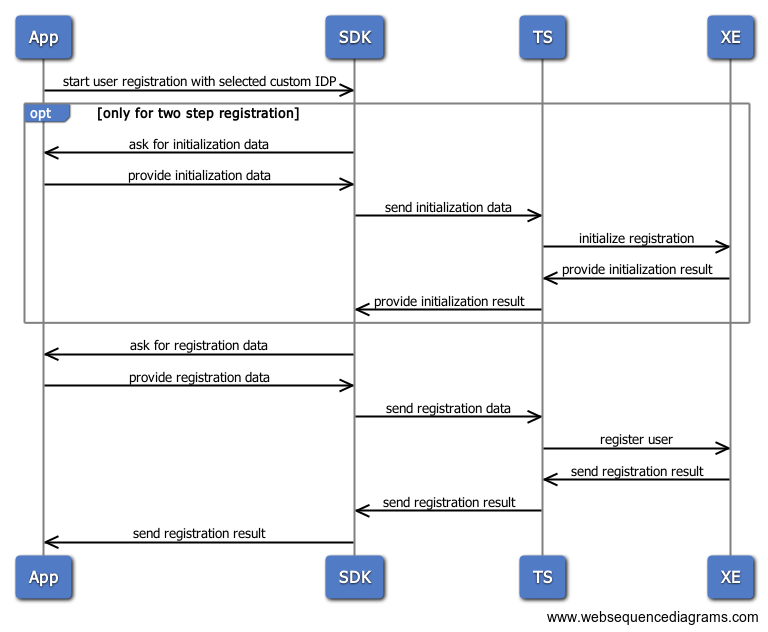
Two-step registration
The Android SDK asks the app for optional initial registration data. The data is sent to the IDAAS-core, where the custom registration is initialized. The optional initialization result is sent back to the Android SDK. Then the Android SDK asks the app for a registration data, providing the optional initialization data provided by the IDAAS-core. The registration data is sent to the IDAAS-core, where the custom registration script is executed. The result of the custom script (status code and optional data) is sent back to the Android SDK and the registration result is propagated to the application.
OneginiCustomIdentityProvider
To use a custom IdP, you must provide an implementation of the OneginiCustomIdentityProvider interface to the Android SDK. The implementation provides the unique ID of the IdP along with methods that should be called during registration.
Example code: for OneginiCustomIdentityProvider implementation
public class TwoWayOtpIdentityProvider implements OneginiCustomIdentityProvider {

private final OneginiCustomRegistrationAction registrationAction;

public TwoWayOtpIdentityProvider(final Context context) {
    this.registrationAction = new TwoWayOtpRegistrationAction(context);
}

@Override
public OneginiCustomRegistrationAction getRegistrationAction() {
    return registrationAction;
}

@Override
public String getId() {
    return "2-way-otp-api";
}
}
class TwoWayOtpIdentityProvider(context: Context?) :
    OneginiCustomIdentityProvider {
    private val registrationAction: OneginiCustomRegistrationAction
    override fun getRegistrationAction(): OneginiCustomRegistrationAction {
        return registrationAction
    }

    override fun getId(): String {
        return "2-way-otp-api"
    }

    init {
        registrationAction = TwoWayOtpRegistrationAction(context)
    }
}
OneginiCustomRegistrationAction
The OneginiCustomRegistrationAction interface is used to request a registration from the app and deliver the registration result back to the Android SDK.
If using one-step registration, the OneginiCustomIdentityProvider should provide an implementation of OneginiCustomRegistrationAction, which includes the finishRegistration method:
Example code: for OneginiCustomRegistrationAction implementation
/**
* The interface used to define custom registration action
*/
public interface OneginiCustomRegistrationAction {

/**
* The method called by the SDK when registration with custom IdentityProvider is required.
*
* @param oneginiCustomRegistrationCallback the {@link OneginiCustomRegistrationCallback} object to return the registration result to
* @param customInfo                        optional {@link CustomInfo} data for registration, provided by the Extension Engine
*/
void finishRegistration(OneginiCustomRegistrationCallback oneginiCustomRegistrationCallback, CustomInfo customInfo);
}
/**
* The interface used to define custom registration action
*/
interface OneginiCustomRegistrationAction {
    /**
    * The method called by the SDK when registration with custom IdentityProvider is required.
    *
    * @param oneginiCustomRegistrationCallback the [OneginiCustomRegistrationCallback] object to return the registration result to
    * @param customInfo                        optional [CustomInfo] data for registration, provided by the Extension Engine
    */
    fun finishRegistration(
        oneginiCustomRegistrationCallback: OneginiCustomRegistrationCallback?,
        customInfo: CustomInfo?
    )
}
If using two-step registration, the OneginiCustomIdentityProvider should provide an implementation of OneginiCustomTwoStepRegistrationAction, which extends the OneginiCustomRegistrationAction to provide an additional initRegistration method:
/**
* The interface used to define the two-step custom registration action.
*/
public interface OneginiCustomTwoStepRegistrationAction extends OneginiCustomRegistrationAction {

/**
* The method called by the SDK when registration with a custom IdentityProvider is required. This method is called for the first registration step,
* for the second step, the finishRegistration() method is used.
*
* @param registrationCallback the {@link OneginiCustomRegistrationCallback} object to return the registration result to
* @param customInfo           optional {@link CustomInfo} data for registration, provided by the extension engine
*/
void initRegistration(@NonNull OneginiCustomRegistrationCallback registrationCallback, @Nullable CustomInfo customInfo);
}
/**
* The interface used to define the two-step custom registration action.
*/
interface OneginiCustomTwoStepRegistrationAction : OneginiCustomRegistrationAction {
    /**
    * The method called by the SDK when registration with a custom IdentityProvider is required. This method is called for the first registration step,
    * for the second step, the finishRegistration() method is used.
    *
    * @param registrationCallback the [OneginiCustomRegistrationCallback] object to return the registration result to
    * @param customInfo           optional [CustomInfo] data for registration, provided by the extension engine
    */
    fun initRegistration(
        registrationCallback: OneginiCustomRegistrationCallback?,
        customInfo: CustomInfo?
    )
}
The OneginiCustomRegistrationCallback is a handler that allows you to provide either the optional data that should be sent to the backend (extension engine script) or an exception that occurred during the registration. In case of an exception, the Android SDK ends the registration with a GENERAL_ERROR and original exception included as a cause.
The CustomInfo object contains a status code and optional data provided by the backend script. The first step of the registration flow always returns null CustomInfo. This means that the object is null in the finishRegistration method of the one-step registration flow and in the initRegistration method of the two-step registration.
The only exception to this rule is a retry of the registration step. In case of a recoverable error returned by the Android SDK, the CustomInfo object in the retried step contains the error info.
There are three groups of status codes that can be returned in the CustomInfo object:
success status (2XXX): When the status code is in the 2000 - 2999 range, the registration step has been finished successfully.recoverable errors (4XXX): When the status code is in the 4000 - 4999 range, the flow can be recovered and the Android SDK calls either theOneginiCustomTwoStepRegistrationAction#initRegistrationor theOneginiCustomTwoStepRegistrationAction#finishRegistrationmethod again, depending on the step that caused the error.unrecoverable errors (5XXX): When the status code is in the 5000 - 5999 range, the flow cannot be recovered and the Android SDK returns an error instead of retrying the step.
Example code: for custom registration action implementation
public class TwoWayOtpRegistrationAction implements OneginiCustomTwoStepRegistrationAction {

public static OneginiCustomRegistrationCallback CALLBACK;

private final Context context;

public TwoWayOtpRegistrationAction(final Context context) {
    this.context = context;
}

@Override
public void initRegistration(final OneginiCustomRegistrationCallback callback, final CustomInfo customInfo) {
    // for a TwoWayOTP the initialization request doesn't contain data
    callback.returnSuccess(null);
}

@Override
public void finishRegistration(final OneginiCustomRegistrationCallback callback, final CustomInfo customInfo) {
    // for a TwoWayOTP the initialization result contains the challenge code
    CALLBACK = callback;
    final Intent intent = new Intent(context, TwoWayOtpRegistrationActivity.class);
    intent.putExtra(OTP_CHALLENGE_EXTRA, customInfo.getData());
    intent.addFlags(Intent.FLAG_ACTIVITY_NEW_TASK);
    context.startActivity(intent);
}
}
class TwoWayOtpRegistrationAction(private val context: Context) :
    OneginiCustomTwoStepRegistrationAction {
    override fun initRegistration(
        callback: OneginiCustomRegistrationCallback,
        customInfo: CustomInfo?
    ) {
        // for a TwoWayOTP the initialization request doesn't contain data
        callback.returnSuccess(null)
    }

    override fun finishRegistration(
        callback: OneginiCustomRegistrationCallback,
        customInfo: CustomInfo?
    ) {
        // for a TwoWayOTP the initialization result contains the challenge code
        CALLBACK = callback
        val intent = Intent(context, TwoWayOtpRegistrationActivity::class.java)
        intent.putExtra(OTP_CHALLENGE_EXTRA, customInfo!!.data)
        intent.addFlags(Intent.FLAG_ACTIVITY_NEW_TASK)
        context.startActivity(intent)
    }

    companion object {
        var CALLBACK: OneginiCustomRegistrationCallback? = null
    }
}
Initializing the OneginiClient
To provide implementations of the OneginiCustomIdentityProvider to the Android SDK, you can use OneginiClientBuilder#addCustomIdentityProvider or OneginiClientBuilder#setCustomIdentityProviders to either add one implementation to the Android SDK or give a set of supported custom IdPs.
Example code: initialize the Android SDK with custom IDP
return new OneginiClientBuilder(applicationContext, createPinRequestHandler, pinAuthenticationRequestHandler)
    // add a browser registration handler
    .setBrowserRegistrationRequestHandler(registrationRequestHandler)
    .setMobileAuthWithPushRequestHandler(new MobileAuthenticationRequestHandler(applicationContext))
    .setMobileAuthWithPushPinRequestHandler(new MobileAuthenticationPinRequestHandler(applicationContext))
    // add a custom identity provider
    .addCustomIdentityProvider(new TwoWayOtpIdentityProvider(applicationContext))
    .build();
return OneginiClientBuilder(
            applicationContext,
            createPinRequestHandler,
            pinAuthenticationRequestHandler
        ) // add a browser registration handler
            .setBrowserRegistrationRequestHandler(registrationRequestHandler)
            .setMobileAuthWithPushRequestHandler(
                MobileAuthenticationRequestHandler(
                    applicationContext
                )
            )
            .setMobileAuthWithPushPinRequestHandler(
                MobileAuthenticationPinRequestHandler(
                    applicationContext
                )
            ) // add a custom identity provider
            .addCustomIdentityProvider(TwoWayOtpIdentityProvider(applicationContext))
            .build()
Registering stateless user
Stateless registration does not create a user profile. You can implement stateless registration using registerStatelessUser. The access token created in the process has the Stateless type. This makes it possible to implement support for App2App authentication towards external identity schemas that do not support derived identities (like DigiD) in a custom registration script.
Stateless registration flow works exactly the same as the regular registration, with the exception that at the end of the registration flow:
PINcreation handler is not triggered, which means no PIN for the user session.User Profileis not stored, which results in limited Android SDK capabilities because part of the functions require theUser Profileparameter.Refresh Tokenis stored as part of the session. WhenAccess Tokenis expired, theRefresh Tokenis automatically used to prolong the session. This can also be done manually using stateless session refresh.
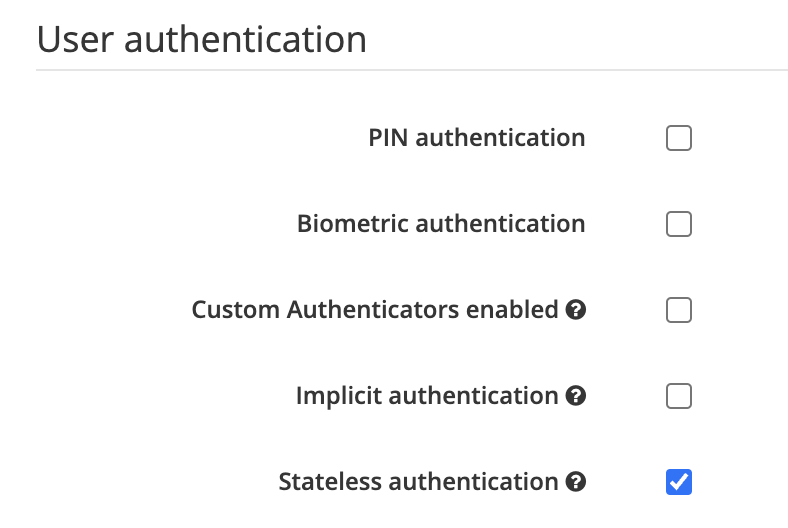
To use stateless authentication, it must be enabled in your application.
return new OneginiClientBuilder(applicationContext, createPinRequestHandler,pinAuthenticationRequestHandler)
  ...
  .addCustomIdentityProvider(new StatelessIdentityProvider())
With stateless authentication enabled, you can registerStatelessUser from the UserClient interface.
/**
   * Registers a new stateless profile using the specified OneginiIdentityProvider. Browser based identity providers are not supported.
   *
   * @param identityProvider    the {@link OneginiIdentityProvider} that is used for the registration or null for default.
   * @param scopes              the scopes authentication is requested for, when no scopes are requested the default scopes of the application will be used.
   * @param statelessRegistrationHandler the registration handler to return the authentication result to
   */
public void registerStatelessUser(@Nullable final OneginiIdentityProvider identityProvider, @Nullable final String[] scopes, @NonNull final OneginiStatelessRegistrationHandler statelessRegistrationHandler) {
    sdkClient.registerStatelessUser(identityProvider, scopes, statelessRegistrationHandler);
}
Registration with a third-party mobile application
Registration with third-party mobile applications is possible using two-step custom registration.
A number of properties need to be set up on the backend side, so be sure that it is properly configured. A two-step custom registration IDP with scripts for both init and complete steps need to be set up. The third-party app needs to be installed on the device, and ready to receive and emit app links.
Flow overview
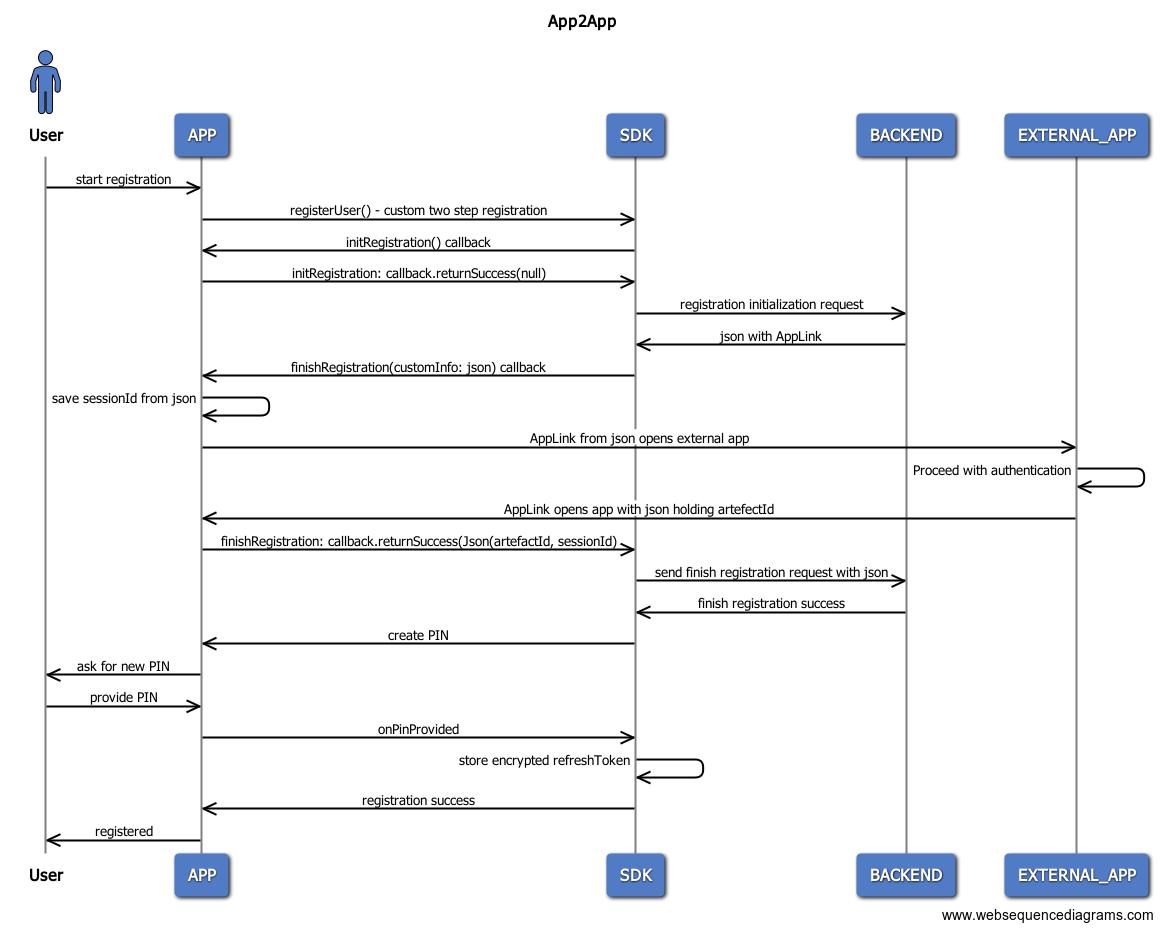
- The app initiates custom registration with an
initrequest. - There is an
Initresponse with thesessionIdandapp link. - The app opens the third-party app using the
app link. - The third-party app authenticates the user and navigates back to the app using the
app link. - The app extracts the
artefactIdfrom theapp linkand sends it to the backend along with thesessionId. - Registration finishes and the app receives an access or a refresh token.
- Proceed with the PIN creation flow.
Example of the flow
Your app needs to be able to receive app links from the third-party app. Be sure to register the correct app link in your manifest file.
Implement OneginiCustomTwoStepRegistrationAction interface.
    public class App2AppRegistrationAction implements OneginiCustomTwoStepRegistrationAction {

        public static OneginiCustomRegistrationCallback CALLBACK;


        public App2AppRegistrationAction() {
        }

        @Override
        public void initRegistration(final OneginiCustomRegistrationCallback callback, final CustomInfo customInfo) {
            // Init registration with null data
            callback.returnSuccess(null);
          }

        @Override
        public void finishRegistration(final OneginiCustomRegistrationCallback callback, final CustomInfo customInfo) {
            // Extract "sessionID" and "app link" from json.
            JsonObject jsonObject = new JsonParser().parse(customInfo.getData()).getAsJsonObject();
            // Save sessionId - you will need it later.
            String sessionId = jsonObject.get("sessionID").getAsString();
            String appLink = jsonObject.get("thirdPartyAppLink").getAsString();
            //Start third-party app
            context.startActivity(new Intent(Intent.ACTION_VIEW, Uri.parse(appLink)));
        }
    }
On successful authentication in third-party app, it runs app link back into your app with a json response. Unpack the response value, parse it with sessionId into new a json, and send it back do the backend via callback.onSuccess(json) from the finishRegistration method.
Implement OneginiCustomIdentityProvider interface
    public class App2AppIdentityProvider implements OneginiCustomIdentityProvider {

        private final OneginiCustomTwoStepRegistrationAction registrationAction;

        public App2AppIdentityProvider() {
            this.registrationAction = new App2AppRegistrationAction();
        }

        @NonNull
        @Override
        public OneginiCustomRegistrationAction getRegistrationAction() {
            return registrationAction;
        }

        @NonNull
        @Override
        public String getId() {
            return "app2app";
        }
    }
In the example above, the IDP ID is app2app. Be sure to use an IDP ID that is set in your backend.
Add custom IdP
    return new OneginiClientBuilder(applicationContext, createPinRequestHandler, pinAuthenticationRequestHandler)
        ...
        .addCustomIdentityProvider(new App2AppIdentityProvider())
Implement registration handler
    final OneginiRegistrationHandler registrationHandler = new OneginiRegistrationHandler() {

        @Override
        public void onSuccess(final UserProfile userProfile, final CustomInfo customInfo) {
            // Handle registration success
        }

        @Override
        public void onError(@NonNull final OneginiRegistrationError oneginiRegistrationError) {
            // Handle registration error
        }
    }
Register user
oneginiClient.getUserClient().registerUser(identityProvider, registrationHandler);