
User registration with custom IdP
Introduction
In the case when a user tries to register with an Indentity Provider (IdP) that has a custom API type it has to be enabled and configured on the Token Server side, and implemented in the app itself. Usually when the custom IdP is created on the server side, you will also provide the server side script for handling the registration process on both client and server side.
One step registration
In case of one step registration the Plugin asks the app for optional registration data. The data is sent to the Token Server where the custom registration script is executed. The result of the custom script (status code and optional data) is sent back to the Plugin and the registration result is propagated to the app in the form of a callback.
Two step registration
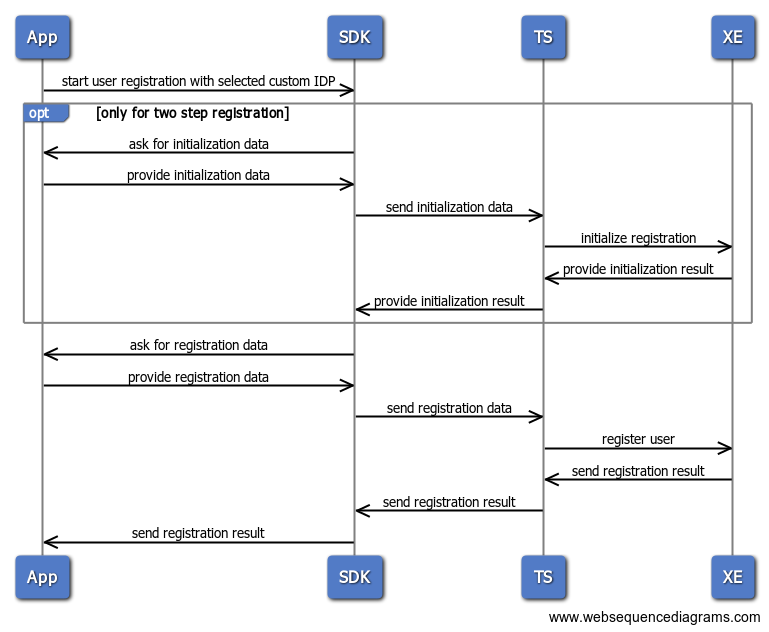
In case of two step registration the Plugin asks the app for optional initial registration data. The data is sent to the Token Server where the custom registration is initialized. The optional initialization result is sent back to the Plugin. Then the Plugin asks the app for a registration data, providing the optional initialization data provided by the Token Server. The registration data is sent to the Token Server where the custom registration script is executed. The result of the custom script (status code and optional data) is sent back to the Plugin and the registration result is propagated to the app.
The following flowchart describes the flow of one and two step registration, the SDK here is the Cordova Plugin.
Implementation
Specify custom IdP in the configuration
In order to use the custom identity providers, they need to be registered as a one or two step IdP in the config.xml file. It is required to specify if they are one or two step. The id of a custom IdP can be found in the token server configuration and is also returned from getIdentityProviders.
<?xml version='1.0' encoding='utf-8'?>
<widget id="com.onegini.ExampleAppCordova" version="8.1.0" xmlns="http:__www.w3.org_ns_widgets" xmlns:android="http:__schemas.android.com_apk_res_android" xmlns:tools="http:__schemas.android.com_tools">
  ...
    <onegini>
        <idps>
            <custom-idp flowType="TWO_STEP" id="2-way-otp-api" _>
            <custom-idp flowType="ONE_STEP" id="qr_registration" _>
        <_idps>
    <_onegini>
  ...
<_widget>
Start registration
To start registration with a custom IdP you should call the onegini.user.register function, similar to registration with browser IDP, with the custom IdP id string.
Handling the JavaScript callback
register: function () {
        this.registerInstance = onegini.user.register({
          identityProviderId: this.selectedIdentityProviderId,
        })
          .onCreatePinRequest((actions, options) => {
                        __ ..
          })
          .onCustomRegistrationInitRequest((actions, options) => {
          __ Only for TWO-STEP registration
            if (options.identityProviderId === "2-way-otp-api") {
              actions.acceptRegistrationInitRequest({
                data: null,
                identityProviderId: options.identityProviderId,
              });
            } else {
              actions.denyRegistrationInitRequest({
                data: null,
                identityProviderId: options.identityProviderId,
              });
              navigator.notification.alert('Registration failed. The identity provider id is not known.');
            }
          })
          .onCustomRegistrationCompleteRequest((actions, options) => {
           __ For both ONE-STEP and TWO-STEP registration
            if (options.identityProviderId === "2-way-otp-api") {
              this.$router.push({
                name: 'TwoWayOtpRegistration',
                params: {
                  actions: actions,
                  code: options.customInfoData,
                  identityProviderId: options.identityProviderId,
                }
              });
            } else if (options.identityProviderId === "qr_registration") {
              actions.acceptRegistrationCompleteRequest({
                data: 'Onegini',
                identityProviderId: options.identityProviderId
              });
            } else {
              actions.denyRegistrationCompleteRequest({
                identityProviderId: options.identityProviderId
              });
              navigator.notification.alert('Registration failed. The identity provider id is not known.');
            }
          })
          .onSuccess((result) => {
            this.$router.push('dashboard');
          })
          .onError((err) => {
            navigator.notification.alert('Registration failed. ' + err.description);
          });
In the 2-way-otp-apiexample above we don't require any initalization data. So we call the acceptRegistrationInitRequest callback with a null for data. After that, the Plugin will call onCustomRegistrationCompleteRequest.
You will have to respond to this request using the acceptRegistrationCompleteRequest callback, supplying the response in the data field. This response depends on the implementation of the custom IdP and will be handled by a custom script in the token server.
The backend script can optionally supply data back to the Plugin in the options.customInfoData attribute. It can supply this in the onCustomRegistrationCompleteRequest callback for two step registration.