
User registration
This document explains adding user registration to your application. To initialize authentication, the client credentials are required. These credentials are received via Dynamic Client Registration (DCR). As an app developer, there is no need to initialize DCR as it is part of the default implementations in the SDK.
Because a timestamp is used within the DCR protocol, it is mandatory that the time on the device is equal to the time on the Mobile Identity module, independent of time zones. In case of a wrong time, the SDK will return an error.
Start registration
User registration begins with enrolling a user on a device using a selected identity provider (IdP). The list of all possible IdPs for an app is configured in the IDAAS-core admin panel. The IDAAS-core also configures a default (primary) IdP that is used for backward compatibility.
To begin user registration, call the registerUser method. This method returns a URL that must be opened in a browser where the registration can continue. Which browser or webview to open for this is up to the developer.
var registrationResponse = await Onegini.instance.userClient
    .registerUser(identityProviderId, "read")
    .catchError((error) {
        print("Registration failed: " + error.message);
    });

if (registrationResponse.userProfile.profileId != null) {
    print("Registration success!");
}
To determine which IdP to use during the registration process, use the identityProviderId parameter from registerUser. To obtain the available IdPs in the IDAAS-core use the getIdentityProviders method. If this parameter isn’t specified, or if its value is null, the default IdP set in the IDAAS-core is used.
Depending on the IdP, different registration flows are followed to register on a device. There are two distinct flows:
- Registration with browser IdP
- Registration with custom IdP
To complete the registration, after you complete the flow for browser-based or custom registration, you must successfully register a PIN.
Register with browser IdP
After starting registration with a browser-based IdP, the app receives a URL from the SDK. This URL must be opened in a browser, and authentication must be completed there to continue the registration. This URL is sent to the application within the HandleRegisteredUrlEvent event, which must be listened to as described in event handling.
StreamSubscription<OWEvent> openPinSubscription = owEventController.stream.where((event) => event is HandleRegisteredUrlEvent).listen((event) {
      // Your logic to handle the registration url
    });
To open a browser and return the result of the browser registration in one step, use the following command:
await Onegini.instance.userClient.handleRegisteredUserUrl(url, signInType: WebSignInType.insideApp);
If this succeeds, the overlapping registration flow continues with the create PIN event.
Cancel browser registration
To cancel the browser registration flow, use the cancelBrowserRegistration method:
await OneginiRegistrationCallback()
  .cancelBrowserRegistration()
  .catchError((error) {
        // handle error
  });
Register with custom IdP
When a user tries to register with an IdP that has a custom API type, it must be enabled and configured on the IDAAS-core side and implemented in the app itself. Usually, when the custom IdP is created on the server side, you also provide the server-side script for handling the registration process on both the client and server side.
The MSP platform expects the registration process to have either one or two steps.
One-step registration
For one-step registration, the SDK asks the app for optional registration data. The data is sent to the IDAAS-core where the custom registration script is executed. The result of the custom script (status code and optional data) is sent back to the SDK and the registration result is propagated to the app in the form of an event.
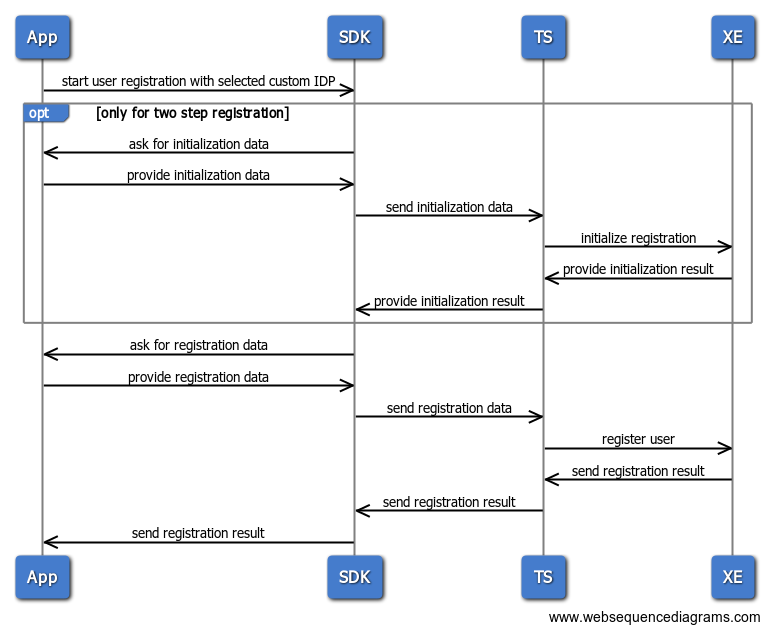
Two-step registration
For two-step registration, the SDK asks the app for optional initial registration data. The data is sent to the IDAAS-core where the custom registration is initialized. The optional initialization result is sent back to the SDK. Then the SDK asks the app for a registration data, providing the optional initialization data that the IDAAS-core provided. The registration data is sent to the IDAAS-core, where the custom registration script is executed. The result of the custom script (status code and optional data) is sent back to the SDK and the registration result is propagated to the app.
Register the custom IdP
To start registration with a custom IDP, call the Onegini.instance.userClient.registerUser function, similar to registration with a browser IDP, with the custom identity provider ID string.
Handle the custom IDP
The application needs to communicate information to the SDK about the current step. The events that the application need to listen to are InitCustomRegistrationEvent and FinishCustomRegistrationEvent.
var broadCastController = Onegini.instance.userClient.owEventStreamController;

// Only needed for two-step registration
StreamSubscription<OWEvent> initCustomSub = broadCastController.stream.where((event) => event is InitCustomRegistrationEvent).listen((event) {
    // Logic to respond to event
});

StreamSubscription<OWEvent> finishCustomSub = broadCastController.stream.where((event) => event is       FinishCustomRegistrationEvent).listen((event) {
  // Logic to respond to event
});
CustomRegistrationEvent customInfo attribute
CustomRegistrationEvent customInfo Attribute contains a status code and optional data that the backend script provides. The first step of the registration flow always returns an empty string. This means that the data is an empty string in the FinishCustomRegistrationEvent method of the one-step registration flow, and in the InitCustomRegistrationEvent method of the two-step registration. The only exception is a retry of the registration step. If the SDK returns a recoverable error, the resulting data object in the retried step contains the error info. There are three groups of status codes that can be returned in the CustomInfo object:
- Success status (2XXX): When the status code is in the 2000-2999 range, the registration step has finished successfully.
- Recoverable errors (4XXX): When the status code is in the 4000-4999 range, the flow can be recovered and the SDK calls either the
InitCustomRegistrationEventor theFinishCustomRegistrationEventmethod again, depending on the step that caused the error. - Unrecoverable errors (5XXX): When the status code is in the 5000-5999 range, the flow cannot be recovered and the SDK returns an error instead of retrying the step.
Respond to events
Using the information from the data parameter, the user can decide if the data is valid and the registration flow can continue. When this decision is made and the required data is acquired, send the following callback for the InitCustomRegistrationEvent or FinishCustomRegistrationEvent events using one of the callbacks from CustomRegistrationCallback. To accept the request, use:
OneginiCustomRegistrationCallback().submitSuccessAction(data: String?)
After this succeeds, the overlapping registration flow continues by starting the PIN creation flow as described in create PIN events.
To cancel the current custom registration flow, use:
OneginiCustomRegistrationCallback()
  .submitErrorAction("Registration canceled": String)
  .catchError((error) {
        // handle error
  })
Create user PIN
After completing the flow for browser-based or custom registration, you register a PIN to complete the registration. This is communicated by the SDK to the Flutter Plugin through events. The app must listen to these events and respond to them accordingly.
For more information on how to handle events and which attribute information the events might contain, see event handling. The events that occur during the creation of the PIN are described below.
Create PIN events
| Event | Description |
|---|---|
| OpenPinCreationEvent | Fired after starting the create PIN flow |
| ClosePinCreationEvent | Fired after supplying a valid PIN for the registration and the PIN is registered. |
| PinNotAllowedEvent | Fired when a PIN is given that does not conform to the set PIN policy on the IDAAS-core. |
Create PIN flow
The first event thrown after the registration to set a PIN is the openPinRegistration event. A user can listen to this event using the following example code:
var owEventController = Onegini.instance.userClient.owEventStreamController;

StreamSubscription<OWEvent> openPinSubscription = owEventController.stream.where((event) => event is OpenPinRegistrationEvent).listen((event) {
      // Your logic to handle the open pin registration event
        // For example navigate to a new screen where a user can fill in their pin
    });
After a user chooses a PIN, the PIN needs to be communicated back to the Flutter SDK. This can be done through the following method:
// Check if the pin is valid
await Onegini.instance.userClient
  .validatePinWithPolicy(pin)
  .then((value) {
    // pin is valid
    OneginiPinRegistrationCallback()
    .acceptAuthenticationRequest(context, pin: pin)
    .catchError((error) {
      // handle error
    });
  })
  .catchError((error) {
    // handle error
  });
If an invalid PIN is passed on to the acceptAuthenticationRequest method, a pinNotAllowedEvent event is thrown. If successful, a ClosePinRegistrationEvent event is thrown and the registerUser function resolves with an OWRegistrationResponse object.
Stateless registration
Stateless registration does not create a user profile. The access token created in the process has the Stateless type and is not stored in the user's device. This makes it possible to implement support for App2App authentication towards external identity schemas that do not allow you to make derived identities (like DigiD) in a custom registration script. This means the app is registered just in time each times a user selects the stateless registration method.
Stateless registration flow works the same as the other custom registration flows, with the following exceptions:
-
PIN creation is not triggered, which means there is no PIN for the user session.
-
The user profile is not stored, which results in limited SDK capabilities, like mobile authentication, implicit authentication, and changing the PIN are not possible.
-
The refresh token is not stored, which means that when it expires, it cannot refresh itself anymore and the user needs to register again.
To implement stateless registration:
-
Enable Stateless authentication in the IDAAS-core admin.
-
Go to Configuration > Applications in the IDAAS-core admin. You can create a new application or edit an existing one. Either way, to enable stateless authentication, under User authentication, enable Stateless authentication.
-
To use stateless registration, first you need to add an identity provider.
-
To register a stateless user, you must call the
registerStatelessUsermethod.
var registrationResponse = await Onegini.instance.userClient
  .registerStatelessUser(identityProviderId, "read")
    .catchError((error) {
    print("Stateless Registration failed: " + error.message);
  });

if (registrationResponse.userProfile.profileId == "stateless") {
  print("Stateless Registration success!");
}
Stateless registration does not create a profile ID. The API returns stateless as the profileId, to indicate a stateless flow. It should not be used in other APIs.
If stateless authentication is not enabled in the IDAAS-core admin, an error is thrown while calling registerStatelessUser.
Deregister a user
Deregistering a user implies the removal of all of their data (including access and refresh tokens) from the device. It also includes a request to the IDAAS-core to revoke all tokens associated with the user. The client credentials remain stored on the device.
The Flutter Plugin exposes the Onegini.instance.userClient.deregisterUser() function to properly deregister the currently authenticated user.
Example code to deregister a user
await Onegini.instance.userClient
    .deregisterUser()
    .catchError((error) {
        print("Deregistration failed: " + error.message);
    });
Note that any existing user can be deregistered. They do not necessarily need to be logged in.