
Registration with custom IdP
Introduction
In the case when a user tries to register with an Identity Provider (IdP) that has a custom API type it has to be enabled and configured on the Token Server side, and implemented in the app itself. Usually when the custom IdP is created on the server side, you will also provide the server side script for handling the registration process on both client and server side.
One and two step registration
The MSP platform expects that the registration process can have either one or two steps.
One step registration
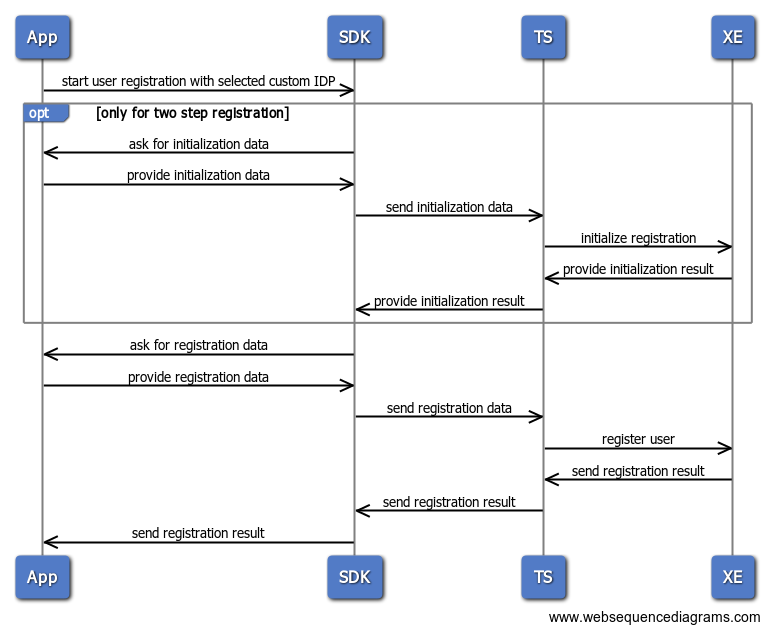
In case of one step registration the SDK asks the app for optional registration data. The data is sent to the Token Server where the custom registration script is executed. The result of the custom script (status code and optional data) is sent back to the SDK and the registration result is propagated to the app in the form of an event.
Two step registration
In case of two step registration the SDK asks the app for optional initial registration data. The data is sent to the Token Server where the custom registration is initialized. The optional initialization result is sent back to the SDK. Then the SDK asks the app for a registration data, providing the optional initialization data provided by the Token Server. The registration data is sent to the Token Server where the custom registration script is executed. The result of the custom script (status code and optional data) is sent back to the SDK and the registration result is propagated to the app.
In order to use the custom identity providers, they need to be registered as a one or two step IdP during initialization of the SDK. See getting-started.
Starting and handling the events from the SDK
Start registration
To start registration with a custom IDP you should call the OneWelcomeSdk.registerUser function, similar to registration with browser IDP, with the custom identity provider id string.
Handling events
The SDK will communicate back to RN about the current steps of the custom registration. You will need to listen for the Events.SdkNotification.CustomRegistration event and handle the initRegistration and finishRegistration actions appropriately.
const [codeFromOnegini, setCodeFromOnegini] = useState<string | null>(null);
const IdProvider = '2-way-otp-api';


__ two step registration
const listener = OneWelcomeSdk.addEventListener(Events.SdkNotification.CustomRegistration, (event: events.CustomRegistrationNotificationEvent) => {
      if (event.identityProviderId === IdProvider) {
        switch (event.action) {
          case Events.CustomRegistration.InitRegistration:
            __ for a TwoWayOTP the initialization request doesn't contain data
            OneWelcomeSdk.submitCustomRegistrationAction(
              event.identityProviderId,
              null,
            );
            break;
          case Events.CustomRegistration.FinishRegistration:
            __ for a TwoWayOTP the initialization result contains the challenge code
            if (event.customInfo) {
              setCodeFromOnegini(event.customInfo.data);
            }
            setVisible(true);
            break;
        }
      }
});


export type finishRegistrationEvent = {
  action: CustomRegistrationNotification.FinishRegistration;
  identityProviderId: string;
  customInfo?: {
    data: string;
    status: number;
  };
};
Communication back to the SDK is done through the OneWelcomeSdk.submitCustomRegistrationAction method. This method has the following signature.
interface NativeMethods {
  submitCustomRegistrationAction(
    identityProviderId: string,
    token: string | null,
  ): void;
  __...
}
In the example above we don't require any initalization data. So we call the submitCustomRegistrationAction method with a null token. After that, the SDK will send us a FinishRegistration event with a customInfo object.
The CustomInfo object contains a status code and an optional data provided by the backend script. The first step of registration flow will always return null CustomInfo. This means that the object will be null in the finishRegistration method of the one-step registration flow and in the initRegistration event of the two-step registration. The only exception to this rule is a retry of the registration step: in case of a recoverable error returned by the SDK the CustomInfo object in the retried step will contain the error info. There are three groups of status codes that can be returned in the CustomInfo object:
- success status (2XXX) - when the status code is in the rage of 2000 - 2999 the registration step has been finished successfully.
- recoverable errors (4XXX) - when the status code is in the range 4000 - 4999 the flow can be recovered and the SDK send an event with the initRegistration or finishRegistration action depending on the step that has caused the error.
- unrecoverable errors (5XXX) - when the status code is in the range 5000 - 5999 the flow cannot be recovered.
After responding to the FinishRegistration event with a submitCustomRegistrationAction the SDK will send a PIN event which has to be handled to create a pin and finish the registration as explained on the User Registration guide.