Setting up the project
This section describes the first steps to integrate the Android SDK with an existing Android project. In this sample, you integrate the Android SDK into the Android example application using the Android Studio IDE and Gradle build automation system.
Android API requirements
The Android SDK supports apps running on Android API level 23+ (Android Marshmallow and newer). Ensure that your application uses Android API level 23+.
Note
The core functionalities of the Android SDK use hardware-backed crypto services (Android Keystore) that were not fully available on Android API level 22 and older.
For example, your app's configuration in the module build.gradle file could look like this:
android {
    defaultConfig {
        minSdkVersion 23
        // ...
    }
    // ...
}
// ...
android {
defaultConfig {
    minSdk = 23
    // ...
}
// ...
}
Required third-party libraries
The Android SDK does not include third-party library dependencies. You require the following third-party libraries.
Tip
If you add the Android SDK as a dependency using Gradle, Gradle automatically resolves third-party dependencies.
| Library | Version | Description |
|---|---|---|
| com.squareup.okhttp3:okhttp | 4.12.0 | http client |
| com.squareup.okhttp3:okhttp-urlconnection | 4.12.0 | - |
| com.squareup.okhttp3:logging-interceptor | 4.12.0 | - |
| com.squareup.retrofit2:retrofit | 3.0.0 | REST client |
| org.bouncycastle:bcprov-jdk15on | 1.70 | Implementation of cryptographic algorithms |
| org.bouncycastle:bcpg-jdk15on | 1.70 | Implementation of the OpenPGP protocol |
| com.goterl.lazycode:lazysodium-android | 5.2.0 | Implementation of the Libsodium library |
| net.java.dev.jna:jna | 5.17.0 | Library for simplified native access |
| com.google.dagger:dagger | 2.56.2 | Dependency injection library |
| io.reactivex.rxjava3:rxjava | 3.1.10 | Library for reactive programming |
| io.reactivex.rxjava3:rxandroid | 3.0.2 | Library for reactive programming on Android |
| net.zetetic:sqlcipher-android | 4.9.0 | Encryption library for SQLite database |
| androidx.sqlite:sqlite-ktx | 2.5.2 | - |
| androidx.core:core | 1.16.0 | Android support library |
| androidx.biometric:biometric | 1.1.0 | Android BiometricPrompt |
Disable the allowBackup attribute in the Android manifest
The Android SDK cannot operate with the android:allowBackup="true" setting in your AndroidManifest.xml. If android:allowBackup="true" is declared, we recommend deleting the attribute. For more information about allowBackup, see back up user data with auto backup.
Add the Android SDK as a dependency
To use the Android SDK, you must add the Android SDK dependency to the module-level build.gradle file. We recommend this method for the following reasons:
- It requires fewer manual steps to add the Android SDK and update the SDK version.
- This method automatically resolves all third-party dependencies.
You require credentials to authenticate your build access to the OneWelcome Identity Platform Artifactory repository. To obtain credentials, visit the Customer Support Portal and submit an access request for the Artifactory repository.
When you have credentials, set your OneWelcome Identity Platform artifactory_user and artifactory_password in the gradle.properties file in your Gradle home directory (such as ~/.gradle on Linux/OS X).
Then set up the repository usage:
allprojects {
    repositories {
        if (project.hasProperty('artifactory_user') && project.hasProperty('artifactory_password')) {
        maven {
            url "https://thalescpliam.jfrog.io/artifactory/onegini-sdk"
            credentials {
            username artifactory_user
            password artifactory_password
            }
        }
        } else {
        throw new InvalidUserDataException("You must configure the 'artifactory_user' and 'artifactory_password' properties in your project before you can build it.")
        }
        // ...
    }
    // ...
    }
allProjects {
    repositories {
        with(project) {
            if (hasProperty("artifactory_user") && hasProperty("artifactory_password")) {
                maven {
                    url = uri("https://thalescpliam.jfrog.io/artifactory/onegini-sdk")
                    credentials {
                        username = findProperty("artifactory_user").toString()
                        password = findProperty("artifactory_password").toString()
                    }
                }
            } else {
                throw InvalidUserDataException("You must configure the 'artifactory_user' and 'artifactory_password' properties in your project before you can build it.")
            }
        }
        // ...
    }
// ...
}
Add the dependency:
dependencies {
implementation('com.onegini.mobile.sdk.android:onegini-sdk:X.X.X@aar') {
    transitive = true
}
}
dependencies {
implementation("com.onegini.mobile.sdk.android:onegini-sdk:X.X.X@aar") {
    transitive = true
}
}
Gradle downloads any third-party dependencies that the Android SDK requires. In the event of dependency conflicts, see the App build dependencies documentation.
Developer and Secure SDK versions
To offer the best possible experience during SDK integration and security of your product, we provide two types of SDK.
Developer SDK version
This version is optimized for development. It has lifted security controls:
- Debug detection
- Root detection
- Debug logs
Read more about security controls.
dependencies {
implementation('com.onegini.mobile.sdk.android:onegini-sdk-developer:X.X.X@aar') {
    transitive = true
}
}
dependencies {
implementation("com.onegini.mobile.sdk.android:onegini-sdk-developer:X.X.X@aar") {
    transitive = true
}
}
Warning
Remember, do not release your app with the Developer version of the SDK under any circumstances. Releasing your app with the Developer version might result in a data breach and a significant decrease in the security level of your app. To avoid accidentally releasing the Developer version, you can configure dependencies for specific build types. You can use debugImplementation and releaseImplementation to distinguish between the Developer and Secure SDK versions.
Secure SDK version
This version is optimized for the release version of your app. It has all security controls up and running:
- Debug detection
- Root detection
- Debug logs
Read more about security controls.
dependencies {
implementation('com.onegini.mobile.sdk.android:onegini-sdk:X.X.X@aar') {
    transitive = true
}
}
dependencies {
implementation("com.onegini.mobile.sdk.android:onegini-sdk:X.X.X@aar") {
    transitive = true
}
}
If you want to test your app in a more developer-friendly environment, use the Developer version of our SDK.
Configure the IDAAS-core
Before you begin configuring the application side, prepare the server side. When you have the proper configuration done on the server side, you can provide a matching configuration to the client (SDK).
The Android SDK expects the app to provide proper configuration in a class that implements the OneginiClientConfigModel interface. To perform certificate pinning, you must also provide a server's SSL certificate.
When the IDAAS-core configuration is complete, you can download a configurable zip for your mobile client configuration.
-
Download the configuration zip from the IDAAS-core.

Application thumbprint
The Android SDK uses a SHA-256 fingerprint of the app signing key. To learn how to obtain your signing key certificate, see application integrity. The calculated hash must be entered into the IDAAS-core configuration.
Configure the client
Configure the client using the sdk-configurator. The sdk-configurator configures your application to use the Mobile SDKs.
-
Download the sdk-configurator.
-
Run the sdk-configurator.
-
Provide the sdk-configurator with the path to your configuration zip from the IDAAS-core.
-
Provide the sdk-configurator with the path to your application /src directory.
-
Verify the SSL Certificate.
-
Override any existing OneWelcome Identity Platform configuration model.
Tip
Create a backup of any existing OneWelcome Identity Platform configuration model.
-
-
To validate that the sdk-configurator completed successfully, verify the following:
-
In your project's assets, there is a new keystore file that contains the SSL certificate.
- In your sources, there is a new class called
OneginiConfigModel. - Compile and run your application.
Sample OneginiConfigModel generated by the SDK configurator
    public class OneginiConfigModel implements OneginiClientConfigModel {

        private final String appIdentifier = "ExampleApp";
        private final String appPlatform = "android";
        private final String redirectionUri = "oneginiexample://loginsuccess";
        private final String appVersion = "2.0.0";
        private final String baseURL = "https://demo-msp.onegini.com";
        private final String resourceBaseURL = "https://demo-msp.onegini.com/resources/";
        private final String keystoreHash = "910638c3e6c17ec9ab2a74969abab06b34470d29c21d8ad8a65af243a1ccb69f";
        private final String serverPublicKey = "355C555820D47CB2010F601D96CB134A3026BFEC7F23732E0890CD5E62AB2D24";

        @Override
        public String getAppIdentifier() {
            return appIdentifier;
        }

        // ...
    }
    class OneginiConfigModel : OneginiClientConfigModel {
    private val appIdentifier = "ExampleApp"
        private val appPlatform = "android"
        private val redirectionUri = "oneginiexample://loginsuccess"
        private val appVersion = "7.5.0"
        private val baseURL = "https://demo-msp.onegini.com"
        private val resourceBaseURL = "https://demo-msp.onegini.com/resources/"
        private val keystoreHash = "99e629cc3f8a50316123bab1fdc1caeaa98e557ebafce89e41d96c2e536816dd"
        private val serverPublicKey = "BBFFCC164C1AC014069B6C2C96E012E434D064F1EB736EF0E2470EFF15410D9D"

        override fun getAppIdentifier(): String {
            return appIdentifier
        }

        // ...
    }
The configurator also states that you need to specify the data scheme in the AndroidManifest.xml, in the intent filter section. It's the baseUrl of the declared redirectionUri in the OneginiConfigModel class.
    <manifest>
    // ...
        <application>
        // ...
            <activity>
            // ...
                <intent-filter>
                <data android:scheme="oneginiexample" />
                // ...
                </intent-filter>
            </activity>
        </application>
    </manifest>
Note
If you use external browsers during registration, you must update your AndroidManifest.xml file <intent-filter> section to include <data android:scheme="oneginiexample" />. Set the value as the baseUrl of your redirectionUri.
If you use WebView, you must address this redirect.
The Android SDK has an ability to detect if the app works in debug mode or with debuggable environment and this feature is enabled by default. When debug mode detection is enabled and debug is detected, the Android SDK will not allow you to execute any security-related flow. To disable this feature during development, follow the security controls.
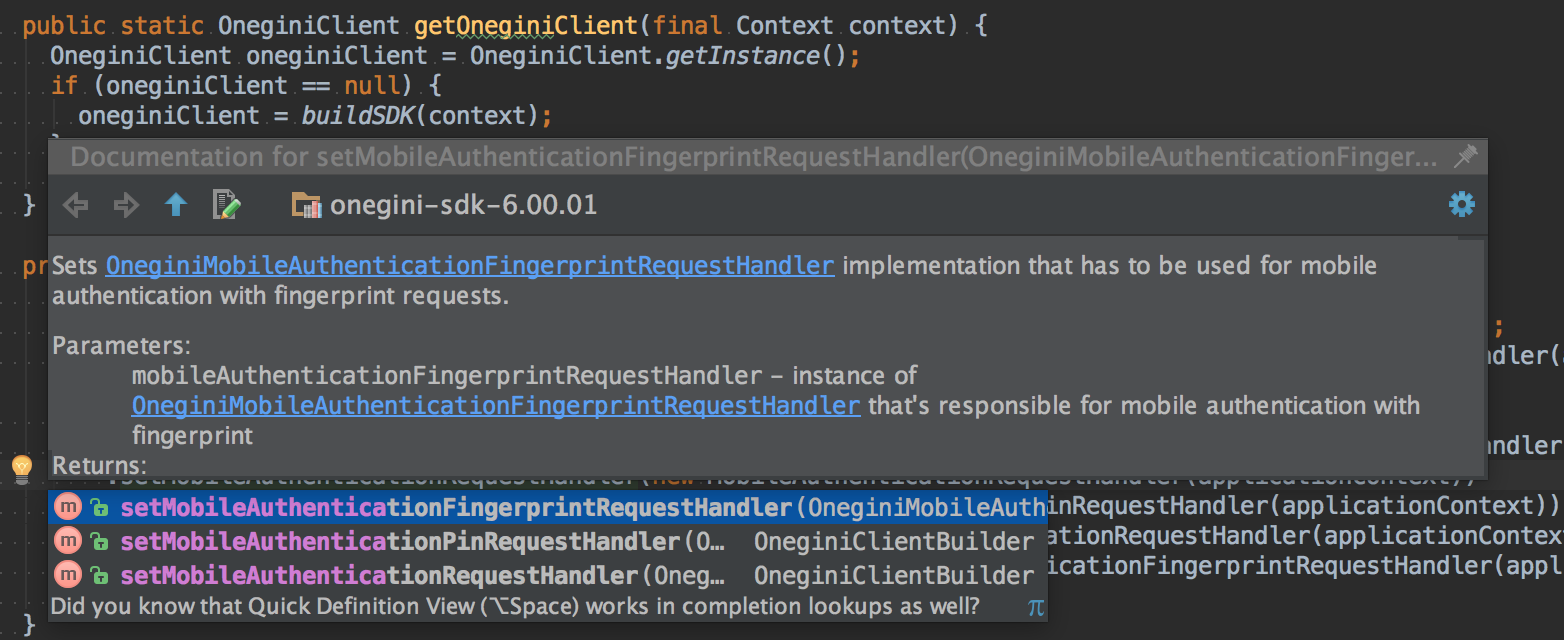
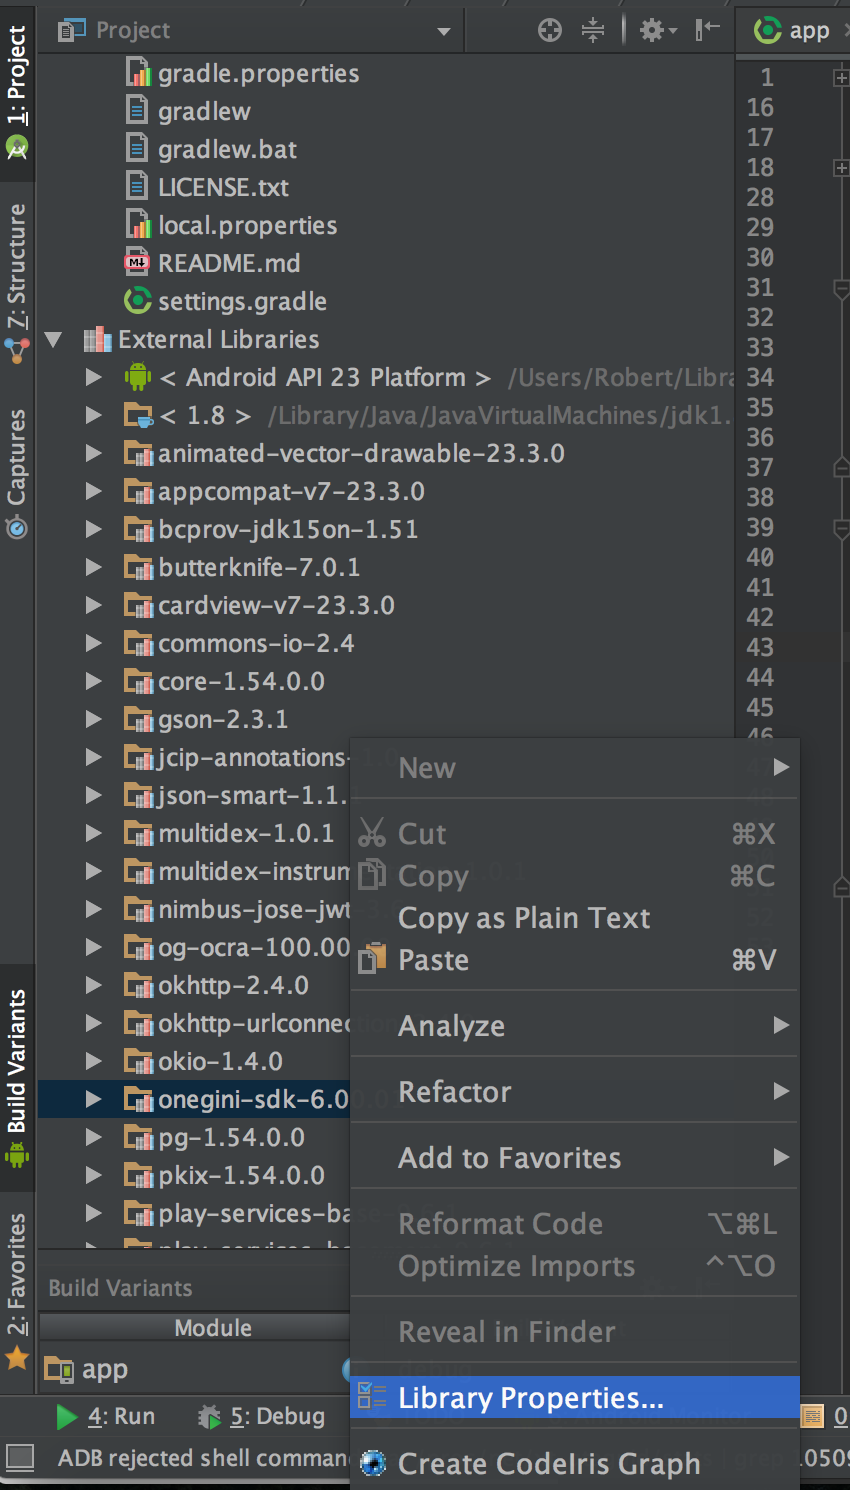
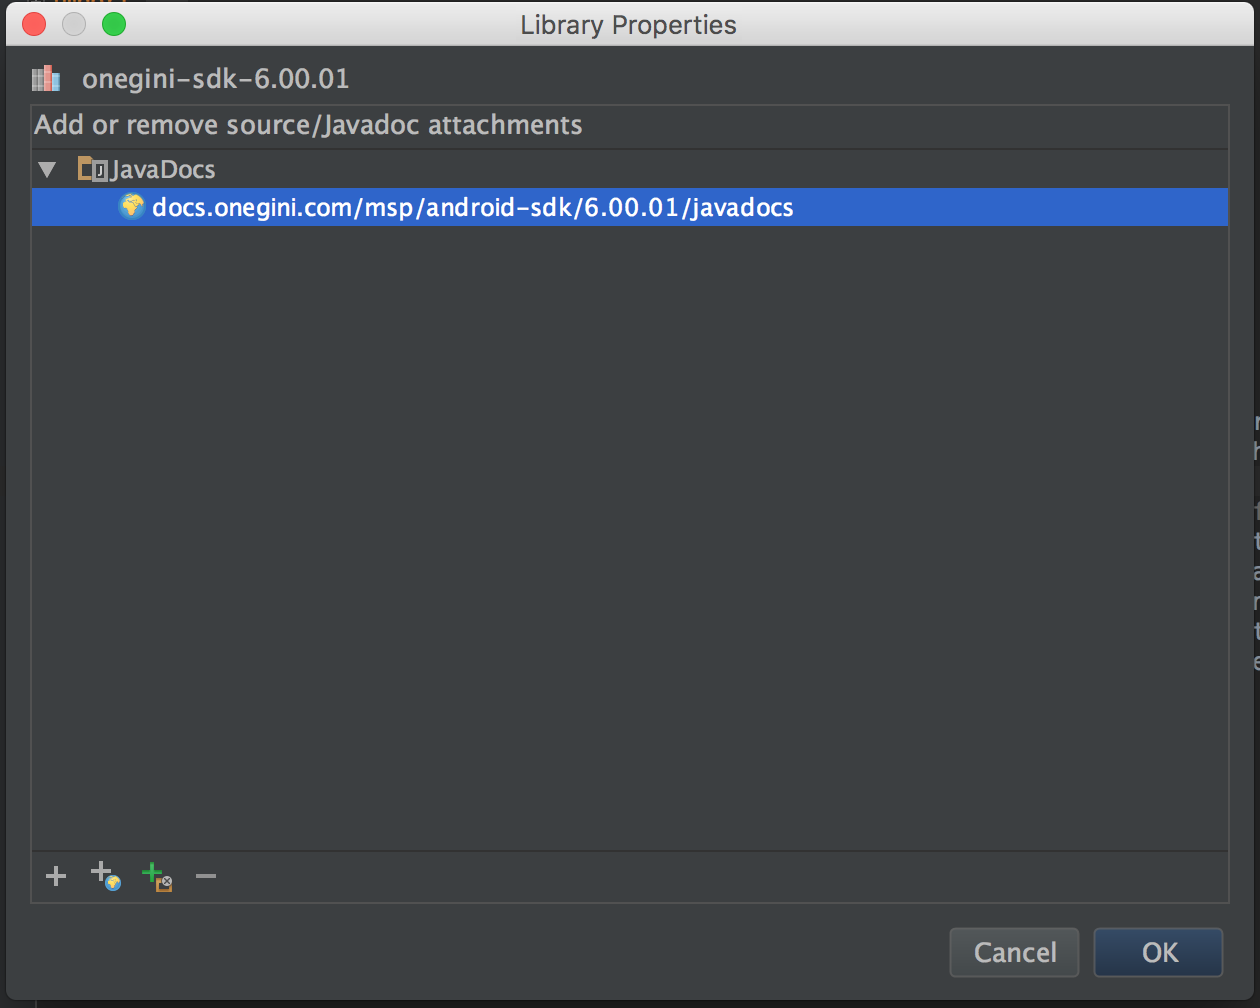
Attach Javadocs to the Android SDK
If you use Android Studio and you want to see the Android SDK Javadocs in your IDE and get more explanation about the Android SDK functions and its parameters, you can easily add them to your project.
Follow the steps below to add the Javadocs to your project:
-
In the Project view, expand External libraries, right-click the SDK and select Library Properties.
-
Click Specify Documentation URL and provide a URL to a local javadocs file (when downloaded from Artifactory) or simply paste the URL.
After that you can see the Javadocs for the SDK in Android Studio: