
Registration with custom IdP
Introduction
In the case when a user tries to register with an Identity Provider (IdP) that has a custom API type, it has to be enabled and configured on the Token Server side, and implemented in the app itself.
One- and Two-Step Registration
The custom registration process can have either one or two steps.
One-Step Registration
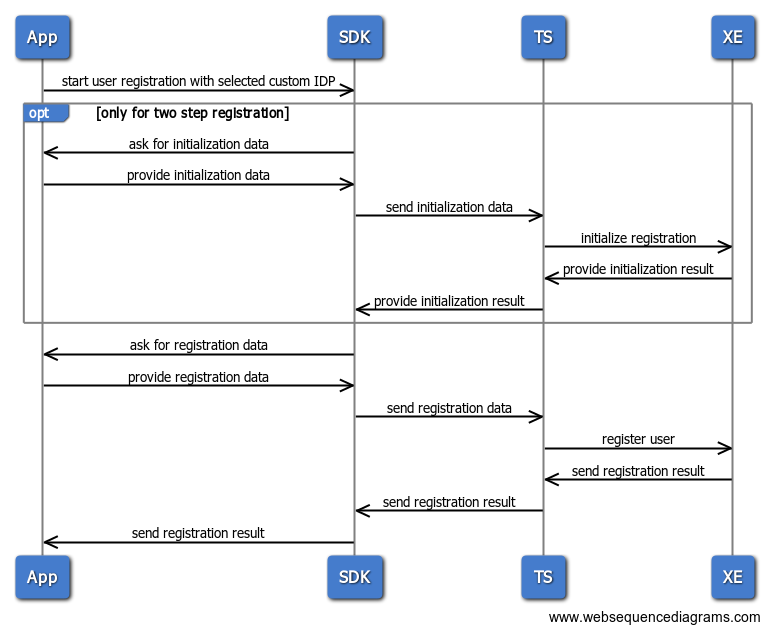
In case of one step registration the SDK asks the app for optional registration data. The data is sent to the Token Server where the custom registration script is executed. The result of the custom script (status code and optional data) is sent back to the SDK and the registration result is propagated to the app in the form of an event.
Two-Step Registration
In case of two step registration the SDK asks the app for optional initial registration data. The data is sent to the Token Server where the custom registration is initialized. The optional initialization result is sent back to the SDK. Then the SDK asks the app for a registration data, providing the optional initialization data provided by the Token Server. The registration data is sent to the Token Server where the custom registration script is executed. The result of the custom script (status code and optional data) is sent back to the SDK and the registration result is propagated to the app.
Starting and Handling the Events from the SDK
Prerequisites
In order to use the custom identity providers, they need to be registered as a one- or two-step IdP during initialization of the SDK. See getting-started.
Start Registration
To start registration with a custom IDP you should call the Onegini.instance.userClient.registerUser function, similar to registration with browser IDP, with the custom identity provider id string.
Handling Events
As previously described, in the one- and two-step registration flows the application needs to communicate information to the SDK about the current step. The events that the application needs to listen to are: InitCustomRegistrationEvent and FinishCustomRegistrationEvent . These events contain additional attribute information which are described in Event Overview.
var broadCastController = Onegini.instance.userClient.owEventStreamController;

__ Only needed for two-step registration
StreamSubscription<OWEvent> initCustomSub = broadCastController.stream.where((event) => event is InitCustomRegistrationEvent).listen((event) {
    __ Logic to respond to event
});

StreamSubscription<OWEvent> finishCustomSub = broadCastController.stream.where((event) => event is       FinishCustomRegistrationEvent).listen((event) {
  __ Logic to respond to event
});
CustomRegistrationEvent customInfo Atribute
OWCustomInfo contains a status code and optional data provided by the backend script. The first step of the registration flow will always return an empty string. This means that data will be an empty string in the FinishCustomRegistrationEvent method of the one-step registration flow and in the InitCustomRegistrationEvent method of the two-step registration. The only exception to this rule is a retry of the registration step: in case of a recoverable error returned by the SDK the resulting data object in the retried step will contain the error info. There are three groups of status codes that can be returned in the CustomInfo object:
- success status (2XXX) - when the status code is in the rage of 2000 - 2999 the registration step has been finished successfully.
- recoverable errors (4XXX) - when the status code is in the range 4000 - 4999 the flow can be recovered and the SDK will call either the
InitCustomRegistrationEventor theFinishCustomRegistrationEventmethod again, depending on the step that has caused the error. - unrecoverable errors (5XXX) - when the status code is in the range 5000 - 5999 the flow cannot be recovered and the SDK will return an error instead of retrying the step.
Responding to the Events
Using the information from the data parameter, the user can decide if the data is valid and the registration flow can continue. Once this decision is made and the required data is acquired, we need to send the following callback for the InitCustomRegistrationEvent and/or FinishCustomRegistrationEvent events using one of the callbacks from CustomRegistrationCallback. In case we would want to accept the request we can use:
OneginiCustomRegistrationCallback().submitSuccessAction(data: String?)
After this succeeds, the overlapping registration flow will continue by starting the pin creation flow as described in Create Pin.
Sometimes it is desired to cancel the current custom registration flow. This can be done using the following method:
OneginiCustomRegistrationCallback()
  .submitErrorAction("Registration canceled": String)
  .catchError((error) {
        __ handle error
  }