
Scopes and claims mapping
A common practice is to enrich the tokens, which an identity provider issues, with identity data that meets the application requirements. Every application can have different data requirements and privileges. In OAUTH and OIDC, this enrichment is typically managed using scopes.
In an authentication request, the scope defines the set of claims to return in the authentication response. Typically, when a scope is requested using a flow, only the attributes from the identity provider are received. You can use scopes and claims mapping to include attributes that you configure in the Identity Store in the ID token.
Scopes
Scopes represent the data or actions that an application can access or perform. You can define the scopes and create a fine-grained policy to limit access. Social networks such as Facebook and Google define a large number of scopes to limit access to only the parts of the applications that users need to access. Examples of such scopes include profile, email, user_likes, and user_posts.
Scopes limit the opportunities for abuse, because they are linked to an access token that is issued to an application on behalf of a user. A client-credentials access token is not issued on behalf of a user, but on behalf of the application.
An application needs to request the scopes during the authorization flow. A user is optionally presented with a consent screen, to allow the application to use certain scopes. The consent screen is particularly for scenarios where the a third party manages the application. You are probably familiar with consent screens if you have logged in to a website using one of your social media accounts. The first time you log in, you need to give consent to share your personal data with the third-party application or website.
An application can have two types of scopes: default and additional. Default scopes are automatically assigned if a client does not request any scopes. During an authorization request, an application can request both additional and default scopes. Each application configuration can define various default and additional scopes. When an application requests a scope that is either not assigned to the application or does not exist, the request is rejected.
Response attributes as claims
You can map attributes that you configure in the Identity Store as response attributes. These response attributes present user data in claims when linked to a granted scope.
Each response attribute has a unique name (case-sensitive). This name is used as the claim name. Using unique names prevents a single OIDC response from having multiple claims with the same name.
The response attributes have a source. The default source is the store of persisted attributes from the Identity Store. Non-persisted attributes are retrieved from the session, which is populated by the result from the identity provider. Together with the source, a source attribute is defined. The source attribute defines the location of the attribute at the source. In general, this location is defined as a JSON path. For the Identity Store, the schema is known so the options can be prefilled. A single response attribute can have a single source. Multiple response attributes with the same name can exist only if the sources are different. If multiple response attributes with the same name exist, the attribute sourced by the Identity Store is used.
A scope can include multiple response attributes. Only response attributes with a value are mapped to a claim, unless a default is set.
Add a scope
To integrate with your existing IT infrastructure, you can add scopes. Within those scopes, you can add resource attributes from the Identity Store as claims. Using resource attributes as claims allows you to build the integration between the Identity Store and the OIDC applications that you configure.
-
On the OneWelcome Identity Platform console, select Applications > Scopes and claims.
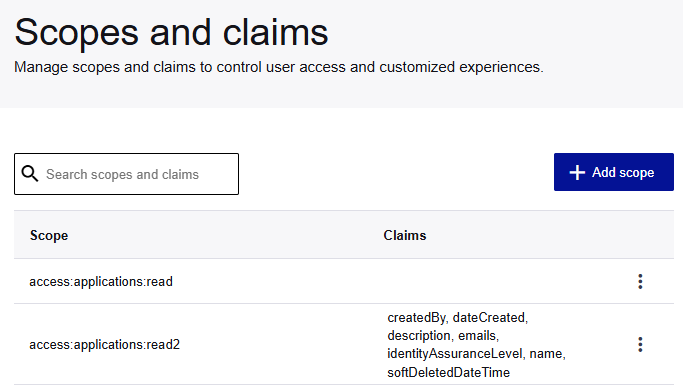
The Scopes and claims page lists any existing scopes and their associated claims.
-
Select Add scope.
-
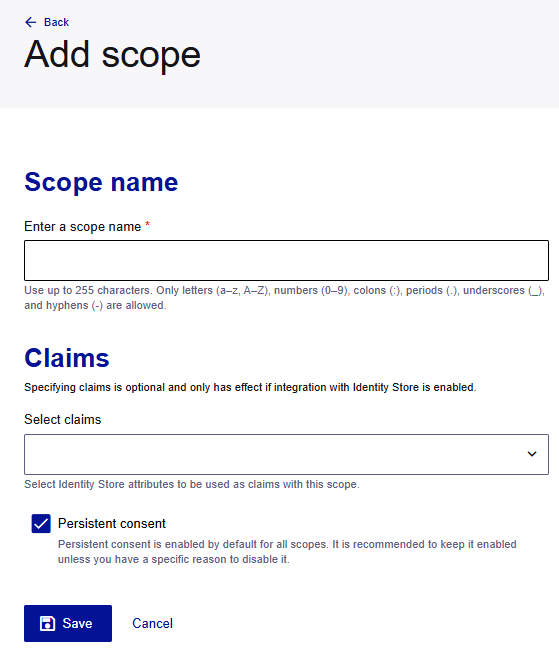
Enter the Scope name.
The name can include up to 255 characters. Only letters (a–z, A–Z), numbers (0–9), colons (:), periods (.), underscores (_), and hyphens (-) are allowed.
A scope represents an action to execute or data for the application to access, and the scope name reflects this action or data. A possible name could be read or email. OAuth flows use the scope name when an access token is requested or validated.
-
(Optional) Select the Identity Store attributes to use as Claims with this scope.
Note
Claims take effect only if your organization has integrated with the Identity Store or the Tulip identity store.
-
Indicate which type of scope you want to use:
-
(Default) To use persistent scopes, where the use gives consent during the first authorization request, select the Persistent consent check box.
-
To use non-persistent scopes, where user consent is required for each authorization request, do not select the Persistent consent check box.
-
-
Select Save.
Apply scopes to a web client
After you add scopes, you can use them in your web client configurations.
The identity provider that the web client uses must enable the identity store as an integration.
Add scopes to a web client
-
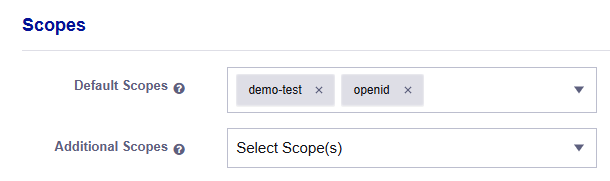
In your web client configuration, scroll down to the Scopes section.
-
Select the Default Scopes and Additional Scopes for the web client.
-
Default Scopes are automatically assigned if the client doesn't request any scopes. To fail an authorization request when no scopes are requested, leave the Default Scopes empty.
-
Additional Scopes are the scopes that a client requests during authorization.
-
-
In the User registration section, check which Identity provider the web client uses.
-
Save the web client.
Add the identity store as an IDP integration
If you do user authentication (not machine-to-machine authentication) and have a claims mapping for at least one of your scopes, you need to add the identity store as an IDP integration. This is a one-time configuration.
-
Open the configuration for the Identity provider that the web client uses.
-
Scroll to the IDP integrations section.
-
In the Integrations list, select Identity store.

-
Save the identity provider.