
Login flows
Login flows include identification and authentication steps, such as providing identifiers and authentication methods. Unlike other user flows, they don't include other kinds of steps, such as business processes.
For login flows, the Access component serves as the main entry point. You configure the relying parties (RP) on the Access admin console, and the Access component is responsible for validating incoming federated login requests. After validation, Access hands over the request to the user journey orchestration module to perform the actual user authentication.
When an authentication is successful, Access connects with an identity store and authentication backend to compile the user claims that the the relying party requested. The core flows module supports only authentication where Thales hosts the user interface.
Parts of a login flow
To be valid, a login flow must provide both identification and authentication for a user.
Each login flow follows a basic workflow that you can edit in the flow editor:
Start: The Start is simply the entry point for the login flow. There is nothing to configure for the login flow start.

Identification and authentication columns
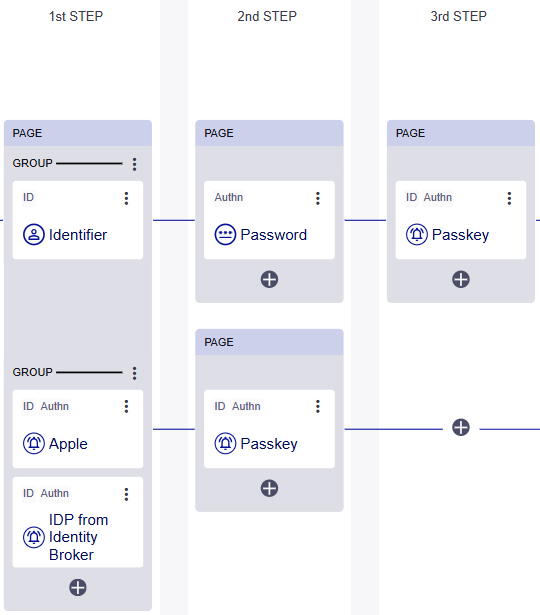
The vertical columns on the flow editor provide options to fulfill both requirements in a login flow:
- Identification (ID): The first column fulfills the identification requirement, where the user provides their identifier and the system performs user lookup.
- Authentication (Authn): The second and third columns fulfill the authentication requirement, where the user provides their credential and the system validates it.
The available identification and authentication options depend on what is configured for your tenant and brand.
Identification
The identification column can include identification or identification and authentication options. The Identifier option provides only identification, while the other options provide both identification and authentication.
The following identification options are available:
-
IDP from Identity Broker: Federate with social or general identity providers (IDP) that you configured in the identity broker. You can add multiple instances of the IDP from Identity Broker for different IDPs.
-
Identifier: Prompt users to provide a unique identifier, which can be either their username, email address, or phone number. This identifier is used to look up and verify the user's account information in the system.
-
Identifier and password: Prompt the user to first provide their unique identifier, such as a username, email, or phone number, to locate their account in the system, and then provide their password to authenticate.
This option includes both identification and authentication in one step, which means that you don't necessarily need an additional step for authentication.
-
Passkey: Generate a challenge and prompt users to provide their passkey authenticator to sign the challenge. The signed challenge is then verified. When necessary, the step also performs a user lookup to confirm the user's identity.
Authentication
The authentication columns can include multiple options.
The following authentication options are available:
-
IDP from Identity Broker based on home realm detection: Automatically detect the user's realm based on the provided identifier and forward the user to the appropriate external IDP for authentication. The realm is mapped to a specific IDP. Includes only IDPs from the Identity Broker (does not include IDPs configured in the Core).
-
IDP from Identity Broker: Federate with social or general identity providers (IDP) that you configured in the identity broker. You can add multiple instances of the IDP from Identity Broker for different IDPs.
-
Passkey: Generate a challenge and prompt users to provide their passkey authenticator to sign the challenge. The signed challenge is then verified. When necessary, the step also performs a user lookup to confirm the user's identity.
-
Password: Prompt the user to enter their password to confirm their identity. The password is verified to ensure that the user's credentials match the account information. The password step comes after the user identifier step, because the password needs to authenticate together with the username.
-
SMS OTP: Generate a unique, time-sensitive, single-use code and send it to the user's primary phone number by SMS. The user must enter this code into the login page to verify their identity and proceed. SMS OTP comes after a user identifier step, because it needs the user's account information to determine where to send the OTP code.
-
Email OTP: Generate a unique, time-sensitive, single-use code and send it to the user's email address. The user must enter this code into the login page to verify their identity and proceed. Email OTP comes after a user identifier step, because it needs the user's account information to determine where to send the OTP code.
-
TOTP: Generate a time-based, single-use code using an authenticator app such as MobilePASS+, Google Authenticator, or Microsoft Authenticator. The user must enter the code from the authenticator app to verify their identity and proceed. TOTP comes after a user identifier step, because it needs the user's account information. Users must have a TOTP authenticator enrolled before they can use this step.
Groups
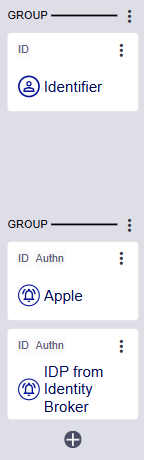
In the columns, you can organize multiple options into groups. Each group creates a separate horizontal path through the login flow.
In the Identification column, the Identifier option is always in a separate group by itself, because it is the only identification option that does not also provide authentication. This means that a path that starts with the Identifier option must have an additional Authentication step. When you have an Identifier and you add another identification option, the system automatically creates a new group for the new identification option.
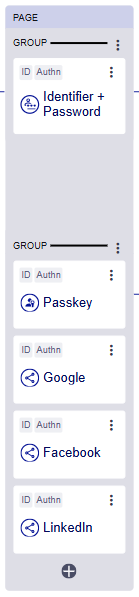
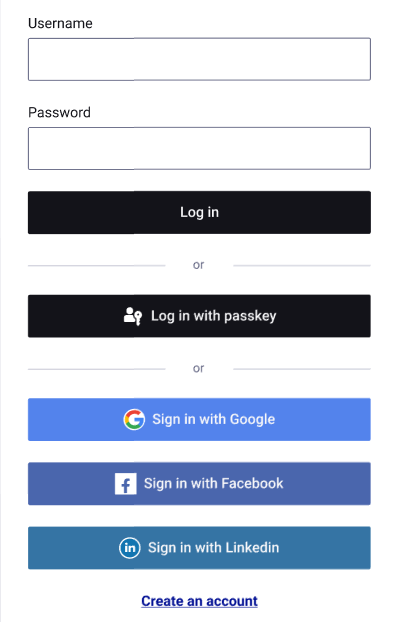
On the user login pages, the options are shown in the same order as on the the flow editor, but are separated based on the type of identifier or authenticator. This means that only the IDP from identity broker options are displayed in the groups that you create, because IDP from identity broker is the only option that can have multiples.
The following example shows how the groups on the flow editor are displayed on the user login page, where the identifiers are listed in the same order but are separated by type.
![]()
Pages
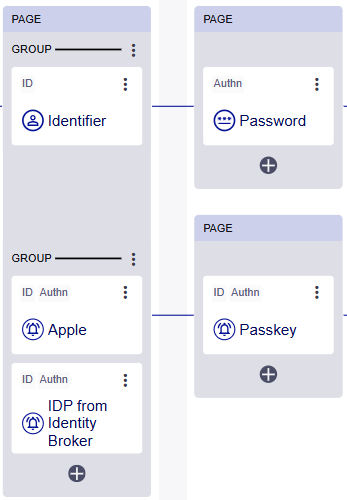
A page shows the selection of identification or authentication options that the user sees on a page or screen.
For the identification column, the user sees all of the options on one page. That page includes the groups and the options are listed in the same order that you see in the flow editor.
For the authentication columns, each group on a path creates a separate page for the user.
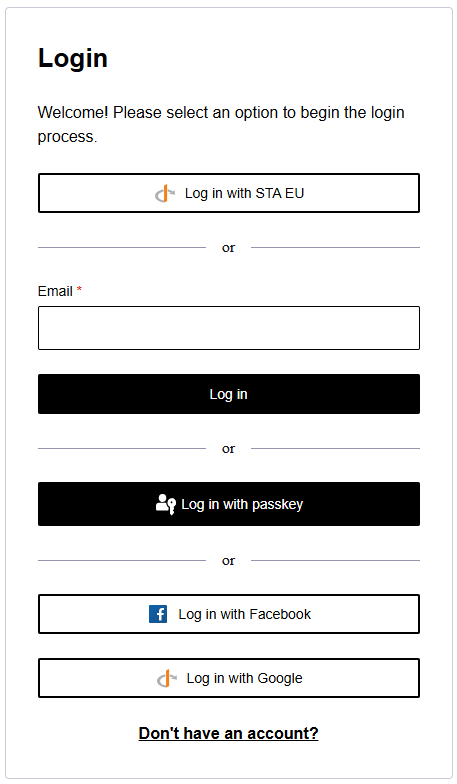
On the user login pages, each type of identification method is separated by an OR, and the groups containing the IDP from identity broker option are included in the same groups that you created on the flow editor:
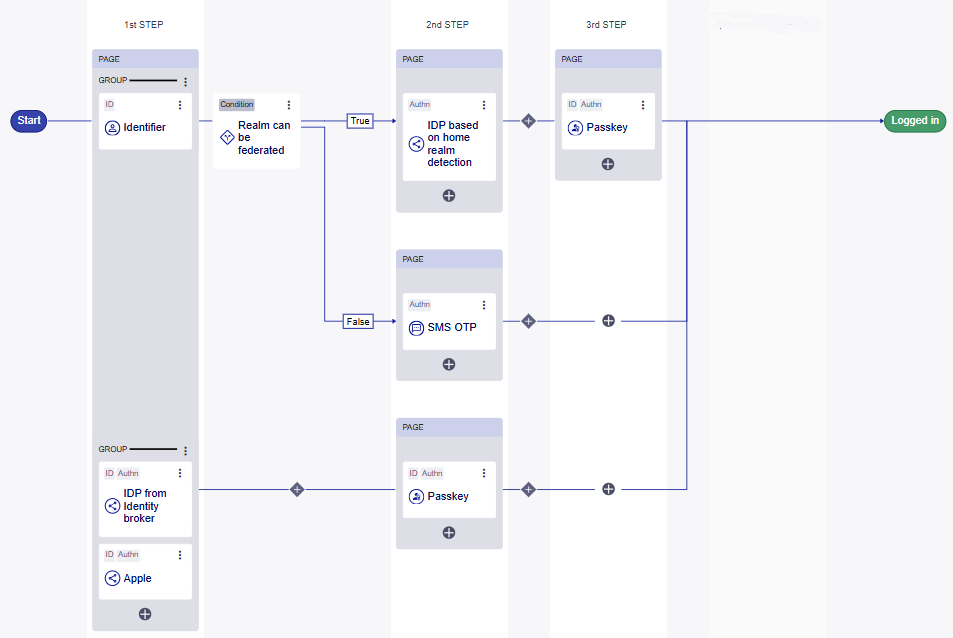
Conditions
Conditions modify the authentication requirements under different contexts.
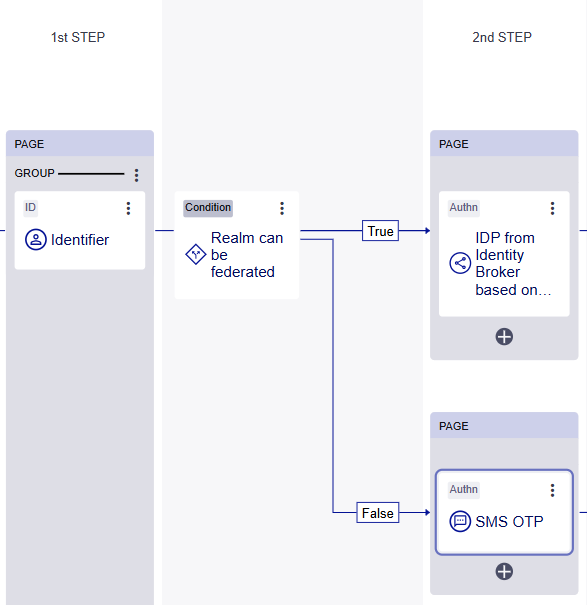
You add conditions between steps in a login flow. The conditions create branches on the path through a login flow, where each branch has different authentication requirements or methods. A condition can also have a branch that leads to authentication failure.
You can create a condition from scratch using the condition builder, or select from a predefined template. Available templates include Anonymous user, Realm can be federated, and Risk level.
Within a branch, you can combine multiple expressions using AND or OR logical operators. You can also nest groups of expressions to create complex conditions, for example, a risk-level check combined with an anonymous-user check. Groups can be nested up to three levels deep, with a maximum of three conditions per group.
Post-authentication
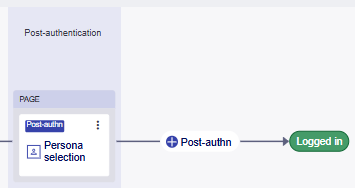
You can add post-authentication steps to the end of a login flow. Post-authentication steps are non-authentication processes that are performed before the session is granted.
Logged in
The result of a successful login flow is that the user is logged in.
