



Secure logs
For troubleshooting and error reporting, refer to the Mobile FIDO SDK logs, which contain diagnostic information captured during use case execution. The logs are useful when you are troubleshooting the issues. It is recommended to keep the logs active even when the application is released to end users.
The log content is encrypted, and even if it is in cleartext format, it does not reveal any personal or sensitive data. Only Mobile FIDO SDK can populate these logs, the application is unable to include its own logs.
The application can retrieve the logs and send them to a support service, to help troubleshooting issues in the field.
Protect log confidentiality
To protect the confidentiality of the logs, ensure that the following actions are performed:
-
Configure the secure logs.
-
You have to generate an asymmetric key pair and provide the public key to the SDK, because no default key is provided. This key is used to encrypt the logs.
-
You can configure additional parameters, such as the log level or the maximum size of the log file.
-
Retrieve the logs from the SDK when needed. For example, the application might allow the end user to send support requests, which might include the extracted logs.
-
Transfer the logs to the application support service.
-
Decrypt the logs using the generated private key.
-
To investigate any issues, communicate to Thales support about the relevant cleartext logs.
Set up secure logs
Different logging configuration options are available, depending on the intended logging level. This includes disabling SDK logging.
Note
-
You have to manually configure the secure log module to properly log the SDK.
-
Disabling log collection reduces the efficiency of Thales support services. These logs are stored in the application directory and can be exported and shared for debugging purposes.
-
Secure logging is enabled by default. To disable secure logging, pass
nullintoFido2Config.setUpSecureLog(Android) ornilintoTGFFido2Config.setupSecureLog(iOS).
Configure the secure log module
To configure the secure log module of the Mobile FIDO SDK, refer to the following steps.
Prerequisite
OpenSSL is required in order to generate a key-pair. To acquire openSSL on macOS, simply run the following command:
brew install openssl
Generate a key-pair
-
Generate an RSA key-pair:
openssl genrsa -out key.pem 2048 -
Extract the public key exponent and modulus:
openssl rsa -in key.pem -text
Configure the secure log
You can generate the public key modulus as well as the exponent, and supply these values to SecureLogConfig:
SecureLog mSecureLog;
byte[] secureLogPublicKeyModulus = new byte[] {
            (byte)0x00, (byte)0xa0, (byte)0x86, (byte)0x90, (byte)0xbe, (byte)0x3a, (byte)0x7d, (byte)0xfd, (byte)0x3d, (byte)0x84, (byte)0x56, (byte)0x38, (byte)0x23, (byte)0x97, (byte)0xd4,
            (byte)0xb6, (byte)0x5f, (byte)0xeb, (byte)0x1e, (byte)0xc0, (byte)0x17, (byte)0x5a, (byte)0xb3, (byte)0x08, (byte)0x92, (byte)0x3b, (byte)0x2a, (byte)0x2b, (byte)0x6c, (byte)0xf6,
            (byte)0x71, (byte)0xd6, (byte)0x62, (byte)0x1c, (byte)0x7a, (byte)0x4f, (byte)0x96, (byte)0xf9, (byte)0x37, (byte)0xa0, (byte)0x77, (byte)0xd6, (byte)0x24, (byte)0x27, (byte)0x84,
            (byte)0x98, (byte)0xfa, (byte)0x7c, (byte)0xb9, (byte)0x3c, (byte)0xfd, (byte)0xc9, (byte)0x58, (byte)0xcd, (byte)0xb7, (byte)0x04, (byte)0x08, (byte)0xbb, (byte)0x0b, (byte)0x23,
            (byte)0x8b, (byte)0x21, (byte)0xaa, (byte)0x4d, (byte)0x2c, (byte)0xfd, (byte)0x19, (byte)0xf6, (byte)0xa9, (byte)0xc9, (byte)0x43, (byte)0xe0, (byte)0xe9, (byte)0x63, (byte)0xcc,
            (byte)0xa8, (byte)0x5e, (byte)0x8c, (byte)0xf4, (byte)0x57, (byte)0x02, (byte)0x13, (byte)0x44, (byte)0x0b, (byte)0xfc, (byte)0x0d, (byte)0x5d, (byte)0x05, (byte)0xbf, (byte)0x70,
            (byte)0xe2, (byte)0xac, (byte)0xad, (byte)0xe9, (byte)0x55, (byte)0x85, (byte)0x04, (byte)0x61, (byte)0xfc, (byte)0x67, (byte)0x25, (byte)0xe8, (byte)0xd2, (byte)0x0f, (byte)0xba,
            (byte)0x0b, (byte)0x62, (byte)0x1a, (byte)0x1d, (byte)0x55, (byte)0xa0, (byte)0x6c, (byte)0x08, (byte)0x83, (byte)0xde, (byte)0xd4, (byte)0xbe, (byte)0x39, (byte)0x95, (byte)0xe6,
            (byte)0x7b, (byte)0xe6, (byte)0xc9, (byte)0x44, (byte)0x9b, (byte)0xf8, (byte)0x54, (byte)0xb8, (byte)0x4e, (byte)0xe3, (byte)0x75, (byte)0xa6, (byte)0xaf, (byte)0xfa, (byte)0x89,
            (byte)0x39, (byte)0x3e, (byte)0xaf, (byte)0xfd, (byte)0x4e, (byte)0xf7, (byte)0xd8, (byte)0x2f, (byte)0x80, (byte)0x0d, (byte)0xa9, (byte)0x7c, (byte)0xf7, (byte)0xa7, (byte)0x53,
            (byte)0x1d, (byte)0x18, (byte)0x95, (byte)0x6a, (byte)0x35, (byte)0x98, (byte)0x48, (byte)0x24, (byte)0xcf, (byte)0x29, (byte)0x52, (byte)0xd7, (byte)0x5f, (byte)0xe0, (byte)0x6b,
            (byte)0xce, (byte)0x61, (byte)0xe4, (byte)0x71, (byte)0x13, (byte)0xd6, (byte)0x82, (byte)0xf3, (byte)0xd9, (byte)0x41, (byte)0x74, (byte)0x5f, (byte)0x5b, (byte)0x85, (byte)0xc6,
            (byte)0x56, (byte)0xa6, (byte)0x1f, (byte)0x8b, (byte)0xd2, (byte)0xc4, (byte)0xa7, (byte)0x57, (byte)0x9c, (byte)0xed, (byte)0x82, (byte)0xca, (byte)0x2f, (byte)0xd7, (byte)0x84,
            (byte)0x47, (byte)0x26, (byte)0x65, (byte)0x43, (byte)0xd9, (byte)0x76, (byte)0x95, (byte)0xf5, (byte)0x20, (byte)0xd1, (byte)0x03, (byte)0xf4, (byte)0xeb, (byte)0x00, (byte)0x34,
            (byte)0x19, (byte)0xca, (byte)0x40, (byte)0x40, (byte)0x34, (byte)0xe2, (byte)0xfb, (byte)0xbd, (byte)0xe3, (byte)0x64, (byte)0x02, (byte)0xcb, (byte)0xe7, (byte)0x1b, (byte)0x87,
            (byte)0x69, (byte)0xac, (byte)0x3b, (byte)0x7a, (byte)0xae, (byte)0x51, (byte)0x3d, (byte)0x4b, (byte)0x32, (byte)0x57, (byte)0x24, (byte)0xe2, (byte)0x03, (byte)0x34, (byte)0x71,
            (byte)0x10, (byte)0xda, (byte)0x60, (byte)0x77, (byte)0x48, (byte)0x26, (byte)0xcb, (byte)0x3c, (byte)0x63, (byte)0x0b, (byte)0xa9, (byte)0x49, (byte)0xa4, (byte)0x92, (byte)0x53,
            (byte)0x69, (byte)0x53
};

byte[] secureLogPublicKeyExponent = new byte[] {
            (byte)0x01, (byte)0x00, (byte)0x01
};

SecureLogConfig secureLogConfig = new SecureLogConfig.Builder(getApplicationContext())
                .publicKey(Configuration.secureLogPublicKeyModulus, Configuration.secureLogPublicKeyExponent)
                .fileID("sample")
                .build();

mSecureLog = Fido2Config.setUpSecureLog(secureLogConfig);
var secureLog : SecureLog!
let publicKeyModulus: [CUnsignedChar] = [
        0x00, 0xc8, 0x52, 0xde, 0x25, 0x47, 0x75, 0x91, 0x0b, 0xcb, 0xfd, 0x3f, 0x73, 0x15, 0x21, 0xff, 0xc4, 0x3f, 0xce, 0x9a, 0xe9, 0x89, 0x06, 0x4d, 0x4a, 0x56, 0xd6, 0x62, 0x00, 0x53, 0x17, 0x09, 0x81, 0xb7, 0x3b, 0xfc, 0x3d, 0x7d, 0xeb, 0x18, 0x2f, 0x60, 0xc6, 0x8a, 0xf0, 0x4d, 0x2d, 0xfd, 0x0f, 0xc5, 0xda, 0xc3, 0xda, 0x22, 0xf1, 0x3f, 0x8f, 0x8b, 0x21, 0x60, 0x93, 0x76, 0xcc, 0x07, 0x24, 0x20, 0x9d, 0x3c, 0x80, 0xe1, 0xea, 0xe1, 0xfe, 0x9c, 0x34, 0x92, 0x37, 0xab, 0x6d, 0x73, 0x0d, 0xa1, 0xb3, 0x58, 0xd0, 0x46, 0x07, 0xc1, 0x9e, 0x94, 0x5d, 0x01, 0x9c, 0x08, 0x37, 0x86, 0xaf, 0xfc, 0x6e, 0xa1, 0x47, 0x39, 0x98, 0xf6, 0x46, 0x28, 0x18, 0x8d, 0x7d, 0xdd, 0xb1, 0xaa, 0x5f, 0xdc, 0x6b, 0x08, 0x9a, 0xe9, 0x06, 0xb5, 0x20, 0x53, 0xae, 0x70, 0xc7, 0xa6, 0x06, 0x32, 0x59, 0x74, 0xaa, 0xe6, 0x98, 0x99, 0xa5, 0xaa, 0x95, 0x25, 0xa5, 0x7f, 0x78, 0xc6, 0xfc, 0xef, 0x62, 0x81, 0x74, 0x43, 0xd8, 0xa3, 0xab, 0x2f, 0xa6, 0x9d, 0x2b, 0x1d, 0xd3, 0xf9, 0x6e, 0xf8, 0xd2, 0x50, 0x2d, 0xf8, 0xe4, 0xbe, 0x7a, 0x63, 0x15, 0x09, 0xb1, 0x74, 0x31, 0xe3, 0x6c, 0x13, 0xae, 0x18, 0x74, 0xdf, 0x8f, 0x8a, 0xb5, 0x60, 0x2c, 0xaf, 0x0e, 0x56, 0x4c, 0xb0, 0xfd, 0x3f, 0x85, 0x16, 0xde, 0xf9, 0x8d, 0x72, 0xdf, 0xed, 0x93, 0x77, 0xda, 0x03, 0x01, 0xf2, 0x34, 0x91, 0x67, 0xaf, 0xa6, 0x11, 0x5b, 0x42, 0xdc, 0x36, 0x5f, 0x29, 0xd7, 0x96, 0x37, 0x0e, 0x0d, 0xe0, 0x08, 0xa8, 0xf5, 0x44, 0xf1, 0x0f, 0xd1, 0x2e, 0x02, 0xee, 0x70, 0x6f, 0x0f, 0x99, 0x22, 0x2b, 0x1d, 0xdc, 0x7a
    ]
let publicKeyExponent: [CUnsignedChar] = [ 0x01, 0x00, 0x01 ]

let config = SecureLogConfig { (slComps) in
    slComps.publicKeyModulus = NSData(bytes: publicKeyModulus, length: publicKeyModulus.count) as Data
    slComps.publicKeyExponent = NSData(bytes: publicKeyExponent, length: publicKeyExponent.count) as Data
}

secureLog = TGFFido2Config.setupSecureLog(config)
Additional configuration options are available for:
-
Log level
-
Maximum log file size
-
Number of log files (they are rotated)
-
Directory and file names
See API Documentation for more details.
Decrypt secure logs
To decrypt the generated secure logs, use the DesktopTool provided in the delivery package.
DesktopTool
DesktopTool is a Java application for decrypting the log files that the SecureLog library generates. Find the application in the release package under the util directory.
The application requires a Java environment to run. On a machine that has a Java version less than 1.8.0_201, install the JCE policy.
Input data
To run the DesktopTool application, the following input data are required:
-
Unique ID
-
Instance ID
-
Key ID,
.pemfile (This is the private key, where the public key info: Modulus - Exponent was registered while configuringSecureLog).
Decrypt the log file
To decrypt the log file:
-
Retrieve the encrypted log files from the mobile device.
-
Run the DesktopTool application.
-
On the main screen, click Configuration.
-
Enter the following data:
Data Current Value Description Unique ID \<fileID>-fido2sdk - \<fileID>-\<POSTFIX_UNIQUE_ID>
- Mobile FIDO SDK sets the
POSTFIX_UNIQUE_IDas fido2sdk. This value is not configurable. - By default,
fileIDis set as d5a1. Hence, the defaultUnique IDis d5a1-fido2sdk. - If
SecureLogConfiguses a customfileID, update this value accordingly. For example, if thefileIDissample, then theUnique IDissample-fido2sdk.
Instance ID bc307141aa9c2d458f42d00bd6672170 Mobile FIDO SDK uses the following InstanceID: bc307141aa9c2d458f42d00bd6672170. This value is not configurable.Key ID path-to-the-private-key-pem-file Browse to the directory and select the required key.pem file. 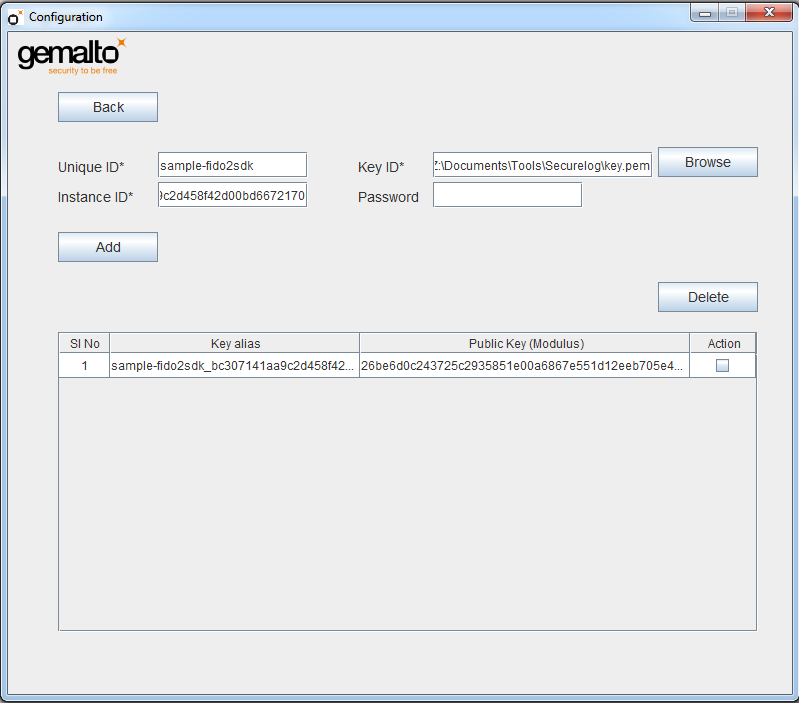
-
Click Add.
-
Click Back to return to the main screen.
-
Select the required log file to decrypt.
-
Click Process.
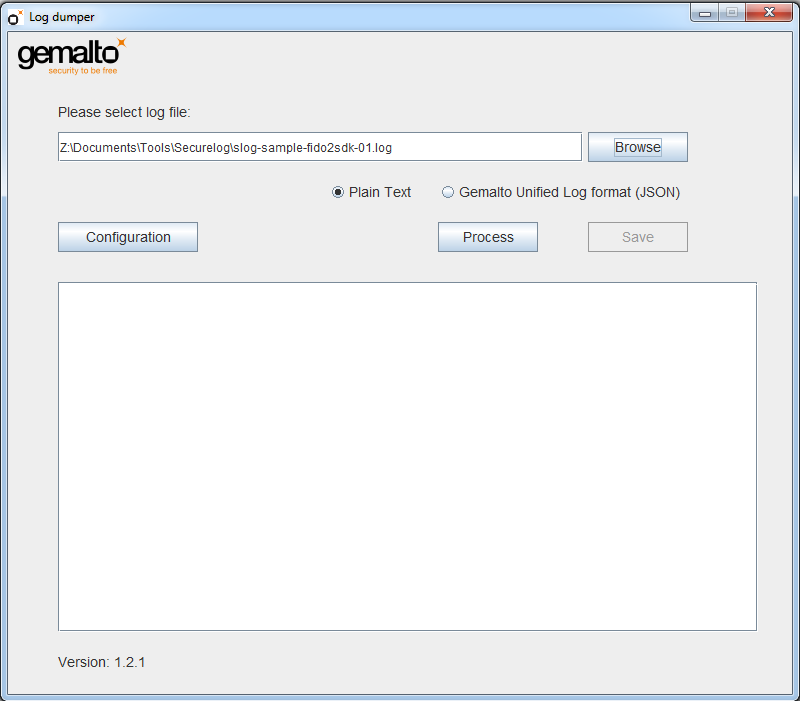
You can now view the secure logs from Mobile FIDO SDK.
Warning
Ensure that the DesktopTool is launched in a directory that allows write access. This is required for caching the necessary configuration files that the DesktopTool requires.
The tool must have write access to the current directory.
On Windows OS, especially with older Java version (for example 1.8.0_261), if you click the Browse button, it shows the folder C:\Windows\System32. Hence, you may need to run the DesktopTool application from the command line, for example:
"C:\Program Files (x86)\Java\jre1.8.0_261\bin\java" -jar SL-DesktopTool.jar &

