



Android hybrid transport
This page explains how to set up your Android app to support hybrid authentication (cross-device authentication) using the Mobile FIDO SDK.
Warning
Hybrid authentication is only supported on Android 14 (API level 34) and above.
Prerequisites
Before setting up hybrid authentication, ensure you have done the following:
-
Set your
targetSdkto 34 or higher -
Integrated the AndroidX credentials library
Hybrid flow
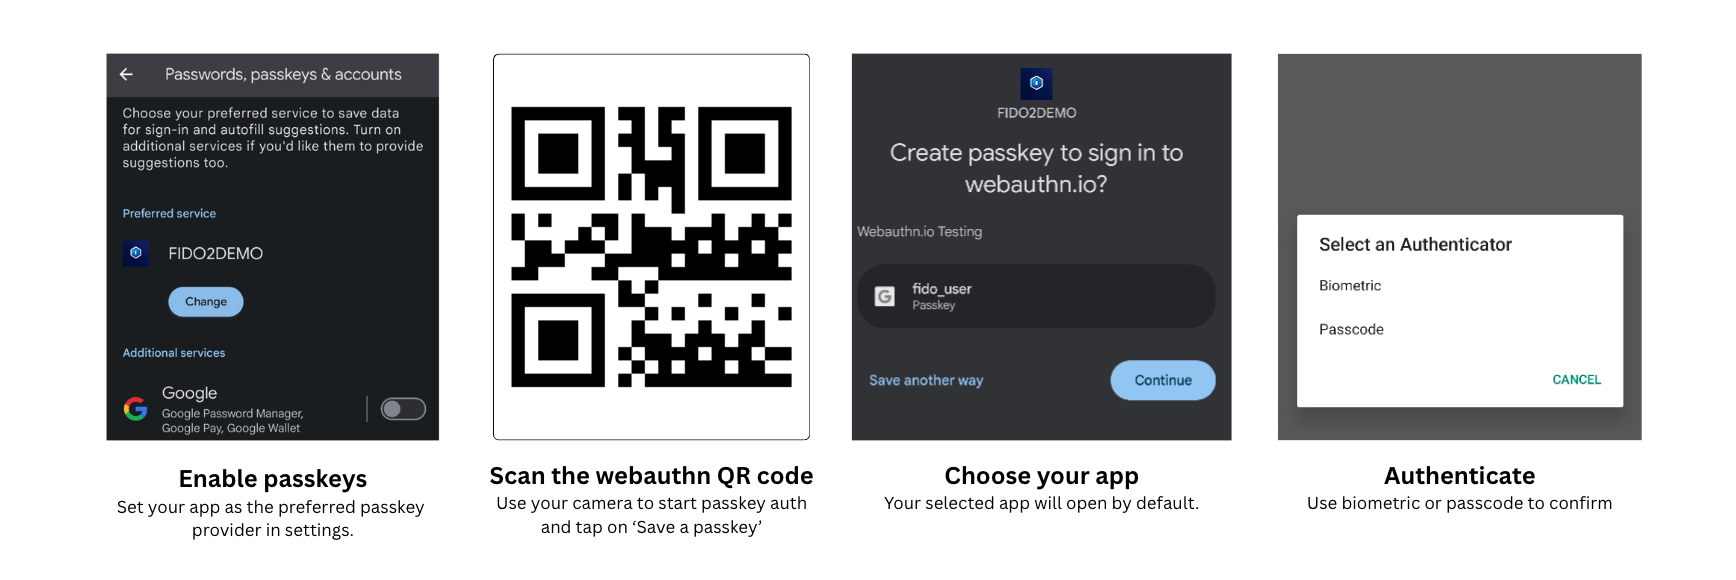
The hybrid flow on Android follows these steps:
-
Set the app as a passkey provider: The user ensures that your app is activated in the Additional services section of the passwords, passkeys, & accounts Android settings screen.
Setting it as the preferred passkey provider avoids manual app selection in step 3, but might conflict with the default password or passkey provider that the user might use for other applications. This setting is only configured once.
-
Scan the QR code: The user uses the mobile camera app to scan the authentication QR code that the computer's browser displays.
-
Create passkey (for registration):
-
Android displays a prompt showing the application and user name, and the passkey provider application that can store it. If your app is not selected, the user can tap select other way and selects your app.
-
Android launches your app, which can choose or prompt the user to choose the authenticator type to use.
-
The user authenticates with a PIN or biometrics to complete the passkey registration. On the first registration with PIN, the user is prompted to define the PIN.
Only biometric and PIN authenticators are available during registration for hybrid transport on Android.
-
-
Authenticate (for login):
-
Android automatically launches your app based on the passkey identifier included in the authentication request.
-
If the user registered passkeys with both PIN and biometrics, your app can choose or prompt user to choose the authenticator type to use.
-
The user authenticates with a PIN or biometrics to complete the passkey registration.
-
Add dependencies
Add the following to your module-level build.gradle file:
dependencies {
    implementation "androidx.credentials:credentials:1.2.2"
}
Implement hybrid authentication
Register credential provider components
The Mobile FIDO UI SDK provides two core components:
CredentialProviderService
-
Acts as the entry point for Android's Credential Manager when a a browser or app initiates a credential (such as a passkey) request.
-
It responds to
CreateCredentialRequestorGetCredentialRequestand delegates the actual logic to thePasskeyHandlerActivity. -
This service must be registered with the correct intent filter and permissions so that the system can discover and invoke it.
PasskeyHandlerActivity
-
This is the UI component that is responsible for handling user interaction during the passkey ceremony.
-
It's launched by the service via a
PendingIntentand handles the actual FIDO2 create/get flows. -
It also processes intent extras (for example,
accountId,displayName), invokes the FIDO2 operation, and returns results back to the system viaPendingIntentHandler.
Warning
Without this activity, the user cannot complete the ceremony or interact with authenticators (biometric, PIN, and so on).
To register them:
<!-- AndroidManifest.xml -->
<service
    android:name="com.thalesgroup.gemalto.fido2.ui.CredentialProviderService"
    android:enabled="true"
    android:exported="true"
    android:label="@string/app_name"
    android:icon="@drawable/ic_fido2_demo_app_icon"
    android:permission="android.permission.BIND_CREDENTIAL_PROVIDER_SERVICE"
    tools:targetApi="34">

    <intent-filter>
        <action android:name="android.service.credentials.CredentialProviderService" />
    </intent-filter>

    <meta-data
        android:name="android.credentials.provider"
        android:resource="@xml/provider" />

    <meta-data
        android:name="com.thalesgroup.gemalto.fido2ui.CONFIGURATION"
        android:resource="@xml/fido_provider_config" />
</service>

<activity
    android:name="com.thalesgroup.gemalto.fido2.ui.PasskeyHandlerActivity"
    android:exported="false"
    tools:targetApi="34" />
Note
PasskeyHandlerActivity is launched by the SDK through an explicit-component PendingIntent, so it does not need any intent-filter and must be declared with android:exported="false". Exporting it or adding intent-filters is unnecessary and increases the attack surface.
Ensure the required XML files (provider.xml, fido_provider_config.xml) are placed in res/xml/.
provider.xml
This file specifies the credential types that your app supports.
<?xml version="1.0" encoding="utf-8"?>
<credential-provider>
    <capabilities>
        <capability name="android.credentials.TYPE_PASSWORD_CREDENTIAL" />
        <capability name="androidx.credentials.TYPE_PUBLIC_KEY_CREDENTIAL" />
    </capabilities>
</credential-provider>
Configure user-facing options
When a user initiates passkey registration (for example, by scanning a QR code), Android’s Credential Manager displays a list of accounts or profiles that your app supports. This helps the user choose which profile to create a passkey for.
To define what appears in that selection list, you must configure the fido_provider_config.xml file located in your app’s res/xml/ folder. This file tells the system which display names, identifiers, and optional metadata (like icons) to show in the UI.
The fido_provider_config.xml file defines the passkey accounts shown to users:
<?xml version="1.0" encoding="utf-8"?>
<fido-provider-config>
    <create-passkey-accounts>

        <account
            accountId="primary_user"
            displayName="My Demo Login" />

        <account
            accountId="business_profile"
            displayName="Business Profile" />

    </create-passkey-accounts>
</fido-provider-config>
The required account attributes are:
-
accountId: This is a unique ID used internally to identify the account type. -
displayName: This is what the user sees when selecting the profile to register a passkey for.
You can define multiple account types if your app supports different login profiles (for example, personal or work). These entries appear as selectable options during passkey registration.
Advanced: Custom icons and metadata
Note
This section is only needed if your app wants to provide a more customized user experience during passkey registration.
In most cases, you can skip this step, because the Mobile FIDO UI SDK already provides a working default configuration.
This configuration allows you to:
-
Add custom icons for different account types (for example, personal or business)
-
Attach extra metadata (for example, roles or tenant info) used during passkey creation
Update the configuration XML
Define the visual and logical attributes for each account entry in res/xml/fido_provider_config.xml:
<account
    accountId="primary_user"
    displayName="My Demo Login"
    icon="@drawable/ic_gemalto_user"
    customData="some_value_for_this_account" />
-
accountId: This is an internal identifier used during passkey registration. -
displayName: This text is shown to the user. -
icon: This is an optional drawable resource. -
customData: This is an optional custom string to pass to your app.
Handle custom fields in code (only if needed)
This step is required only if your app intends to use the custom icon or data at runtime.
-
Update the
Accountclass:private static class Account { final String accountId; final String displayName; final int iconResId; final String customData; Account(String accountId, String displayName, int iconResId, String customData) { this.accountId = accountId; this.displayName = displayName; this.iconResId = iconResId; this.customData = customData; } } -
Update the config XML parser to read the new attributes:
private void parseConfigFromXml(int resId) throws IOException, XmlPullParserException { // inside the while loop if ("account".equals(parser.getName())) { String id = parser.getAttributeValue(null, "accountId"); String name = parser.getAttributeValue(null, "displayName"); String iconString = parser.getAttributeValue(null, "icon"); String customDataString = parser.getAttributeValue(null, "customData"); int iconResId = 0; if (iconString != null && iconString.startsWith("@drawable/")) { String resourceName = iconString.substring("@drawable/".length()); iconResId = getResources().getIdentifier(resourceName, "drawable", getPackageName()); } if (iconResId == 0) { iconResId = R.drawable.ic_fido2_demo_app_icon; // fallback } config.createPasskeyAccounts.add(new Account(id, name, iconResId, customDataString)); } } -
Pass custom data to your Intent (optional):
private PendingIntent createCreatePendingIntent(Account account) { Intent intent = new Intent(ACTION_CREATE_PASSKEY).setPackage(getPackageName()); Bundle accountData = new Bundle(); accountData.putString("accountId", account.accountId); accountData.putString("displayName", account.displayName); if (account.customData != null) { accountData.putString("CUSTOM_DATA_KEY", account.customData); } intent.putExtra(EXTRA_KEY_ACCOUNT_DATA, accountData); return createPendingIntent(intent, new SecureRandom().nextInt(9999) + 1); } -
Use the icon and metadata during credential entry creation:
for (Account account : config.createPasskeyAccounts) {
    Icon icon = Icon.createWithResource(getApplicationContext(), account.iconResId);

    int dummyPasswordCount = 0; // Customize as needed
    int dummyPasskeyCount = 1;
    boolean isAutoSelectAllowed = false;

    createEntries.add(new CreateEntry(
        account.accountId,
        createCreatePendingIntent(account),
        account.displayName,
        Instant.now(),
        icon,
        dummyPasswordCount,
        dummyPasskeyCount,
        dummyPasswordCount + dummyPasskeyCount,
        isAutoSelectAllowed
    ));
}
Test hybrid authentication
-
Set up or connect to a test site that supports WebAuthn (for example, webauthn.io).
-
From a desktop browser, start registration or sign-in.
-
Select Use a phone, tablet, or security key.
A QR code is shown on the screen.
-
Open the camera app on your Android 14+ device.
-
Scan the QR code.
Android prompts you to open your app’s credential provider.
Your
PasskeyHandlerActivityhandles the WebAuthn request. -
When prompted, complete the user verification process.
-
Verify that the operation succeeds on the browser.
Troubleshooting
Common issues
-
Credential provider not showing: Ensure your
CredentialProviderServiceis correctly declared and your app targets API 34+. -
Invalid QR code: Verify that the scanned QR code is a valid WebAuthn request.
-
Missing permissions: Ensure that
android.permission.BIND_CREDENTIAL_PROVIDER_SERVICEis declared in the manifest. -
Custom icons not visible: Confirm that the icon resource name is correct and the drawable exists.
-
Account not appearing: Validate the XML structure and ensure that the account IDs and display names are provided.

