
Authentication nodes
An authentication (auth) node is any RADIUS client, agent, or application that sends authentication requests to the virtual server. Only requests from an auth node are processed by the virtual server.
The number of auth nodes cannot exceed the allowed number set by your service provider. The virtual server will not process authentication requests received from devices or applications that are not in the list.
Depending on the network conditions, the virtual server accepts authentication requests from an auth node for processing within approximately five minutes of configuration.
Configure auth nodes
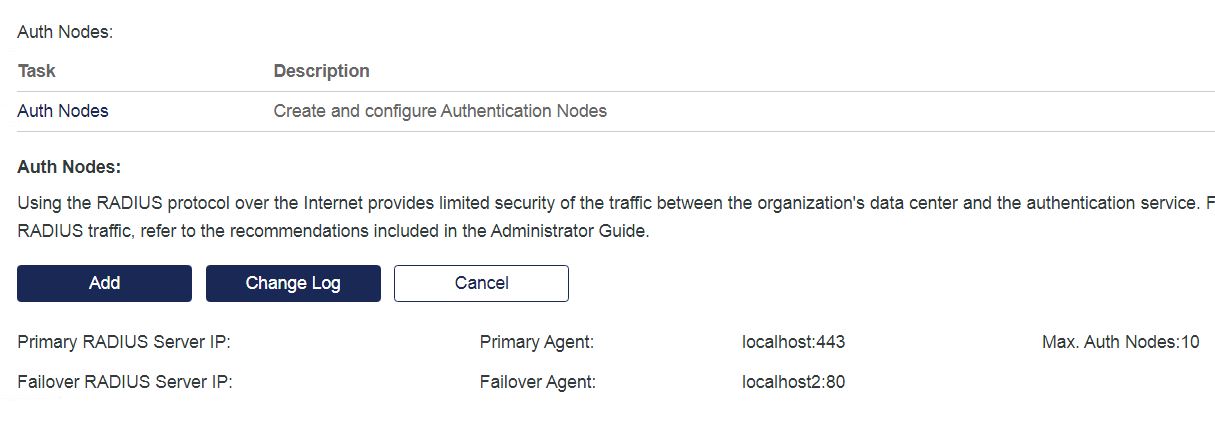
You can configure RADIUS IP and port numbers, as well as RADIUS clients, SafeNet agents, and applications (such as VPN or Outlook Web Access), so that they can authenticate against the account’s virtual server.
-
On the STA Token Management console, select Comms > Auth Nodes and select the Auth Nodes link.
-
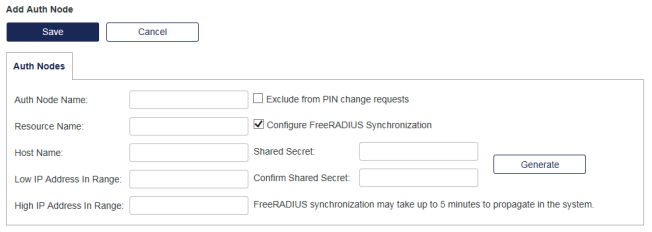
Click the Add button and enter the information on the Auth Nodes tab.
-
Auth Node Name: Must be unique. For example, the name can identify the vendor and model of the auth node product.
-
Resource Name: Identifies which authentication node a push notification relates to, to help the user determine whether they are authenticating a valid node. By default, this is the Auth Node Name. Unlike the auth node name, the resource name does not have to be unique.
If authentication nodes are shared, the resource name is inherited from the parent account. If authentication nodes are shared with child accounts, make sure that the resource name is also meaningful to users of these child accounts.
-
Host Name: (Optional) Indicates the fully qualified domain name (FQDN) of the auth node.
-
Low IP Address In Range and High IP Address In Range: Specify the external IP address of the RADIUS client or agent. These fields must conform to IPv4 or IPv6 address standards. This is the address that the account's virtual server receives authentication requests from.
-
Exclude from PIN change requests: If selected, the virtual server does not enforce server-side PIN changes during authentication through this auth node. Some RADIUS clients are not fully RADIUS-compliant and do not support challenge-response, which is a requirement for server-side PIN changes. If your RADIUS client does not support challenge-response and you have configured your server-side PIN policy to require the user to periodically change their PIN, select this check box to prevent a forced PIN change with the non-compliant RADIUS client.
If no auth nodes support challenge-response, a better option is to disable server-side PIN changes or select a different form of PIN management.
-
Configure FreeRADIUS Synchronization: If selected, changes to auth nodes are effective in less than five minutes on managed services or on instances using the FreeRADIUS plugin. This value has no effect if using Microsoft NPS as the RADIUS server.
-
Shared Secret: Used with RADIUS clients. It must match the shared secret that is configured in the RADIUS client. It is not required for agents.
-
-
Select Save.
Configure sharing and realms
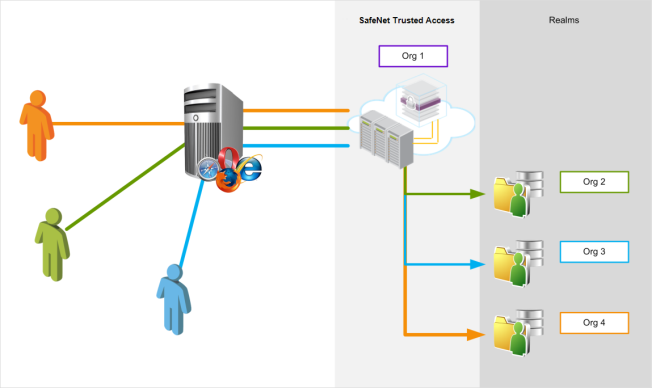
Sharing and realms is an optional service feature that allows an auth node to be shared with two or more virtual servers. Essentially, a realm is a group of virtual servers.
For example, Org 1 manages a web application and its own users for authentication. Org 1 wants users from three of its subsidiaries (Org 2, 3, 4), each with their own virtual server, to be able to log in to the web application. In addition, each Org has protected applications to which only its users should have access. Using sharing and realms, Org 1 can share the web application with other organizations while restricting access to other auth nodes to its own users.
An account’s auth node can be shared with an external user (account manager) only if it is within the external user account’s scope.
It is not possible to share an auth node of a subscriber account with any other virtual server. Subscriber accounts under the same parent account (service provider) can share an auth node only if the auth node is added to the parent account.
-
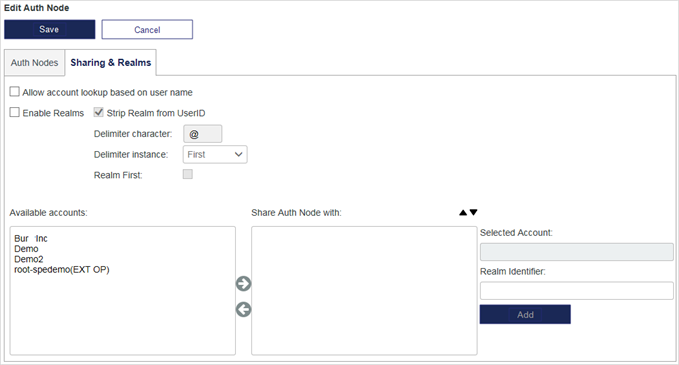
On the STA Token Management console, select Comms > Auth Nodes > Edit Auth Node > Sharing & Realms.
-
Configure the options as required:
-
Allow account lookup based on user name: The submitted user ID will be used to authenticate the user. The virtual server will search the Shared Auth Node list in descending order. The first matching user ID is used to authenticate the user. Use the up and down arrows to move a selected realm up or down in the priority list. Effectively, this means that all user IDs must be unique across all realms.
-
Enable Realms: Use this option where user IDs may not be unique across all realms. If enabled, additional user ID information will be used to determine to which realm the user belongs. Typically, the user ID will be an email address. Use this feature in conjunction with the Selected Account and Realm Identifier options.
-
Strip Realm from UserID: Strips all data starting with the delimiter character from the user ID. This allows a submitted user ID, such as an email address (UserID@myco.com), to be authenticated as the UserID.
-
Delimiter character—Character that separates a username from a realm name (for example, @). Typically, @ is used when the realm is on the right (user@domain.com<), while \ is used when the realm is on the left (DOMAIN\user).
-
Delimiter Instance: Specifies where to split up when multiple delimiter characters are present. Uses the first instance of the delimiter (left to right) or the last instance of the delimiter (right to left). In the example user@realm1@realm2:
-
Split at First delimiter instance: user | realm1@realm2
-
Split at Last delimiter instance: user@realm1 | realm2
-
-
Realm First: Specifies which part of the string is the realm versus the user ID, after splitting at the delimiter character. In the DOMAIN\user example, the delimiter character is \. When Realm First is enabled, user is sent, and when Realm First is disabled DOMAIN is sent.
-
Selected Account: Specifies the particular account.
-
Realm Identifier: Specifies the particular realm. You can define only one realm identifier for a given account on a single auth node.
-
-
Select Save.