
SAML applications
You can configure STA as the identity provider (IdP) that provides authentication services for your SAML application service providers, such as Google Apps, Salesforce, or Box.net.
To be suitable for SAML integration in STA, the applications should be web-based. At a minimum, the applications must offer web-based user login initiation, and redirection or response endpoints.
When a user accesses a SAML application through STA, they are in a STA single sign-on (SSO) session for applications. This SSO session is bound by the same SSO timeout rules as any other SSO sessions.
If your configuration includes SAML applications on the STA Token Management console in Comms > SAML Service Providers, they will continue to use the legacy IdP technology. It is strongly recommended that you migrate the SAML applications to Applications on the STA Access Management console to take advantage of advanced IdP technology. In this case, you must update the Service Provider side of the application to refer to the metadata or IdP links and certificate provided when you configure the application on the Applications tab.
About application templates
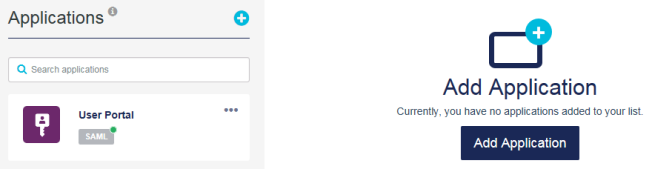
You set up and manage your SAML integrations on the Applications tab.
STA includes templates that you use to add and configure a SAML application.
-
Approved templates are based on a review of publicly available documentation, but are untested. Support for approved templates is provided on a best-effort basis.
-
Verified templates are based on lab-testing of the integration and are fully supported. Verified templates are distinguished by the shield
 icon that displays next to them in the template list.
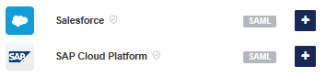
Most templates include the configuration options that the service provider requires, as well as application-specific instructions.
If there is no template for your application, use the generic template. For example, you can use the generic template to integrate custom SAML applications. The generic template includes advanced configuration settings to allow you to integrate a broad range of SAML applications.
Configure an application
After you add an application, you configure it so that your users can access it through STA. First, you go to the SAML service provider and configure it to use STA as the IdP. Then, you configure STA to authenticate the application. Finally, you assign the application to users and groups.
To add a SAML application, complete the following steps:
-
(Optional) Advanced configuration settings.
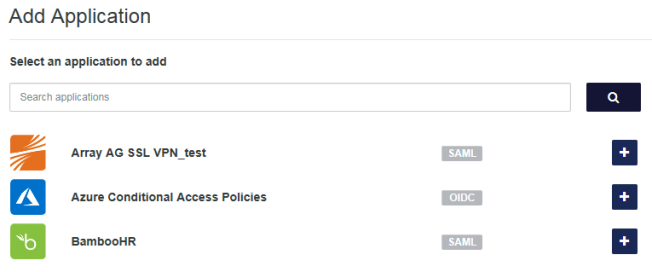
Select an application template
You can view the list of integration templates and find help for each template in the Thales Application Catalog.
-
On the STA Access Management console, select the Applications tab.
-
Select Add Application.
The Add Application dialog box lists all of the application templates and indicates the application type, such as SAML or agent.
-
Select the application that you want to add.
-
To change the application name, edit the name in the Display Name field.
This is the name that is displayed in the list of applications.
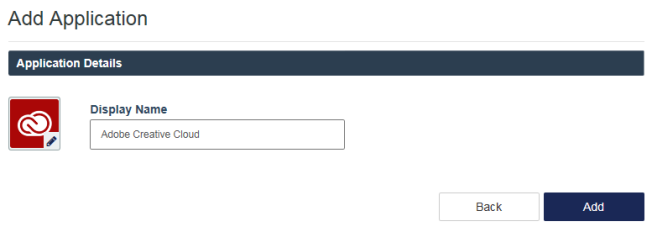
You can replace the system-generated application icon with a custom icon.
-
Select Add.
The application is added in the inactive state.
Note
If this is the first SAML application that you have added, setup instructions are displayed. The instructions explain that the first step is to configure the SAML service provider to use STA as the IdP, and the next step is to configure the application in STA.
Click the next
 icon, and then click Begin Setup.
The Configure tab displays the options for configuring the application. You need to configure the application to activate it.
Configure the SAML service provider
You need to go to the service provider and configure STA as the identity provider for the application. Before you can perform the configuration, you need to gather some information from STA and use that information to configure the SAML service provider.
STA provides two options for gathering the configuration information:
-
Manual configuration: If the SAML service provider doesn't allow you to upload a metadata file, you can manually gather the information from STA, and then use that information to configure the service provider.
-
Metadata configuration: Download a metadata file in XML format, and then upload that file for the SAML service provider.
When you add an application, the Configure tab displays the configuration mode that best matches the application service provider's requirements. Some SAML service providers do not provide a metadata file, and instead provide only their entity ID and location (essentially the resource that is being accessed). In these cases, STA displays only the manual configuration option. If the SAML service provider supports both configuration modes, you can switch between manual and metadata configuration.
The configuration details are different for each application. For application-specific details, refer to the instructions in STA.
Configure the SAML service provider manually
Many applications display the manual configuration option by default. For example, if the service provider doesn't support importing a metadata file, you can manually gather the information from STA, and then use that information to configure the application.
-
If the metadata configuration mode is displayed, click Switch to Manual Configuration.
-
Click the link to display detailed instructions.
The application-specific instructions open in a new browser tab, so that you can refer to them while you configure the application.
-
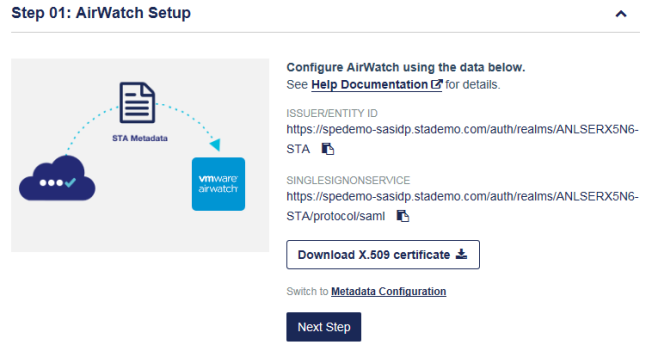
Go to the SAML service provider, and complete the steps in the [application name] Setup section of the instructions.
Use the information on the STA Step 01: [application name] Setup screen as described in the instructions:
-
Copy the ISSUER/ENTITY ID.
-
Copy the SINGLESIGNONSERVICE.
-
Click Download X.509 certificate.
-
-
On the STA Step 01: [application name] Setup screen, click Next Step.
The Step 02: STA Setup screen opens and displays the options for configuring the application in STA.
Configure the SAML service provider using metadata
If the service provider supports it, you can download the metadata file in XML format and then upload that file in the SAML application. Using a metadata file is simpler than configuring an application manually, and avoids typos or copy and paste errors.
If the service provider doesn't support uploading the metadata, see Configure the SAML service provider manually.
-
If the manual configuration mode is displayed, click Switch to Metadata Configuration.
-
Click Download metadata file and save the file.
STA saves its metadata file in your Downloads folder. You can later import this file into the SAML service provider (if the SP supports the import option) or use the manual settings.
-
Click the link to display detailed instructions.
The application-specific instructions open in a new browser tab, so that you can refer to them while you configure the application.
-
Go to the service provider's application. Upload the metadata file and complete any additional configuration steps that are described in the [application name] Setup section of the instructions.
-
On the STAStep 01: [application name] Setup screen, click Next Step.
The Step 02: STA Setup screen opens and displays the options for configuring the application in STA.
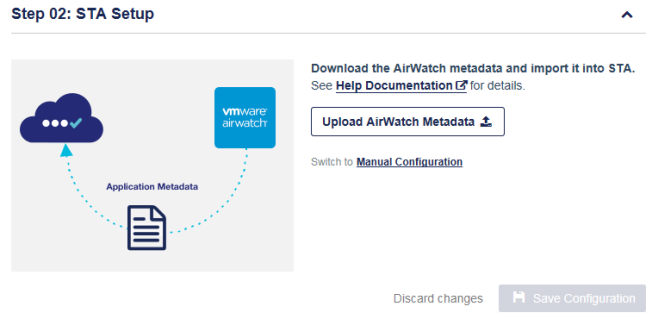
Configure the application in STA
To configure the application in STA, you need to gather information from the application service provider and enter the information in STA.
Depending on the SAML service provider's requirements, there are two ways to configure an application in STA:
-
Manual configuration: Each application can have different configuration options, and includes application-specific instructions.
-
Metadata configuration: You download a metadata file (XML) from the SAML service provider and then upload that metadata file in STA. Uploading the metadata file is simpler and faster than manual configuration. However, some service providers don't provide a metadata file.
When the SAML service provider supports uploading a metadata file from the application, then STA also offers the manual configuration option. The metadata option is displayed only if the SAML service provider supports it.
Metadata configuration with the option to switch to manual configuration
Manual configuration with an option to upload the metadata file
In STA, the Configure tab displays the configuration option that best matches the application service provider's requirements.
-
To view application-specific instructions, click the Help Documentation link.
The instructions open in a new browser tab, so that you can refer to them while you configure the application.
-
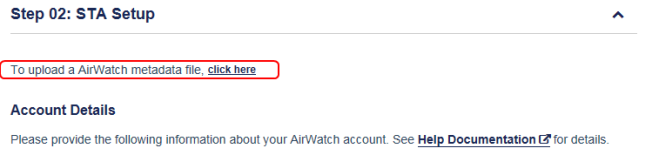
For Metadata Configuration, do the following:
-
Download the metadata file from the application service provider.
-
In the Step 02: STA Setup options, click the link to upload the metadata file.
-
Upload the file that you downloaded from the application.
The system extracts the metadata properties, and displays them in the Account Details. The application template that you selected defines whether you can edit the Account Details or upload a new metadata file.
-
-
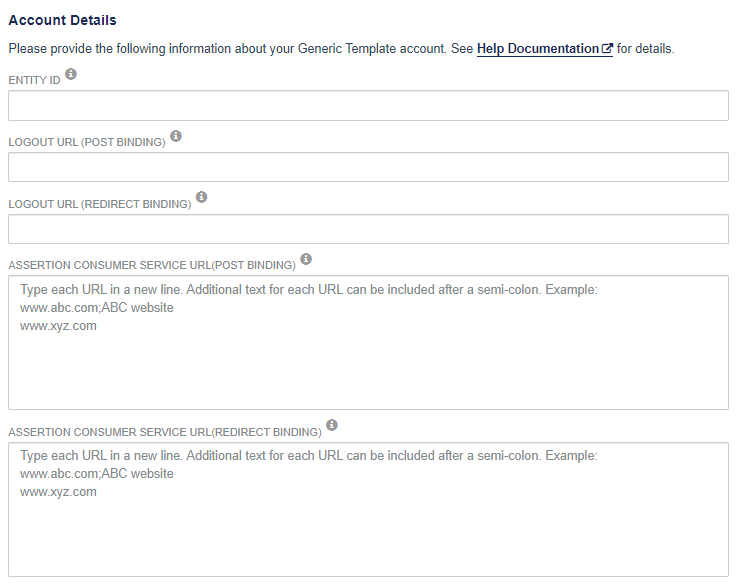
For Manual Configuration, in the Account Details section, enter the metadata information from the application.
You can configure multiple assertion consumer service (ACS) URLs for a single SAML application.
-
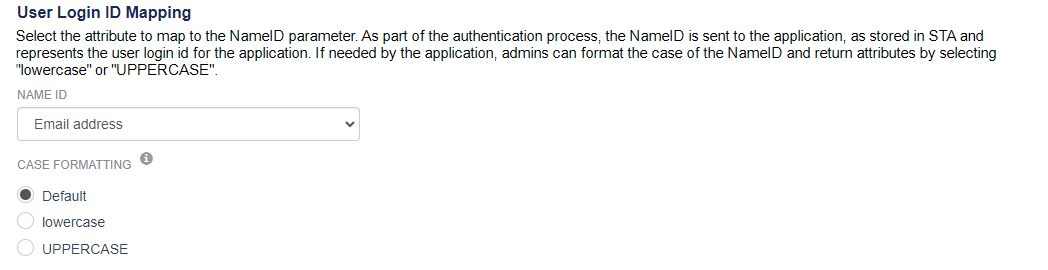
In the User Login ID Mapping section:
-
Select the attribute to map to the NAME ID parameter.
The STA IdP sends the name ID to the SAML service provider as the user's login ID.
The name ID is part of the SAML assertion, which is the response from the IdP to the application service provider. It contains a Name ID tag, which is the user name to use in the application. It must be mapped to a user attribute in the STA IdP because each application service provider uses different user names. The most common user names are User ID, UPN, and Email address.
-
Select the CASE FORMATTING to apply to the value sent in the SAML assertion.
- Default: The NAMEID and RETURN ATTRIBUTES sent in the SAML assertion will be exactly as stored in SafeNet Trusted Access. For example, if the original value is SafeNet_User1, then the SAML assertion sent will be SafeNet_User1.
- lowercase: The NAMEID and RETURN ATTRIBUTES sent in the SAML assertion will be entirely in lowercase. For example, if the original value is SafeNet_User1, then the SAML assertion sent will be safenet_user1.
- UPPERCASE: The NAMEID and RETURN ATTRIBUTES sent in the SAML assertion will be entirely in uppercase. For example, if the original value is SafeNet_User1, then the SAML assertion sent will be SAFENET_USER1.
Applications that were previously configured without this functionality do not support case formatting but can be reconfigured using the generic template to support case formatting.
-
-
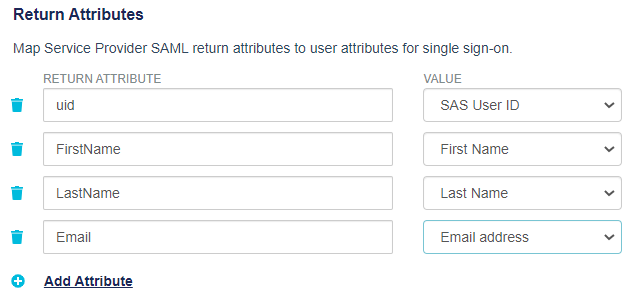
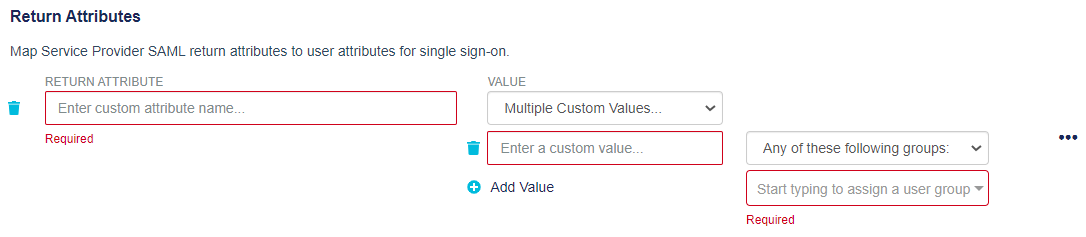
If the application uses Return Attributes, map each attribute to a Value.
Return attributes authorize the user based on the attribute values.
-
To add a return attribute, click Add Attribute. Type the Return Attribute name and select a Value.
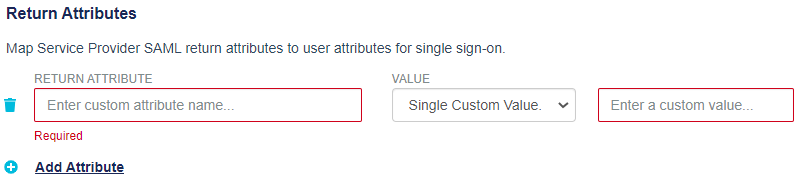
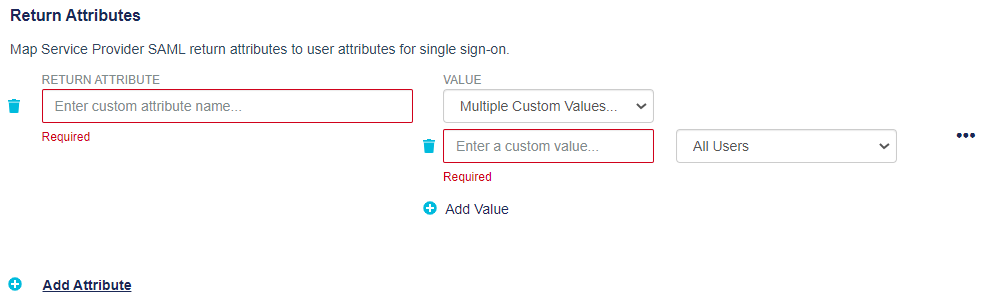
If the User Attribute that you need is not in the list, you can add a custom value. Custom attributes can have either a single value or multiple values:
-
Single Custom Value: In the Value list, select Single Custom Value and enter the value.
-
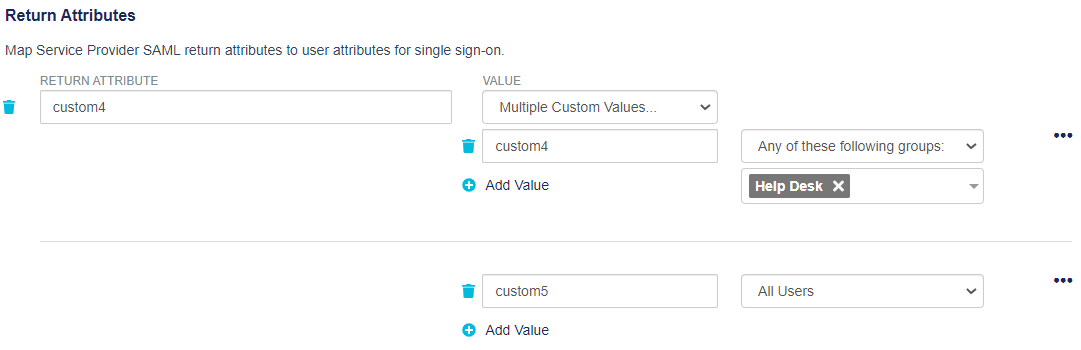
Multiple Custom Values: In the Value list, select Multiple Custom Values. By default, the values apply to all users. However, you can also set the scope of a set of values to specific user groups. A return attribute can have multiple group-scoped sets of values. For example, for the same return attribute, you can have one set of values that applies to groupA and groupB, while another set of values applies to groupC.
-
Enter the custom value.
-
To add another value, select Add Value and enter the value.
-
To set the scope for a set of values, select Any of these following groups and then select the groups.
-
To add another set of values, select the menu next to the value, and then select Add New Set.
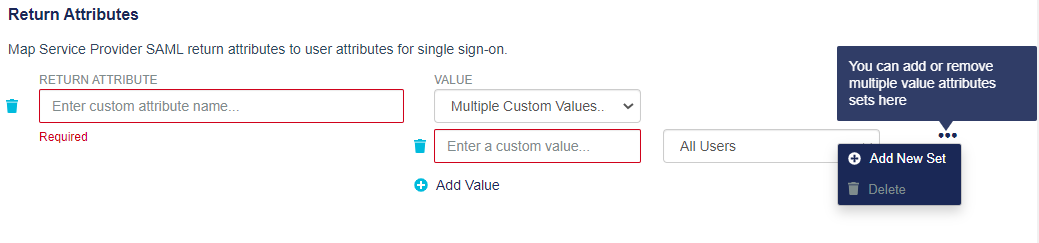
You can add multiple sets of values, where each set has multiple values.
-
-
-
Configure the Advanced Settings and User Portal Settings. For descriptions of the settings, see Advanced configuration settings.
-
Click Save Configuration.
The application is now active and available to be assigned to groups and users.
After you save the application, you can upload new metadata. For some applications, you can also edit the information.
Assign the application to users and groups
You assign an application to users to grant those users with the authorization to access the application. If an application is not assigned to a user, then STA blocks access to the application.
You can assign an application to all users or to specific user groups. An individual user can access the applications that are assigned to all users, or to groups that they are a member of.
If a user is authorized to access an application, the STA authentication flow that is dictated by the applicable policy, scenario, and state of the Single Sign-On (SSO) session applies.
Ensure that users who need access to web applications can use single sign-on (SSO).
-
On the STA Access Management console, select the Applications tab.
-
In the Applications list, select the application.
-
In the application details panel, click the Assign tab.
-
Under Assign to Users, select one of the options:
-
No users (Default)
-
All users
-
Users from any of these user groups: Enter the group names in the text box.
-
-
Click Save Configuration.
An Application Assignment entry is added to the audit log each time an application assignment is saved.
Advanced configuration settings
The advanced configuration settings are visible only when you configure an application manually. Only the settings that apply to the application are displayed. The generic template includes the full list of advanced configuration settings.
Some applications support optional, advanced IdP settings that you can configure to fine-tune the IdP parameters for your SAML integration. For example, you can use these advanced settings to adapt the generic template for a custom application.
You can configure the options in the Advanced Settings section to match the settings from the SAML service provider:
| Setting | Description | Options |
|---|---|---|
| NAME ID FORMAT | The format of the NameID element which is mapped to the SP username. |
|
| ENFORCE USER NAME | The SP can predefine the username displayed on the IdP login page if the username is included in the NameID element of the Subject tag within the authentication request. |
|
| SIGNATURE ALGORITHM | The algorithm used to sign SAML responses. |
|
| AUTHENTICATION REQUEST SIGNATURE VALIDATION | SAML AuthN requests are usually signed by the SP. This setting governs whether or not signature validation should be enforced. The "Verify request signature" option is recommended so as to ensure that STA IdP processes authentication requests from a trusted source only. |
|
| ASSERTION ENCRYPTION | SAML assertions contained in an IdP response can be encrypted using the Client public key if: i) encryption is supported and ii) an encryption certificate is available. |
|
| RESPONSE SIGNING | STA IdP can sign the complete response, the assertion contained in the response, or both. Signing the complete response is sufficient but some SPs may require different configurations. |
|
| BINDING PROTOCOL | The protocol which is used to submit the IdP response. Post Binding is not restricted in length. The bindings which are available depend on the SP. |
|
| GROUP RETURN ATTRIBUTE FORMAT | The format of the user assigned group return attribute. |
|
| SIGNATURE KEY NAME | STA IdP can provide a certificate hint to enable the SP to identify the key used to sign a SAML response. |
|
| IDP INITIATED SSO RELAY STATE | The value that the system sends in the SAML assertion response to the SP. This field is available for templates that support the IdP-initiated flow. | |
LOGOUT CHANNEL |
When a user logs out of an application in their SSO session, all of the applications in the session are logged out. Choose one of the following channels to implement the logout request:
If in doubt, select Back to ensure that the SSO session is terminated. If the SP does not support back channel logout, or is not reachable by the IdP, this error is ignored. |
|
User portal settings
Use the following options for the user portal to match the settings of the service provider:
| Setting | Description | Options |
|---|---|---|
| FEDERATION MODE | The access request message flow between the SP and the IdP that the system uses when a user initiates access to the application from the User Portal. If the application supports both flows, the system uses the IdP-initiated flow. |
|
| SERVICE LOGIN URL | The URL that the system uses to access the application when a user initiates access from the User Portal in an SP-initiated flow. This field is available for the generic template and for application templates that do not support the IdP-initiated flow. |