
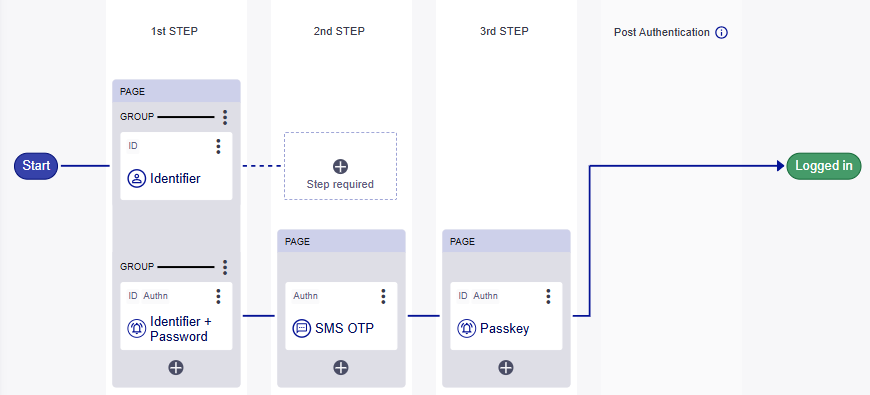
Design your login flows
You can design login flows that range from simple to complex; with conditions, multiple branches, and/or post-authentication steps.
After you design a login flow, you configure how to initiate it, such as by making it the default login flow.
You can also export and import login flows to back them up, migrate them to other environments, or restore to a previous version.
Login flow states
Login flows have two states:
-
Unpublished: Unpublished login flows are not available for user authentication. They include draft or saved login flows.
-
Published: Published login flows are available for user authentication. You can publish a login flow only if all paths in the flow meet both the identification and authentication requirements along the path connecting Start and Logged in.
When you publish a login flow, it immediately takes effect in production. After you publish a login flow, you must publish all subsequent updates to the login flow before you can save it.
Assurance levels
For the authentication options, the assurance level reflects the degree or trust or assurance in the authentication that is performed. It is a measure of the confidence in and the strength of an authentication mechanism and its issuing process. A higher assurance level reduces the risk of a fraudulent identity gaining access.
Applications can specify the assurance level that users must attain before access is granted. You can set the assurance level that each authentication step in a login flow provides. When a user successfully authenticates with the authentication method for that step, the assurance level is updated to that level.
When you add an authentication method to a login flow, you can select the assurance level that the user achieves after they complete that step.
The OneWelcome Identity Platform returns only the assurance level that the application requests, even if the authentication step in the login flow provides the highest assurance level. This is because the OneWelcome Identity Platform doesn't provide an assurance level that is more powerful than needed, in accordance with the principle of least privilege. The assurance level that the authentication method provides is stored in the session for future single sign-on (SSO), in case a higher level is requested later.
You can customize the assurance levels that are available to select in login flows. To configure the assurance levels, use the Access configuration and end user APIs. Each assurance level has an ID, a name, and a value.
Add a login flow
-
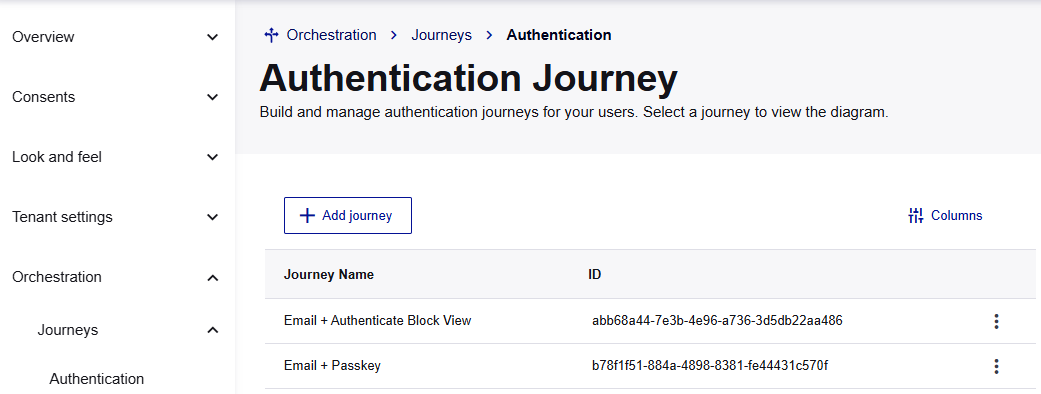
On the OneWelcome Identity Platform console, select Core flows > Login flows*.
The Login flows page lists the existing flows.
-
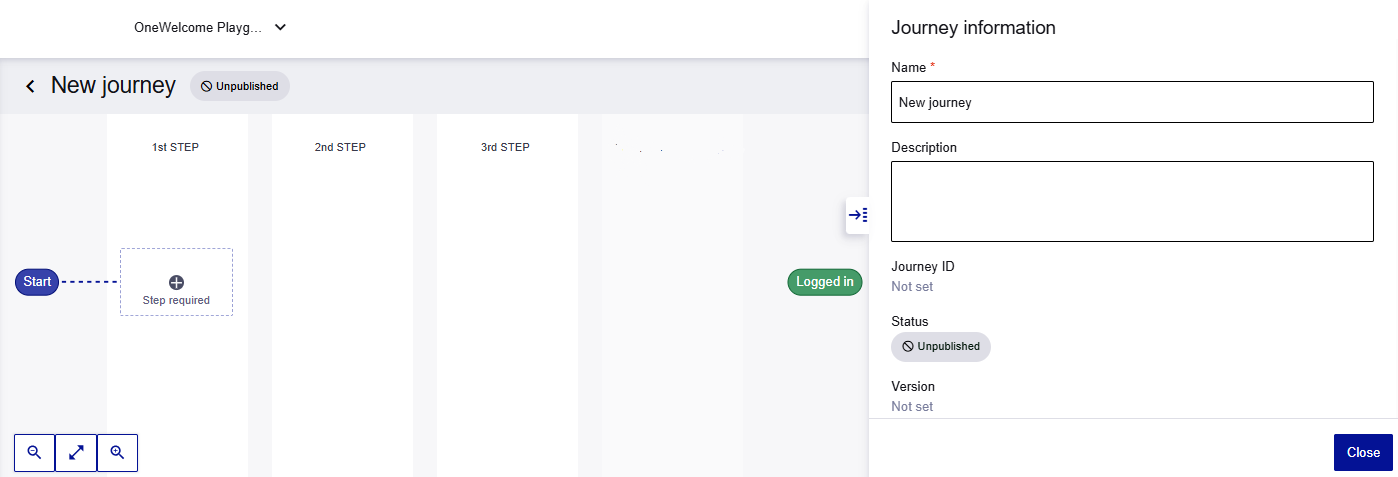
Select Add flow.
A new, blank, unpublished login flow opens in the flow editor.
-
In the side sheet on the right, under Journey information, enter a Name and (optional) Description. To close the side sheet, select Close.
-
To save your progress, select Save.
Saving the login flow means that it remains unpublished, and you can continue to make changes before publishing it.
After you save, if you make changes that you don't want, select Discard to revert to the last saved version.
-
To make the login flow live in production where users can access it, select Publish. Any subsequent updates must be published.
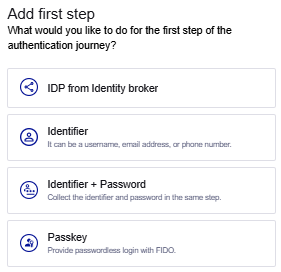
Add user identification
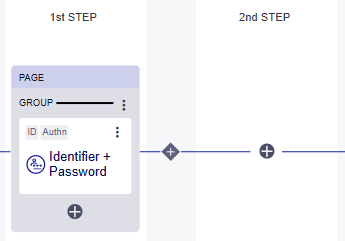
The first step in a login flow allows the user to provide their identification. All identification options except Identifier also provide authentication.
-
In the Identification column, select the plus sign in the Step required block.
The side sheet on the right slides open and shows the Identification options.
-
In this side sheet, select an identification option in the login flow:
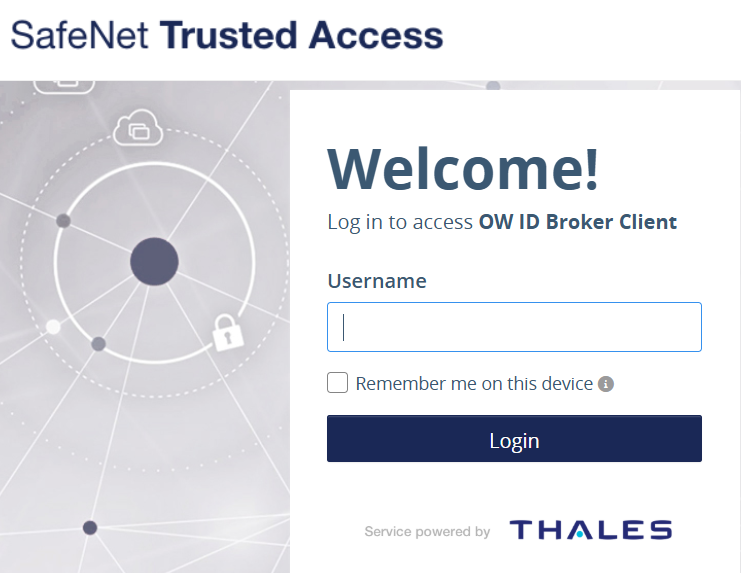
IDP from Identity Broker
Federate with social or general identity providers (IDP)that you configured in the identity broker. You can add multiple instances of the IDP from Identity Broker for different IDPs, such as SafeNet Trusted Access, Facebook, or Google.
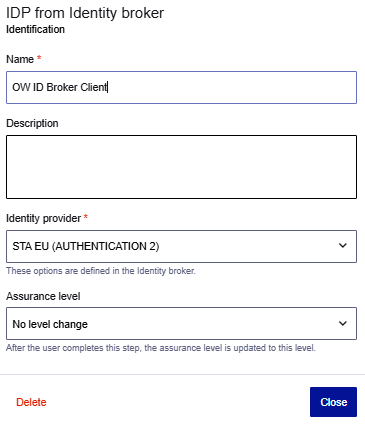

Enter the IDP information:
- Name: Enter a name for the IDP that is configured in the identity broker. This name is used on both the flow editor and the user login screen, such as Log in with Facebook or Sign in with Google.
- Description (optional)
- Identity provider: Lists all of the IDPs that you configured in the identity broker.
- Assurance level: Lists the authentication assurance levels that are configured using the Access configuration and end user APIs. Web clients or applications can request that users meet a specific authentication assurance level.
Identifier
Prompt users to provide a unique identifier, which can be either their username, email address, or phone number. This identifier is used to look up and verify the user's account information in the system.

Enter the identifier information:
- Name: The name is used on the flow editor.
- Description (optional)
- User attribute: The options are Username, Email, and Phone number.
- Account registration link: The link uses this formula
https://{{idp_base_url}}/{{brand}}/registration/, but you can override it if necessary. The default link points to the registration flow. The system resolves the placeholders in the link. If left empty, the link is not displayed to users.
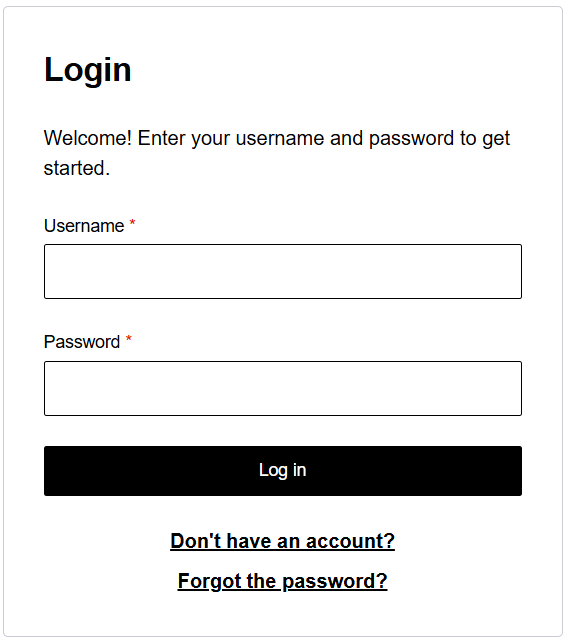
Identifier + Password
Prompt the user to first provide their unique identifier, such as a username, email, or phone number, to locate their account in the system, and then provide their password to authenticate.
This option includes both identification and authentication in one step, which means that you don't necessarily need an additional step for authentication.
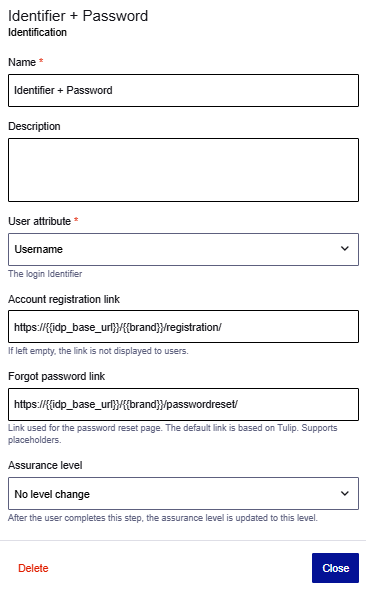
Enter the identifier and password information:
-
Name: This name is used on the flow editor.
-
Description (optional)
-
User attribute: The options are Username, Email, and Phone number.
-
Account registration link: The link uses this formula
https://{{idp_base_url}}/{{brand}}/registration/, but you can override it if necessary. The default link points to the registration flow. The system resolves the placeholders in the link. If left empty, the link is not displayed to users. -
Forgot password link: The link uses this formula
https://{{idp_base_url}}/{{brand}}/passwordreset/, but you can override it if necessary. The default link points to the password reset flow. The system resolves the placeholders in the link. If left empty, the link is not displayed to users. -
Assurance level: Lists the authentication assurance levels that are configured using the Access configuration and end user APIs. Web clients or applications can request that users meet a specific authentication assurance level.
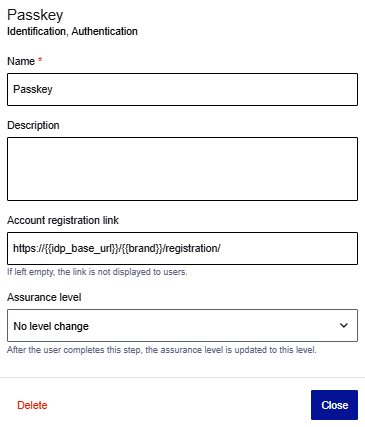
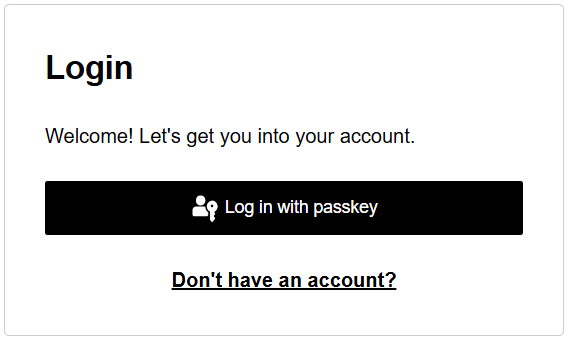
Passkey
Generate a challenge and prompt users to provide their passkey authenticator to sign the challenge. The signed challenge is then verified. When necessary, the step also performs a user lookup to confirm the user's identity.
When passkey is used for the identification step, it is anonymous. This means that any compliant authenticator is accepted and the result is that you identify and authenticate the user.
Enter the passkey information:
-
Name: This name is used on both the flow editor and the user login page.
-
Description (optional)
-
Account registration link: The link uses this formula
https://{{idp_base_url}}/{{brand}}/registration/, but you can override it if necessary. The default link points to the registration flow. The system resolves the placeholders in the link. If left empty, the link is not displayed to users. -
Assurance level: Lists the authentication assurance levels that are configured using the Access configuration and end user APIs. Web clients or applications can request that users meet a specific authentication assurance level.
-
Save or Publish your changes.
Add user authentication
You can add one or two authentication steps to a login flow. Each authentication step can have multiple authentication options. If you add conditions, you need to add an authentication for each branch that the condition creates.
-
In an Authentication column, select the Step required plus sign.
The side sheet on the right slides open and shows the Add authentication options.
-
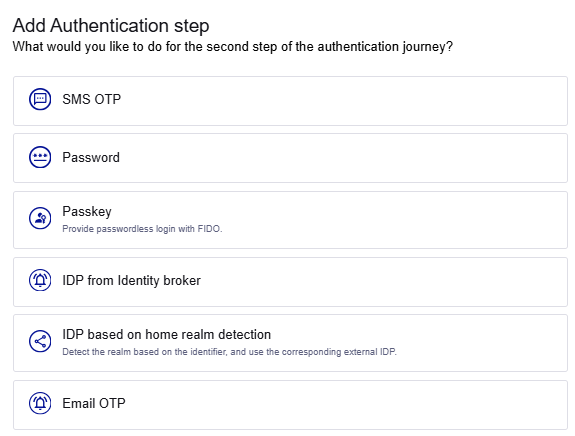
In this side sheet, select an authentication option in the login flow:
IDP from Identity Broker based on home realm detection
Automatically detect the user's realm based on the provided identifier and forward the user to the appropriate external IDP for authentication. The realm is mapped to a specific IDP.
Includes only IDPs from the Identity Broker (does not include IDPs configured in the Core).
A login flow can include multiple home-realm detection steps.
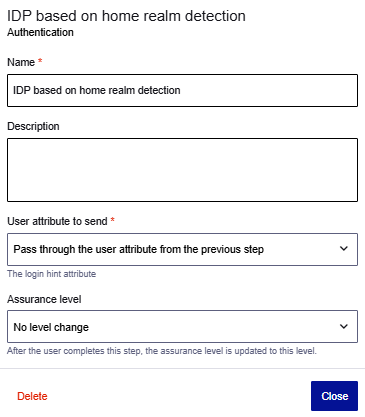
Enter the IDP information:
- Name:
- Description (optional)
-
Use attribute to send: All home-realm detection steps in a login flow must use the same lookup, or login hint, attribute.
-
Pass through the username attribute from the previous step: Forward whatever the user entered in the identifier step.
-
Primary Email Address: After looking up the user by identifier, the system forwards the contents of the email attribute to the external IDP. For example, you can look up by username but forward the email to the external IDP.
-
Username: After looking up the user by identifier, the system forwards the contents of the username attribute to the external IDP. For example, you can lookup by email but forward the username to the external IDP.
-
-
Assurance level: Lists the authentication assurance levels that are configured using the Access configuration and end user APIs. Web clients or applications can request that users meet a specific authentication assurance level.
IDP from Identity Broker
Federate with social or general identity providers that you configured in the identity broker. You can add multiple instances of the IDP from Identity Broker.
Enter the IDP information:
- Name: Enter a name for the IDP that is configured in the identity broker. This name is used on both the flow editor and the user login screen, such as Log in with Facebook or Sign in with Google.
- Description (optional)
- Identity provider: Lists all of the IDPs that you configured in the identity broker.
- Assurance level: Lists the authentication assurance levels that are configured using the Access configuration and end user APIs. Web clients or applications can request that users meet a specific authentication assurance level.
You can add multiple instances of the IDP from the identity broker to a group.
Passkey
Generate a challenge and prompt users to provide their passkey authenticator to sign the challenge. The signed challenge is then verified. When necessary, the step also performs a user lookup to confirm the user's identity.
When passkey is used for the 2nd or 3rd step, the list of allowed FIDO authenticators includes only the the authenticators that the user has enrolled.
Enter the passkey information:
-
Name
-
Description (optional)
-
Account registration link: The link uses this formula
https://{{idp_base_url}}/{{brand}}/registration/, but you can override it if necessary. The default link points to the registration flow. The system resolves the placeholders in the link. If left empty, the link is not displayed to users. -
Assurance level: Lists the authentication assurance levels that are configured using the Access configuration and end user APIs. Web clients or applications can request that users meet a specific authentication assurance level.
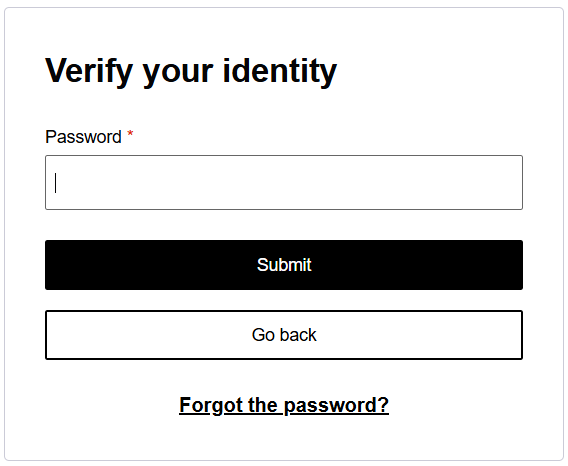
Password
Prompt the user to enter their password to confirm their identity. The password is verified to ensure that the user's credentials match the account information. The password step comes after the user identifier step, because the password needs to authenticate together with the username.
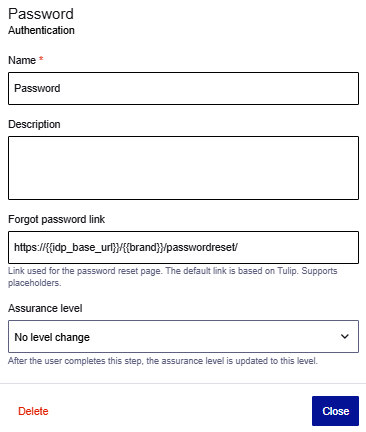
Enter the password information:
-
Name: This name is used on both the flow editor and the user login page.
-
Description (optional)
-
Forgot password link: The link uses this formula
https://{{idp_base_url}}/{{brand}}/passwordreset/, but you can override it if necessary. The default link points to the password reset flow. The system resolves the placeholders in the link. If left empty, the link is not displayed to users. -
Assurance level: Lists the authentication assurance levels that are configured using the Access configuration and end user APIs. Web clients or applications can request that users meet a specific authentication assurance level.
SMS OTP
Generate a unique, time-sensitive, single-use code and send it to the user's primary phone number by SMS. The user must enter this code into the login page to verify their identity and proceed. SMS OTP comes after a user identifier step, because it needs the user's account information to determine where to send the OTP code.

Enter the SMS OTP information:
-
Name: This name is used on both the flow editor and the user login page.
-
Description (optional)
-
Assurance level: Lists the authentication assurance levels that are configured using the Access configuration and end user APIs. Web clients or applications can request that users meet a specific authentication assurance level.
Email OTP
Generate a unique, time-sensitive, single-use code and send it to the user's email address. The user must enter this code into the login page to verify their identity and proceed. Email OTP comes after a user identifier step, because it needs the user's account information to determine where to send the OTP code.
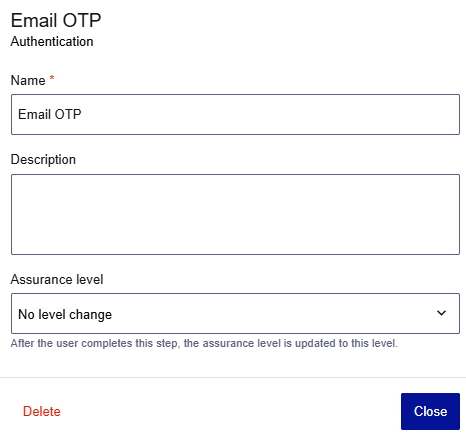
Enter the Email OTP information:
-
Name: This name is used on both the flow editor and the user login page.
-
Description (optional)
-
Assurance level: Lists the authentication assurance levels that are configured using the Access configuration and end user APIs. Web clients or applications can request that users meet a specific authentication assurance level.
TOTP
Generate a time-based, single-use code using an authenticator app such as MobilePASS+, Google Authenticator, or Microsoft Authenticator. The user must enter the code from the authenticator app to verify their identity and proceed. TOTP comes after a user identifier step, because it needs the user's account information.
Note
Users must have a TOTP authenticator enrolled before they can use this step. TOTP enrollment is performed outside of the login flow, by an administrator using the Tulip credential API.
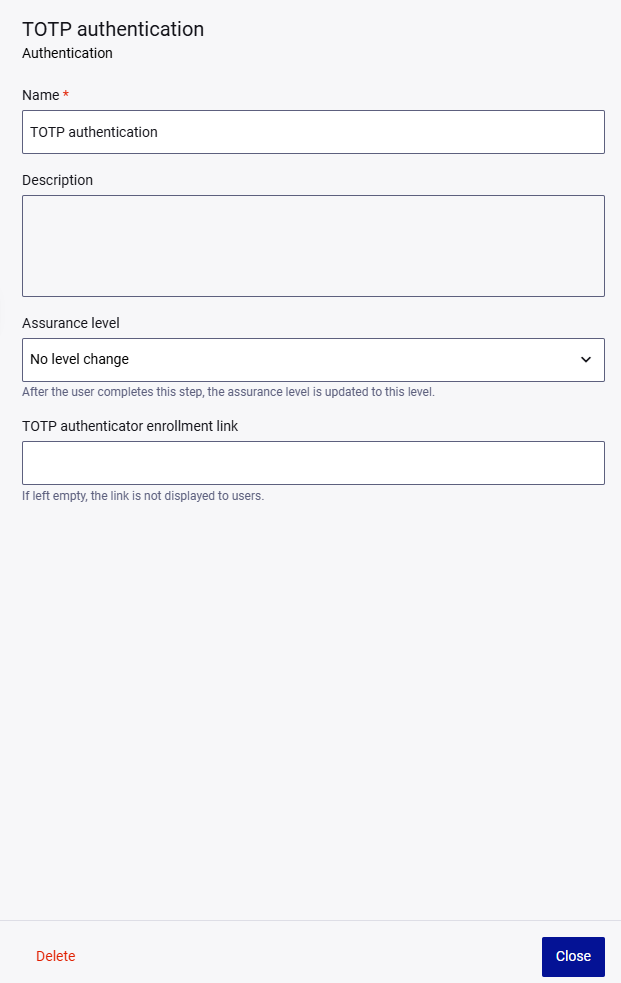
Enter the TOTP information:
-
Name: This name is used on both the flow editor and the user login page.
-
Description (optional)
-
Assurance level: Lists the authentication assurance levels that are configured using the Access configuration and end user APIs. Web clients or applications can request that users meet a specific authentication assurance level.
-
TOTP authenticator enrollment link: A link to a TOTP authenticator enrollment page for users who have not yet enrolled a TOTP authenticator. If left empty, the link is not displayed to users.
Recovery code
Prompt the user to enter one of their pre-issued, single-use recovery codes as a fallback authentication method. This is useful when a user cannot access their primary authenticator, such as a lost or unavailable TOTP device. Recovery code comes after a user identifier step, because it needs the user's account information to validate the code.
Note
Users must have recovery codes already issued before they can use this step. Recovery code generation, enrollment, regeneration, and status visibility are performed outside of the login flow and are not available to configure here.
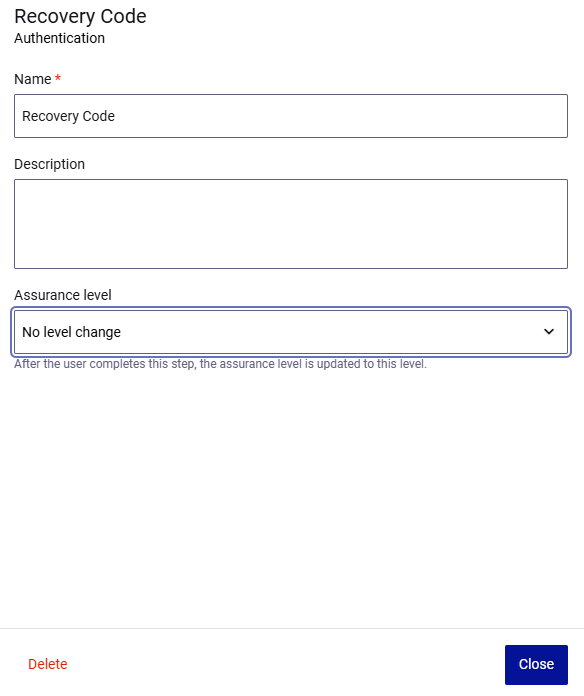
Enter the recovery code information:
-
Name: This name is used on both the flow editor and the user login page.
-
Description (optional)
-
Assurance level: Lists the authentication assurance levels that are configured using the Access configuration and end user APIs. Web clients or applications can request that users meet a specific authentication assurance level.
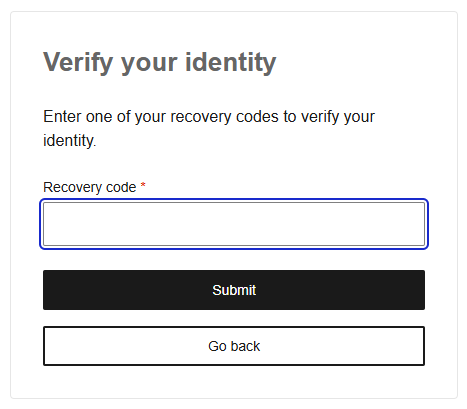
On the user login page, the user is shown a dedicated input field with the guidance text Enter one of your recovery codes. The field accepts alphanumeric characters with optional hyphens for readability. Hyphens are removed before the code is submitted. The expected code length is configurable per tenant, with a default of eight characters.
When the user submits a valid code, the code is consumed and cannot be reused, and the login flow advances to the next step. If the user enters an invalid code, exceeds the maximum number of attempts, or the identity becomes locked due to too many failed attempts, a clear error message is displayed so the user understands why authentication did not succeed.
This step is available in English, German, Spanish, French, Italian, and Dutch.
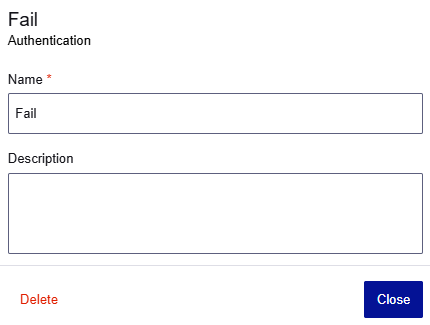
Fail
This option is available only for conditions. Select this option to Fail authentication and prevent users on this path from logging in.
-
Save or Publish your changes.
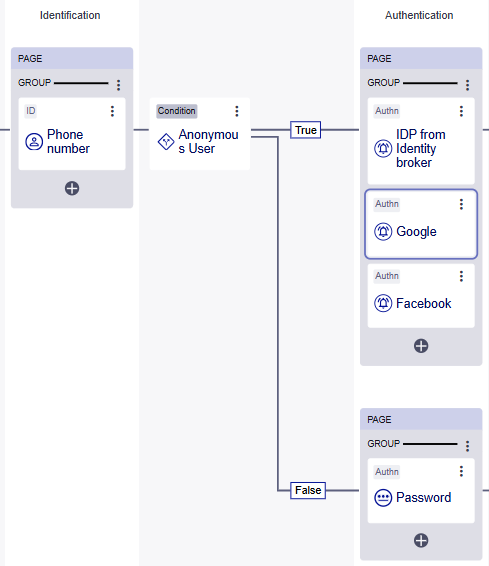
Add a condition
Add an optional condition between steps to modify the authentication requirements under different contexts. The conditions create branches on the path through a login flow, where each branch has different authentication requirements or methods. A condition can also have a branch that leads to authentication failure.
-
Select the plus sign between the columns where you want to add the condition.
-
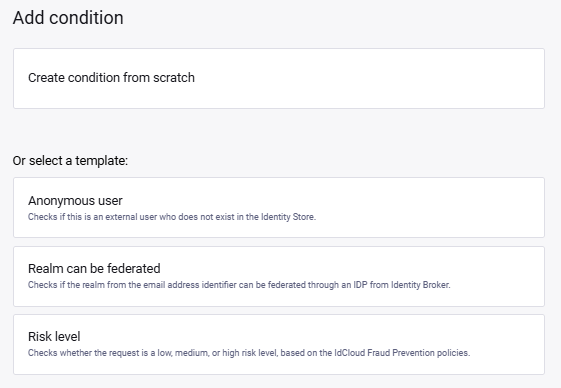
On the Add condition side sheet, choose how to create the condition:
-
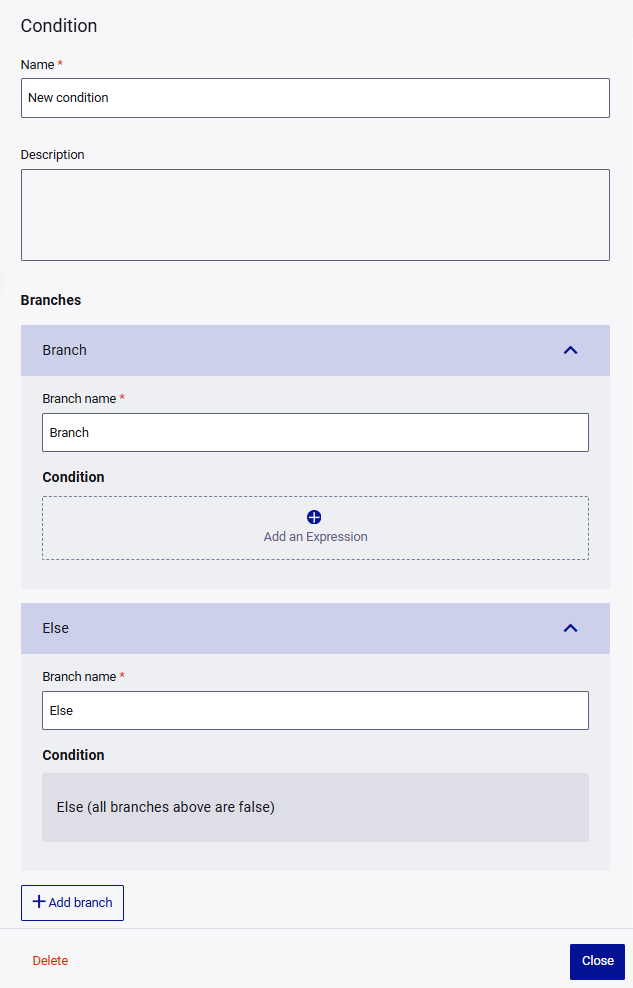
Create condition from scratch: Open the condition builder to create a custom condition with named branches and expressions.
-
Enter a Name and optional Description for the condition.
-
In the Branches section, configure the branches for the condition. By default, the condition includes one Branch and an Else branch.
-
To rename a branch, update the Branch name field.
-
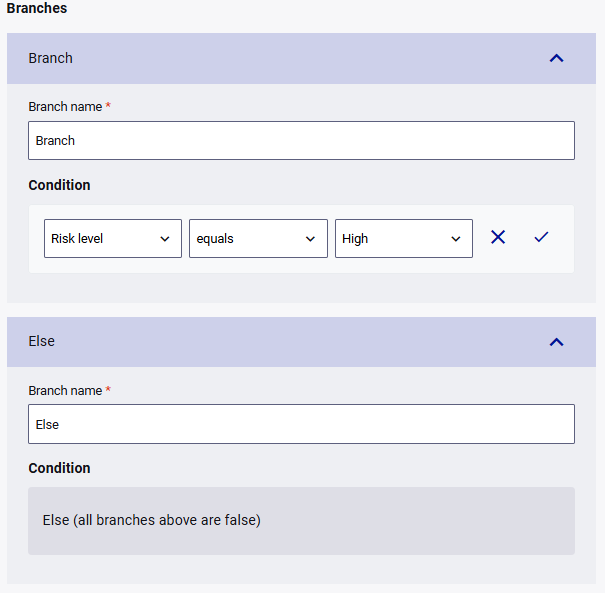
To add an expression to a branch, select Add an Expression. Select the variable, operator, and, if applicable, the value for the expression, and then confirm the expression.
The available variables are:
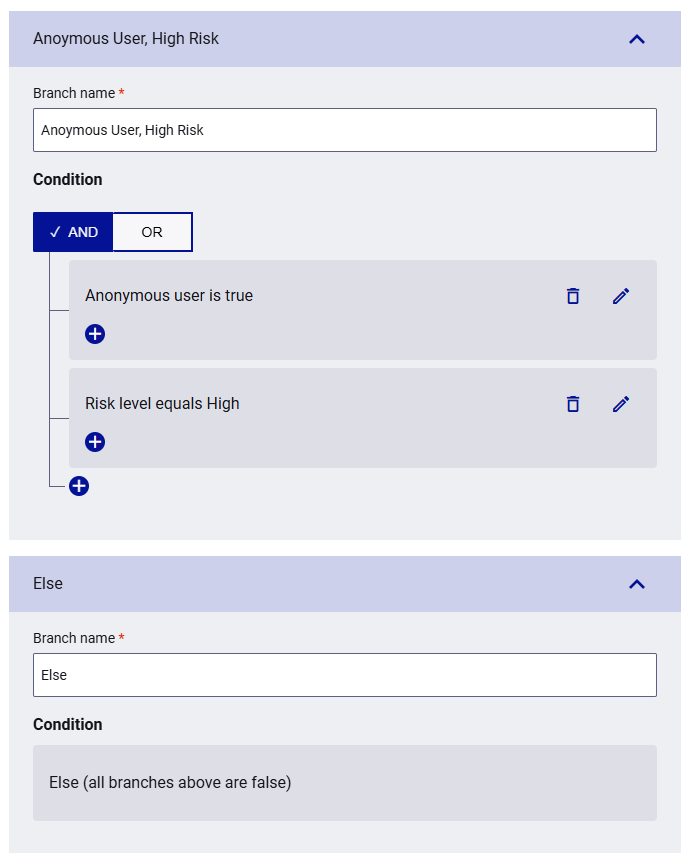
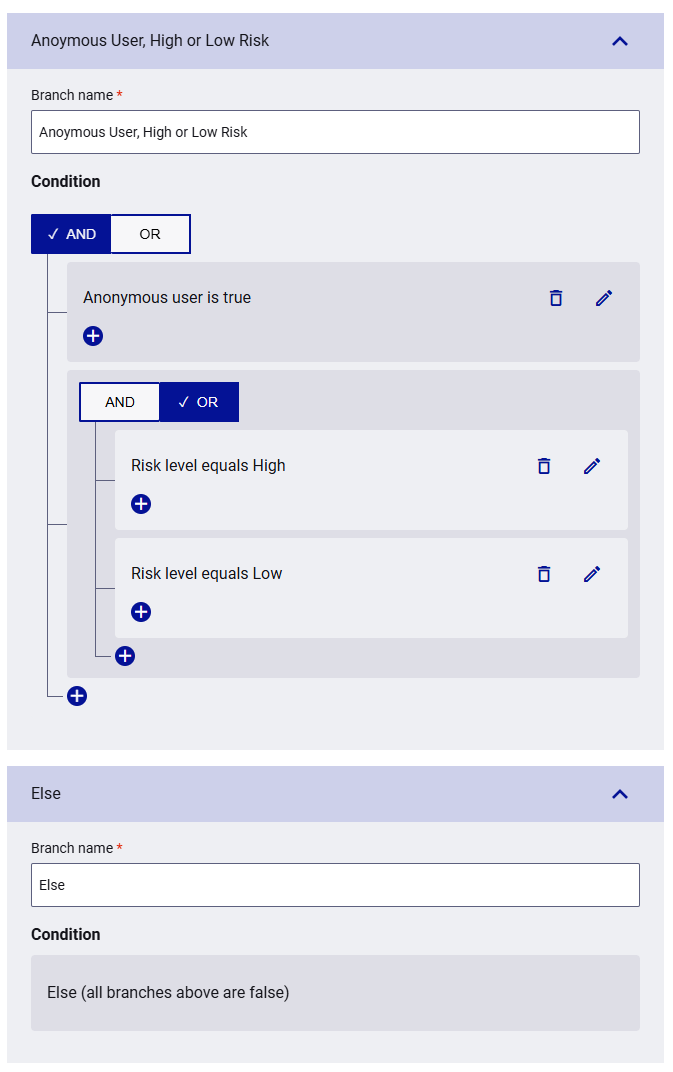
Variable Description Operators Values Anonymous user Whether the user is external and does not exist in the Identity Store. Adding this variable enables account enumeration, regardless of the account enumeration setting. is true, is false — Realm can be federated Whether the realm from the email address that the user provides can be federated through an identity provider (IDP) configured in the identity broker. is true, is false — Risk level The risk level of the authentication request based on the risk management policies. equals, does not equal High, Medium, Low -
To combine multiple expressions in a branch using logical operators, select Add condition group. This creates a group that you can join with AND or OR.
-
Select the logical operator (AND or OR) at the top of the group to control how the expressions in that group are combined.
-
AND means all expressions in the group must be true for the branch to be taken.
-
OR means at least one expression in the group must be true.
-
-
-
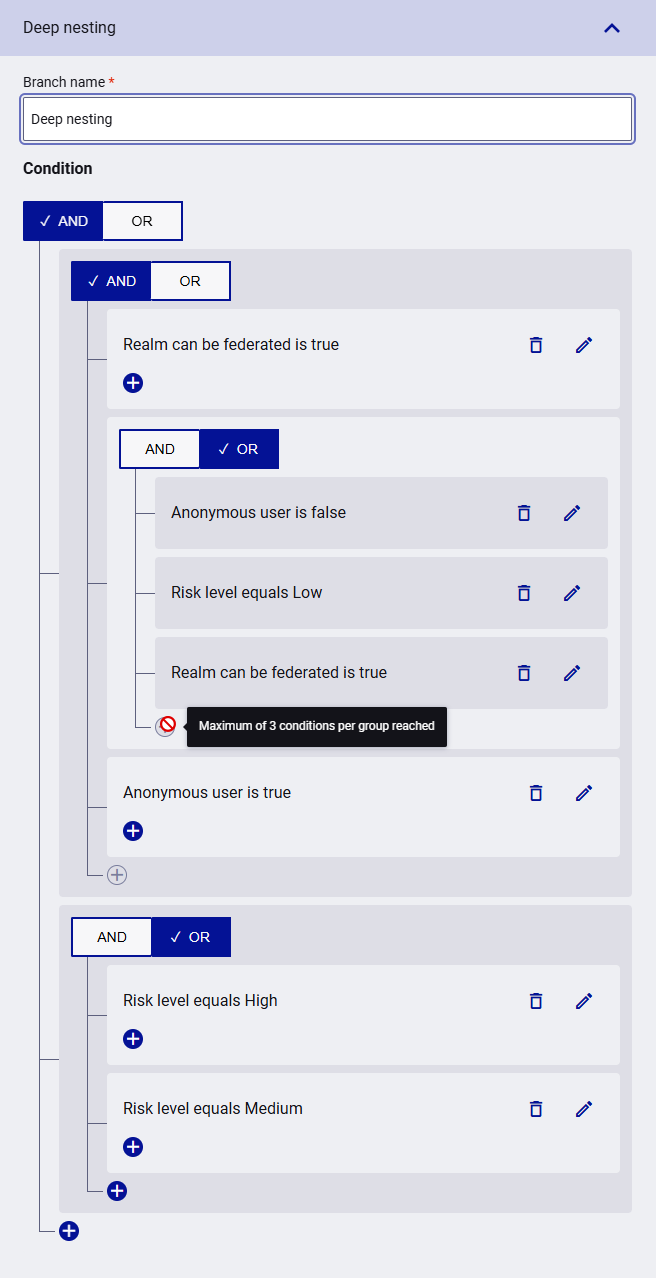
To nest a group within another group, select Nest into group on an existing expression or group. This creates an inner group that you can join with a different logical operator.
Note
Groups can be nested up to 3 levels deep, with a maximum of 3 conditions per group. The Add condition and Nest into group actions are automatically disabled when the limit is reached.
-
To add another branch, select + Add branch. The Else branch is always the last branch and applies when none of the other branch conditions are true.
-
-
For each branch, select the Step required plus sign and then select an authentication method.
The authentication methods are the same as for adding user authentication but there is an additional option to Fail authentication and prevent users on that branch from logging in.
-
Alternatively, you can select a template to create a condition with pre-configured branches:
-
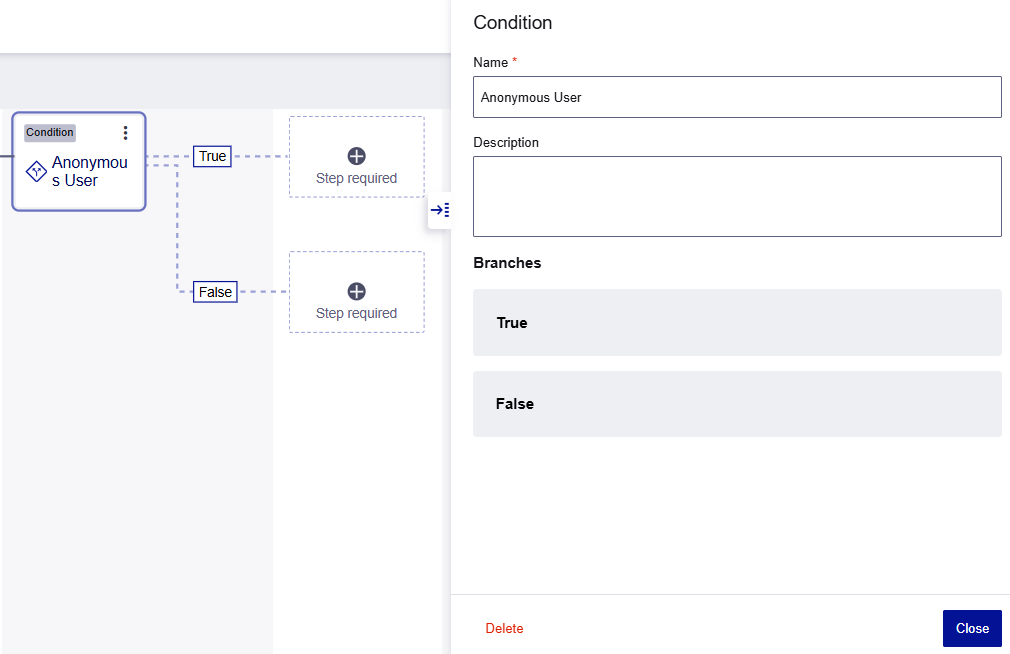
Anonymous user: This condition checks whether the user exists in the Identity Store. Adding this condition enables account enumeration, regardless of the account enumeration setting.
-
On the Condition side sheet, enter the Name and optional Description. The default name is Anonymous user.
The authentication methods for the condition's branches are the same as for adding user authentication but there is an additional option to Fail authentication and prevent users on a particular branch from logging in.
-
Select the Step required plus sign for the True branch and then select an authentication method to use when the user is external and does not exist in the Identity Store.
-
Select the Step required plus sign for the False branch and then select an authentication method.
-
-
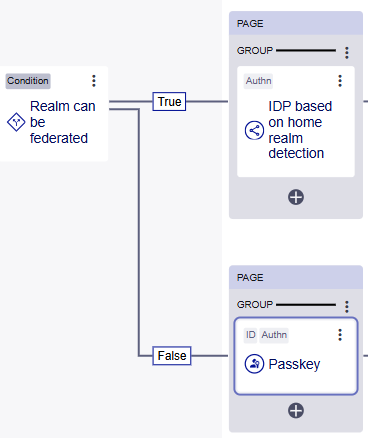
Realm can be federated: This condition is based on home realm detection. It checks whether the realm from the email address that the user provides can be federated through an identity provider (IDP) that you configured in the identity broker.
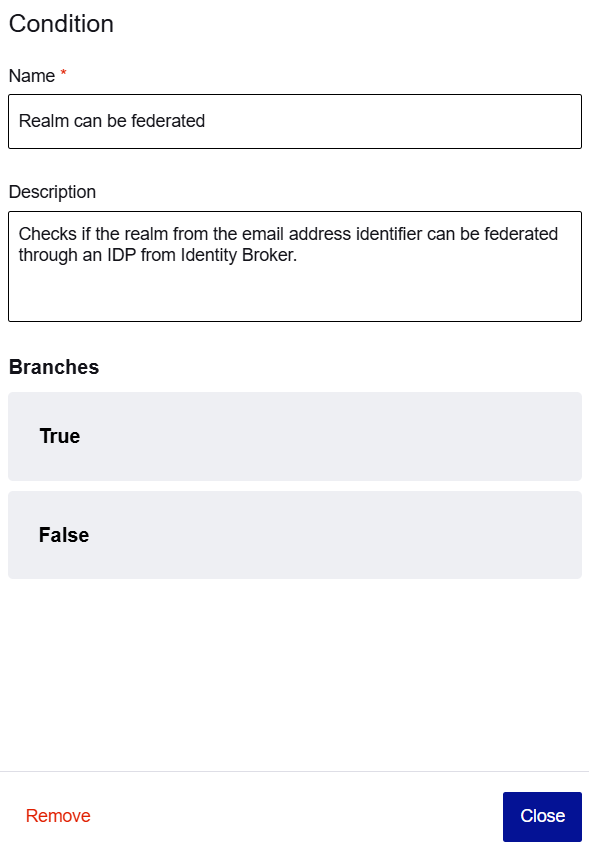
-
On the Condition side sheet, enter the Name and optional Description. The default name is Realm can be federated.
-
Select the Step required plus sign for the True branch and then select IDP from Identity Broker based on home realm detection.
-
Select the Step required plus sign for the False branch, and then select a different authentication method.
The options are the same as for adding user authentication but there is an additional option to Fail authentication and prevent users on this branch from logging in.
-
-
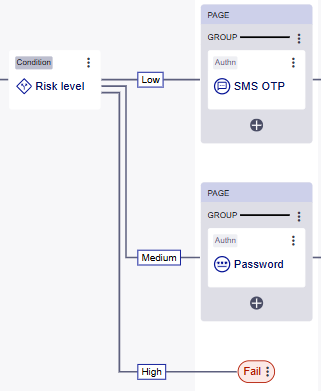
Risk level: This condition checks whether there is a low, medium, or high risk level based on the risk management policies. It creates Low, Medium, and High branches.
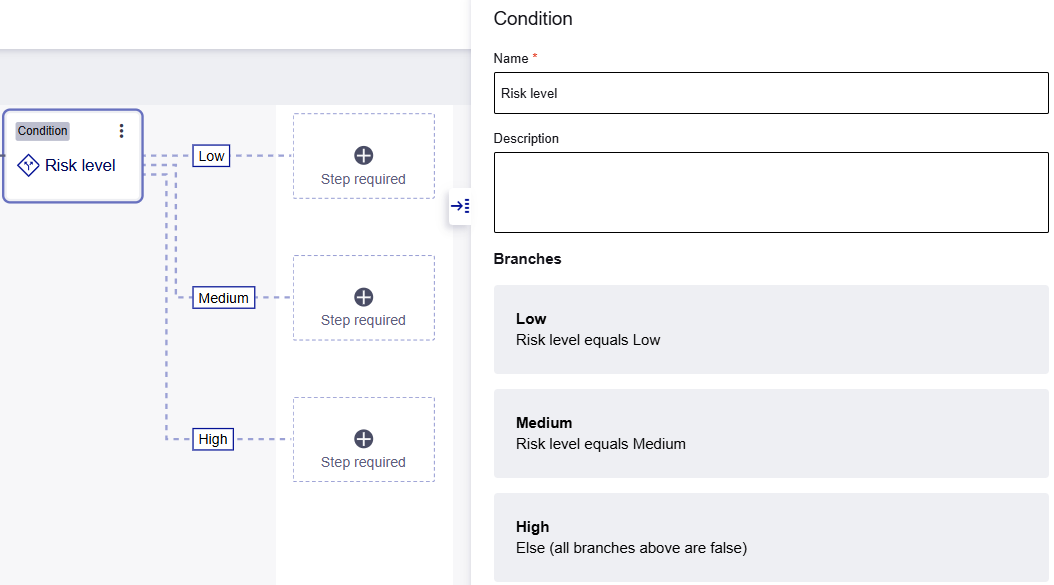
-
On the Condition side sheet, enter the Name and an optional Description. The default name is Risk level.
The authentication options are the same as for adding user authentication but there is an additional option to Fail authentication and prevent users from logging /in.
-
Select the Step required plus sign for the Low branch, and then select an authentication option.
-
Select the Step required plus sign for the Medium branch, and then select an authentication option.
-
Select the Step required plus sign for the High branch, and then select an authentication option.
-
-
-
Save or Publish your changes.
Add a post-authentication step
You can add post-authentication steps to the end of a login flow. Post-authentication steps are non-authentication processes that are performed before the session is granted.
-
On the flow editor, select the Post-authn plus sign.

-
On the Add post-authentication step side sheet, select an option:

-
Persona selection: Checks whether the user belongs to more than one organization and prompts the user to select their organization. The user's authorization for specific apps might differ based on the organization.
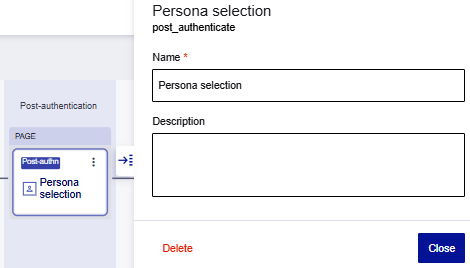
- Enter a Name and optional Description.
-
-
Save or Publish your changes.
Change the order of groups and options
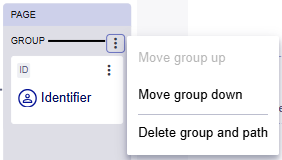
You can move groups and the options in the groups so that they appear in the order that you want to show on the user login pages.
Groups have the following menu items:
-
Move group up: Move the entire group up on the flow editor and the user login page.
-
Move group down: Move the entire group down on the flow editor and the user login page.
-
Delete group and path: When you delete a group, all options in the group are deleted and the rest of the path is also deleted.
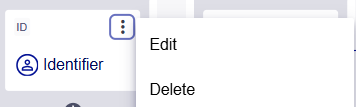
The options in the identification and authentication columns have the following menu items:
-
Move up: Move the item up on the flow editor and the user login page.
-
Move down: Move the item down on the flow editor and the user login page.
-
Add group separator above: Moves the option to a new group that is below the current group. Move existing options up or down to add them to the group.
-
Add group separator below: Moves the option to a new group that is above the current group. Move existing options up or down to add them to the group.
Delete unwanted steps
The system doesn't automatically clean up unused steps. This means that a login flow can end up with unused steps that don't proceed through to the user being Logged in.
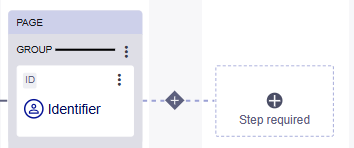
In the following example, there is an invalid path, because it has an identification step, but it doesn't have an authentication step. The path has a Step required block, to indicate that it's incomplete. Because the path is incomplete, the login flow is invalid and you cannot publish it.
You have several possible courses of action:
-
Save the incomplete login flow in the unpublished state.
-
Add the authentication step to complete the path, and then save or publish it.
-
Delete the identification step from the incomplete path.
-
Delete the incomplete path.
-
To delete an unwanted step, in the flow editor, select the step that you want to delete. In the example shown above, this is the identification step.
-
You can delete a step using the side sheet, step menu, or group menu:
-
To delete the step using the side sheet, at the bottom-left of the side sheet, select Remove step.
-
To delete the step using the step menu, select the menu and and then select Delete.
-
To delete the step using the group menu, select the group menu and then select Delete group and path.
-
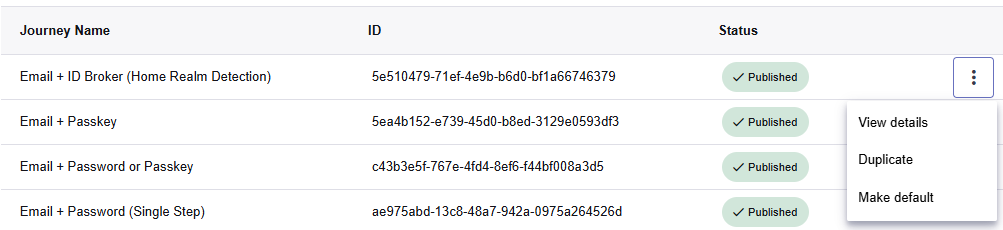
Duplicate a login flow
The easiest way to create a new login flow, is to start from a login flow that has similar steps.
-
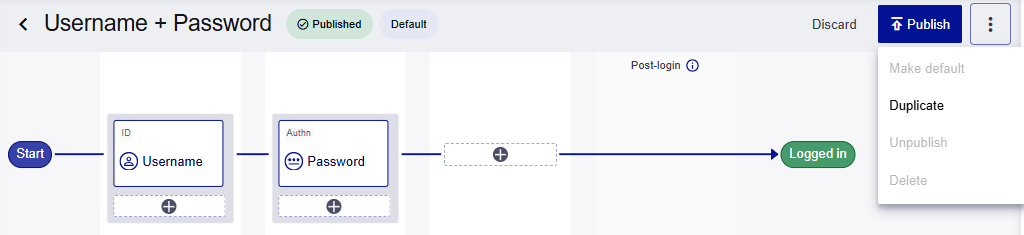
Duplicate a login flow from the Login flows screen or from the flow editor screen:
-
To duplicate a login flow from the Login flows screen, locate the login flow that you want to duplicate. In the menu for that login flow, select Duplicate.
-
To duplicate a login flow from the flow editor, select the login flow to open it in the flow editor. In the top-right corner of the flow editor, select the menu, and then select Duplicate.
-
-
Update the login flow as required, and then Save or Publish.
Update a login flow
-
On the Login flows page, select the login flow that you want to update, or in the menu for that login flow, select View details.
The login flow opens in the flow editor.
-
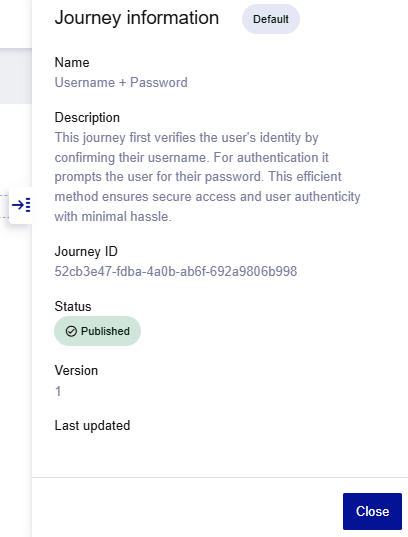
To view details about the login flow, select the Side sheet handle.
The login flow details include the name, description, journey ID, status, version, and last update date.
-
Update the login flow and steps as required, and then Save or Publish.
Unpublish a login flow
When you unpublish a login flow, the login flow is taken offline and is no longer available for authentication. You cannot unpublish the default login flow.
-
On the Login flows screen, select the login flow that you want to unpublish, or in the menu for that login flow, select View details.
-
In the top-right corner of the flow editor, select the menu, and then select Unpublish.
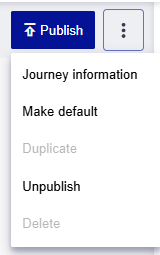
Delete a login flow
You cannot delete the default login flow or published flows. To delete the default login flow, you must first set another login flow as default. To delete a published login flow, first you must unpublish it.
-
On the Login flows screen, select the login flow that you want to delete, or in the menu for that login flow, select View details.
-
In the top-right corner of the flow editor, select the menu, and then select Delete.