Workflow API Tutorial
This tutorial demonstrates how you can use the workflow API in a custom workflow UI, rather than using the out-of-the-box Material UI.
User onboarding involves the registration and activation flows. The registration flow typically creates a user with the bare minimum information, and the InActive state. After a user is created in the InActive state, the activation workflow starts. First it sends a verification email to the user, then the user clicks the link to verify that the email address belongs to them, and finally you can ask the user to share more information, according to the onboarding requirements.
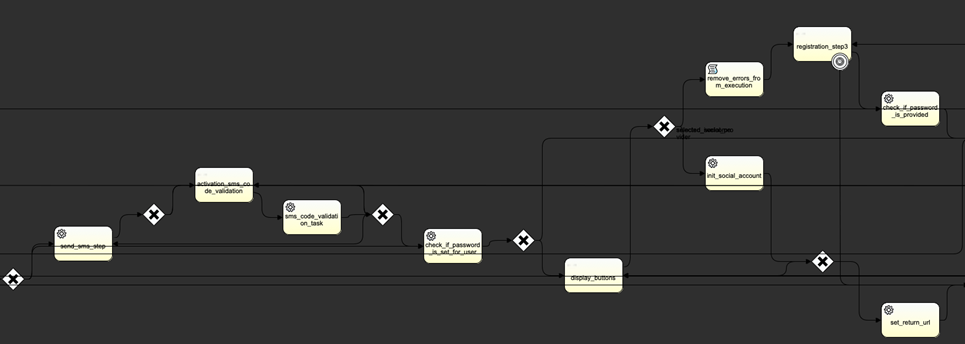
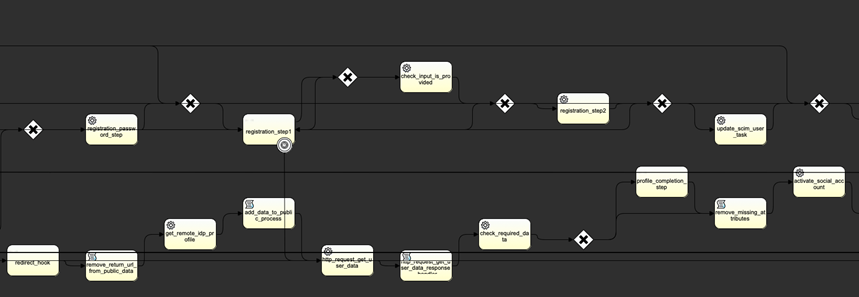
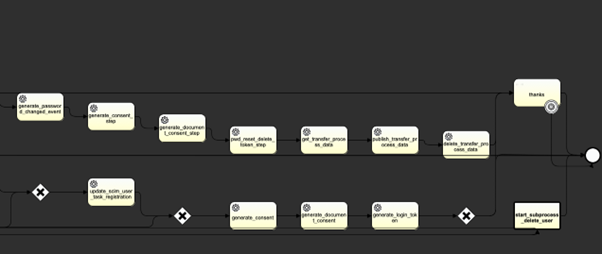
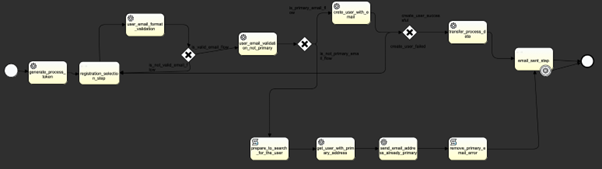
InsurCar registration flow
Review the registration flow Business Process Model and Notation (BPMN) for the InsurCar brand, which is available at https://insurgroup-edge.test.onewelcome.io/insurcar/registration/
1. InsurCar registration flow obtains a processToken
Use the API from the Start Registration Flow request.
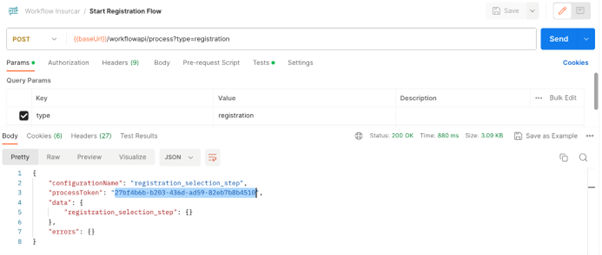
The start initiation flow initiates a process instance of the registration BPMN and returns a processToken that you can use to refer to the process instance in future requests.
It also indicates that the next UserTask in the BPMN is registration_selection_step. After the response, it is up to you to redirect the user to a UI page that requests the information that is required for registration.
After the user enters those details in the UI page, you can invoke the API to resume the workflow with the next API call.
To continue with the workflow, you need to capture the processToken from the response and use that for the next request. That information is captured in the processToken variable through the tests tab in the previous request. Use this variable to refer to the processToken in your future calls.
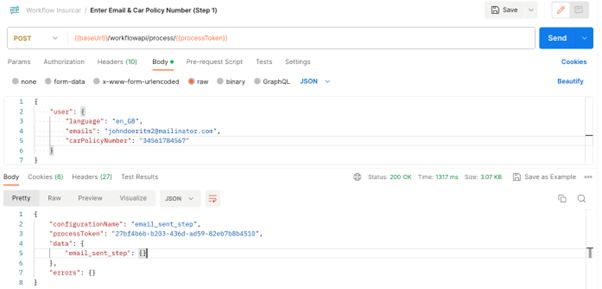
2. Email address and policy number
In the InsurCar registration flow, the registration_selection_step expects the user to specify the following information:
-
Email address
-
An existing policy number
You can invoke the next API with this information, along with the processToken captured in the previous request. If the user provided valid information, all validation succeeds, and the user is created successfully, the workflow proceeds with the next steps until the next UserTask, which in this case is the email_sent step.
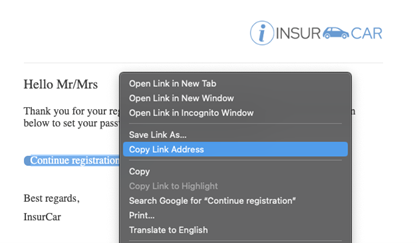
At this point, the user is created in the inactive state, which means that the activation flow gets initiated and sends a verification email to the email address that the user provided. The verification link in the email contains a processToken and token, which is needed in the next steps for verifying the user and continuing with the rest of the flow.
To capture the ProcessToken and token from the email, right-click the Continue registration button and copy the link address. You need to capture the processToken and token to make your next API call, which verifies the user.
This processTokenis different from the processToken in the registration flow, because this processToken is for an instance of the activation flow. Use this process token to continue with the activation flow execution.
For the remaining Postman requests, change the endpoint to point to the activation process token that you obtained from your email confirmation link.
3. Simulate user click
To simulate the user click for registration, use the following call:
{{baseUrl}}/workflowapi/process/2dd9e729-b136-4038-bb89-193304e493a5
This simulates the user clicking the verify button, and gets to the display_buttons UserTask.
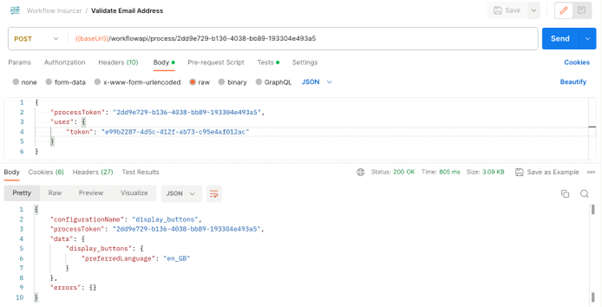
You can show the user a UI page that allows the user to choose an identity provider (IDP) that can fill in their details. In this case, keep it simple and use the continue button (which means use the OneWelcome Identity Platform as the IDP).
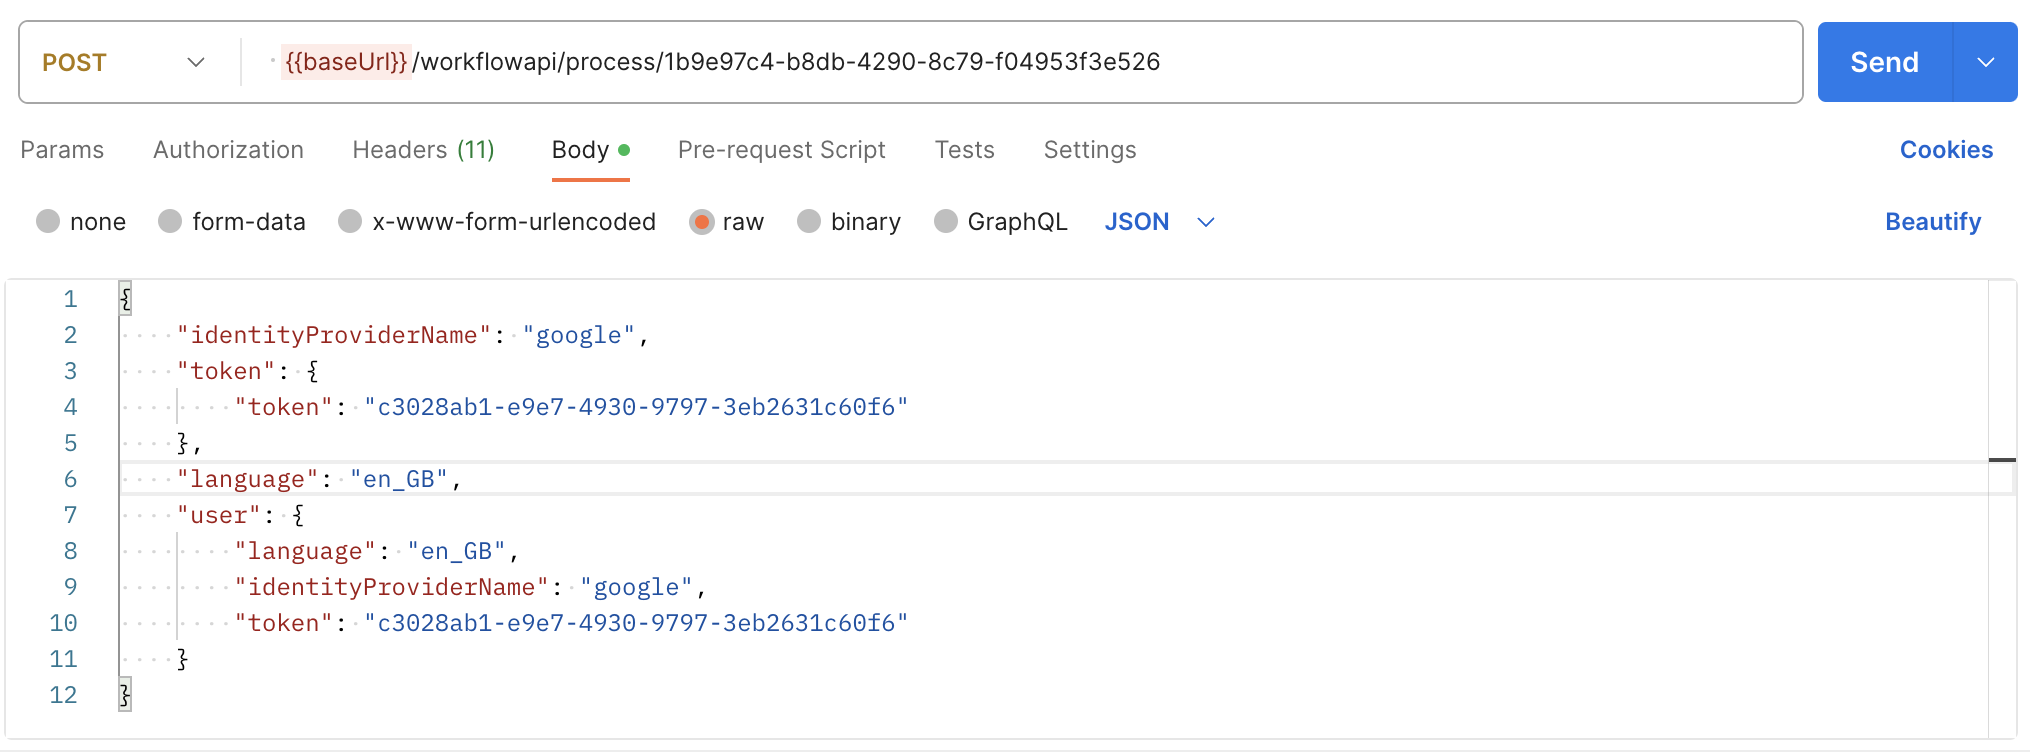
4. Set the identity provider
To set the OneWelcome Identity Platform as the identity provider (IDP), use the request below:
5. Set the user password
With the OneWelcome Identity Platform as the IDP, the BPMN expects the user to first set a password and confirm the password with registration_step3. To achieve that, use the call below:
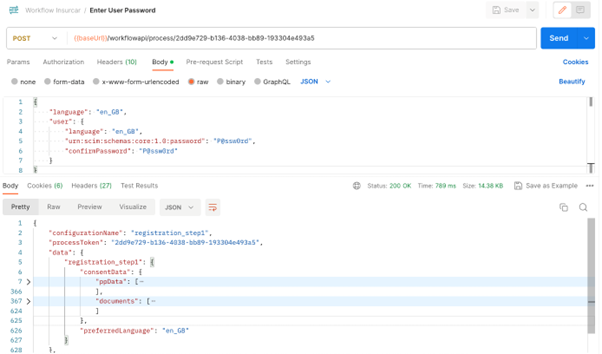
Detailed response
You can review the detailed response:
{
"configurationName": "registration_step1",
"processToken": "2dd9e729-b136-4038-bb89-193304e493a5",
"data": {
"registration_step1": {
"consentData": {
"ppData": [
{
"id": "1",
"descriptions": [
{
"locale": "de_DE",
"description": "um Ihr Konto zu verwalten"
},
{
"locale": "en_GB",
"description": "to manage your account"
},
{
"locale": "es_ES",
"description": "para administrar su cuenta"
},
{
"locale": "fr_FR",
"description": "pour gérer votre compte"
},
{
"locale": "it_IT",
"description": "per gestire il tuo account"
},
{
"locale": "nl_NL",
"description": "om je account te beheren"
},
{
"locale": "ro_RO",
"description": "pentru a gestiona contul dvs"
},
{
"locale": "sv_SE",
"description": "för att hantera ditt konto"
}
],
"legalBasis": "contract",
"attributeName": "emails",
"dataController": "InsurGroup",
"tags": [
"registration_step1",
"social_registration_consent_step"
],
"status": "active"
},
{
"id": "7",
"descriptions": [
{
"locale": "de_DE",
"description": "um Ihre Versicherungsgebühr zu berechnen"
},
{
"locale": "en_GB",
"description": "to help calculate your insurance fee"
},
{
"locale": "es_ES",
"description": "para ayudar a calcular su cuota de seguro"
},
{
"locale": "fr_FR",
"description": "pour vous aider à calculer vos frais d'assurance"
},
{
"locale": "it_IT",
"description": "per aiutare a calcolare la tua quota di assicurazione"
},
{
"locale": "nl_NL",
"description": "om je premie te berekenen"
},
{
"locale": "ro_RO",
"description": "pentru a vă ajuta să calculați taxa de asigurare"
},
{
"locale": "sv_SE",
"description": "för att hjälpa dig att beräkna din försäkringsavgift"
}
],
"legalBasis": "consent",
"attributeName": "carBrand",
"dataController": "InsurGroup",
"tags": [
"registration_step1",
"registration_selection_step",
"profile_completion_step"
],
"status": "active"
},
{
"id": "6",
"descriptions": [
{
"locale": "de_DE",
"description": "um Ihnen Briefe über überfällige Zahlungen oder über andere rechtliche Verpflichtungen die Sie erfüllen müssen zu schicken"
},
{
"locale": "en_GB",
"description": "o send you letters about overdue payments or about other juridical obligations you have to fulfil"
},
{
"locale": "es_ES",
"description": "para enviarle cartas sobre pagos atrasados o sobre otras obligaciones jurídicas que tenga que atender"
},
{
"locale": "fr_FR",
"description": "pour vous adresser des courriers de relances de paiement de facture ou autres obligations juridiques auxquelles nous devons nous conformer"
},
{
"locale": "it_IT",
"description": "per mandarti corrispondenza su pagamenti insoluti o altri obblighi di tipo giuridico"
},
{
"locale": "nl_NL",
"description": "voor het versturen van eventuele aanmaningen en andere post aangaande het nakomen van juridische afspraken"
},
{
"locale": "ro_RO",
"description": "pentru a vă trimite scrisori cu privire la plățile restante sau despre alte obligații juridice pe care trebuie să le îndepliniți"
},
{
"locale": "sv_SE",
"description": "för att skicka dig fakturor eller för annat juridiskt du måste ta hänsyn till"
}
],
"legalBasis": "contract",
"attributeName": "address",
"dataController": "InsurGroup",
"tags": [
"registration_step1"
],
"status": "active"
},
{
"id": "5",
"descriptions": [
{
"locale": "de_DE",
"description": "um unsere Angebote besser auf Sie abzustimmen"
},
{
"locale": "en_GB",
"description": "to better customise our offers to you"
},
{
"locale": "es_ES",
"description": "para personalizar mejor nuestras ofertas"
},
{
"locale": "fr_FR",
"description": "pour mieux personnaliser nos offres à votre attention"
},
{
"locale": "it_IT",
"description": "per personalizzare le offerte a te rivolte"
},
{
"locale": "nl_NL",
"description": "om onze aanbiedingen beter op uw wensen af te stemmen"
},
{
"locale": "ro_RO",
"description": "pentru a personaliza mai bine ofertele pentru dvs."
},
{
"locale": "sv_SE",
"description": "för att bättre skräddarsy erbjudanden till dig"
}
],
"legalBasis": "consent",
"attributeName": "gender",
"dataController": "InsurGroup",
"tags": [
"registration_step1",
"social_registration_consent_step"
],
"status": "active"
},
{
"id": "2",
"descriptions": [
{
"locale": "de_DE",
"description": "um Sie persönlich in unserer Kommunikation anzusprechen"
},
{
"locale": "en_GB",
"description": "to address you personally in our communications"
},
{
"locale": "es_ES",
"description": "para dirigirnos a usted personalmente en nuestras comunicaciones"
},
{
"locale": "fr_FR",
"description": "pour personnaliser nos échanges lors de nos communications"
},
{
"locale": "it_IT",
"description": "per comunicare in maniera personale nella comunicazioni"
},
{
"locale": "nl_NL",
"description": "om je persoonlijk te kunnen aanspreken in onze communicatie"
},
{
"locale": "ro_RO",
"description": "pentru a ne putea adresa dvs. in comunicație"
},
{
"locale": "sv_SE",
"description": "för att addressera dig personligen i våra utskick"
}
],
"legalBasis": "contract",
"attributeName": "name",
"dataController": "InsurGroup",
"tags": [
"registration_step1",
"social_registration_consent_step"
],
"status": "active"
},
{
"id": "3",
"descriptions": [
{
"locale": "de_DE",
"description": "um zu bestätigen, dass Sie das Mindestalter von 18 Jahren haben"
},
{
"locale": "en_GB",
"description": "to confirm you have the minimum age of 18"
},
{
"locale": "es_ES",
"description": "para confirmar que tiene la edad mínima de 18 años"
},
{
"locale": "fr_FR",
"description": "pour confirmer que vous avez au moins 18 ans"
},
{
"locale": "it_IT",
"description": "per confirmare che hai almeno 18 anni"
},
{
"locale": "nl_NL",
"description": "om te bevestigen dat je 18 jaar of ouder bent"
},
{
"locale": "ro_RO",
"description": "pentru confirmare ca aveți minim 18 ani"
},
{
"locale": "sv_SE",
"description": "för att bekräfta att du är över 18"
}
],
"legalBasis": "contract",
"attributeName": "birthDate",
"dataController": "InsurGroup",
"tags": [
"registration_step1"
],
"status": "active"
},
{
"id": "10",
"descriptions": [
{
"locale": "de_DE",
"description": "um zu kontaktieren, wenn wir spezielle Angebote für Sie haben"
},
{
"locale": "en_GB",
"description": "to be contacted when we have special offers for you"
},
{
"locale": "es_ES",
"description": "para ser contactado cuando tengamos ofertas especiales para usted"
},
{
"locale": "fr_FR",
"description": "être contacté lorsque nous avons des offres spéciales pour vous"
},
{
"locale": "it_IT",
"description": "essere contattato quando avremo offerte speciali per te"
},
{
"locale": "nl_NL",
"description": "om gecontacteerd te worden wanneer we speciale aanbiedingen voor je hebben"
},
{
"locale": "ro_RO",
"description": "pentru a fi contactat atunci când avem oferte speciale pentru dumneavoastră"
},
{
"locale": "sv_SE",
"description": "kontaktas när vi har specialerbjudanden åt dig"
}
],
"legalBasis": "consent",
"attributeName": "phoneNumbers",
"dataController": "InsurGroup",
"tags": [
"registration_step1"
],
"status": "active"
},
{
"id": "8",
"descriptions": [
{
"locale": "de_DE",
"description": "um unsere Angebote besser auf Sie abzustimmen"
},
{
"locale": "en_GB",
"description": "to better customise our offers to you"
},
{
"locale": "es_ES",
"description": "para personalizar mejor nuestras ofertas"
},
{
"locale": "fr_FR",
"description": "pour mieux personnaliser nos offres à votre attention"
},
{
"locale": "it_IT",
"description": "per personalizzare le offerte a te rivolte"
},
{
"locale": "nl_NL",
"description": "om onze aanbiedingen beter op uw wensen af te stemmen"
},
{
"locale": "ro_RO",
"description": "pentru a personaliza mai bine ofertele pentru dvs."
},
{
"locale": "sv_SE",
"description": "för att bättre skräddarsy erbjudanden till dig"
}
],
"legalBasis": "consent",
"attributeName": "carModel",
"dataController": "InsurGroup",
"tags": [
"registration_step1",
"profile_completion_step"
],
"status": "active"
}
],
"documents": [
{
"id": "1",
"dataController": "InsurGroup",
"tags": [
"step1",
"step2",
"document_consent"
],
"locale": "de_DE",
"url": "https://www.onewelcome.com/privacy-policy",
"type": "privacy-policy",
"version": "v1.0",
"versionDate": "2022-01-01",
"name": "Datenschutzerklärung",
"status": "active"
},
{
"id": "10",
"dataController": "InsurGroup",
"tags": [
"step1",
"step2",
"document_consent"
],
"locale": "en_GB",
"url": "https://www.onewelcome.com/terms-of-use",
"type": "terms-of-service",
"version": "v1.0",
"versionDate": "2022-01-01",
"name": "Terms of Service",
"status": "active"
},
{
"id": "11",
"dataController": "InsurGroup",
"tags": [
"step1",
"step2",
"document_consent"
],
"locale": "es_ES",
"url": "https://www.onewelcome.com/terms-of-use",
"type": "terms-of-service",
"version": "v1.0",
"versionDate": "2022-01-01",
"name": "Términos del servicio",
"status": "active"
},
{
"id": "12",
"dataController": "InsurGroup",
"tags": [
"step1",
"step2",
"document_consent"
],
"locale": "fr_FR",
"url": "https://www.onewelcome.com/terms-of-use",
"type": "terms-of-service",
"version": "v1.0",
"versionDate": "2022-01-01",
"name": "Conditions d'Utilisation",
"status": "active"
},
{
"id": "13",
"dataController": "InsurGroup",
"tags": [
"step1",
"step2",
"document_consent"
],
"locale": "it_IT",
"url": "https://www.onewelcome.com/terms-of-use",
"type": "terms-of-service",
"version": "v1.0",
"versionDate": "2022-01-01",
"name": "Condizioni di utilizzo",
"status": "active"
},
{
"id": "14",
"dataController": "InsurGroup",
"tags": [
"step1",
"step2",
"document_consent"
],
"locale": "nl_NL",
"url": "https://www.onewelcome.com/terms-of-use",
"type": "terms-of-service",
"version": "v1.0",
"versionDate": "2022-01-01",
"name": "Gebruiksvoorwaarden",
"status": "active"
},
{
"id": "15",
"dataController": "InsurGroup",
"tags": [
"step1",
"step2",
"document_consent"
],
"locale": "ro_RO",
"url": "https://www.onewelcome.com/terms-of-use",
"type": "terms-of-service",
"version": "v1.0",
"versionDate": "2022-01-01",
"name": "Condiții de Utilizare",
"status": "active"
},
{
"id": "16",
"dataController": "InsurGroup",
"tags": [
"step1",
"step2",
"document_consent"
],
"locale": "sv_SE",
"url": "https://www.onewelcome.com/terms-of-use",
"type": "terms-of-service",
"version": "v1.0",
"versionDate": "2022-01-01",
"name": "Användarvillkor",
"status": "active"
},
{
"id": "2",
"dataController": "InsurGroup",
"tags": [
"step1",
"step2",
"document_consent"
],
"locale": "en_GB",
"url": "https://www.onewelcome.com/privacy-policy",
"type": "privacy-policy",
"version": "v1.0",
"versionDate": "2022-01-01",
"name": "Privacy Policy",
"status": "active"
},
{
"id": "3",
"dataController": "InsurGroup",
"tags": [
"step1",
"step2",
"document_consent"
],
"locale": "es_ES",
"url": "https://www.onewelcome.com/privacy-policy",
"type": "privacy-policy",
"version": "v1.0",
"versionDate": "2022-01-01",
"name": "Política de privacidad",
"status": "active"
},
{
"id": "4",
"dataController": "InsurGroup",
"tags": [
"step1",
"step2",
"document_consent"
],
"locale": "fr_FR",
"url": "https://www.onewelcome.com/privacy-policy",
"type": "privacy-policy",
"version": "v1.0",
"versionDate": "2022-01-01",
"name": "Politique de Confidentialité",
"status": "active"
},
{
"id": "5",
"dataController": "InsurGroup",
"tags": [
"step1",
"step2",
"document_consent"
],
"locale": "it_IT",
"url": "https://www.onewelcome.com/privacy-policy",
"type": "privacy-policy",
"version": "v1.0",
"versionDate": "2022-01-01",
"name": "Informativa sulla Privacy",
"status": "active"
},
{
"id": "6",
"dataController": "InsurGroup",
"tags": [
"step1",
"step2",
"document_consent"
],
"locale": "nl_NL",
"url": "https://www.onewelcome.com/privacy-policy",
"type": "privacy-policy",
"version": "v1.0",
"versionDate": "2022-01-01",
"name": "Privacybeleid",
"status": "active"
},
{
"id": "7",
"dataController": "InsurGroup",
"tags": [
"step1",
"step2",
"document_consent"
],
"locale": "ro_RO",
"url": "https://www.onewelcome.com/privacy-policy",
"type": "privacy-policy",
"version": "v1.0",
"versionDate": "2022-01-01",
"name": "Politică de Confidențialitate",
"status": "active"
},
{
"id": "8",
"dataController": "InsurGroup",
"tags": [
"step1",
"step2",
"document_consent"
],
"locale": "sv_SE",
"url": "https://www.onewelcome.com/privacy-policy",
"type": "privacy-policy",
"version": "v1.0",
"versionDate": "2022-01-01",
"name": "Integritetspolicy",
"status": "active"
},
{
"id": "9",
"dataController": "InsurGroup",
"tags": [
"step1",
"step2",
"document_consent"
],
"locale": "de_DE",
"url": "https://www.onewelcome.com/terms-of-use",
"type": "terms-of-service",
"version": "v1.0",
"versionDate": "2022-01-01",
"name": "Nutzungsbedingungen",
"status": "active"
}
]
},
"preferredLanguage": "en_GB"
}
},
"errors": {}
}
The response contains the processing purposes and privacy documents, which you can use for the next UI page for user consent. For example, the UI page might resemble the following page:
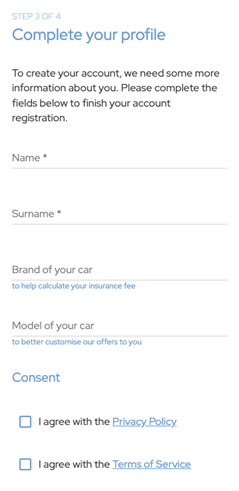
6. Complete the registration
The user can enter the details and complete the registration. Make the next call to perform that operation:
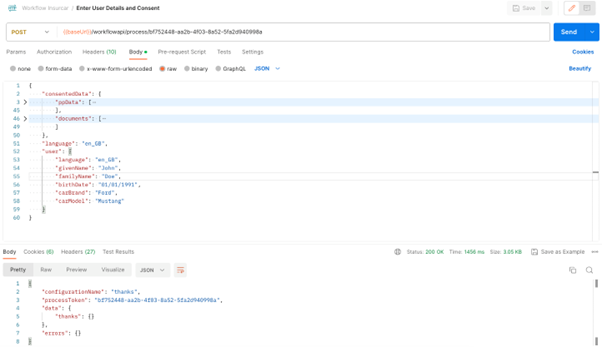
Congratulations! If you notice thanks in the response, that's because it was the last step in the workflow. The workflow completes successfully.
You used the registration and activation flow, but you can use any flow in a similar way.
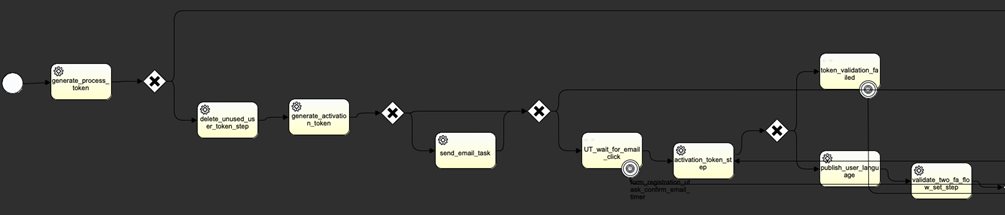
Activation flow
For your reference, here is a visual representation of the activation workflow: