
Pre-installation
You must complete the pre-installation process to ensure that you have the required installation and configuration files for an initial installation. Perform the following steps:
Note
-
Before configuring FIDO authentication with WLA, ensure that the user is enrolled with a FIDO authenticator using either the user portal or a STA-protected application. See FIDO Authentication for more information.
-
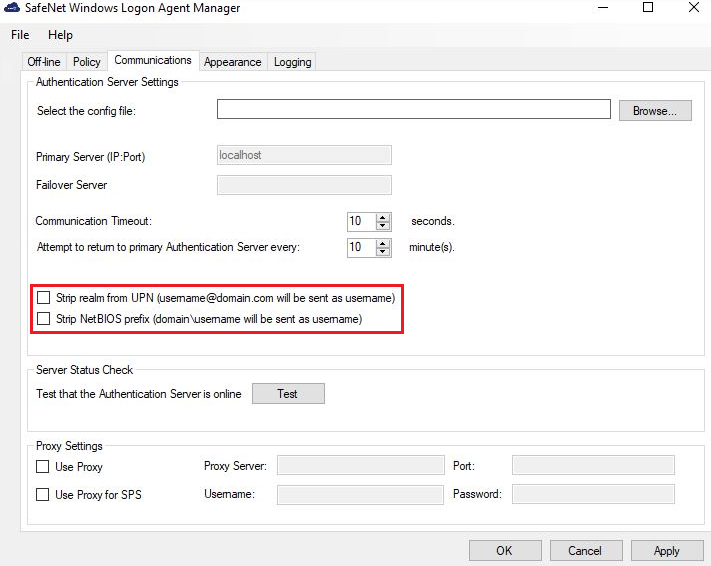
While authenticating with passwordless using a FIDO authenticator, it is recommended to enable the StripUPN and StripNetBIOS settings either through the registry or the management console. Also ensure that the username created in STA is in stripped format.
-
Log in to SafeNet Trusted Access (STA) as an operator.
-
On the STA console, in the top right-hand side corner, click the dropdown and select the required virtual server account.
-
Click the Applications tab.
-
Click Add Application (if no applications are listed) or
 (displayed next to Applications) to add an application. The Add Application window displays a list of available applications.
 -
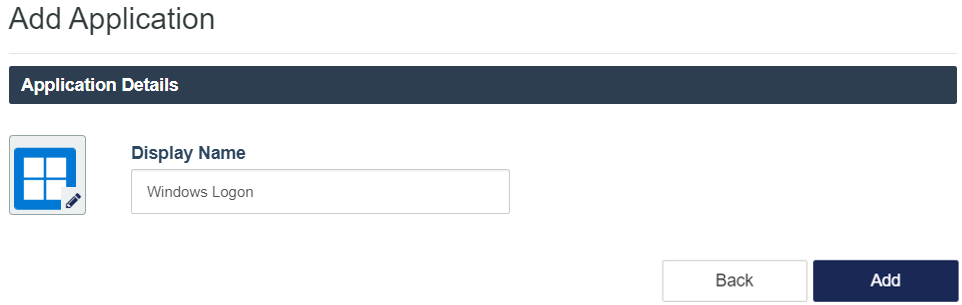
Select Windows Logon from the list of available applications.

-
Enter a Display Name and then click Add.
-
Navigate to the Windows Logon application that you just created.
-
Under Agent Setup > Language Selection, select the preferred language to be displayed by the agent from the LANGUAGE dropdown.
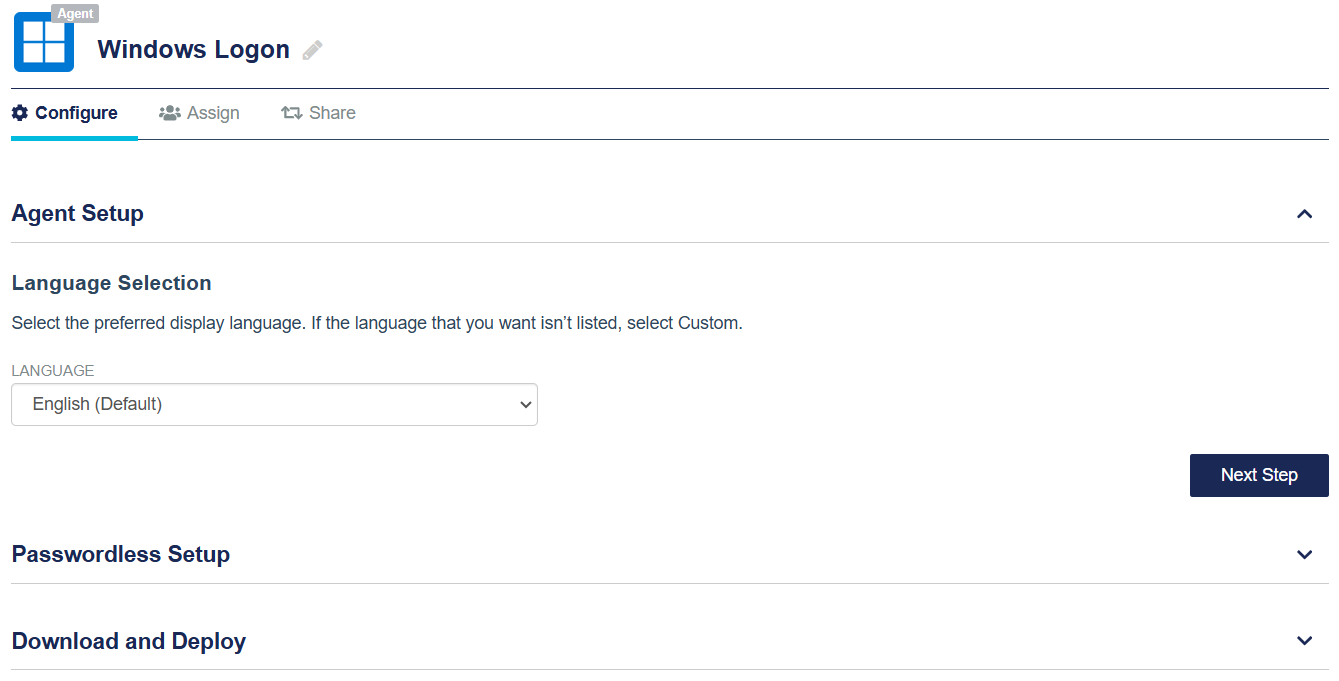
Select Custom to apply a language that is not listed in the dropdown menu. Edit the customized language file, custom.json (downloaded from STA), and push it locally via MDM, GPO, Intune, or SCCM.
-
Click Next Step.
-
[Optional] Under Passwordless Setup, select the Allow passwordless authentication check box, to allow the agent to proceed with passwordless-specific configurations and settings.
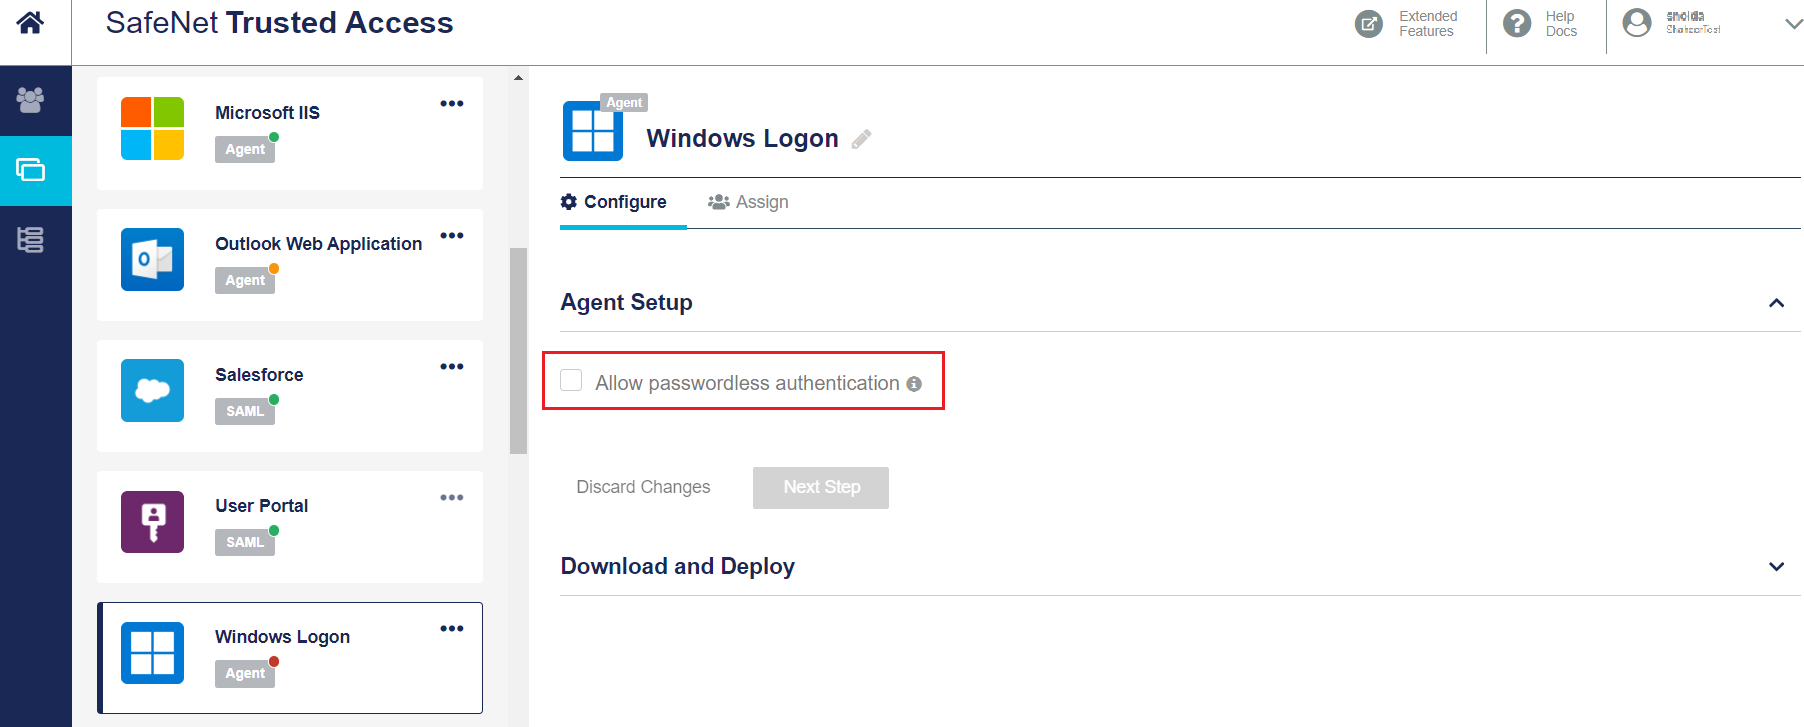
The following passwordless specific configurations will be available:
-
Server Setup
-
Passwordless authentication settings
-
-
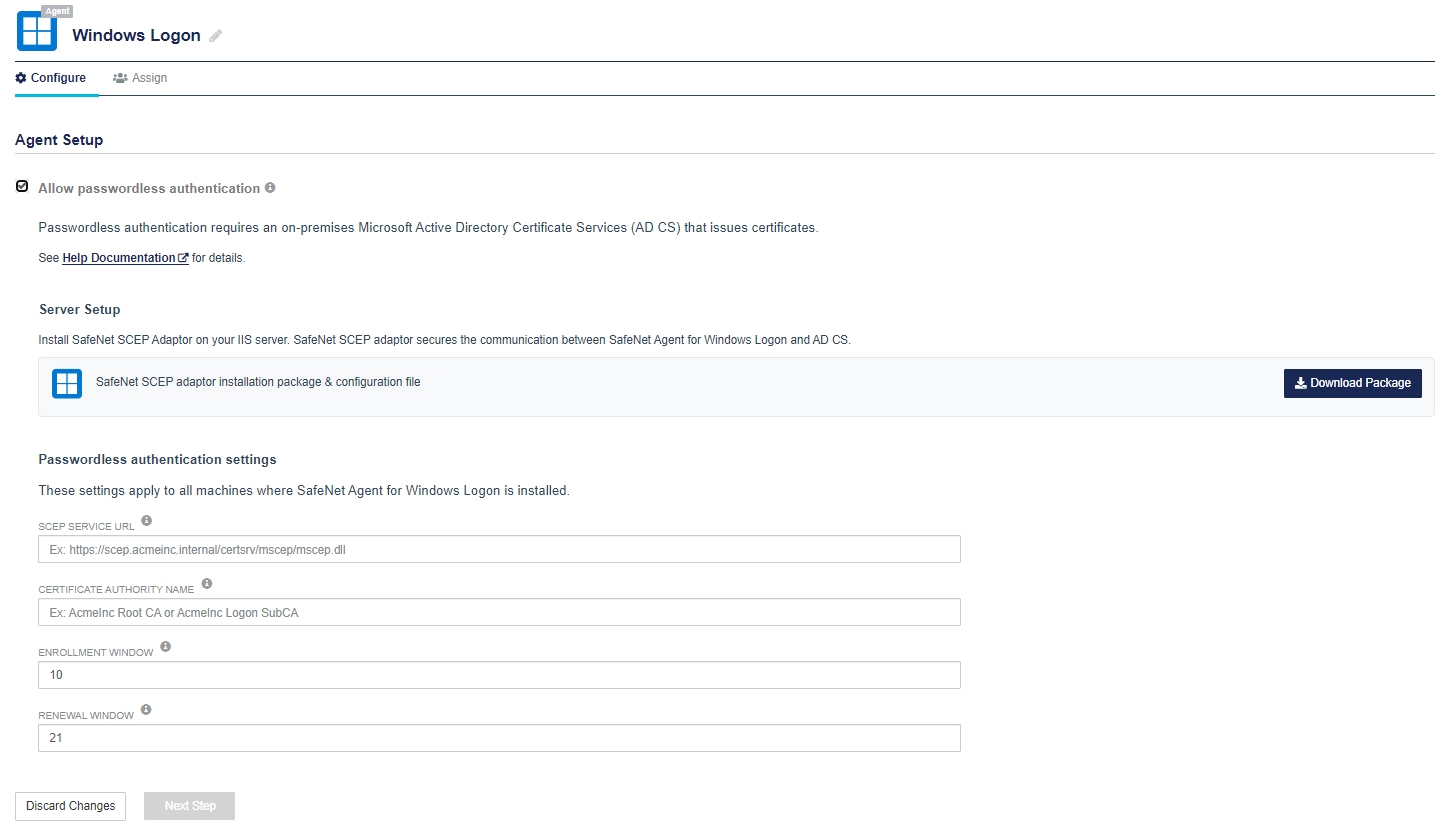
Under Server Setup, click Download Package, to download the SafeNet SCEP Adaptor installation package and configuration file.

The following components will be downloaded:
-
Installation file (SafeNet SCEP Adaptor)
-
Configuration file (Safenet_SCEP_Adaptor_Config_<date>.config file)
These downloaded files are used to install SafeNet SCEP Adaptor on the IIS server for secure communication between the SafeNet Agent for Windows Logon and SCEP endpoints.
We recommend to keep both the installation and configuration files in the same folder on the machine where SCEP service is configured.
-
-
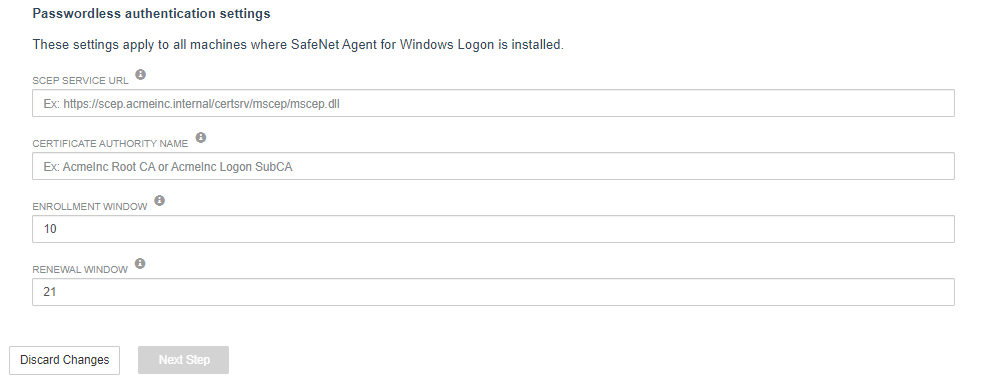
Under Passwordless authentication settings, complete the following fields:
-
SCEP SERVICE URL: Specifies the URL where the SCEP Adaptor is installed. For example, https://<FQDN>/certsrv/mscep/mscep.dll
where, <FQDN> is the Fully Qualified Domain Name (FQDN) of the machine where SafeNet SCEP Adaptor is installed.
-
CERTIFICATE AUTHORITY NAME: Specifies the Root CA that is configured during the deployment of AD CS.
-
ENROLLMENT WINDOW: Specifies the number of days in which the user can enroll for the logon certificate.
Default: 10
Range: 1-99 -
RENEWAL WINDOW: Specifies the number of days in which the user can re-enroll for the logon certificate.
Default: 21
Range: 1-99
-
-
Click Save And Continue to update the configuration.
-
Under Download and Deploy, click Install Package, to download the SafeNet Agent for Windows Logon installation package and configuration file. You can click HELP DOCUMENTATION to view the SafeNet Agent for Windows Logon documentation.
The following components will be downloaded:
-
Installation file (SafeNet Authentication Service Agent for Win 8-10-2012-2016 x64.msi)
-
Configuration file (.agent file)
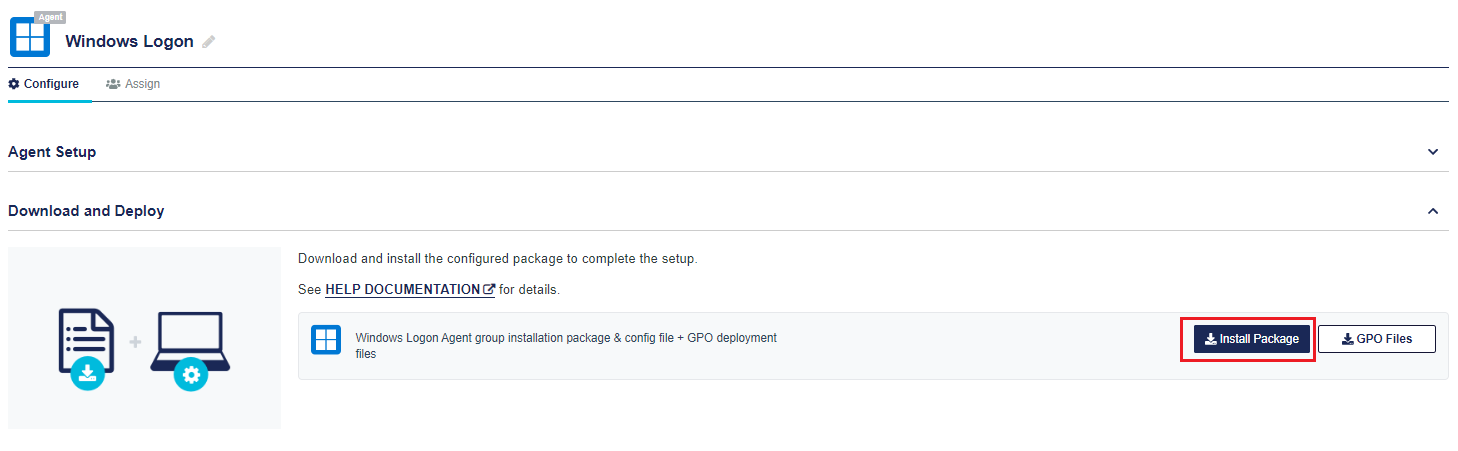
Once the agent is successfully downloaded, the application Status will change to active on the STA console. Refresh the console page to view any change in the setup Status.
Keep both the installation and configuration files in the same folder at a secure location on the client machine.
-
-
Install the agent on the client machine using the downloaded files.
Ensure that you upload the updated .agent file in the WLA management console.
Language Customization
For WLA v4.0.0 and earlier
Administrators can customize the language displayed in WLA locally using the ccl files present in the C:\Program Files\SafeNet\Windows Logon\Languages\en folder (provided in the downloaded package from STA). To achieve this, update the ccl files and then push them to the client machine using SCCM, GPO, or Intune.
Also, for Passwordless Windows Logon, you can customize the SafeNet Desktop Logon Application. The <InstallationDirectory>\Assets\local folder contains the JSON language files that you can edit. For more details, see Customizing SafeNet Desktop Logon Application.
For WLA v4.1.0
With the WLA v4.1.0 release, the ccl files (under C:\Program Files\SafeNet\Windows Logon\Languages\en) and the JSON files (under <InstallationDirectory>\Assets\local), through which customized messages are displayed, are discarded.
WLA v4.1.0 introduces centrally managed language selection and customization. All WLA messages are now combined in JSON files under C:\Program Files\SafeNet\Windows Logon\Languages. In the Languages folder, there are different JSON files for each supported language. For example, en.json holds the English language text strings.
Before upgrading or installing the agent, make a backup of the ccl files. You need to manually edit the key values in the specific language JSON files to match the previous customization. For information about the key-value pairs, see Annexure.
To customize the messages in the supported languages:
-
Open the STA management console and click the settings icon
 .
. -
Under SETTINGS, click Language Customization.
-
Enable the Language customization toggle button.
-
Click Download.
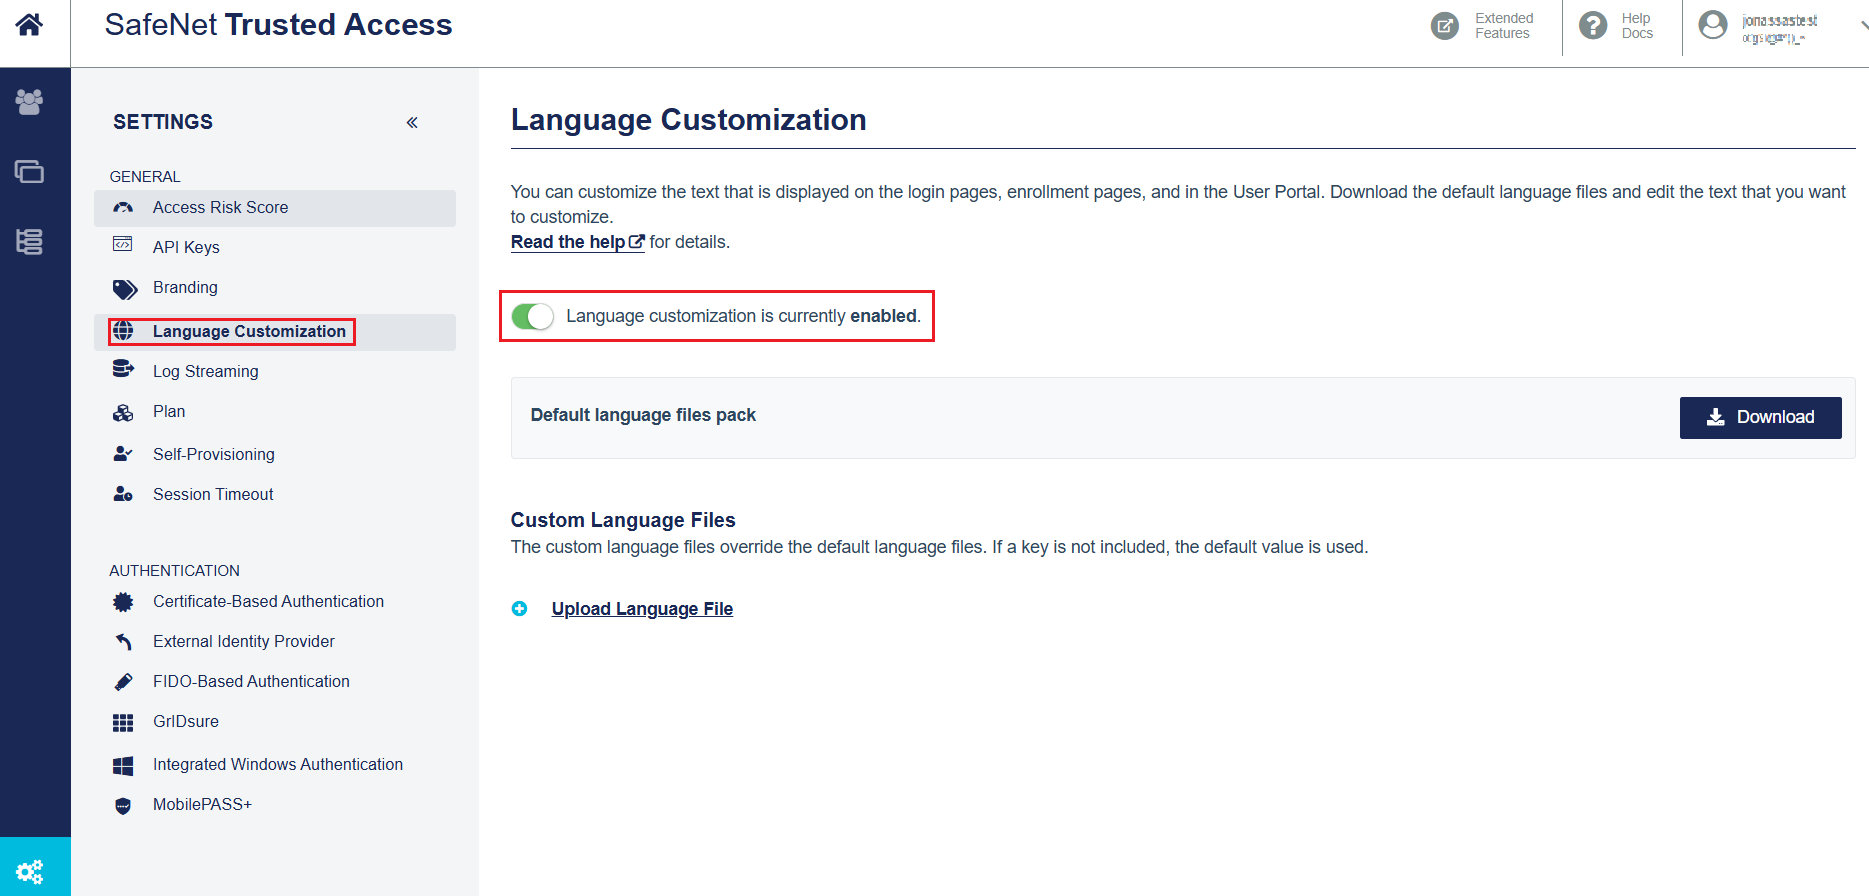
If language customization is enabled, and the customized language file is already uploaded, merge the WLA messages (available in the Default language files pack) with the customized language file and upload it again. For the WLA-specific messages, refer to the message key information in Annexure.
-
Edit the downloaded sample language file as selected in the LANGUAGE dropdown menu in STA using any text editor. Follow the procedures in Language customization.
-
Under Custom Language Files, click Upload Language File to upload the updated version of the language file.
Note
- Before uploading an updated version of a specific language file (for example, en.json), delete the existing version (if any).
- STA customization json files (custom.json) can only accommodate the following server-supported html tags: strong, b, h1, h2, h3, h4, h5, p, i, u, br, span, and label.
Enable Passwordless Logon
To enable the passwordless authentication, enable the Passwordless Logon Policy on STA > Policies.
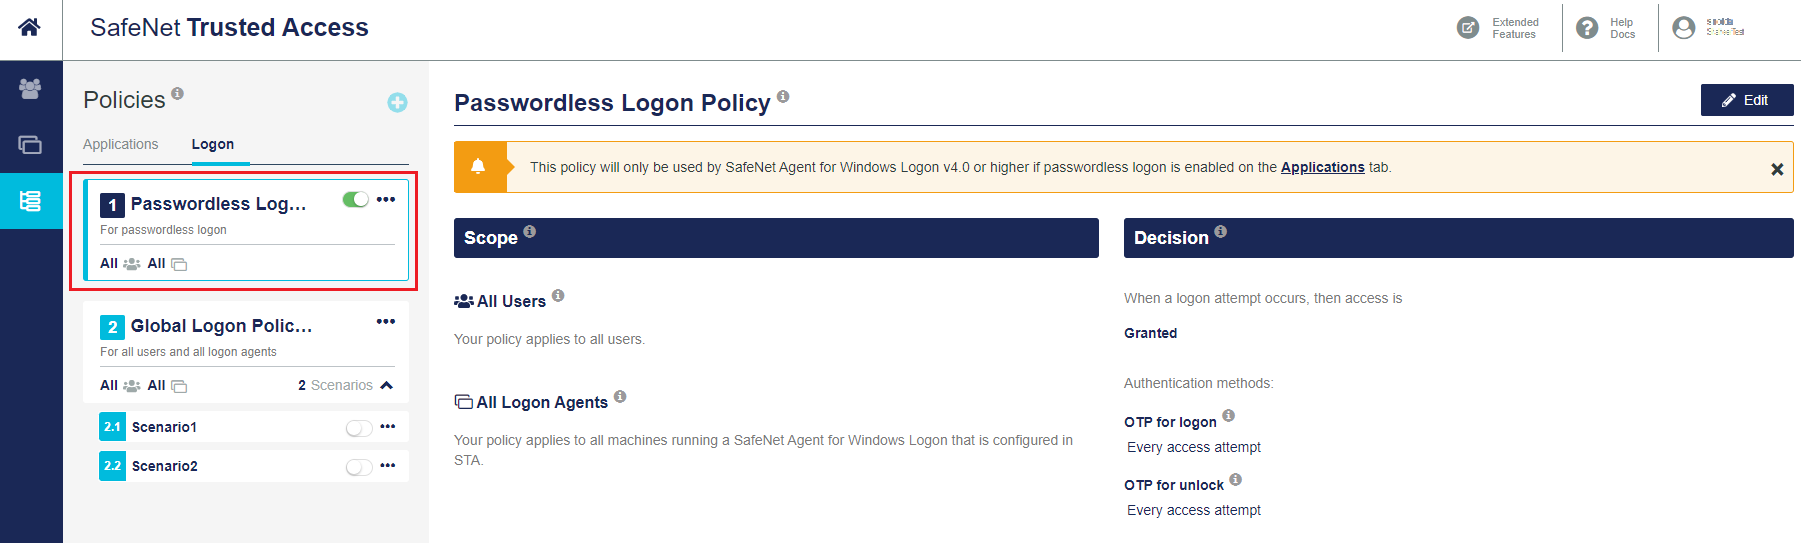
By default, the global logon policy applies to all the users of a tenant. However, the passwordless logon policy takes precedence over the global logon policy for groups of users, if enabled.
Share an application
Sharing the WLA application allows multiple virtual servers to use the same agent and to protect a machine that is shared by users on these virtual servers. For more information, see Windows Logon app sharing.
-
WLA application sharing can be configured at any point in the lifetime of the agent.
-
WLA application sharing works in both online and offline modes.
To use this feature in offline mode, the user must log on online at least once after it is configured.
-
This feature does not apply to versions of the agent that are not configured in the Applications tab.
Limitations
-
Under Username Format in STA, you can select either username@domain.com or domain.com\username. Accordingly, the user must enter the username in the selected format only while authenticating with WLA.
-
If you are configuring WLA application sharing with the realming option in STA, then:
-
If the username@domain.com format is used to determine the realm in STA, do not select the Strip realm from UPN option in the WLA management console.
-
If the domain.com\username format is used to determine the realm in STA, do not select the Strip NetBIOS prefix option in the WLA management console.
-