



AD password synchronization
This functionality requires SafeNet Synchronization Agent version 3.5.1 (or later) and STA or SAS PCE. Active Directory (AD) password synchronization and authentication is available using the LDAP filtering attribute, located in the authentication console, in Comms > Authentication Processing > Pre-authentication Rules. Pre-authentication rules with the AD can be used in STA and SAS PCE only when AD password synchronization is enabled.
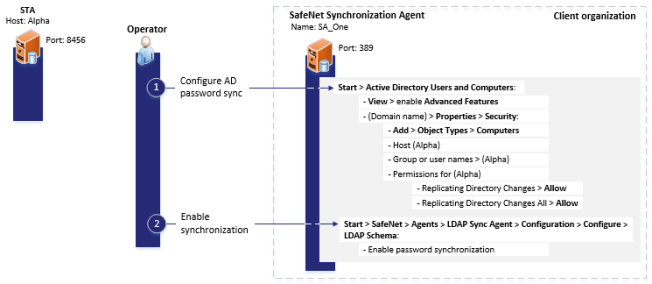
The diagram above illustrates the steps for granting replication permissions using the Sync Agent server name (Option 1). For Option 2 (using a dedicated service account), select Service Accounts instead of Computers in the Object Types dialog.
Users can authenticate into STA or SAS PCE using their AD (domain) password, without the requirement of a token or other password to be provisioned. Operators manage this functionality by synchronizing the users' AD passwords into STA or SAS PCE. This allows users to temporarily authenticate with their AD password until they activate a token.
The Windows server hosting SafeNet Synchronization Agent must be joined to the AD domain.
AD passwords are double-hashed and encrypted in all stages of transmission and storage between the AD, SafeNet Synchronization Agent, and in the STA or SAS PCE database.
For the parent (for example, root.com) to replicate the child user (for example, child.root.com) password hashes, it is recommended that you create an LDAP service account (for example, serviceldapsync@root.com) on the parent domain and configure the LDAP credentials on the LDAP service account.
MSCHAPv2 authentication protocol is not supported for LDAP/AD passwords.
Add replication permissions
After you configure groups for synchronization, add replication permissions to allow SafeNet Synchronization Agent to read user credentials from the AD. Select one of the following methods:
-
Using the Sync Agent server name — The Sync Agent server is granted permission to read password data directly from the AD. This is the simpler method and works for most deployments.
-
Using a dedicated service account — A separate AD user account is created and granted permission to read password data. This method limits access to only what is needed, makes it easier to track activity, and keeps the permissions separate from the server itself.
You only need to configure one method.
Option 1 — Grant replication permissions using the Sync Agent server name
-
From an administrator account on a Windows computer, log in to the Domain Controller.
-
Click Start > Active Directory Users and Computers.
-
Click View and enable Advanced Features.
-
In the Active Directory Users and Computers pane, right-click the domain name and then click Properties.
-
Click the Security tab.
-
Click Add and then click Object Types.
-
Verify that Computers is checked and then click OK.
-
Enter the SafeNet Synchronization Agent server host name and then click Check Names.
-
After the server hosting SafeNet Synchronization Agent is discovered, click OK.
-
In the Group or user names field, click the server host name.
-
In the Permissions for <server host name> field, select Allow for both Replicating Directory Changes and Replicating Directory Changes All.
-
Click Apply and then click OK.
Repeat this procedure for each subdomain that contains users with synchronized passwords.
Option 2 — Grant replication permissions using a dedicated service account
This option describes how to configure SafeNet Synchronization Agent to replicate Active Directory (AD) password hashes by using a dedicated service account. Using a dedicated service account follows the principle of least privilege, simplifies auditing, and decouples replication rights from the host computer.
The procedure is performed across three machines. Complete each step in the order listed below.
Step 1 — Create the service account (AD Machine)
-
From an administrator account on the Domain Controller, click Start > Active Directory Users and Computers (ADUC).
-
In the navigation pane, expand the domain and select the Users organizational unit (OU).
-
Right-click Users and then click New > User.
-
Enter the following information and then click Next.
Field Description User logon name Enter a name for the service account. For example: svc_sync. Password Enter a strong password that complies with the domain password policy. User cannot change password Select this option. Password never expires Select this option. -
Click Finish.
Step 2 — Grant replication permissions to the service account (AD Machine)
-
In Active Directory Users and Computers, right-click the root domain (for example, abcd.domain) and then click Properties.
-
Click the Security tab.
-
Click Add, search for the service account (svc_sync), and then click OK.
-
In the Permissions for svc_sync field, select Allow for both:
-
Replicating Directory Changes
-
Replicating Directory Changes All
-
-
Click Apply and then, click OK.
Repeat this procedure for each subdomain that contains users with synchronized passwords.
Step 3 — Remove machine-account replication permissions (AD Machine)
If the Sync Agent machine account was previously granted replication rights, remove them so that only the service account can replicate password hashes.
-
On the Security tab of the domain root properties, locate the Sync Agent computer account (<SyncAgentMachineName>$).
-
In the Permissions for <SyncAgentMachineName>$ field, clear Allow for both:
-
Replicating Directory Changes
-
Replicating Directory Changes All
-
-
Click Apply and then, click OK.
Step 4 — Grant "Log on as a service" right
-
On the SafeNet Synchronization Agent host, click Start, type secpol.msc, and then press Enter to open the Local Security Policy console.
-
In the navigation pane, expand Security Settings > Local Policies > User Rights Assignment.
-
Double-click Log on as a service.
-
Click Add User or Group.
-
Enter the service account in UPN format (for example, svc_sync@yourdomain.com) and then, click OK.
-
Click Apply and then, click OK.
Step 5 — Grant folder permissions on which Sync Agent is installed
Grant the service account Full Control on the folders used by SafeNet Synchronization Agent.
| Folder |
|---|
| C:\ProgramFiles\CRYPTOCard\ |
For each folder:
-
Right-click the folder and then click Properties.
-
Click the Security tab and then click Edit.
-
Click Add, enter DOMAIN\svc_sync, and then click OK.
-
In the Permissions for svc_sync field, select Allow for Full Control.
-
Click Apply and then, click OK.
Step 6 — Configure the Sync Agent service to run as the service account
-
On the SafeNet Synchronization Agent host, click Start, type services.msc, and then press Enter.
-
Locate the BlackShield ID Proxied Source Client service.
-
Right-click the service and then click Properties.
-
Click the Log On tab.
-
Select This account and then enter the following:
Field Description This account Enter DOMAIN\svc_sync. Password / Confirm password Enter the password for the service account. -
Click Apply and then, click OK.
Step 7 — Configure Sync Agent LDAP settings
-
Launch SafeNet Synchronization Agent and select the virtual server you want to configure.
-
In the User Source Configuration section, click Reconfigure to start the LDAP wizard.
-
On the LDAP Configuration page, enter the following and then click Next.
Field Description Host Name or IP Address Enter the fully qualified domain name (FQDN) of the Domain Controller.
NOTE: Use the Domain Controller Name or IP Address.
Port Enter the LDAP port used by your Domain Controller. Use TLS for LDAP connection Select or clear this option according to your organization's security policy and the port you have configured. -
On the LDAP Credentials page, enter the following and then click Next.
Field Description User DN Enter the service account in UPN format, for example, service account Name or email ID. Base DN Enter the base distinguished name of the domain, for example, DC=yourdomain,DC=com. Password Enter the password for the service account. -
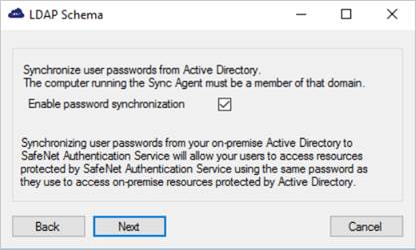
On the LDAP Schema page, select Enable password synchronization and then click Next.
-
Complete the remaining wizard pages and then click Finish.
-
Start (or restart) the BlackShield ID Proxied Source Client service so that the new credentials and configuration take effect.
For full LDAP wizard details, see SafeNet Synchronization Agent for LDAP.
Enable synchronization
To enable SafeNet Synchronization Agent to synchronize user passwords between STA or SAS PCE and the AD, select Enable password synchronization, as described in Configure SafeNet Synchronization Agent for LDAP.
To disable the use of AD passwords, clear the Enable password synchronization check box. After successful synchronization, the AD passwords are removed from STA or SAS PCE and they can no longer be used for authentication into STA or SAS PCE—the passwords will still appear as assigned, but they can no longer be used for authentication.
The AD password can be used as a token supplement. To do so in STA or SAS PCE, Assignment > Tokens > Assign, Accept LDAP/AD Password must be selected for the user.
The Accept LDAP/AD Password option will not be displayed in the STA Token Management or SAS PCE console until the Enable password synchronization feature is enabled in SafeNet Synchronization Agent and the passwords are synced to STA or SAS PCE.

