
Install and Configure SafeNet Access Exchange
SafeNet Access Exchange v1.3.0 must be installed to enable the FIDO authentication.
Once SafeNet Access Exchange (SAE) is successfully installed, FIDO-based authentication flows must be configured in SAE. This involves setting up an Operator Realm and creating individual realms for each tenant to support tenant-specific FIDO configurations.
Install SafeNet Access Exchange
Install SafeNet Access Exchange v1.3.0 to enable the FIDO authentication. For the detailed deployment instructions to install SafeNet Access Exchange (SAE), refer to thalesdocs.
If it is already installed, you may skip this step and proceed to the next section.
Note
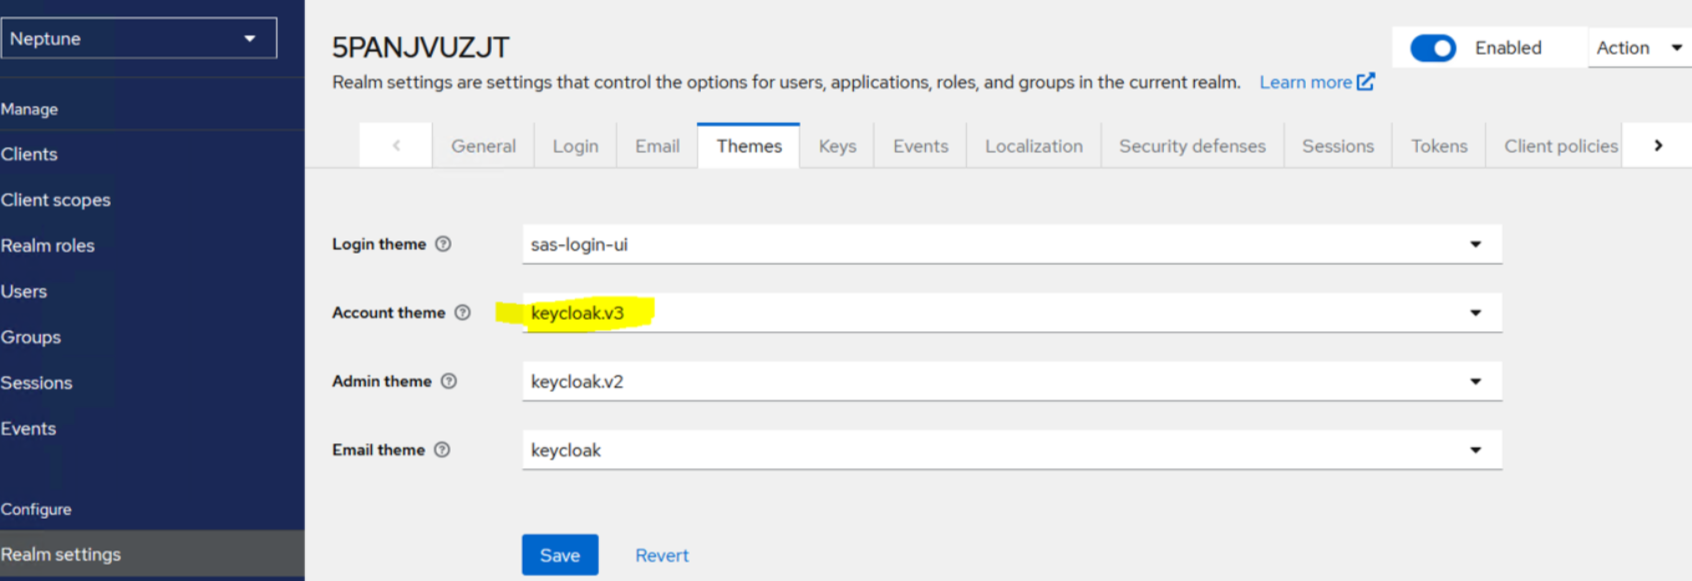
After upgrading to SafeNet Access Exchange v1.3.0 from an earlier version, users must update the account theme to keycloak.v3 under Realm Settings > Themes > Account theme.
For First-Time Installation
If you are installing SafeNet Access Exchange (SAE) for the first time, use the attached compose.yml file. Ensure to update the IP address for the FIDO2_API_URL environment variable within the file.
For Existing Installations:
If you are using an existing SafeNet Access Exchange setup, add the following configuration under the environment variables.
FIDO2_API_URL=http://<<IP-Address>>:8080/fido2
Configure SafeNet Access Exchange for FIDO Server
The SAE configuration for the FIDO server involves the following steps:
Operator Realm setup for FIDO
To configure the Operator Realm in SafeNet Access Exchange (SAE), perform the following steps:
-
Log in to SAE using the admin user and select the Master realm.
-
Navigate to Realm Roles and click Create Role.
-
Enter the role name as generate-jwt and click Save.
-
In the left navigation menu, select Users, click the user whom you want to assign access to the role that is created in the above step (for example, admin user), and then navigate to the Role Mapping tab.

-
Click Assign Role, select the role created earlier, and then assign it to the user.
-
Create a new realm in SAE named Operator using the SafeNetOtpRealm.json file provided in the SafeNet Access Exchange package.
-
Select the newly created Operator realm, navigate to Realm Settings from the left-hand menu, and then open the Keys tab.
-
Locate the entry for RS256. Copy the values for both the kid (Key ID) and Public Keys. These values will be used later while starting the FIDO Server.
User Federation setup
To enable FIDO authentication for users under a specific tenant, the SafeNet Access Exchange (SAE) administrator needs to create a separate realm for each tenant. Within each realm, the administrator should configure the SAS user federation and LDAP user federation settings, based on the tenant's chosen authentication flow.
Note
-
A separate realm must be created for each tenant. As a result, each tenant will have a unique FIDO enrollment URL, which should be shared with the respective tenant after their realm is created in SafeNet Access Exchange (SAE).
-
SAS user federation settings are required to enable the FIDO authentication flow.
-
If you are using the SafeNet LDAP FIDO flow, you must configure both SAS User Federation and LDAP User Federation.
For detailed instructions on setting up user federation, please refer to thalesdocs.
FIDO Authentication Flows
Following are the authentication flows for FIDO:
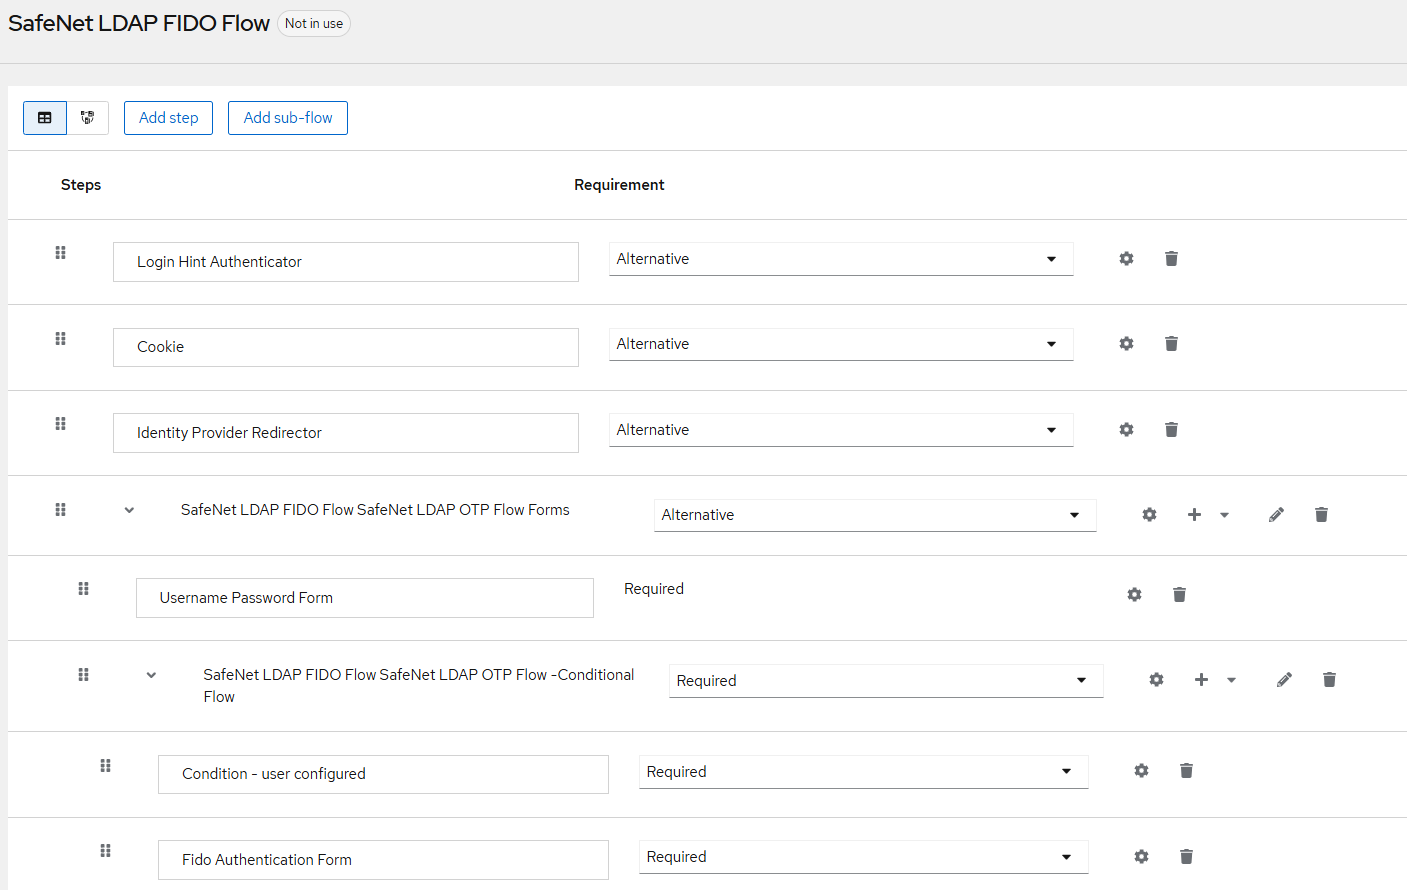
SafeNet LDAP FIDO flow
Use Case: Handling 2FA (Domain password + FIDO) integrations managed at the SafeNet Access Exchange Identity Provider
-
The SafeNet Access Exchange LDAP User Federation Provider authenticates Password as the first factor with Domain password.
-
The SafeNet Authentication Form, prompted by the SafeNet Access Exchange, authenticates FIDO as the second factor using the SafeNet Authentication Service. Refer to the Realm Configuration section for detailed steps.
-
For existing realms, ensure to add the LDAP Session Details Authenticator immediately after the Username Password Form at the same level within the authentication flow.
Note
It is not recommended to use FIDO as the first or only authentication factor due to security concerns. It is strongly advised to use another authentication method—such as OTP or LDAP—to pre-authenticate users prior to FIDO enrollment.
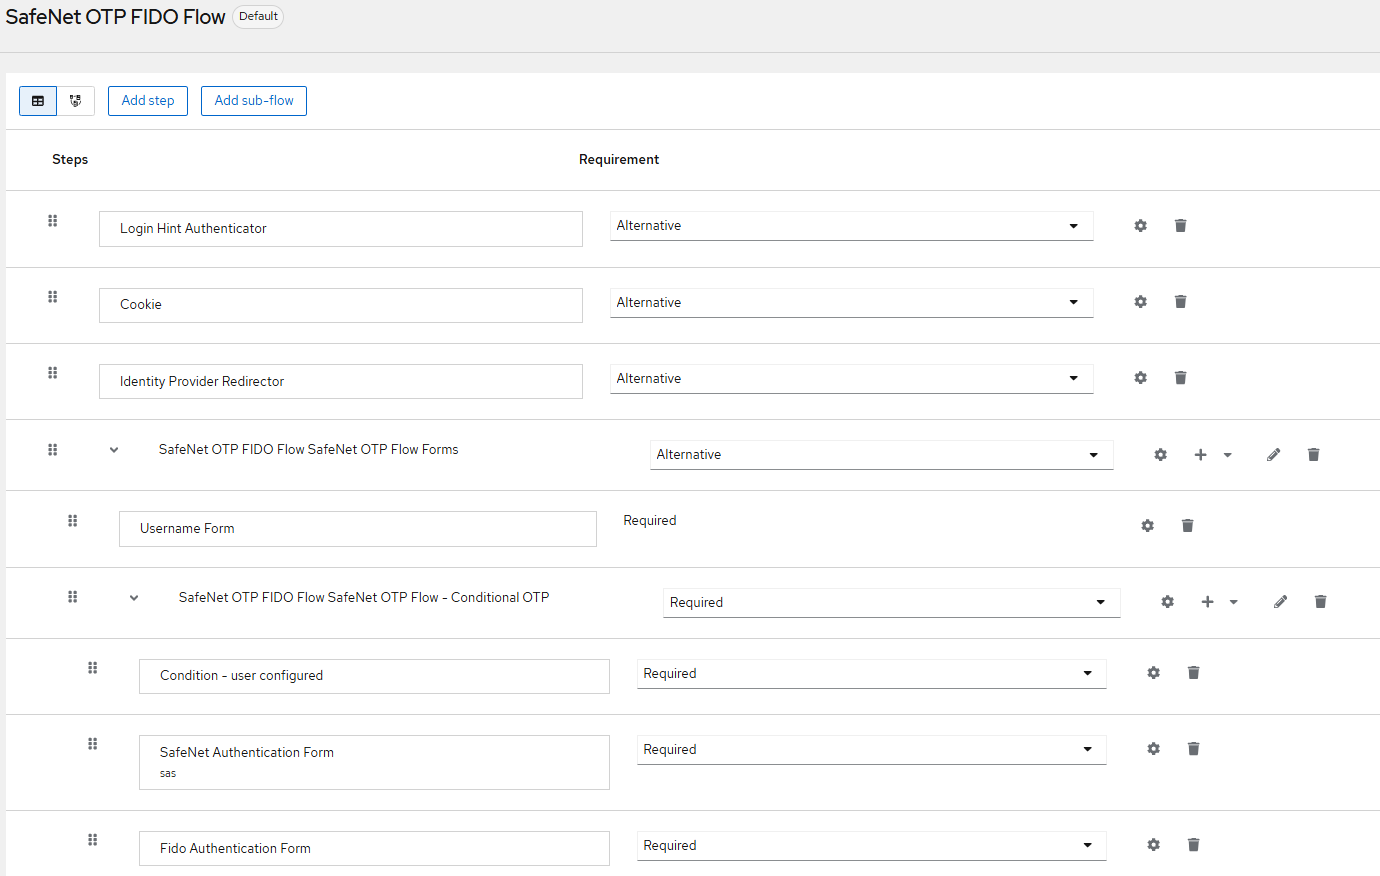
SafeNet OTP FIDO flow
Use Case: Handling 2FA (OTP + FIDO) integrations managed at the SafeNet Access Exchange Identity Provider
-
The SafeNet Authentication Form, prompted by the SafeNet Access Exchange, authenticates OTP as the first factor using the SafeNet Authentication Service. Refer to the Realm Configuration section for detailed steps.
-
The SafeNet Authentication Form then authenticates FIDO as the second factor.
-
For existing realms, ensure to add the FIDO Authentication Form immediately after the SafeNet Authentication Form at the same level within the authentication flow. Also, add FIDO Authentication Form after the Condition – user configured at the same level.
Note
It is not recommended to use FIDO as the first or only authentication factor due to security concerns. It is strongly advised to use another authentication method—such as OTP or LDAP—to pre-authenticate users prior to FIDO enrollment.
Configure FIDO authentication flow for existing Realms
To add a new workflow for the SafeNet OTP FIDO Flow in an existing realm, perform the following steps:
-
Log in to the SafeNet Access Exchange Admin Console.
-
In the left pane, select the desired realm.
-
Click Authentication, go to the Flows tab, and then select the SafeNet OTP Flow.
-
From the Action drop-down, select Duplicate to create a copy of the flow.
-
In the Duplicate Flow window, enter the relevant details and click Duplicate.
-
Open the newly duplicated flow and under the Conditional OTP section, add a new step FIDO Authentication Form, as shown in the screenshots below.
-
Set the newly added FIDO Authentication Form step as Required by selecting Required from the Requirement drop-down.
Note
Similarly, users can duplicate the SafeNet LDAP Flow to create a customized SafeNet LDAP FIDO Flow. These flows can be tailored as needed based on specific authentication requirements.