



Microsoft Azure Key Vault Managed HSM
Integrating Microsoft Azure Key Vault Managed HSM with Thales Luna HSMs delivers a powerful mix of cloud-based key management and hardware-level security via external key management features. External Key Management is an approach where organizations generate, store, and manage encryption keys outside of cloud infrastructure, while using those keys to protect data in cloud services. Azure Key Vault Managed HSM serves as a centralized platform for securely generating, storing, and managing identity signing private keys, while Thales Luna HSMs offer an extra layer of protection by protecting these keys in a dedicated and tamper-resistant hardware environment. Thales has developed an EKM Proxy module that exposes API endpoints for Managed HSM to connect with Luna HSM. EKM Proxy communicates with Managed HSM and Luna HSM over TLS and acts as a bridge between Managed HSM and on-premises Luna HSM.
This integration ensures enhanced security and regulatory compliance, empowering organizations to safeguard sensitive data with stringent access controls and separation of duties. The synergy of Azure Key Vault Managed HSM and Thales Luna HSMs is particularly beneficial for hybrid cloud scenarios, providing a streamlined approach to key management while minimizing risks associated with insider threats and unauthorized access.
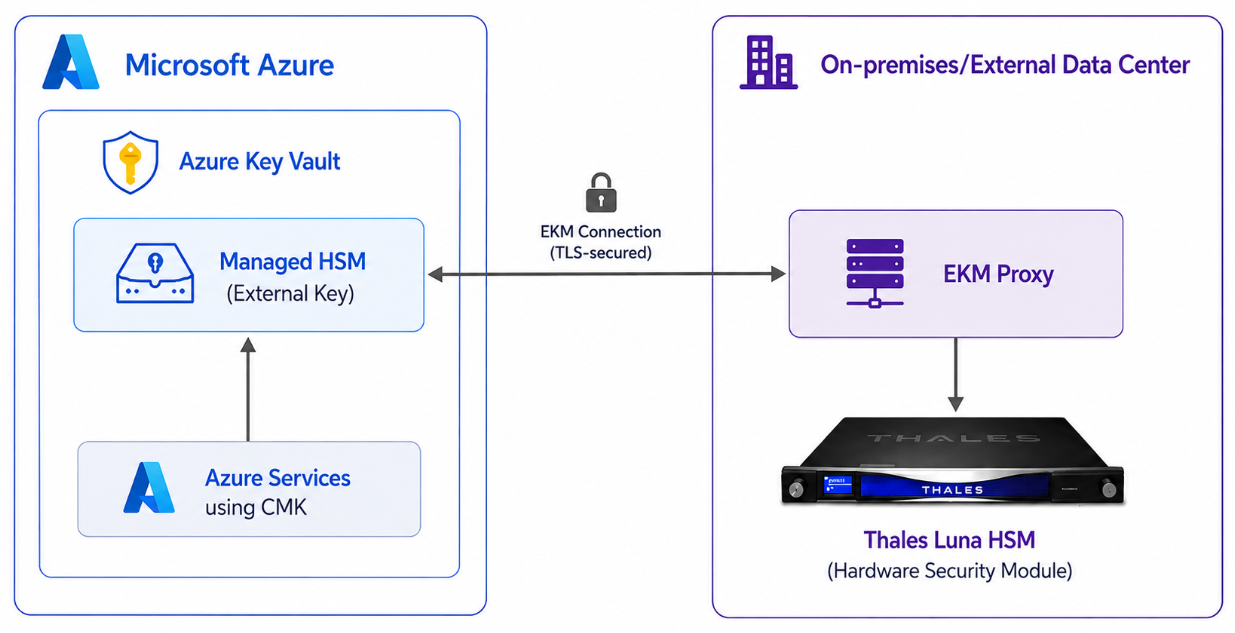
The key benefits of this integration are:
-
Secure generation, storage, and protection of the identity signing private keys using either FIPS 140-2 or FIPS 140-3 Level 3 validated hardware.
-
Full life cycle management of the keys to ensure their integrity and reliability throughout their usage.
-
Maintenance of a comprehensive HSM audit trail for transparency and accountability in key operations. It's important to note that Luna Cloud HSM service does not have access to this secure audit trail.
-
Significant performance enhancements by offloading cryptographic operations from application servers.
Supported HSM Devices
This integration supports:
-
Thales Luna Network HSM 7
-
Thales Luna PCIe HSM 7
-
Thales Luna U700 USB HSM
-
Luna Cloud HSM
This integration has been tested with Luna Client in both High Availability and FIPS modes.
Prerequisites
Before proceeding with this integration, ensure the following prerequisites are in place:
Set up Luna HSM
As the first step to accomplish this integration, you need to set up either On-Premise Luna HSM or Luna Cloud HSM.
Set up On-Premise Luna HSM
Follow these steps to set up your on-premise Luna HSM:
Ensure that the HSM is set up, initialized, provisioned, and ready for deployment. For more information, refer to Luna HSM documentation.
Create a partition that will be later on used by Managed HSM via EKM Proxy.
Create and exchange certificates between the Luna Network HSM and client system. Register client and assign partition to create an NTLS connection.
Initialize Crypto Officer and Crypto User roles for the registered partition.
Ensure that each partition is successfully registered and configured. Use the following command to view the registered partitions:
# /usr/safenet/lunaclient/bin/lunacm
Upon successful execution, you should observe an output similar to the example provided below:
lunacm (64-bit) v10.9.0-65. Copyright (c) 2025 Thales Group. All rights reserved.

Available HSMs:
Slot Id ->              0
Label ->                TPA01
Serial Number ->        1312109862206
Model ->                LunaSA 7.8.4
Firmware Version ->     7.8.4
Bootloader Version ->   1.1.2
Configuration ->        Luna User Partition With SO (PW) Key Export
                        With Cloning Mode
Slot Description ->     Net Token Slot
FM HW Status ->         Non-FM
For PED-authenticated HSM, enable partition policies 22 and 23 to allow activation and auto-activation.
For detailed instructions on configuring Luna HSM, including creating an NTLS connection, initializing partitions, and assigning user roles, refer to the Luna HSM documentation.
Set up Luna HSM in High Availability Mode
For instructions on configuring a High Availability (HA) group with two or more Luna HSMs, refer to the Luna HSM documentation. To ensure automatic failover, enable the HAOnly setting. When this setting is enabled, if the primary HSM becomes unavailable, requests are automatically routed to a secondary HSM in the HA group until the primary HSM is available again.
This integration has been tested with Luna Client in both High Availability and FIPS modes.
Set up Luna Cloud HSM
The following steps are applicable for setting up the Luna Cloud HSM on a Windows environment:
Transfer the downloaded .zip file to your client workstation using pscp, scp, or other secure means.
Extract the .zip file into a directory on your client workstation.
Extract or untar the appropriate client package for your operating system. Do not extract to a new subdirectory; place the files in the client install directory.
tar -xvf cvclient-min.tar
Run the setenv script to generate a new configuration file with the necessary information for the Luna Cloud HSM service. Right-click setenv.cmd and select Run as Administrator.
To add the configuration to an already installed UC client, use the –addcloudhsm option when running the setenv script.
Run the LunaCM utility and verify that the Cloud HSM service is listed.
If your organization requires non-FIPS algorithms for your operations, ensure that the Allow non-FIPS approved algorithms check box is checked. For more information, refer to Supported Mechanisms.
Set up Azure Key Vault Managed HSM
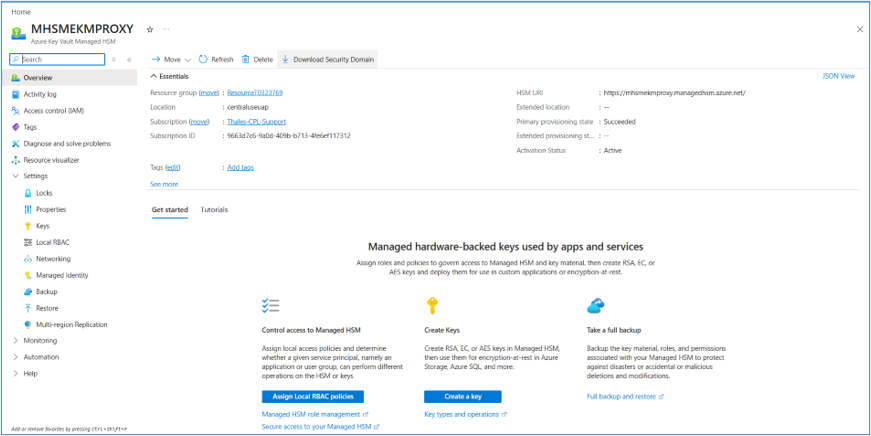
Before you begin, ensure that an Azure Key Vault Managed HSM is deployed in an Azure public region and that the external key management feature is enabled for your Azure subscription. External key management must be enabled by your Microsoft account team. Contact your Microsoft account team to request enablement. For instructions on deploying a Managed HSM, see the Azure Key Vault Managed HSM documentation.
It is assumed that your Azure Key Vault Managed HSM is provisioned successfully, configured for external key management, and in an active state. Ensure that the required Azure RBAC roles for creating and managing Data Encryption Keys (DEKs) are assigned before proceeding.
Install Microsoft Azure CLI
Microsoft Azure CLI is required to execute the commands provided in this guide. Install Azure CLI on the system where you intend to run the commands and where the Luna HSM Client is installed. For installation instructions, see Install Azure CLI.
Ensure that you are using the latest Azure CLI version with support for Azure Key Vault Managed HSM external key management. To install or update the Azure Key Vault extension, run one of the following commands:
– az extension add --name keyvault
– az extension update --name keyvault
Download Luna EKM Proxy
Azure Key Vault Managed HSM supports external key management, which enables it to use encryption keys that are stored and managed outside of Azure in a customer-owned HSM. In this deployment model, Azure Key Vault Managed HSM communicates with an EKM Proxy, which performs cryptographic operations using the external HSM.
Thales provides the Luna EKM Proxy utility to enable communication between Azure Key Vault Managed HSM and Thales Luna HSM. The EKM Proxy communicates with both Azure Key Vault Managed HSM and Luna HSM over TLS and acts as a secure bridge between the two.
Download the Luna EKM Proxy utility from the Thales Customer Support portal.
KB Article: KBXXXXXXX
DOW ID: DOWXXXXXX
Select a Supported Key Type
Luna EKM Proxy supports the following key types for use as Key Encryption Keys (KEKs):
| Key Name | Key Type | Key Size | Key Origin | Description |
|---|---|---|---|---|
| Key Encryption Key (KEK) | RSA | 2,048-bit 3,072-bit 4,096-bit |
Luna HSM | RSA key used to encrypt a key managed by Azure Key Vault Managed HSM. |
| Key Encryption Key (KEK) | AES | 128-bit 192-bit 256-bit |
Luna HSM | AES key used to encrypt a key managed by Azure Key Vault Managed HSM. |
Integrate Luna HSM with Managed HSM Using EKM Proxy
The following are the key stages to integrate Luna HSM with Azure Key Vault Managed HSM using the EKM Proxy. When Azure services perform cryptographic operations against an external key in Managed HSM, Managed HSM communicates with the EKM Proxy via the Proxy API to perform the requested operation on the Luna HSM.
Generate a Key Encryption Key on Luna HSM
Ensure that the Luna Client is installed and that an NTLS connection is configured to access the Luna HSM or Luna Cloud HSM partition from your workstation. To generate a KEK:
Before generating the key pair, decide on a unique label and id for the key. The label can be any name you choose. The id must be a 16-byte hexadecimal value (GUID) that uniquely identifies the key. The id attribute is used by Azure Key Vault Managed HSM to locate the key through the Luna EKM Proxy, so ensure that each KEK is assigned a unique id.
You can use an online GUID generator to generate a unique GUID: https://www.guidgenerator.com
Alternatively, use one of the following Linux commands to generate a 16-byte (32-character) hexadecimal value for the id attribute:# head -c16 </dev/urandom | xxd -p -u# xxd -len 16 -plain /dev/urandom
Generate an RSA key pair by running the following command on your workstation, replacing the label and id values with your own:
# /usr/safenet/lunaclient/bin/cmu generatekeypair -modulusBits=2048 -publicExponent=65537 -label=EKMKey1 -encrypt=1 -decrypt=1 -wrap=1 -unwrap=1 -id=54F32D6571E9541C7E2C47395FC269DD
Where:
-
labelspecifies the name of the key. -
idspecifies the 16-byte hexadecimal value (GUID) generated in the previous step, which uniquely identifies the key.
Enter the partition password when prompted, and select PKCS as the mechanism type.
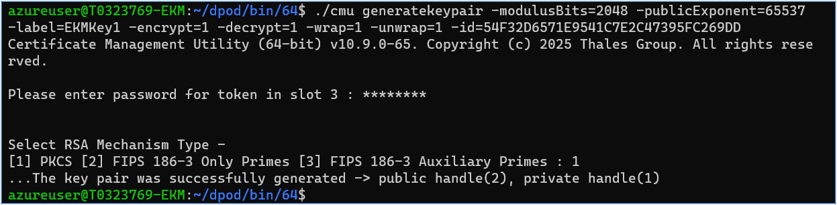
Verify that the key pair has been created by running the following command. When prompted, enter the partition password.
# /usr/safenet/lunaclient/bin/cmu list

Repeat these steps to generate additional KEKs, ensuring that each key has a unique label and id. A single KEK can be used to encrypt multiple DEKs, or you can use a different KEK for each DEK, depending on your organization's key management policy.
For AES KEKs, use the CKDEMO utility included with the Luna Client. Ensure that each AES key is assigned a unique label and id.
Configure EKM Proxy with Luna HSM
The Luna EKM Proxy acts as a secure bridge between Azure Key Vault Managed HSM and an on-premises or external Luna HSM. When Azure services perform cryptographic operations using an external key, Azure Key Vault Managed HSM communicates with the EKM Proxy over the Proxy API. The EKM Proxy then forwards the request to the Luna HSM to perform the required cryptographic operation. To configure the Luna EKM Proxy with Luna HSM:
Ensure that OpenSSL 3.x is installed on the system where the Luna Client is installed and an NTLS connection to the Luna HSM is configured. Install OpenSSL if it is not already available.
Open the <OPENSSLDIR>/openssl.cnf file in a text editor and update the [CA_default] section as follows:
dir             = /etc/pki/CA
new_certs_dir   = $dir/certs
You can change the value of dir to a different location. If you do so, use the updated path consistently throughout the remaining steps.
Create the directory for storing generated certificates if it does not already exist.
# mkdir -p /etc/pki/CA/certs
Create the following files:
-
/etc/pki/CA/index.txt -
/etc/pki/CA/serial
Open /etc/pki/CA/serial, enter the value 01 on the first line, save the file, and close it.
Open <OPENSSLDIR>/openssl.cnf again and update the [v3_ca] section as follows:
[ v3_ca ]

subjectKeyIdentifier=hash
authorityKeyIdentifier=keyid:always,issuer
basicConstraints = critical,CA:true
keyUsage = critical, digitalSignature, cRLSign, keyCertSign
Create the required directories for the Luna EKM Proxy.
# mkdir -p /opt/ekm/bin
# mkdir -p /opt/ekm/conf
# mkdir -p /opt/ekm/certs
Change to the /opt/ekm/certs directory. The remaining steps generate the Certificate Authority (CA) certificate and the EKM Proxy server certificate used to establish a TLS connection with Azure Key Vault Managed HSM.
Generate the CA private key.
# openssl genpkey -algorithm RSA -pkeyopt rsa_keygen_bits:4096 -out ca.key
Generate a Certificate Signing Request (CSR) using the CA private key.
# openssl req -key ca.key -new -out ca.csr
Generate the CA certificate by signing the CSR with the CA private key.
# openssl x509 -signkey ca.key -in ca.csr -req -extfile /etc/pki/tls/openssl.cnf -extensions v3_ca -days 365 -out ca.crt
Generate the EKM Proxy server private key.
# openssl genpkey -algorithm RSA -pkeyopt rsa_keygen_bits:2048 -out server.key
Generate a CSR for the EKM Proxy server. The Common Name (CN) in the server certificate must match the EKM Proxy endpoint hostname or the hostname configured in Azure Key Vault Managed HSM. For example, if the public endpoint is server.ekmproxy.example.com, specify either server.ekmproxy.example.com or *.ekmproxy.example.com as the CN.
# openssl req -key server.key -new -out server.csr
Sign the EKM Proxy server CSR using the CA certificate and private key to generate the server certificate.
# openssl ca -policy policy_anything -cert ca.crt -keyfile ca.key -in server.csr -out server.crt
Copy the downloaded EKM Proxy binary to the /opt/ekm/bin directory and make it executable.
# cp ekm_proxy /opt/ekm/bin/
# chmod +x /opt/ekm/bin/ekm_proxy
Create the EKM Proxy configuration file used by the service at startup.
# vi /opt/ekm/conf/ekm_proxy.conf
Add the following configuration and update the parameter values to match your environment.
ChrystokiConfigurationPath=/etc
HOST=server.ekmproxy.example.com
PORT=443
P11_LIB=/usr/safenet/lunaclient/lib/libCryptoki2_64.so
P11_TOKEN=TPA01
P11_PIN=userpin1
USER_TYPE=1
CACHING_ENABLED=false
DEBUG_LOGGING_ENABLED=true
TLS_CERT=/opt/ekm/certs/server.crt
TLS_KEY=/opt/ekm/certs/server.key
TLS_CA=/opt/ekm/certs/ca.crt
TLS_CLIENT_CN=EKM-Client
PERFORMANCE_LOGGING_ENABLED=true
CACHE_TTL_MINUTES=10
The following table describes the EKM Proxy configuration parameters:
| Parameter | Description |
|---|---|
ChrystokiConfigurationPath |
Path to the directory containing the Chrystoki.conf file. |
HOST |
Hostname or IP address of the EKM Proxy endpoint. |
PORT |
TCP port on which the EKM Proxy service listens for incoming connections. |
P11_LIB |
Full path to the Luna PKCS#11 library (libCryptoki2_64.so). |
P11_TOKEN |
Label of the Luna HSM partition. Use vtl listslots to view available partition labels. |
P11_PIN |
Crypto Officer (CO) password for the Luna HSM partition. |
USER_TYPE |
PKCS#11 user type indicating the crypto role. Supported value: 1 (Crypto Officer). |
CACHING_ENABLED |
Enables or disables key metadata caching. Supported values are true and false. The default value is false (no caching by default). |
DEBUG_LOGGING_ENABLED |
Enables or disables debug logging. Supported values are true and false. The default value is false. |
TLS_CERT |
Full path to the EKM Proxy TLS server certificate file. |
TLS_KEY |
Full path to the EKM Proxy TLS server private key file. |
TLS_CA |
Full path to the CA certificate used to validate incoming TLS client requests. Specifically, the CA certificate used to sign the Managed HSM service certificate. |
TLS_CLIENT_CN |
Expected CN in the client certificate presented by Azure Key Vault Managed HSM. This value corresponds to the subjectCommonName of the Managed HSM service. |
PERFORMANCE_LOGGING_ENABLED |
Enables or disables API performance logging. |
Create a user account and assign the required permissions to run the EKM Proxy service. Skip this step if the service will be run as the root user.
# useradd ekmuser
# gpasswd --add ekmuser hsmusers
# chown -R ekmuser:hsmusers /opt/ekm
# chmod -R 755 /opt/ekm/bin
Create a systemd service to run the EKM Proxy as a system service under a non-privileged user account.
# vi /etc/systemd/system/ekm_proxy.service
Add the following configuration to the ekm_proxy.service file.
[Unit]
Description=EKM Proxy Service
After=network.target

[Service]
Type=simple
User=ekmuser
Group=hsmusers
Restart=on-failure

# Required to allow a non-privileged user to bind to port 443.
AmbientCapabilities=CAP_NET_BIND_SERVICE

RestartSec=5
EnvironmentFile=-/opt/ekm/conf/ekm_proxy.conf
ExecStart=/opt/ekm/bin/ekm_proxy

[Install]
WantedBy=multi-user.target
Reload the systemd configuration, enable the EKM Proxy service, and start the service.
# systemctl daemon-reload
# systemctl enable ekm_proxy
# systemctl start ekm_proxy
Verify that the EKM Proxy service is running.
# systemctl status ekm_proxy -l --no-pager
Connect Azure Key Vault Managed HSM to EKM Proxy
Azure Key Vault Managed HSM communicates with the EKM Proxy over TLS. The EKM Proxy authenticates requests from Azure Key Vault Managed HSM by validating the client certificate against the trusted CA certificate and the certificate's CN. To establish this trust, configure the EKM Proxy with the CA certificate and CN of the Azure Key Vault Managed HSM certificate. To connect Azure Key Vault Managed HSM to the EKM Proxy:
Sign in to Azure using Azure CLI.
# az login
Verify that the Azure Key Vault Managed HSM is provisioned and accessible. The command returns details about the Managed HSM. Verify that it is in an active state before proceeding.
# az keyvault show --hsm-name <MHSM-Name>
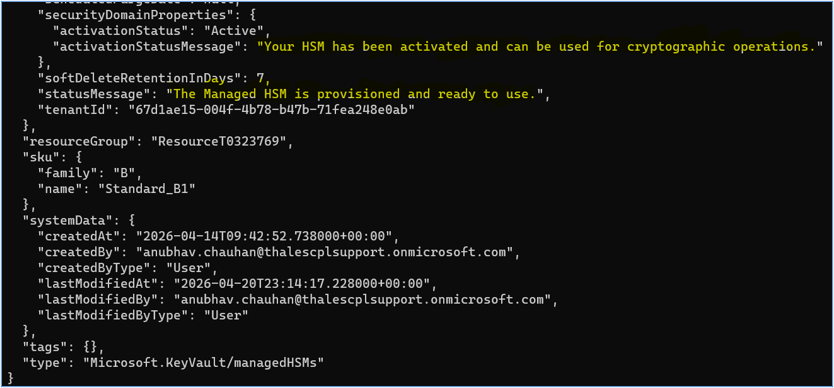
Retrieve the Root CA certificate and the CN of the Azure Key Vault Managed HSM client certificate.
# az keyvault ekm-connection certificate show --hsm-name <MHSM-Name>
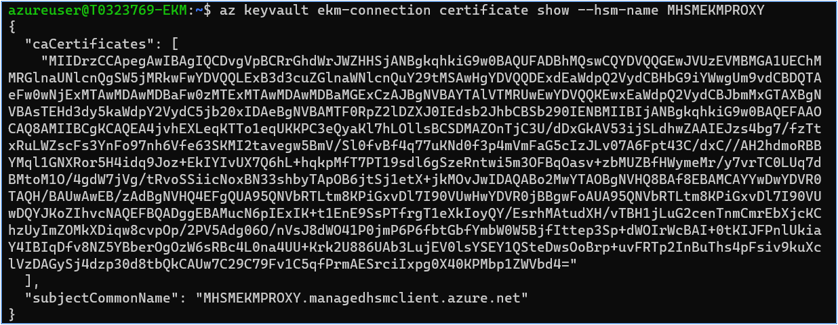
Save the Root CA certificate and CN. The EKM Proxy uses these values to authenticate incoming TLS connections. It will only trust a connection if the presented certificate matches the specified CN and is signed by the specified CA certificate.
Copy the Root CA certificate from the command output and save it as /opt/ekm/certs/mhsm-ca.crt in PEM format.
-----BEGIN CERTIFICATE-----
<paste the copied certificate here>
-----END CERTIFICATE-----
Open the EKM Proxy configuration file and update the TLS_CA and TLS_CLIENT_CN parameters with the CA certificate and CN values retrieved in the previous steps.
# vi /opt/ekm/conf/ekm_proxy.conf

TLS_CA=/opt/ekm/certs/mhsm-ca.crt
TLS_CLIENT_CN=<subjectCommonName>
Restart the EKM Proxy service.
# systemctl restart ekm_proxy
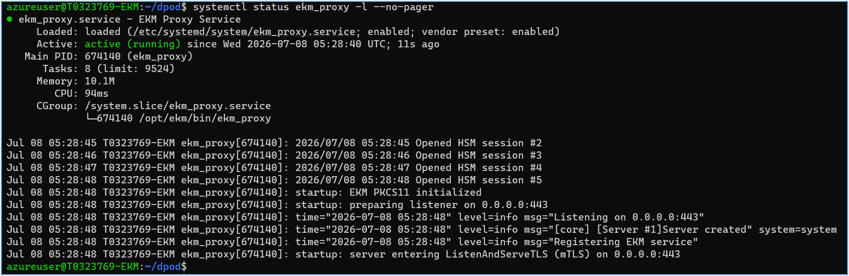
Ensure that the service restarts successfully without any errors.
Create the EKM connection on Azure Key Vault Managed HSM.
# az keyvault ekm-connection create --hsm-name <MHSM-Name> --host <EKM-Proxy-Host-Name> --server-ca-certificate <EKM-Proxy-Server-CA-Certificate>
Where:
-
--server-ca-certificatespecifies the EKM Proxy server CA certificate (/opt/ekm/certs/ca.crt) that was generated using OpenSSL and used to sign the EKM Proxy server TLS certificate. -
--hostspecifies the EKM Proxy endpoint in the formathostnameorhostname:port. If no port is specified, Azure uses the default HTTPS port (443).
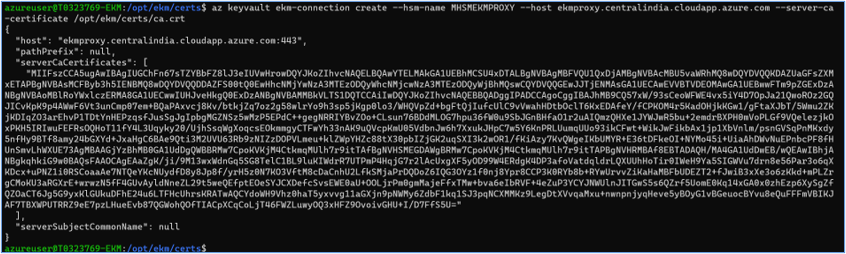
Verify the EKM connection.
# az keyvault ekm-connection check --hsm-name <MHSM-Name>

Create and Use Luna HSM Keys in Azure Key Vault Managed HSM
Azure Key Vault Managed HSM can create a key reference to an existing Key Encryption Key (KEK) stored in the Luna HSM. The key material remains in the Luna HSM and is never imported into Azure Key Vault Managed HSM. Instead, Azure Key Vault Managed HSM stores a reference to the external key and uses the EKM Proxy to perform cryptographic operations on the Luna HSM. To create and use an external key:
Create a key reference in Azure Key Vault Managed HSM that points to an existing KEK in the Luna HSM.
# az keyvault key create --external-key-id <key-id-of-KEK> --hsm-name <MHSM-Name> --name <Managed-HSM-Key-Name>
Where:
-
--external-key-idspecifies the unique identifier (id) of the KEK created on the Luna HSM. The EKM Proxy uses this identifier to locate the corresponding key. -
--namespecifies the name of the key reference created in Azure Key Vault Managed HSM.
No key material is generated or stored in Azure Key Vault Managed HSM. The command creates only a reference to the external key stored in the Luna HSM.
Both RSA and AES KEKs are supported. Ensure that the value specified for --external-key-id matches the id assigned to the KEK when it was created on the Luna HSM.
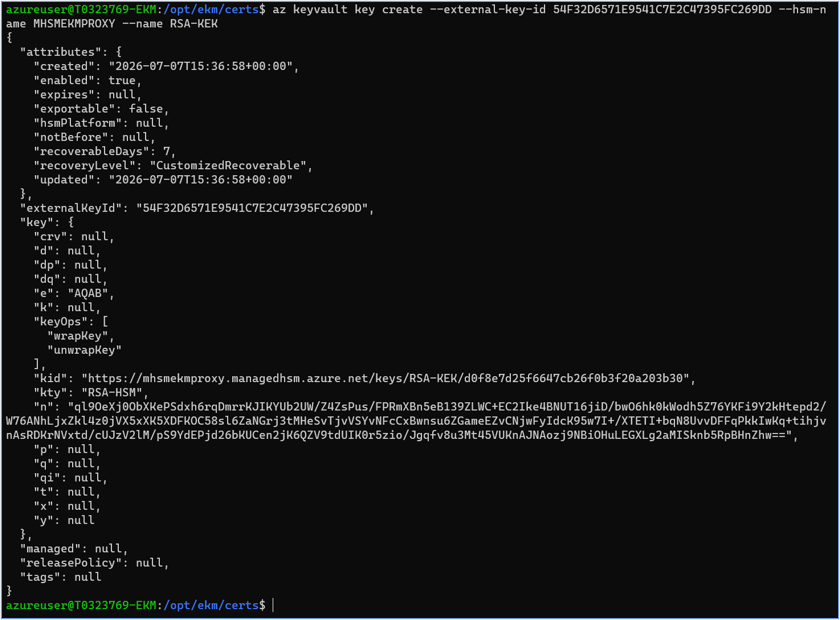
Verify that the key reference has been created by opening the Keys page for your Azure Key Vault Managed HSM in the Azure portal.
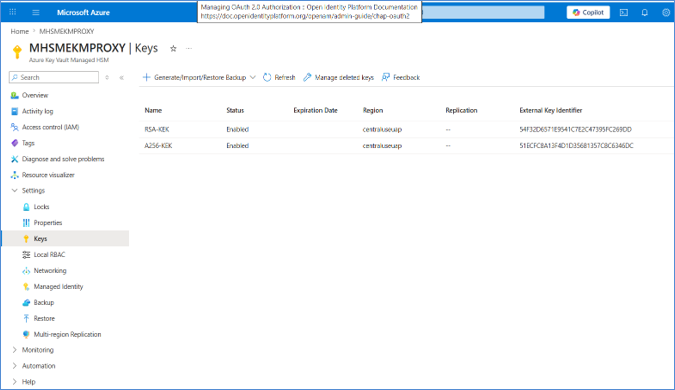
Retrieve the Key Identifier (KID) of the key reference.
# az keyvault key show --hsm-name <MHSM-Name> --name <Managed-HSM-Key-Name> --query "key.kid" -o tsv
The KID uniquely identifies the key reference within Azure Key Vault Managed HSM.

After the key reference has been created, Azure services can use it for cryptographic operations. During these operations, Azure Key Vault Managed HSM forwards the requests to the EKM Proxy, which performs the requested operation using the corresponding key stored in the Luna HSM. To verify the integration, perform a wrap and unwrap operation as follows.
Create the request body for the wrap operation. Set the value field to the Base64URL-encoded plaintext key material to be wrapped, and save the file as wrapkey.json.
{
  "alg": "RSA-OAEP-256",
  "value": "<base64url-encoded-plaintext-key>"
}
For AES KEKs, specify "A256KW" or "A256KWP" instead of "RSA-OAEP-256" for the alg parameter.
Invoke the wrapkey endpoint on the Azure Key Vault Managed HSM key reference.
# az rest --method POST --uri "https://<Managed-HSM-Name>.managedhsm.azure.net/keys/<key-reference-name>/wrapkey?api-version=0.1" --resource "https://managedhsm.azure.net" --headers "Content-Type=application/json" --body @wrapkey.json

Create the request body for the unwrap operation using the wrapped value returned by the previous step. Save the file as unwrapkey.json.
{
  "alg": "RSA-OAEP-256",
  "value": "<wrapped-value>"
}
For AES KEKs, specify "A256KW" or "A256KWP" instead of "RSA-OAEP-256" for the alg parameter.
Call the unwrapkey endpoint to confirm round-trip correctness.
# az rest --method POST --uri "https://<Managed-HSM-Name>.managedhsm.azure.net/keys/<key-reference-name>/unwrapkey?api-version=0.1" --resource "https://managedhsm.azure.net" --headers "Content-Type=application/json" --body @unwrapkey.json

This completes the integration of Managed HSM with Luna HSM using EKM Proxy. With the external key created and verified, it is ready to be consumed by Azure services.
Example: Encrypt an Azure Storage Account with the External Key
The following steps configure an Azure Storage Account to use the external key for encryption, showing how the key can be consumed by Azure services.
Create a new Storage Account in the "US Central EUAP" region, using Azure Blob Storage as the preferred storage type. Replace the placeholder values in angle brackets with your own unique values.
# az storage account create --name <account-name> --resource-group <resource-group> --location centraluseuap --sku Standard_RAGRS --kind StorageV2 --min-tls-version TLS1_2 --allow-blob-public-access false
Assign an identity to the storage account. Replace the placeholder values in angle brackets with your own unique values.
# az storage account update --name <account-name> --resource-group <resource-group> --assign-identity
Assign the Managed HSM Crypto Service Encryption User role to the storage account's managed identity, so that the storage account has permissions to access the Managed HSM.
Get the storage account's managed identity. Replace the placeholder values in angle brackets with your own unique values.
# az storage account show --name <account-name> --resource-group <resource-group> --query "identity.principalId" -o tsv

Assign the role to the storage account's managed identity.
# az keyvault role assignment create --hsm-name <MHSM-Name> --assignee <storage-account-principal-id> --role "Managed HSM Crypto Service Encryption User" --scope /keys/<managed-hsm-key-name>
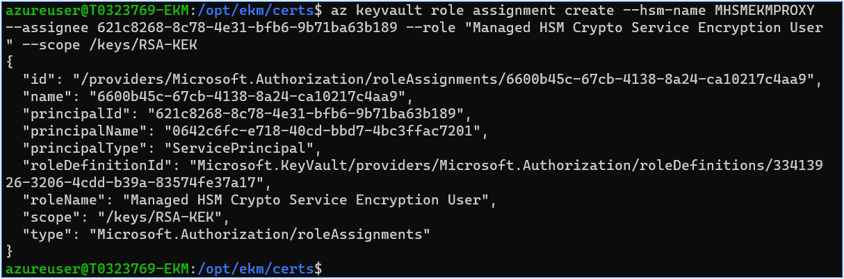
Get the Managed HSM URI.
# az keyvault show --hsm-name <MHSM-Name> --query "properties.hsmUri" -o tsv

Configure Azure Storage encryption with a customer-managed key by using a key stored in the Managed HSM. Replace the placeholder values in angle brackets with your own unique values.
# az storage account update --name <account-name> --resource-group <resource-group> --encryption-key-source Microsoft.Keyvault --encryption-key-name <managed-hsm-key-name> --encryption-key-vault <managed-hsm-uri>
The storage account will be encrypted using the Managed HSM key, which in turn uses the Key Encryption Key generated on the Luna HSM. An output similar to the following will be displayed:
# az storage account update --name ekmteststorage01 --resource-group ResourceT0323769 --encryption-key-source Microsoft.Keyvault --encryption-key-name RSA-KEK --encryption-key-vault https://mhsmekmproxy.managedhsm.azure.net/
.
.
.
  "encryption": {
    "encryptionIdentity": null,
    "keySource": "Microsoft.Keyvault",
    "keyVaultProperties": {
      "currentVersionedKeyExpirationTimestamp": "1970-01-01T00:00:00+00:00",
      "currentVersionedKeyIdentifier": "https://mhsmekmproxy.managedhsm.azure.net/keys/RSA-KEK/d0f8e7d25f6647cb26f0b3f20a203b30",
      "keyName": "RSA-KEK",
      "keyVaultUri": "https://mhsmekmproxy.managedhsm.azure.net/",
      "keyVersion": null,
      "lastKeyRotationTimestamp": "2026-07-07T16:11:05.428337+00:00"
    },
.
.
.
Run the following command to query the encryption status.
# az storage account show --name <account-name> --resource-group <resource-group> --query "encryption" -o json
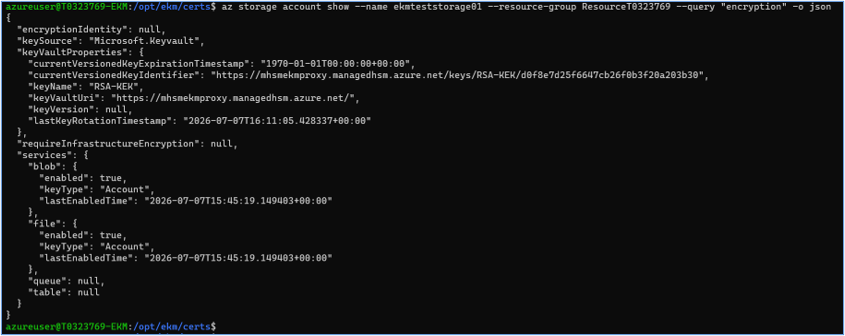
Log in to the Azure Portal and open the Encryption configuration of the Storage Account. The Encryption Type will be displayed as Customer-managed keys.
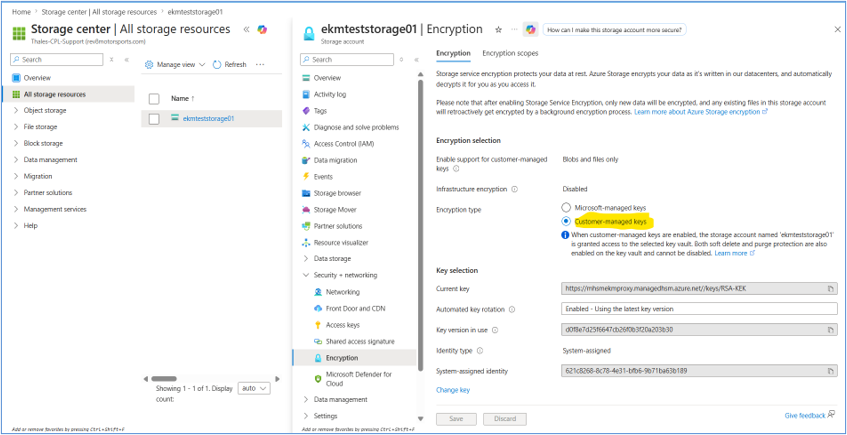
This concludes the integration of Azure Key Vault Managed HSM with Luna HSM. Keys generated on the on-premises Luna HSM are used by Azure Key Vault Managed HSM as customer-managed keys, or external keys. These customer-managed keys are accessible for use by Azure services via Managed HSM, which makes requests to the Luna EKM Proxy.

