



Oracle Key Vault
This guide explains how to integrate Oracle Key Vault with a Luna HSM or Luna Cloud HSM. When Oracle Key Vault is integrated with a Luna HSM, the HSM establishes the Root of Trust (RoT) by first protecting the wallet password. The wallet password then secures the Oracle TDE master key, and that master key, in turn, protects all encryption keys, certificates, and security artifacts managed by Oracle Key Vault. It is important to note that the Luna HSM does not store customer encryption keys; these remain within the Oracle Key Vault server, which is solely responsible for their storage and management.
The key benefits of this integration include:
-
Secure generation, storage, and protection of the identity signing private keys using FIPS 140-3 Level 3 validated hardware.
-
Full life cycle management of the keys to ensure their integrity and reliability throughout their usage.
-
Maintenance of a comprehensive HSM audit trail for transparency and accountability in key operations. It's important to note that Luna Cloud HSM service does not have access to this secure audit trail.
-
Significant performance enhancements by offloading cryptographic operations from application servers.
Supported Platforms
This integration has been tested and verified on the following platforms:
Platforms supported by Luna HSM
| HSM Type | Platforms Certified | Luna Client Version |
|---|---|---|
| Luna HSM | Oracle Key Vault v21.15.0.0.0 Oracle Key Vault v21.11.0.0.0 Oracle Key Vault v21.10.0.0.0 |
Luna Client 10.9.2 Luna Client 10.9.0 Luna Client 10.7.0 |
| Luna HSM | Oracle Key Vault v21.15.0.0.0 Oracle Key Vault v21.5.0.0.0 Oracle Key Vault v21.4.0.0.0 Oracle Key Vault v21.3.0.0.0 with Multi-Master Cluster |
UC 10.4 |
| Luna HSM | Oracle Key Vault v21.1.0.0.0 | UC 10.3 |
| Luna HSM | Oracle Key Vault v18.5.0.0.0 with Multi-Master Cluster Oracle Key Vault v18.4.0.0.0 Oracle Key Vault v18.1.0.0.0 Oracle Key Vault v12.2.0.8 |
UC 10.2 |
This integration has been tested in both high availability and FIPS modes. Luna Client supports all versions of Oracle Key Vault, provided that the base operating system of the Oracle Key Vault deployment is listed in the Luna Client supported OS matrix.
Platforms supported by Luna Cloud HSM
| OpenSSL Toolkit | Platform Tested |
|---|---|
| Luna Cloud HSM | Oracle Key Vault v21.1.0.0.0 |
Prerequisites
The prerequisites for this integration are:
Set up Luna HSM
As the first step to accomplish this integration, you need to set up either On-Premise Luna HSM or Luna Cloud HSM.
Set up On-Premise Luna HSM
Follow these steps to set up your on-premise Luna HSM:
Ensure that the HSM is set up, initialized, provisioned, and ready for deployment. For more information, refer to Luna HSM documentation.
Create a partition that will be later on used by Oracle Key Vault.
Create and exchange certificate between the Luna Network HSM and client system. Register client and assign partition to create an NTLS connection.
Initialize Crypto Officer and Crypto User roles for the registered partition.
Run the following command to verify that the partition has been successfully registered and configured:
/usr/safenet/lunaclient/bin/lunacm
Upon successful execution, you should observe an output similar to the example provided below:
lunacm (64-bit) v10.7.0-255. Copyright (c) 2023 Thales Group. All rights reserved.
Available HSMs:
Slot Id ->                           0
Label ->                             TPA01
Serial Number ->                     1312109862206
Model ->                             LunaSA 7.8.4
Firmware Version ->                  7.8.4
Bootloader Version  ->               1.1.5
Configuration ->                     Luna User Partition With SO (PW) Key Export With Cloning Mode
Slot Description ->                  Net Token Slot
FM HW Status ->                      Non-FM
Current Slot ID:                     0
Refer to Luna HSM documentation for detailed steps on creating NTLS connection, initializing the partitions, and assigning various user roles.
For proper configuration of a PED-based Luna HSM, it is recommended to activate partition policies 22 and 23, allowing for both activation and auto-activation.
Managing User Access to Your HSM
Initially, only the root user can access the Hardware Security Module (HSM). However, you can grant access to specific non-root users by including them in the hsmusers group. This group is automatically created when you install the client software. Even if you later uninstall the client software, the hsmusers group remains intact, ensuring you can upgrade your software without losing your user access settings.
To add users to the hsmusers group
If you wish to permit non-root users or applications to interact with the HSM device, you must assign these users to the hsmusers group. Make sure that the users you intend to add to the hsmusers group are already established on the client workstation. Only users added to the hsmusers group will be granted access to the HSM device. Follow these steps to add a user to the hsmusers group:
Ensure that you possess sudo privileges on the client workstation.
Add a user to the hsmusers group using the command:
sudo gpasswd --add <username> hsmusers
Replace username with the actual username you want to include in the hsmusers group.
To remove users from the hsmusers group
If you need to withdraw a user's authorization to access the HSM device, you can remove them from the hsmusers group. Carry out the following steps to remove a user from the hsmusers group:
Confirm that you hold sudo privileges on the client workstation.
Eliminate a user from the hsmusers group using the command:
sudo gpasswd --add <username> hsmusers
Replace username with the specific username you want to exclude from the hsmusers group. To observe the changes, you will need to log in again.
Any user you remove will retain access to the HSM device until the client workstation is rebooted.
Set up Luna HSM High-Availability Group
Refer to Luna HSM documentation for HA steps and details regarding configuring and setting up two or more HSM boxes on host systems. You must enable the HAOnly setting in HA for failover to work so that if the primary goes down due to any reason, all calls get automatically routed to the secondary until the primary recovers and starts up.
Set up Luna Cloud HSM
Follow these steps to set up your Luna Cloud HSM:
Transfer the downloaded .zip file to your client workstation using pscp, scp, or other secure means
This integration has been certified on the RHEL platform.
Extract the .zip file into a directory on your client workstation.
Extract or untar the appropriate client package for your operating system. Do not extract to a new subdirectory; place the files in the client install directory.
tar -xvf cvclient-min.tar
Run the setenv script to create a new configuration file containing information required by the Luna Cloud HSM service.
source ./setenv
To add the configuration to an already installed UC client, use the –addcloudhsm option when running the setenv script.
Run the lunacm utility and verify that the Cloud HSM service is listed.
If your organization requires non-FIPS algorithms for your operations, ensure that the Allow non-FIPS approved algorithms check box is checked. For more information, refer to Supported Mechanisms.
Set Up Oracle Key Vault
Oracle Key Vault is a software appliance that is delivered as an ISO image. It is recommended that you install Oracle Key Vault on its own dedicated physical server. The Oracle Key Vault ISO image consists of a preconfigured operating system, an Oracle database, and the Oracle Key Vault application. For detailed information about installing Oracle Key Vault, refer to the Oracle Key Vault documentation.
Configure Oracle Key Vault to Use Thales Luna HSM
This section describes how to configure Oracle Key Vault to use Thales Luna HSM. When you initialize the HSM from the Oracle Key Vault Management Console, the master encryption key that serves as the root of trust is created on a Luna HSM partition and used by Oracle Key Vault. This section covers the following topics:
-
Initialize Luna HSM in Oracle Key Vault: Configure the Oracle Key Vault server and initialize Luna HSM from the Management Console.
-
Prepare Oracle Key Vault for Upgrade with Luna HSM: Create and run the pre-upgrade and post-upgrade scripts that preserve Luna HSM connectivity when you upgrade Oracle Key Vault v21.3 or later.
Initialize Luna HSM in Oracle Key Vault
Before you begin, ensure that you have completed the steps in the Prerequisites section and verified that Luna Client is connected to Luna HSM on the Oracle Key Vault server.
These steps apply whether you are setting up Oracle Key Vault for the first time or upgrading an existing installation to the latest version of Oracle Key Vault.
To initialize Luna HSM in Oracle Key Vault:
Log in to the Oracle Key Vault server through SSH as the support user, and then switch to the root user using su.
Skip steps 1-9 if you are using Luna Client v6.x, or the Standalone Luna Cloud HSM service with the minimum client package.
Add the oracle user to the hsmusers group.
# gpasswd --add oracle hsmusers
Reboot the Oracle Key Vault server for the changes to take effect.
# reboot
Log in to the Oracle Key Vault server through SSH as the support user, and then switch to the root user using su.
Skip steps 4-9 and start directly from step 10 if you are using Oracle Key Vault v21.2 or lower. These steps apply to Oracle Key Vault v21.3 onward.
Navigate to the following directory:
# cd /usr/local/okv/hsm/generic
NOTE: Starting from Oracle Key Vault v21.3, Oracle provides an interface to enable Luna HSM using a Luna Client version other than v6.x.
Open the okv_hsm.conf file in a file editor, and make the following changes.
# The vendor name, to be displayed on the HSM page on the management console.
VENDOR_NAME="Thales_Luna"

# The location of the PKCS#11 library. This file must be preserved on upgrade.
PKCS11_LIB_LOC="/usr/safenet/lunaclient/lib/libCryptoki2_64.so"

# A colon-separated list of the full paths of files and directories that must
# be preserved on upgrade. All of these files and directories should have been
# created by the HSM client software setup; none should have existed on Oracle
# Key Vault by default. These will be necessary when upgrading to a version
# of Oracle Key Vault that is running on a higher major OS version.
# Do not use wildcards.
PRESERVED_FILES="/usr/safenet/lunaclient:/etc/Chrystoki.conf:/usr/safenet/lunaclient/lib/libCryptoki2_64.so"
All of the parameters shown above are essential. However, the PRESERVED_FILES parameter applies only during the next major version upgrade.
Open the okv_hsm_env file in a file editor, and make the following changes.
# Oracle Key Vault HSM vendor environment file
# Use this file to set any necessary environment variables needed when using
# a vendor's PKCS#11 library. Parameter names must not contain '='.
# Parameter values must be enclosed in double quotes. Names and values must
# be shorter than 4096 characters.

# Below is an example. Remove the '#' character to uncomment the line.
#EXAMPLE_ENV_VAR_NAME="EXAMPLE_ENV_VAR_VALUE"
ChrystokiConfigurationPath="/etc"
Open the okv_hsm_mid_upgrade file in a file editor, and make the following changes.
This script is used only during upgrades of Oracle Key Vault. If you are upgrading from Oracle Key Vault v21.3 to a later version, refer to Preparing Oracle Key Vault for Upgrade with Luna HSM.
######################################################################
# Do not make changes above this line
######################################################################

# For now, this script does nothing, so log it and exit.
logger -t "${LOGTAG}" -p "${LOGDEBUG}" "Adding hsmusers group"

sudo groupadd hsmusers
exit ${DBFW_PM_CHANGED}

# Until changes are added, exit indicating that no changes occurred.
exit ${DBFW_PM_NO_CHANGE_REQUIRED}

# If changes are made and were successful, you should exit like the commented
# code below:
#exit ${DBFW_PM_CHANGED}
Reboot the Oracle Key Vault server for the changes to take effect.
# reboot
Log in to the Oracle Key Vault Management Console at https://<Oracle_Key_Vault_Server_IP>, using the credentials of a user with system administrator privileges.
The System Admin user credentials are created during the installation and configuration of Oracle Key Vault.
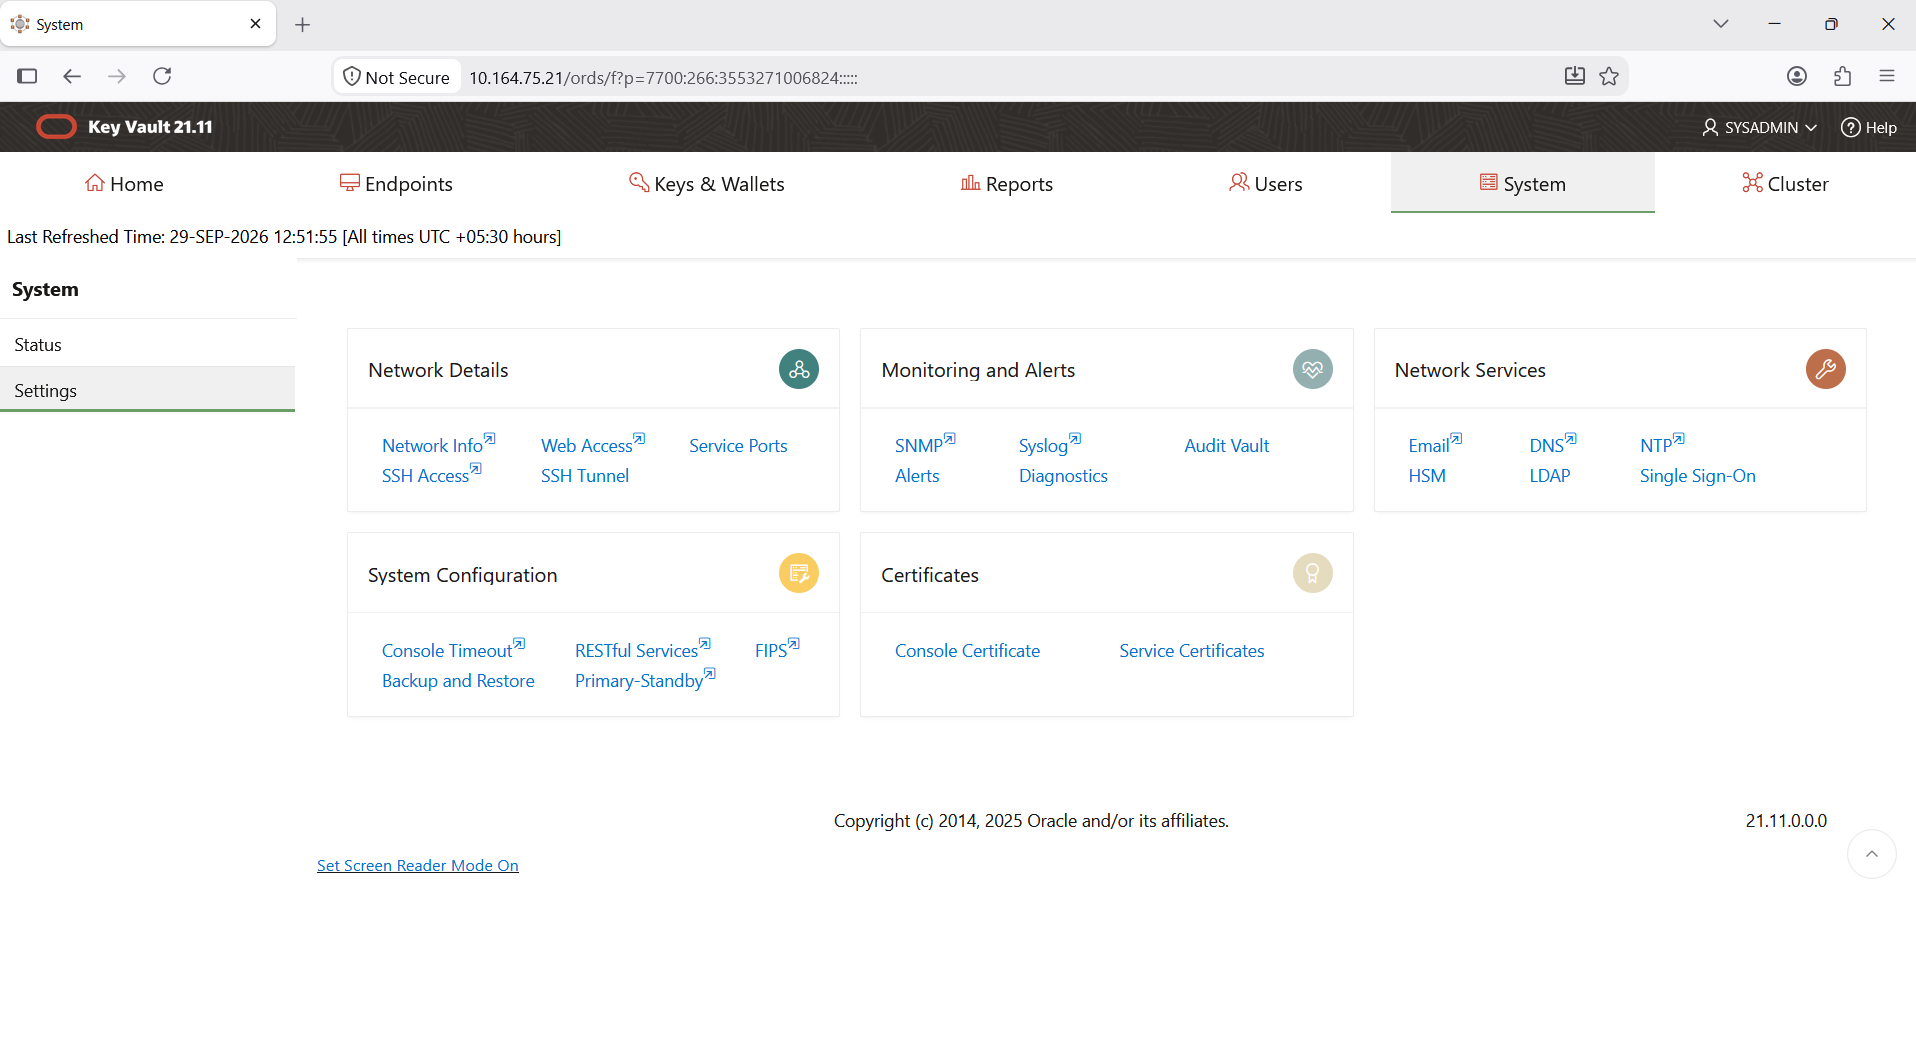
Navigate to the System tab.
Access the HSM settings, depending on your Oracle Key Vault version:
-
For Oracle Key Vault v21.1 or later, click Settings in the left sidebar. Under Network Services, click HSM.
-
For Oracle Key Vault v18.5 or earlier, click Hardware Security Module in the left sidebar.
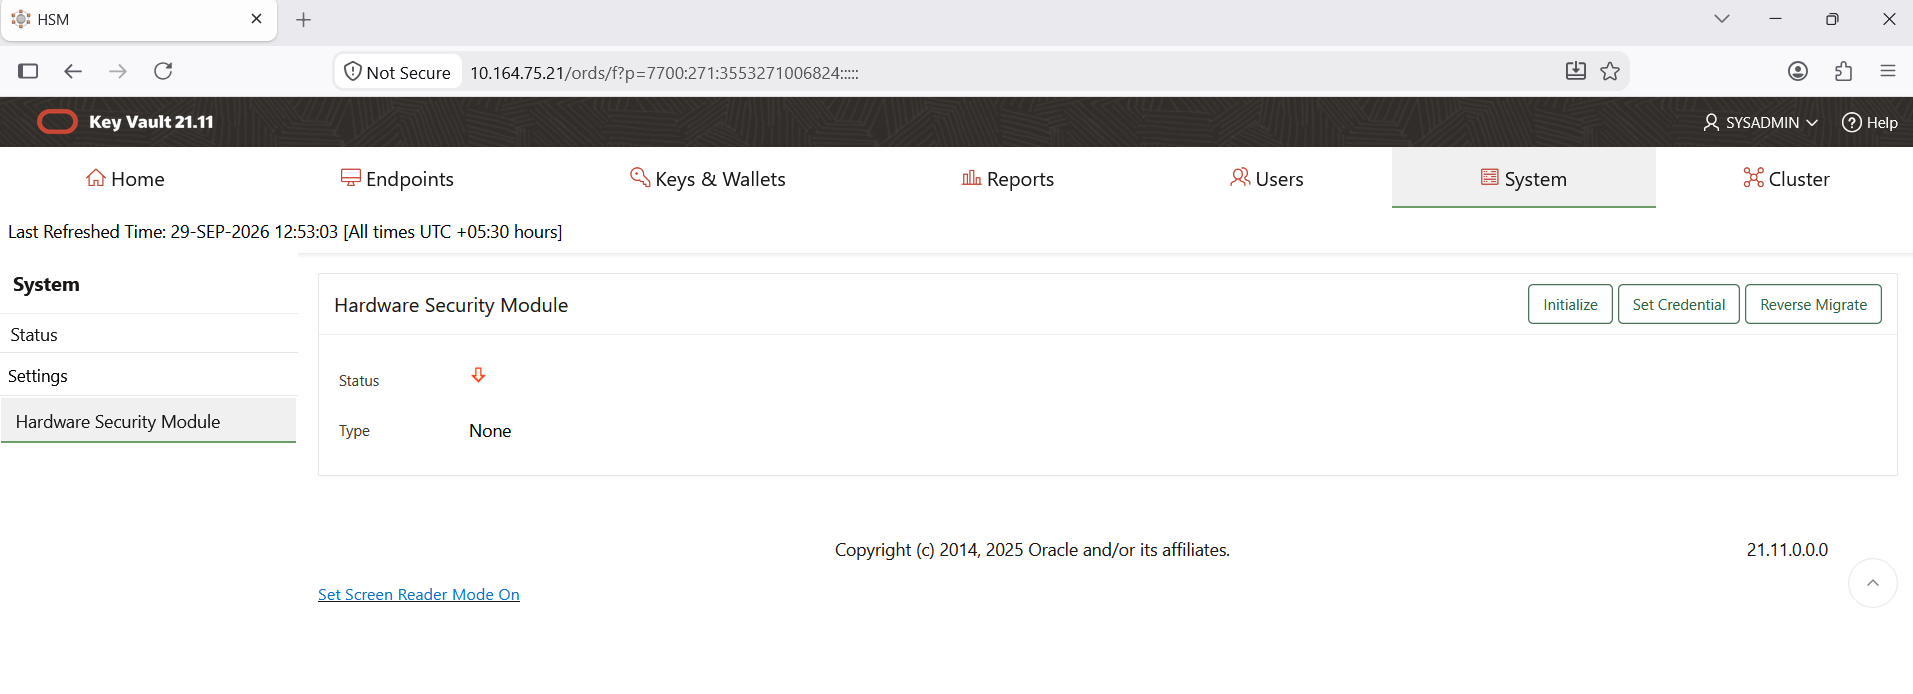
Check the HSM initialization status. If the HSM is not initialized, a red arrow pointing down is displayed in the Status field.
Click Initialize. The Initialize HSM dialog box is displayed.
From the Vendor drop-down list, select the vendor:
-
For Oracle Key Vault v21.3 onward, when using a Luna Client version other than v6.x, select the vendor that matches the
VENDOR_NAMEvalue defined in theokv_hsm.conffile. -
For Oracle Key Vault v21.2 or lower, select Thales, which is listed at the top of the drop-down list.
In earlier versions of Oracle Key Vault (v18.4 or lower), select SafeNet from the Vendor drop-down list. Thales is available from Oracle Key Vault v18.5 onward.
Enter the HSM credential (the partition password) in both the HSM Credential and Re-enter HSM Credential fields, and enter the recovery passphrase (set during the post-installation setup of Oracle Key Vault) in the Recovery Passphrase field. Select the Use Token Label check box, and then enter the token label in the Token Label field.
Beginning with Oracle Key Vault v18.4, use the token label, especially when multiple partitions are registered. The token label functionality is not supported in Oracle Key Vault versions earlier than v18.4.
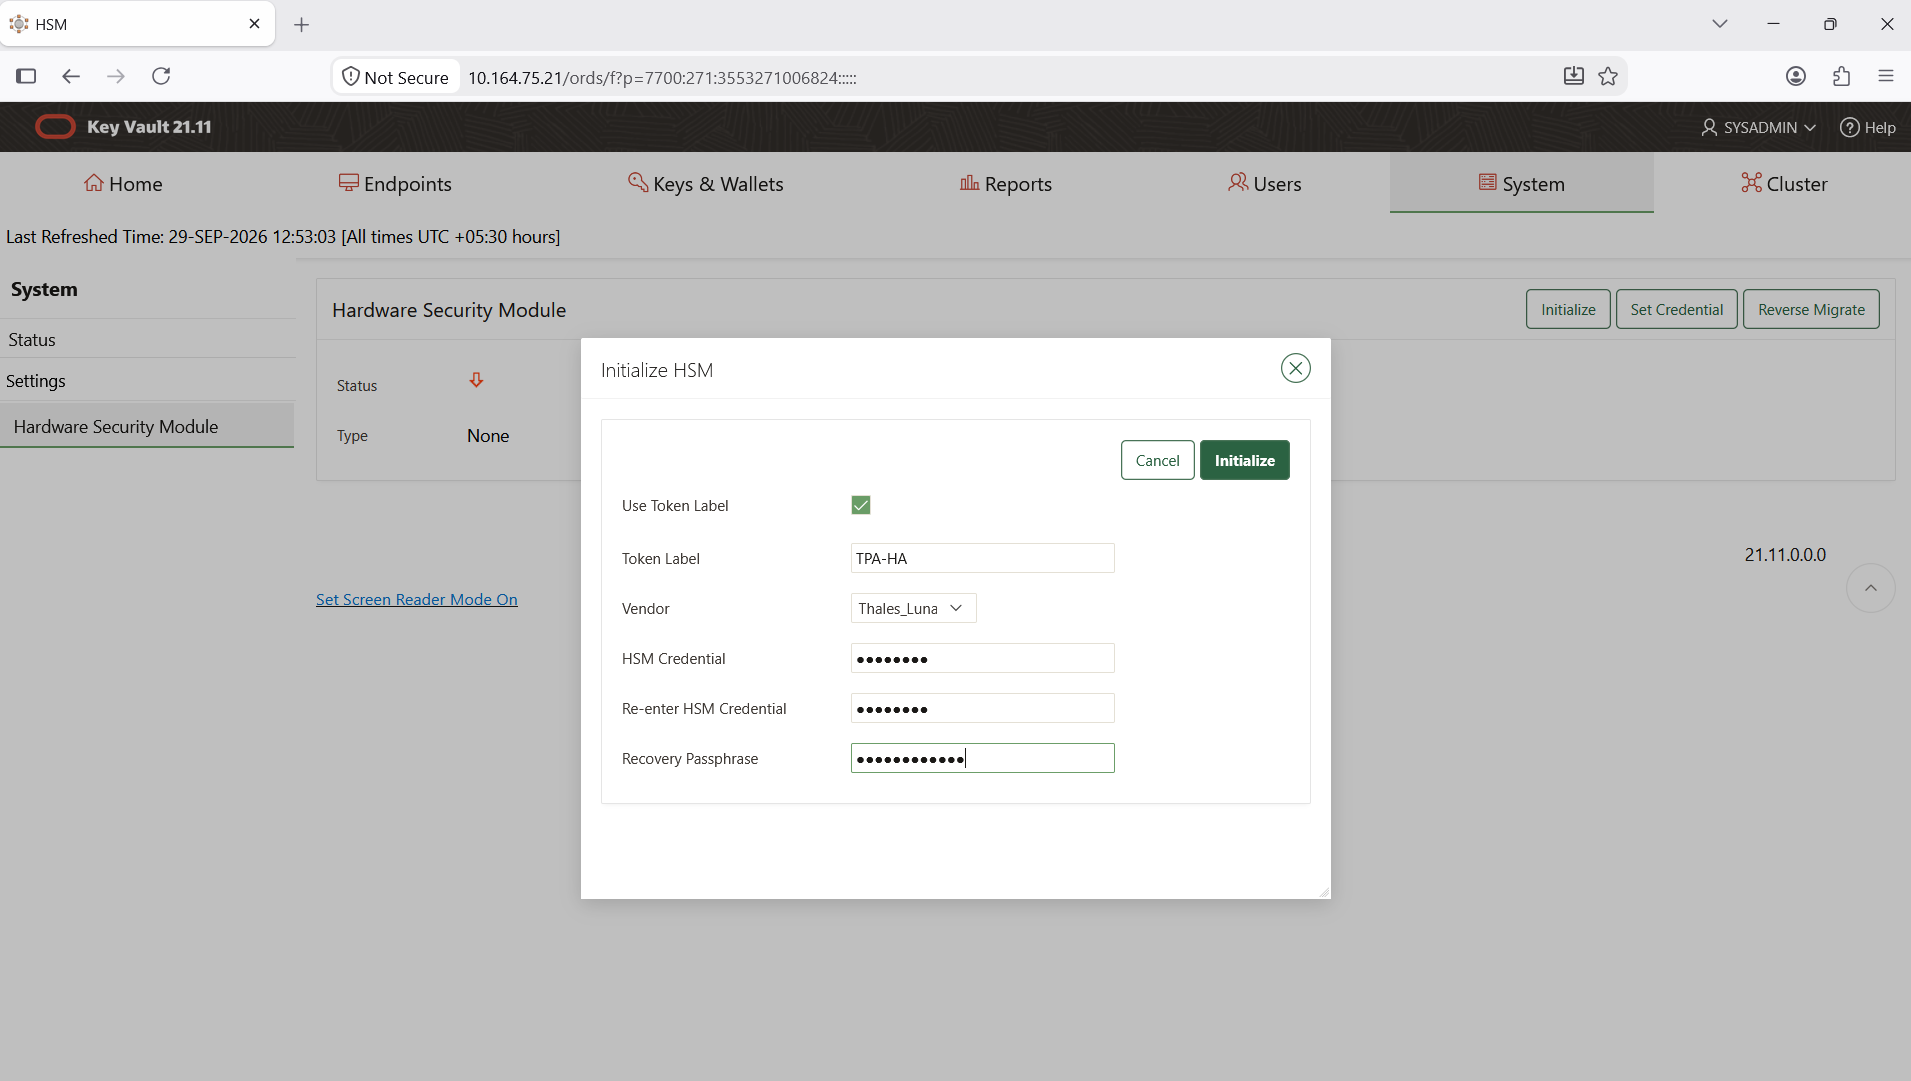
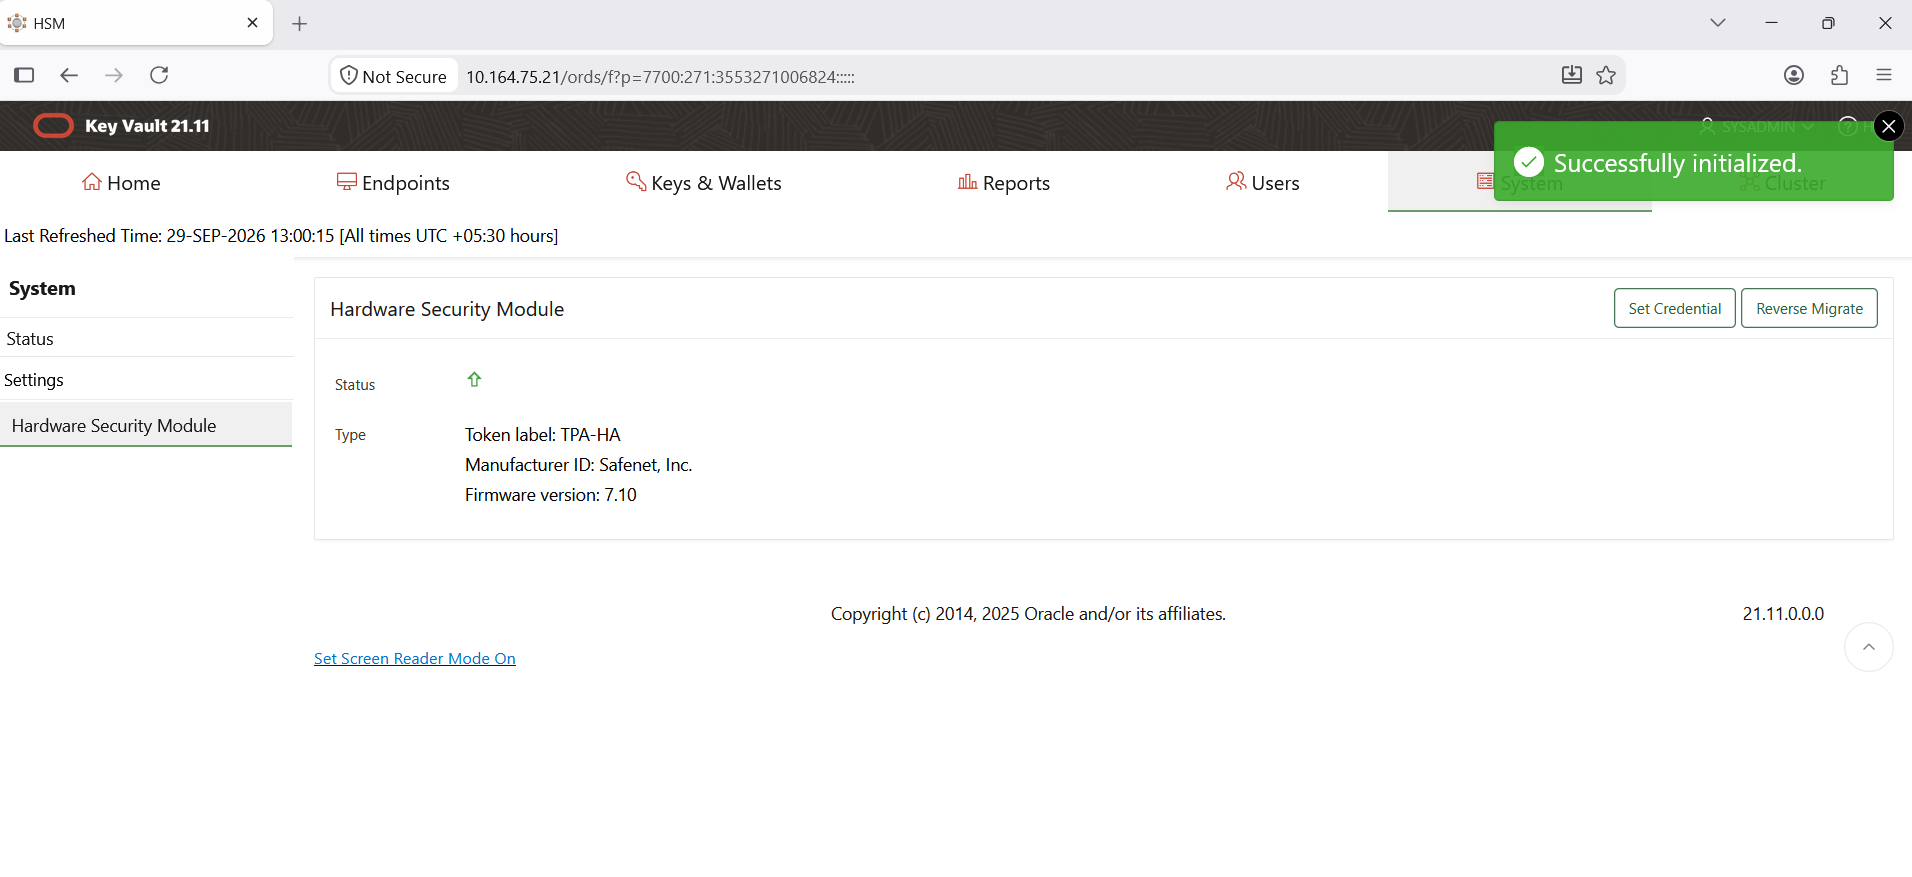
Click Initialize. On success, the following message is displayed.
Check the HSM status after initialization. A green arrow pointing up, along with the HSM partition details, is displayed.
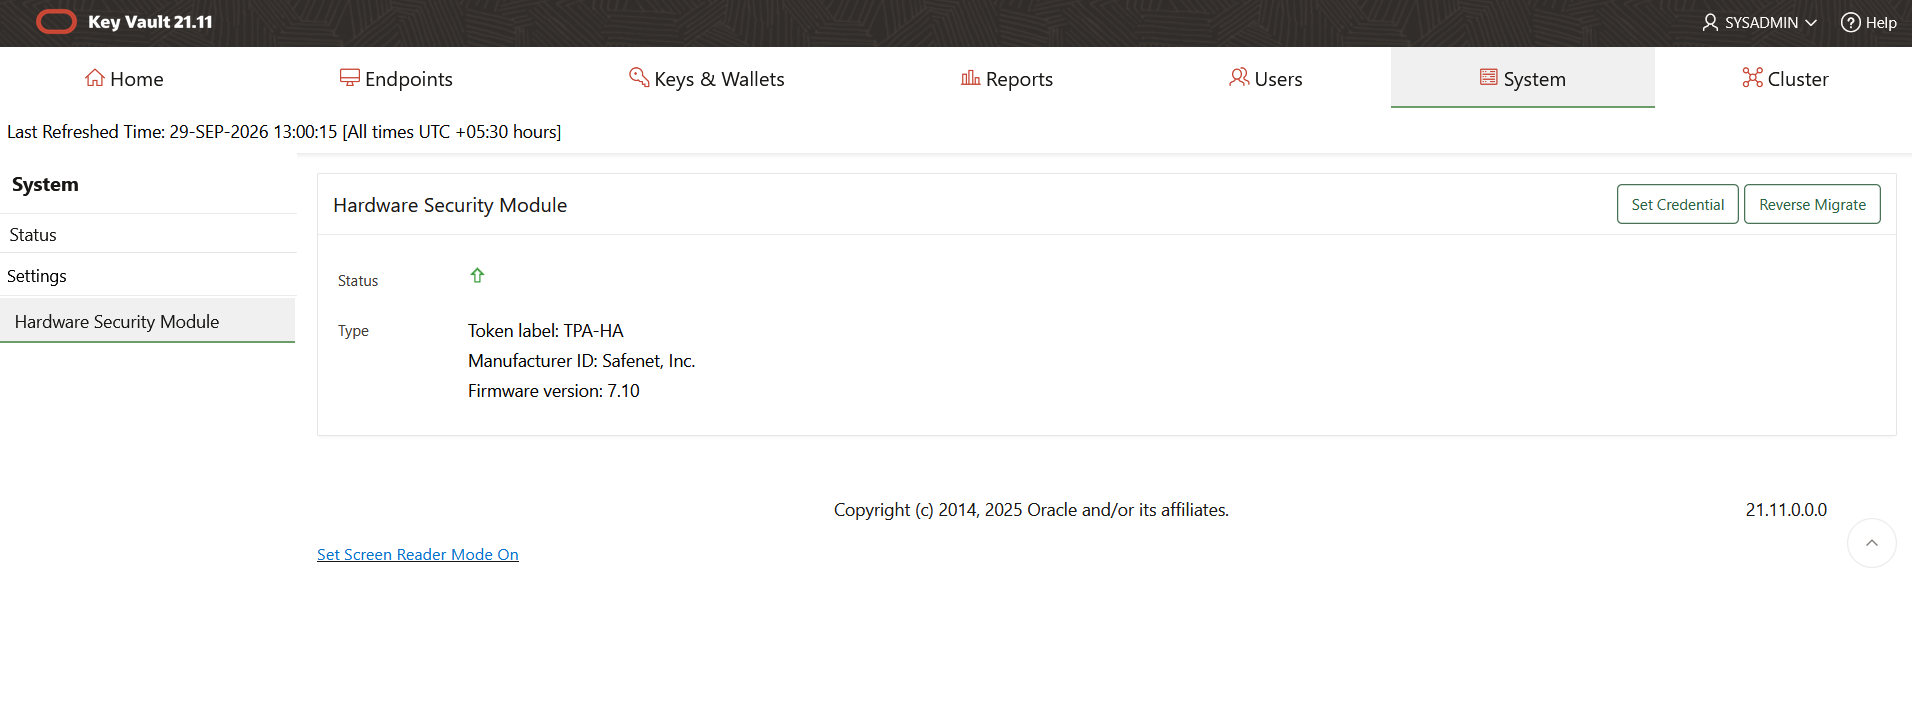
If you change the HSM credential after initialization, you must also update the credential on the Oracle Key Vault server by using the Set Credential option.
Confirm that the master encryption key OKV 18.1 HSM Root Key has been created on the Luna HSM partition.
# /usr/safenet/lunaclient/bin/cmu list -label "OKV 18.1 HSM Root Key"

This completes the integration of Oracle Key Vault with Thales Luna HSM.
Prepare Oracle Key Vault for Upgrade with Luna HSM
The steps in this section apply to Oracle Key Vault v21.3 onward when Luna HSM is configured with Oracle Key Vault.
If your Oracle Key Vault installation is set up with Luna HSM, complete the following tasks before you start the upgrade. They help to keep your data safe and your configuration consistent.
-
Perform a one-time backup of the Oracle Key Vault server to a remote destination. This backup is mandatory to protect your data and to allow recovery if the upgrade fails.
-
Log in to the Oracle Key Vault server through SSH as the
supportuser, and then switch to therootuser. -
Create the required pre-upgrade and post-upgrade scripts in the
/optdirectory. -
Run the scripts as instructed to validate the Luna HSM-related configuration before the upgrade begins and after it completes.
-
Proceed with the upgrade by following the official Oracle Key Vault upgrade documentation.
To prepare the Oracle Key Vault server for the upgrade and ensure that Luna HSM connectivity is set up correctly:
Log in to the Oracle Key Vault server through SSH as the support user, and then switch to the root user using su.
In the /opt directory, create the required pre-upgrade and post-upgrade scripts. You will run them at the appropriate points in this procedure.
Depending on your Luna Client version, select the appropriate pre-upgrade script. Save the script as /opt/pre-upgrade-luna.sh, and make it executable before running it.
Pre-upgrade script for Luna Client 10.4.1 or lower:
#!/bin/bash
chown -R root:root /etc/Chrystoki.conf
chmod 644 /etc/Chrystoki.conf
chmod -R g-s /usr/safenet/lunaclient/cert
chown -R root:root /usr/safenet/lunaclient/cert
chmod -R 755 /usr/safenet/lunaclient/cert
chmod -R g-s /usr/safenet/lunaclient/configData
chown -R root:root /usr/safenet/lunaclient/configData
chmod -R 755 /usr/safenet/lunaclient/configData
chmod -R g-s /usr/safenet/lunaclient/data
chown -R root:root /usr/safenet/lunaclient/data
chmod -R 777 /usr/safenet/lunaclient/data
sudo -u oracle /usr/safenet/lunaclient/bin/vtl listslots
Pre-upgrade script for Luna Client 10.5.0 or higher:
#!/bin/bash
chown -R root:root /etc/Chrystoki.conf
chmod 644 /etc/Chrystoki.conf
chmod -R g-s /usr/safenet/lunaclient/cert
chown -R root:root /usr/safenet/lunaclient/cert
chmod -R 755 /usr/safenet/lunaclient/cert
chmod -R g-s /usr/safenet/lunaclient/configData
chown -R root:root /usr/safenet/lunaclient/configData
chmod -R 755 /usr/safenet/lunaclient/configData
chmod -R g-s /usr/safenet/lunaclient/data
chown -R root:root /usr/safenet/lunaclient/data
chmod -R 777 /usr/safenet/lunaclient/data
chmod -R g-s /usr/safenet/lunaclient/lock
chown -R root:root /usr/safenet/lunaclient/lock
chmod -R 777 /usr/safenet/lunaclient/lock
chown -R root:root /usr/safenet/lunaclient/lib/libSoftToken.so
chmod -R 755 /usr/safenet/lunaclient/lib/libSoftToken.so
sudo -u oracle /usr/safenet/lunaclient/bin/vtl listslots
Create a post-upgrade script to restore Luna HSM connectivity and permissions after the upgrade. Select the appropriate version for your Luna Client, save the script as /opt/post-upgrade-luna.sh, and make it executable.
Post-upgrade script for Luna Client 10.4.1 or lower:
#!/bin/bash
gpasswd --add oracle hsmusers
chown -R root:hsmusers /etc/Chrystoki.conf
chmod 660 /etc/Chrystoki.conf
chmod -R 755 /usr/safenet/lunaclient/bin
chmod -R 755 /usr/safenet/lunaclient/lib
chmod -R 755 /usr/safenet/lunaclient/plugins
chown -R root:hsmusers /usr/safenet/lunaclient/cert
chmod -R 2770 /usr/safenet/lunaclient/cert
chmod 664 /usr/safenet/lunaclient/cert/client/*
chmod 664 /usr/safenet/lunaclient/cert/server/*
chown -R root:hsmusers /usr/safenet/lunaclient/configData
chmod -R 2770 /usr/safenet/lunaclient/configData
chmod 664 /usr/safenet/lunaclient/configData/token/001/*
chown -R root:hsmusers /usr/safenet/lunaclient/data
chmod -R 2770 /usr/safenet/lunaclient/data
chmod -R 2770 /usr/safenet/lunaclient/data/*
sudo -u oracle /usr/safenet/lunaclient/bin/vtl listslots
Post-upgrade script for Luna Client 10.5.0 or higher:
#!/bin/bash
gpasswd --add oracle hsmusers
chown -R root:hsmusers /etc/Chrystoki.conf
chmod 660 /etc/Chrystoki.conf
chmod -R 755 /usr/safenet/lunaclient/bin
chmod -R 755 /usr/safenet/lunaclient/lib
chown -R root:hsmusers /usr/safenet/lunaclient/lib/libSoftToken.so
chmod 550 /usr/safenet/lunaclient/lib/libSoftToken.so
chmod -R 755 /usr/safenet/lunaclient/plugins
chown -R root:hsmusers /usr/safenet/lunaclient/cert
chmod -R 2770 /usr/safenet/lunaclient/cert
chmod 664 /usr/safenet/lunaclient/cert/client/*
chmod 664 /usr/safenet/lunaclient/cert/server/*
chown -R root:hsmusers /usr/safenet/lunaclient/configData
chmod -R 2770 /usr/safenet/lunaclient/configData
chmod 664 /usr/safenet/lunaclient/configData/token/001/*
chown -R root:hsmusers /usr/safenet/lunaclient/data
chmod -R 2770 /usr/safenet/lunaclient/data
chmod -R 2770 /usr/safenet/lunaclient/data/*
chown -R root:hsmusers /usr/safenet/lunaclient/lock
chmod -R 2770 /usr/safenet/lunaclient/lock
chmod 660 /usr/safenet/lunaclient/lock/*
sudo -u oracle /usr/safenet/lunaclient/bin/vtl listslots
Run pre-upgrade-luna.sh before you run the upgrade command /usr/bin/ruby /images/upgrade.rb --confirm, as described in the Oracle Key Vault upgrade documentation.
Do not run the Oracle Key Vault upgrade script without first running pre-upgrade-luna.sh, otherwise the upgrade may fail. Ensure that you have a pre-upgrade backup of the Oracle Key Vault server so that you can recover if needed.
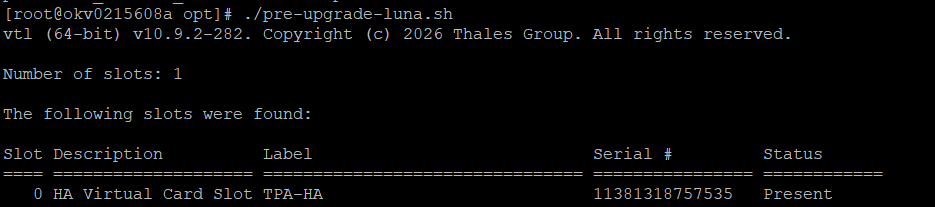
After running pre-upgrade-luna.sh, verify that its output shows the Luna HSM slot details. The output should be similar to the following example.
Follow the Oracle Key Vault upgrade documentation, and run the upgrade script that is included with the upgrade ISO.
root# /usr/bin/ruby /images/upgrade.rb --confirm
The upgrade is complete when the screen displays the following text:
Oracle Key Vault Server version. This appliance was upgraded from previous_release_version.
Confirm that Oracle Key Vault has been upgraded to the correct version.
-
Log in to the Oracle Key Vault Management Console as a user who has the System Administrator role.
-
Select the System tab, and then select Status.
-
Verify that the displayed version is the latest release number. The release number is also displayed at the bottom of each page, to the right of the copyright information.
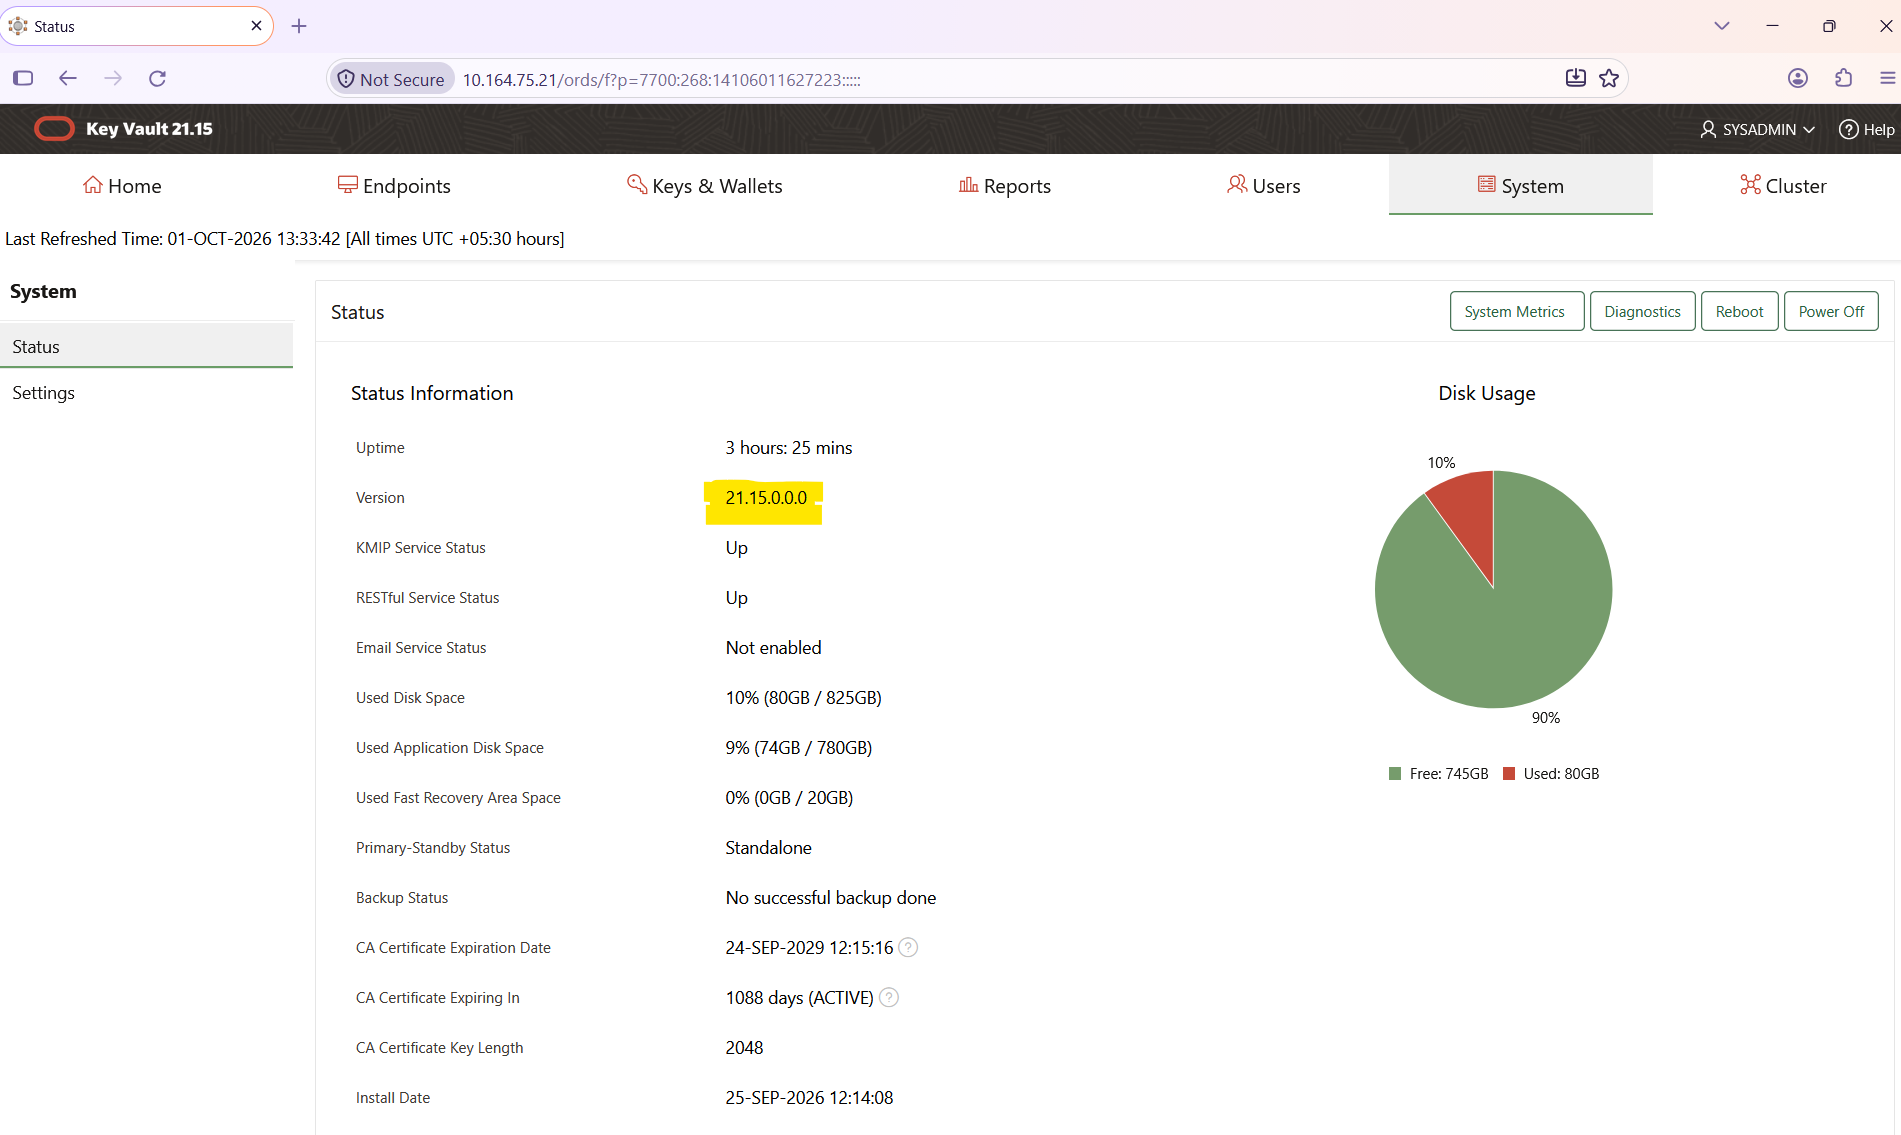
Click Settings. Under Network Services, click HSM, and then verify that Luna HSM is shown as enabled in the upgraded Oracle Key Vault version.
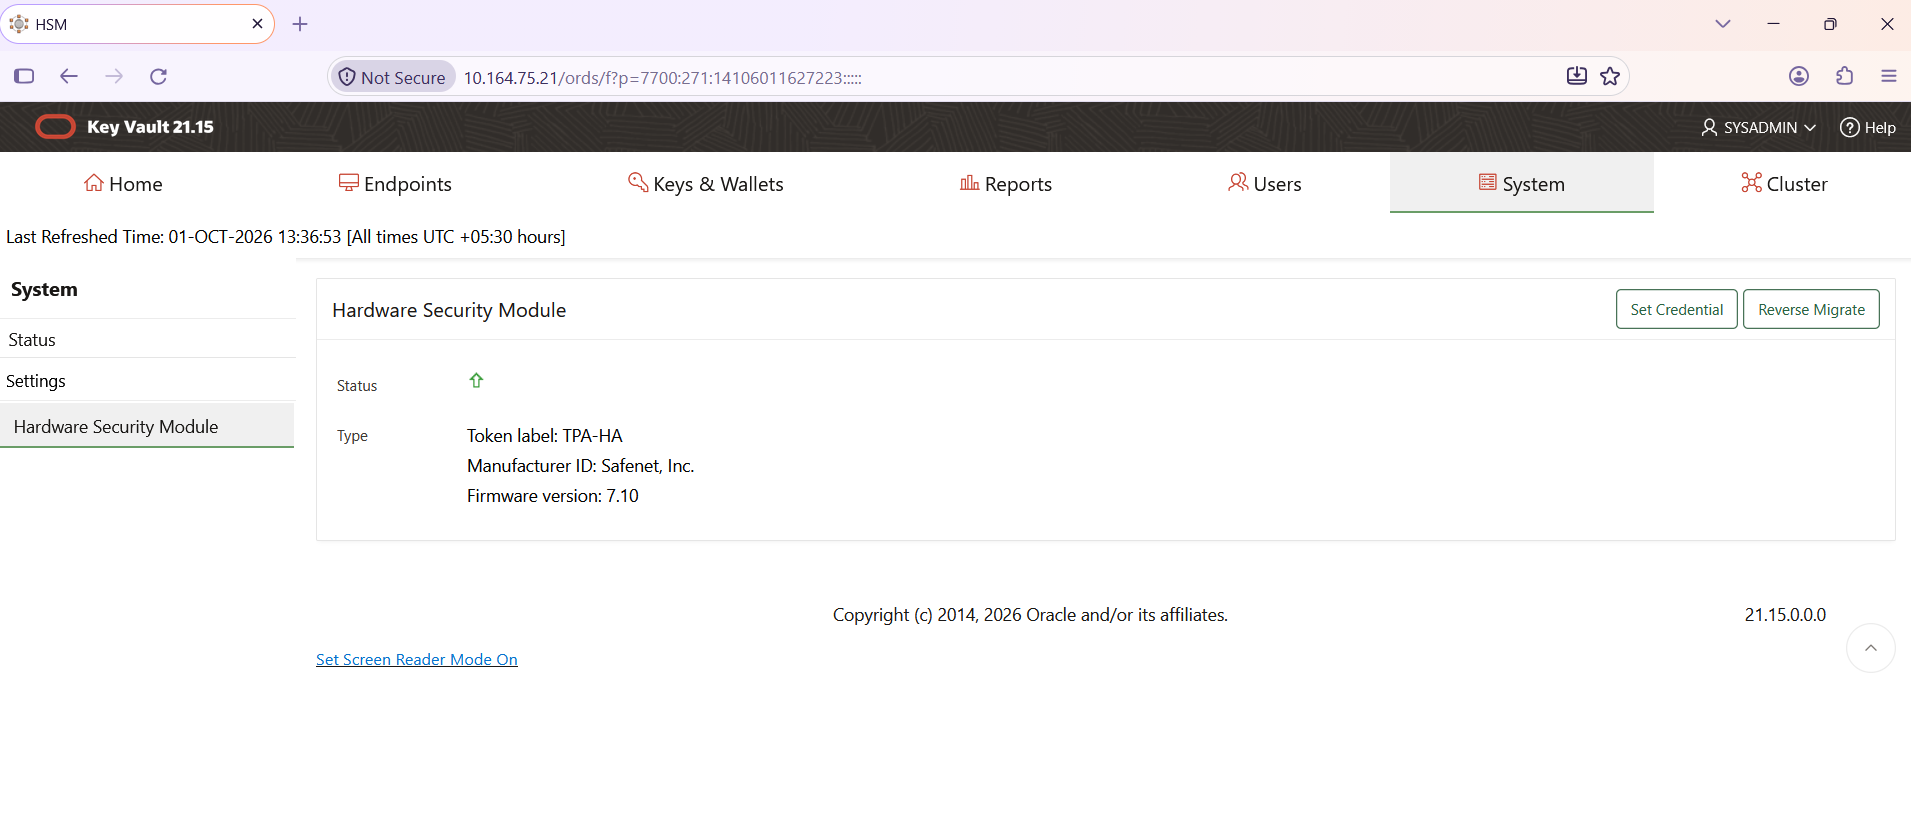
Log in to the Oracle Key Vault server through SSH as the support user, and then switch to the root user using su.
Run post-upgrade-luna.sh, and verify that the Luna HSM information is displayed after the upgrade. The output should include a message such as Adding user oracle to group hsmusers, as shown in the following example.
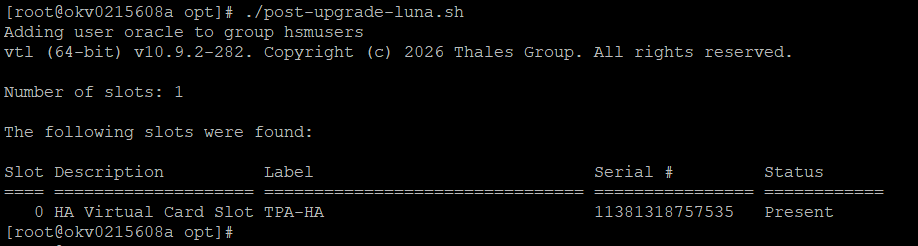
If post-upgrade-luna.sh does not display the Luna HSM information, do not restart the Oracle Key Vault server. Contact Thales Customer Support for assistance.
When you have confirmed the output, continue with the post-upgrade steps described in the official Oracle Key Vault documentation.
Back up and Restore Oracle Key Vault in HSM mode
Ensuring the availability of a backup is crucial for maintaining Oracle Key Vault data integrity, especially when HSM mode is enabled. Regular backups not only reduce downtime but also provide a safety net for unexpected data losses and system failures. While backup options include local destinations, opting for a remote destination is recommended. This guide illustrates the process of performing a one-time backup.
Back up Oracle Key Vault in HSM mode
To back up Oracle Key Vault in HSM mode:
Log in to the Oracle Key Vault management console using a user account with System Administrator privileges.
For Oracle Key Vault v21.1 or later, navigate to System > Settings and click Backup and Restore under System Configuration. For versions v18.5 or below, go to the System tab and click on System Backup in the left sidebar. This will display a list of scheduled and completed backups.
Click Manage Backup Destinations to view all configured backup destinations.
Click Create.
Enter the following information for the backup location:
a. Destination Name: Specify a name for the destination.
b. Transfer Method: By default, set to SCP for secure file copying.
c. Hostname: Enter the IP address of the backup destination. If DNS is configured, provide the hostname.
d. Port: Specify the Port number for SCP. The default is 22.
e. Destination Path: Enter the actual path on the backup destination.
f. Username: Enter the username with read-write permission for the destination path.
g. Authentication Method: Choose between key-based or password-based authentication. For key-based authentication, enter the public key. For password-based authentication, enter the password.
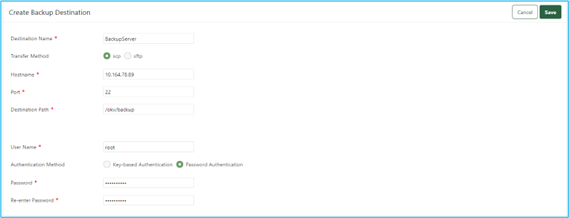
Click Save. Oracle Key Vault will verify the specified destination. If the validation process fails, the destination will not be created.
You can adjust these settings at any time, with the exception of when performing a restoration from a backup.
Click on System Backup > Backup once the destination is created.
Enter the following information for the backup:
a. Name: Assign a name for easy identification of the backup.
b. Start Time: Opt for a specific time for the backup to commence. If immediate, select Now.
c. Destination: Select between a local or remote destination.
d. Type: Choose between One-Time or Periodic. If Periodic is selected, specify the scheduled backup time.
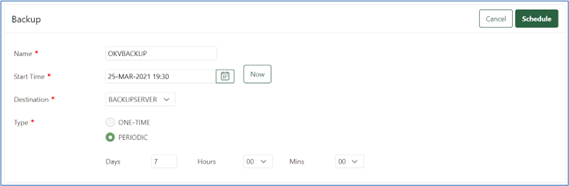
Click Schedule. This enables real-time monitoring of the backup status, categorized as ACTIVE, ONGOING, PAUSED, or DONE. When the backup is in progress, the status will be ONGOING, and upon completion, it will change to DONE.

Verify the backup files on the backup destination.

Restore Oracle Key Vault in HSM mode
Only backups taken in HSM mode can be restored to an HSM-enabled Oracle Key Vault. Ensure that the system can access both the HSM and Root of Trust (RoT) used during the backup before initiating the restore process. Additionally, the Luna Client Application must be installed on the Oracle Key Vault server, and the partition used during backup should be registered.
To restore Oracle Key Vault in HSM mode:
Log in to the Oracle Key Vault management console as a user with System Administrative privileges.
For Oracle Key Vault v21.1 or above, navigate to Settings. Under Network Services, click HSM. For Oracle Key Vault v18.5 or below, in the left sidebar, click Hardware Security Module.
Validate the HSM status. If the status appears as disabled, click Set Credential to open the Prepare for HSM Restore dialog.
Skip steps 4-6 if the HSM status is already enabled with a Green Arrow pointing UP.
Open the Vendor drop-down menu and select the Vendor.
- For Oracle Key Vault v21.3 onwards, when using Luna Client other than v6.x, choose the Vendor as per the
VENDOR_NAMEdefined in theokv_hsm.conffile.
- For Oracle Key Vault v21.2 or below, choose Thales as the Vendor listed at the top.
- For versions 18.4 or lower, select SafeNet in the Vendor drop-down menu. Thales is available since Oracle Key Vault v18.5 onwards.
Enter the partition password in the HSM Credential field. Select Use Token Label and input the token label. Click Set Credential.
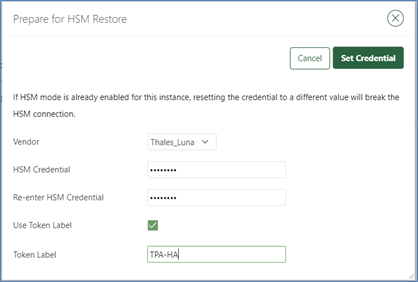
In earlier versions of Oracle Key Vault (v18.3 or below), the option to select token label is not available. With token label, you can choose any token if multiple tokens are registered.
For Oracle Key Vault v21.1 or above, navigate to Settings from the left sidebar, and select Backup and Restore under System Configuration. For Oracle Key Vault v18.5 or below, click System Backup in the left sidebar.
Click Restore. Choose the source where the backup files are stored. The available backups on the source will be listed. Select the backup you want to restore.
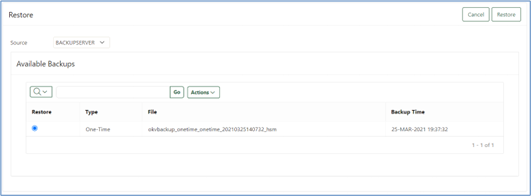
Click Restore.
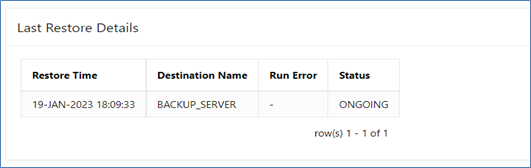
Enter the recovery passphrase set during the Post Installation Step of Oracle Key Vault and click Restore. The restore process will commence, and the status will be displayed as ONGOING.
During the restore process, the Oracle Key Vault management console may not be functional. Avoid making any configuration changes until the restore is completed. The system will be restored from the backup and then restarted. The system will be available after the completion of the restore process.
Enable Luna HSM in OKV Multi-Master Cluster
You can set up Luna HSM in a multi-master cluster, whether it comprises a single node or multiple nodes, using one of the following methods:
In a multi-master Oracle Key Vault installation, any Key Vault node in the cluster can utilize any HSM. The nodes within the multi-master cluster will employ distinct TDE wallet passwords and RoT keys. Depending on your configuration choices for each cluster node, they may or may not use different HSM credentials.
-
Configure Luna HSM for a multi-master cluster starting with a single node (recommended)
-
Configure Luna HSM for a Multi-Master Cluster with multiple nodes
Configure Luna HSM for a multi-master cluster starting with a single node (recommended)
When integrating an HSM with a multi-master cluster, it's advisable to initiate the process with a single HSM-enabled node. Subsequently, additional HSM-enabled nodes can be incorporated using the node induction procedure. Follow these steps:
Convert an existing Oracle Key Vault Server into the first node of the cluster
HSM-enable the candidate node before adding it to the cluster
Add the HSM-enabled candidate node to the cluster using HSM-enabled (first) controller node
If any node in the cluster is already HSM-enabled, adding a new node that lacks HSM-enablement is not permitted. The Add Node to Cluster page on the controller node will necessitate HSM credentials of the controller node.
Convert an existing Oracle Key Vault Server into the first node of the cluster
To establish a cluster, transform an existing standalone Oracle Key Vault server into the initial node, also known as the controller node. This controller node will serve as the starting point for adding additional nodes to the cluster. Until it becomes part of a read-write pair, this node operates in read-only restricted mode. Follow these steps to convert a node into the first node:
Ensure data integrity by performing a backup of the Oracle Key Vault server.
Log in to the Oracle Key Vault Management console with System Administrator credentials.
Generate and activate a new certificate if the Oracle Key Vault server was upgraded from a release earlier than Oracle Key Vault release 12.2 (bundle patch 8).
Navigate to the Cluster tab in the Oracle Key Vault management console.
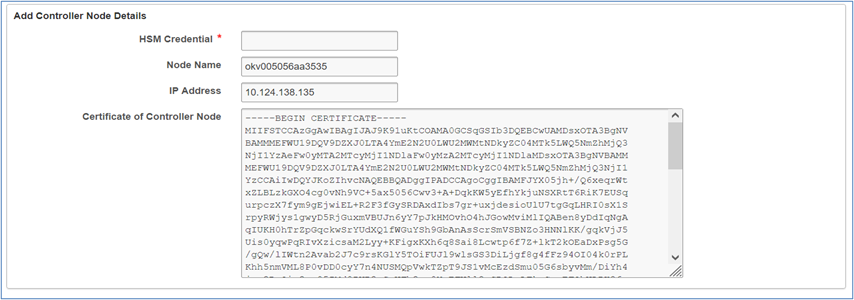
Access the Configure as Candidate Node page, where the IP address of the current server is shown in the Current Server IP field.
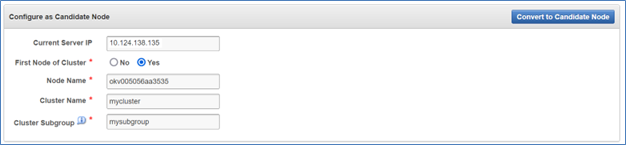
Enter the following information:
- First Node of Cluster: Choose Yes.
- Node Name: Assign a unique name for this node.
- Cluster Name: Specify a name for this cluster of nodes.
- Cluster Subgroup: Provide a name for this subgroup of nodes, such as a data center name or logical group name.
Click the Convert to Candidate Node button. After the conversion process is complete, the Cluster Management page will appear, indicating that the node is now operating in read-only restricted mode.
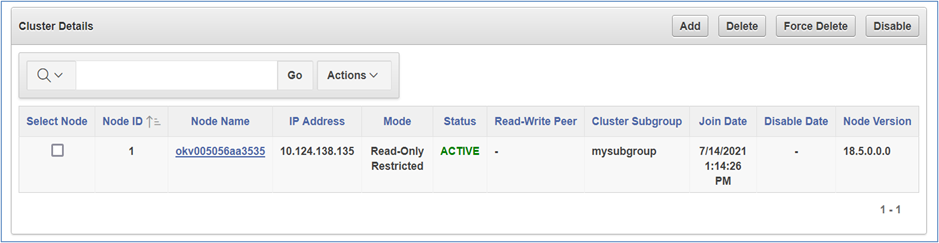
Confirm the successful conversion by checking the Cluster Details on the Cluster Management page.
HSM-enable the first node
Refer to Integrate Oracle Key Vault with Luna HSM to enable the HSM on the first node.
HSM-enable the candidate node before adding it to the cluster
Refer to Integrate Oracle Key Vault with Luna HSM to enable HSM on candidate node.
Add HSM-enabled candidate node to the cluster using HSM-enabled first (controller) node
Follow these steps to integrate the HSM-enabled candidate node into the cluster using an HSM-enabled first (controller) node:
Perform a backup: Prior to proceeding, ensure a backup of the controller node is completed.
Confirm the following network prerequisites:
-
Ensure robust connectivity between the servers hosting the controller and candidate nodes.
-
Verify that the required ports for Oracle Key Vault are open in the network firewall. Refer to Network Port Requirements in Oracle Key Vault documentation.
Log into the first (controller) node: Access the Oracle Key Vault Management Console on the first (controller) node using credentials with the System Administrator role. Any existing node, including the first node without a read-write peer, can serve as the controller for this operation. Add a read-only node if needed.
Navigate to the cluster tab: Select the Cluster tab to initiate the node addition process.
Initiate node addition: Click on the Add option.
Enter Recovery Passphrase: Provide the recovery passphrase of the cluster. This passphrase will be utilized during the pairing process with the candidate node.
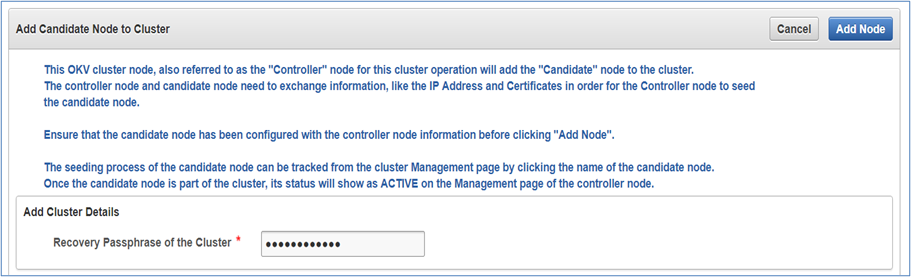
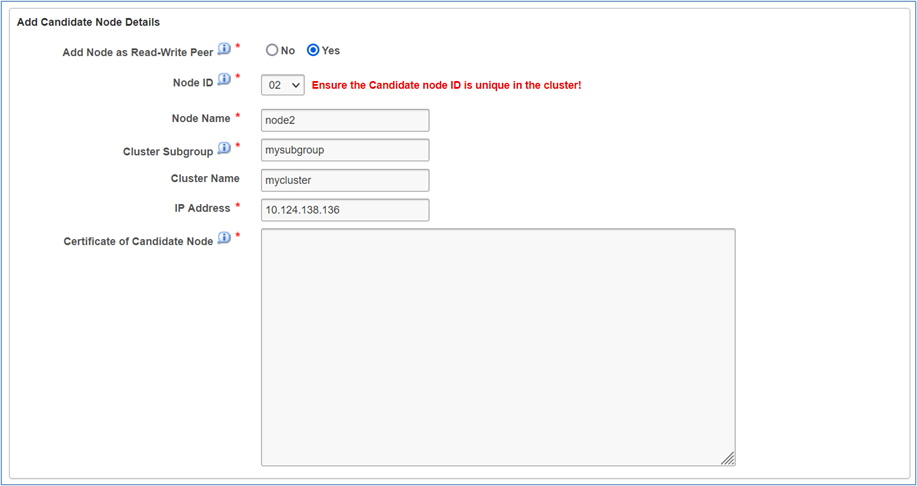
Specify Read-Write Peer: Choose Yes to designate the added node as a read-write peer during the addition process.
Enter Candidate Node Details:
a. Node ID: Choose a unique ID for the candidate node. Note that this ID is permanent.
b. Node Name: Input a distinctive name for the candidate node. This name is permanent once created.
c. Cluster Subgroup: Enter the subgroup name for the candidate node. Use an existing subgroup or create a new one. Subgroup selection is permanent after the node joins the cluster.
d. IP Address: Specify the IP address of the candidate node. Do not save or click the Add Node button yet.
Access Oracle Key Management Console:
-
Log into the Oracle Key Vault management console of the candidate node as a user with the System Administrator role.
-
Select the Cluster tab to display the Configure as Cluster Candidate page.
Configure Candidate Node:
a. First Node of Cluster: Select No.
b. Recovery Passphrase of the Cluster: Enter the recovery passphrase of the cluster created earlier for the controller node.
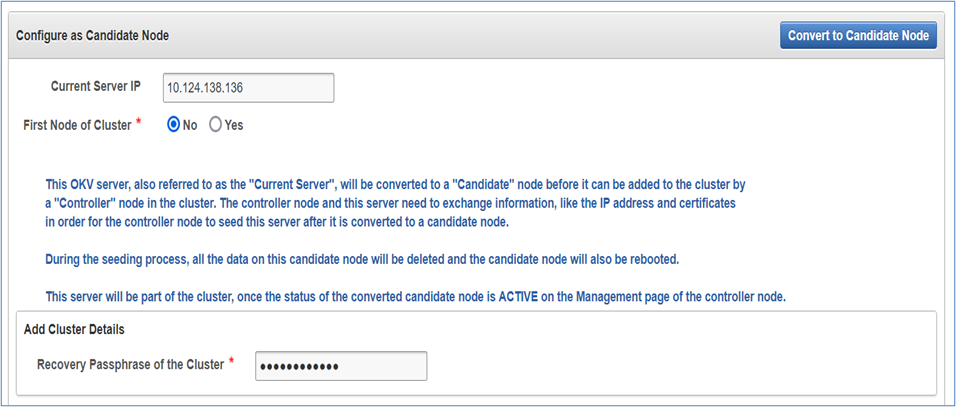
c. IP Address: Enter the IP address of the controller node.
Certificate Handling:
-
Scroll to the bottom of the controller node's screen, select and copy the entire node certificate.
-
In the candidate node's window, paste the certificate copied from the controller node into the Certificate of the Controller Node field.
Verify the recovery passphrase, IP address, and the pasted certificate carefully. Any errors may require Oracle Key Vault reinstallation.
Convert to Candidate Node: Click the Convert to Candidate Node button. Once the process is finished, the screen will refresh and Adding Candidate Node to Cluster page will appear, displaying the certificate of the candidate node. This step might take several minutes to complete.
Certificate Exchange:
- Select and copy the entire candidate node certificate.
- In the controller node's browser window, paste the certificate copied from the candidate node into the Certificate of Candidate Node box.
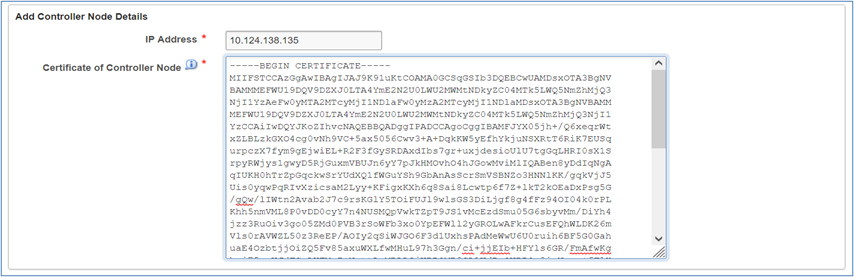
HSM Credential and Finalization:
-
Add the HSM Credential (partition password).
-
Click Add Node.
-
Confirm by clicking OK in the dialog box.
The node addition process can take an hour or more, depending on server performance, network quality, and the amount of data in the cluster. During this time, the Oracle Key Vault network management interface restarts, which may briefly display a Server Error 500 on the controller node. On the candidate node, you may also see errors such as Bad Gateway, and the node will restart automatically as part of the induction process. These behaviors are normal and do not indicate a problem. While pairing is in progress, the candidate node status is shown as PAIRING on all cluster nodes.
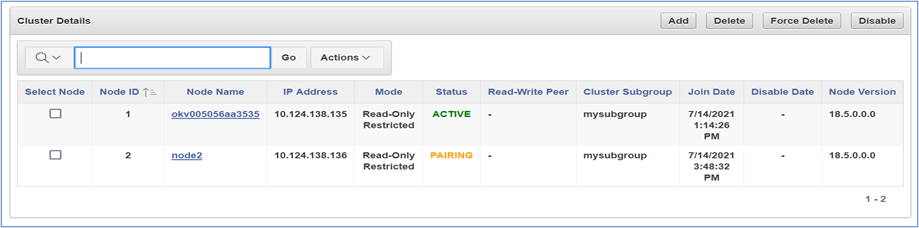
Verification: When the pairing completes, verify that the status of both nodes is ACTIVE and in Read-Write Peer mode.
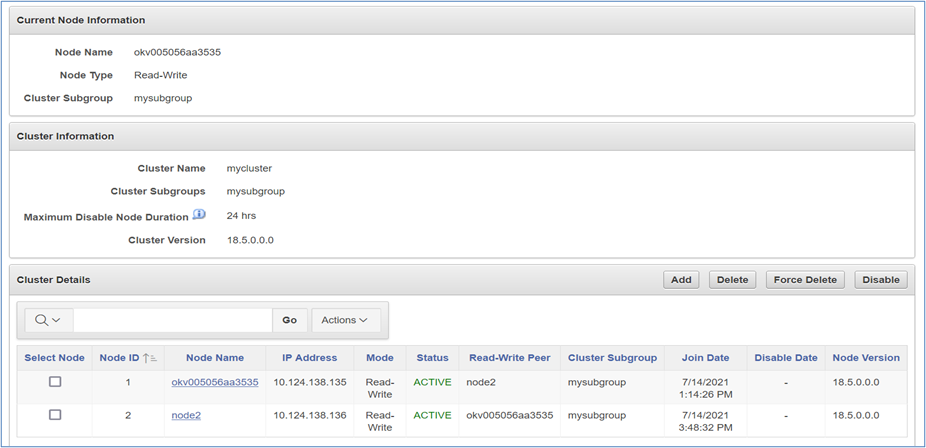
Configure Luna HSM for a multi-master cluster with multiples nodes
You can configure HSM for a multi-master Cluster with multiple nodes by completing these tasks:
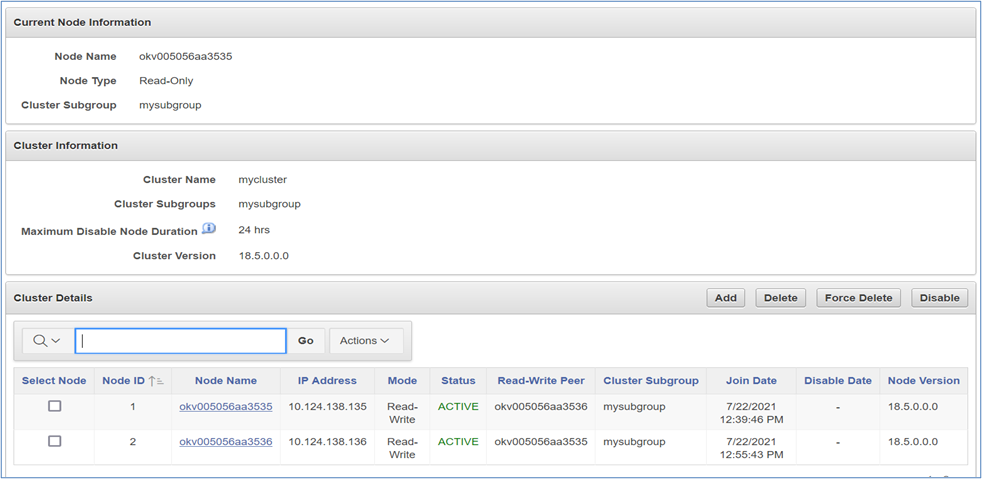
Before moving on to the primary steps, ensure that a multi-master cluster with multiple nodes is already set up, as shown below.
HSM-enable the first node
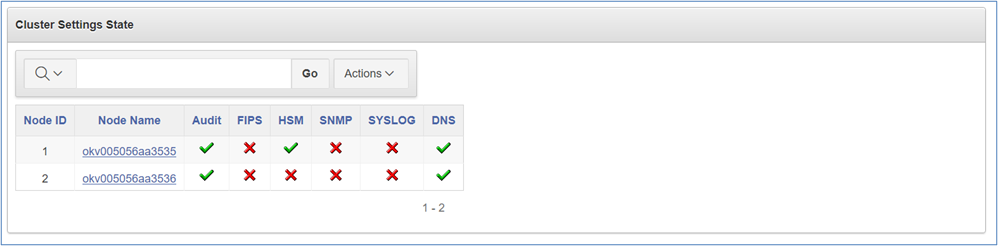
Follow the steps provided in the Integrate Oracle Key Vault with Luna HSM section to HSM-enable the first node in the multi-master cluster. After the HSM is enabled, you can check its status on the Cluster Settings State page.
Create and copy the bundle after HSM-enabling the first node
After HSM-enabling the first node in the multi-master cluster, follow these steps to create a bundle and copy it to the other nodes in the cluster:
Log in to the Oracle Key Vault management console as a user with the System Administrator role.
Click the System tab:
-
For Oracle Key Vault v21.1 or above, click Settings. Under Network Services, select HSM.
-
For Oracle Key Vault v18.5 or below, in the left sidebar, click Hardware Security Module.
On the HSM-enabled node, navigate to the HSM page and click Create Bundle.

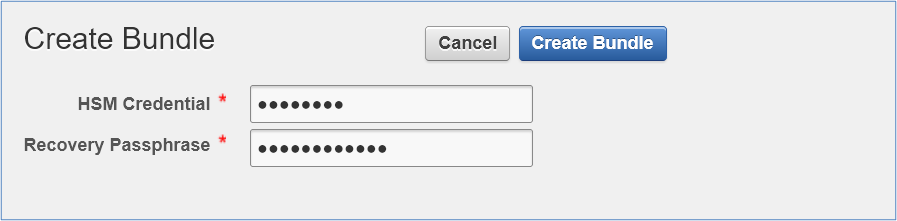
In the Create Bundle dialog box, make the following changes:
-
In the HSM Credential field, enter the HSM password.
-
In the Recovery Passphrase field, enter the recovery passphrase.
-
Click the Create Bundle button.
Log in to the Oracle Key Vault server through SSH as the user support, and switch user (su) to root.
Copy the bundle to the /usr/local/okv/hsm location on all the other nodes using the IP address:
scp /usr/local/okv/hsm/hsmbundle support@ip_address:/tmp
Ensure to perform these steps diligently to complete the bundle creation and copying process.
Configure the remaining nodes
After configuring the first node, proceed to install the bundle on the remaining nodes. Follow this procedure promptly after HSM-enabling the initial node and copying the bundle to all other nodes.
Log in to each node in the cluster using the IP address (excluding the original HSM-enabled node):
ssh support@ip_address
Switch to the root user on each node:
su root
Copy the /tmp/hsmbundle file to /usr/local/okv/hsm/:
cp /tmp/hsmbundle /usr/local/okv/hsm/
Change the ownership of the hsmbundle file to user oracle and group oinstall:
chown oracle:oinstall /usr/local/okv/hsm/hsmbundle
On each node, excluding the original HSM-enabled node, perform the following steps:
a. Navigate to the HSM page and click Apply Bundle.
b. In the Recovery Passphrase field, enter the recovery passphrase.
c. Click the Apply Bundle button.
Ensure that you repeat these steps on each applicable node to complete the bundle application process.
Apply the bundle immediately on all nodes before reverse-migrating the original HSM-enabled node.
Proceed to HSM-enable each of the remaining nodes in the cluster using the steps outlined in Integrate Oracle Key Vault with Luna HSM.
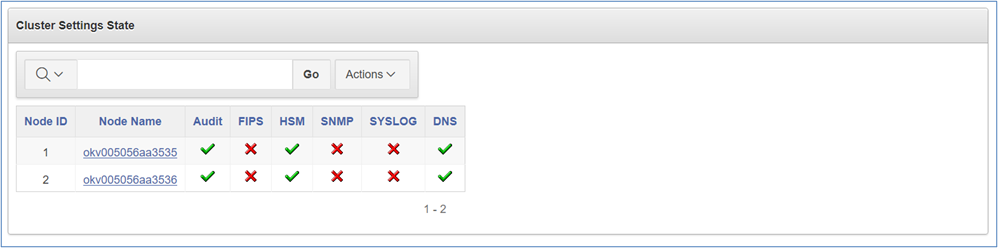
Verify that the HSM is enabled on every node in the cluster in Cluster Settings State.
After the HSM is enabled on all nodes and replication between nodes is verified, remove the hsmbundle file from all nodes.

