



IBM DataPower
IBM DataPower Gateway appliances help secure, integrate, control, and optimize access to a range of mobile, cloud, API, web, SOA, and B2B workloads through a single, extensible, DMZ-ready gateway. HSM is a factory-installed feature on DataPower appliances that provides secure storage for RSA keys and accelerates RSA operations, including synchronous and asynchronous signing, verification, encryption, and decryption, as well as encrypted password-based login. It can generate and store RSA private keys on the HSM, delete them when no longer needed, and export or import key material among HSM-equipped appliances that share a key-wrapping key and belong to the same key-sharing domain.
DataPower virtual or container instances have no secure storage for keys, so cloud deployments should use a physical HSM appliance to protect them. A network-based Luna Network HSM appliance can serve as this HSM for secure key storage and cryptographic operations. In this integration, the Luna Network HSM acts as the server and the DataPower Gateway as the client, exchanging cryptographic requests over a network trust link. The Luna Network HSM stores keys in HSM partitions, and one DataPower Gateway can integrate with multiple Network HSMs, using multiple partitions on each.
The key benefits of this integration are:
-
Secure generation, storage, and protection of the private keys using either FIPS 140-2 or FIPS 140-3 Level 3 validated hardware.
-
Full life cycle management of the keys to ensure their integrity and reliability throughout their usage.
-
Maintenance of a comprehensive HSM audit trail for transparency and accountability in key operations.
-
Significant performance enhancements by offloading cryptographic operations from application servers.
Supported Platforms
The following platforms have been tested with this integration:
| Platforms Tested | Luna Client Software Version | Firmware Version |
|---|---|---|
| IBM DataPower (Virtual Appliance) 7.5.0.0 | Luna Client 5.4.1-2 Luna Appliance Version-5.4.7-1 |
6.10.9 |
Prerequisites
The prerequisites for this integration are:
Set up the Luna Network HSM
Refer to the Luna Network HSM documentation for installation steps and details regarding configuring and setting up the box on Linux systems. Before you get started, ensure the following:
Ensure that you have a Luna Network HSM appliance and a secure admin password.
Ensure that the Luna Network HSM has a hostname suitable for your network.
Set the Luna Network HSM parameters to work with your network.
Initialize the Luna Network HSM appliance.
Create and exchange certificates between the Luna Network HSM and the client system.
Create a partition on the HSM and remember the partition password that will later be used by IBM DataPower. Register the client with the partition. Run the vtl verify command on the client system to verify the NTLS.
Enable Partition "Activation" and "Auto Activation" policies 22 and 23 respectively (applies to Luna Network HSM with Trusted Path Authentication).
Set up the IBM DataPower Virtual Appliance
Use the appropriate virtual image file to deploy the virtual appliance on VMware. For more information, see the IBM DataPower Gateways documentation in IBM Knowledge Center. When your virtual appliance is on VMware, complete the following steps:
Access the WebGUI through the URL that you defined when you initialized the web management service. For example:
https://IP-Address:9090
Accept the license agreements.
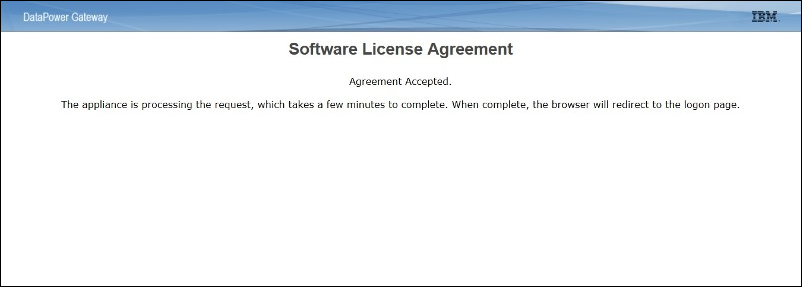
Integrating IBM DataPower Virtual Appliance with Luna Network HSM
This section guides you through integrating the IBM DataPower Virtual Appliance with the Luna Network HSM. Follow these steps for a successful integration:
Create a key on the Luna Network HSM
Before creating a key on the HSM, make sure you have already established the NTLS connection with the Luna Network HSM on the RHEL machine. Traverse to the LunaClient installation directory path (/usr/safenet/lunaclient/bin) and execute the following commands using the certificate management utility (cmu):
Generate the key pair using the following command:
./cmu generatekeypair -modulusBits=1024 -publicExponent=65537 -labelPublic=joe_public -labelPrivate=joe_private -encrypt=1 -decrypt=1 -sign=1 -verify=1
Run cmu list to list the generated key pair:
./cmu list

Please enter password for token in slot 1 : ********
handle=29    label=joe_private
handle=26    label=joe_public
Generate a self-signed certificate:
./cmu selfsigncertificate -publichandle=1578 -privatehandle=2701 -startDate=20151017 -endDate=20291017 -serialNumber=ADDEDFEE -label joe_cert
Export the certificate:
./cmu export -handle=<handle id of the certificate created in step 3> -outputfile joe_cert.pem
[root@localhost bin]# ./cmu list
Please enter password for token in slot 1 : ********
handle=29    label=joe_private
handle=26    label=joe_public
handle=22    label=joe_cert
[root@localhost bin]#
Configure the Luna Network HSM in DataPower
To configure the DataPower Gateway Virtual Appliance with the Luna Network HSM, perform the following steps:
Create or import the client key and certificate pair for the DataPower Gateway.
Copy the client certificate to the Luna Network HSM.
On the Luna Network HSM, register the DataPower Gateway as an authorized client and assign the HSM partitions that the DataPower Gateway can access.
On the DataPower Gateway, register the Luna Network HSM as a trusted server and configure the connection to the Luna Network HSM. This configuration is available only in the default domain.
On the DataPower Gateway, specify the Luna Network HSM partitions that the DataPower Gateway accesses.
A DataPower Gateway can use only one client key-certificate pair to connect to the Luna Network HSM. If you have multiple Luna key-certificate pairs on the DataPower Gateway, the DataPower Gateway uses the most recent pair that you create or import.
Create the client key-certificate pair
Create a private key and a certificate for the DataPower Gateway to establish an NTLS connection to the Luna Network HSM. You must know the IP address or host name of the DataPower Gateway. Open the WebGUI link of the DataPower Appliance and follow these steps:
In the search field, type Crypto.
From the search results, click Crypto Tools.
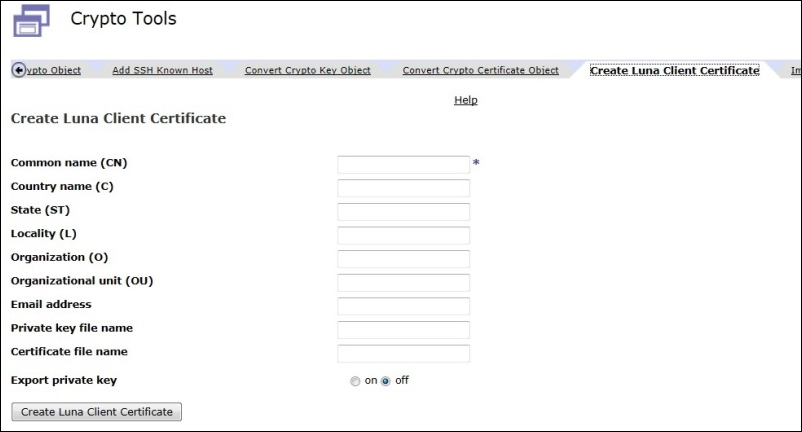
Click the Create Luna Client Certificate tab.
Specify the common name.
The common name must be the IP address or the host name of the DataPower Gateway. The Luna HSM registers the DataPower Gateway by the common name. The NTLS connection breaks when the provided common name is incorrect.
Optional: Specify the two-character country code.
Optional: Specify the unabbreviated name of the state or province.
Optional: Specify the name of the city or town.
Optional: Specify the organization name.
Optional: Specify the organizational unit name.
Optional: Specify the email address.
Optional: Specify the file name for the generated private key. If you do not specify one, the private key file takes the format common_nameKey.pem.
Optional: Specify the file name for the generated certificate. If you do not specify one, the certificate takes the format common_name.pem.
Optional: Specify whether to export the private key to the temporary: directory.
Click Create Luna Client Certificate. The key-certificate pair is created in the cert: directory. The certificate is exported to the temporary: directory. The private key is exported to the temporary: directory when you enable the export private key option.
After the key-certificate pair is created successfully, the following screen displays:
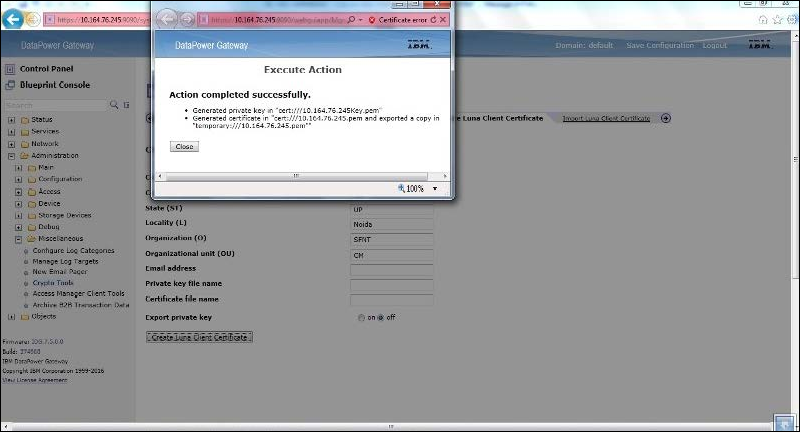
The key-certificate pair is created at the following location:
| Name | Action | Size | Modified |
|---|---|---|---|
| cert: | Actions... | ||
| 10.164.76.245.pem | Details | 1,180 | Apr 26, 2016 12:45:50 AM |
| 10.164.76.245Key.pem | Details | 1,743 | Apr 26, 2016 12:45:50 AM |
You can use the Import Luna Client Certificate option in Crypto Tools if you want to use an existing client certificate.
Next, copy the certificate to the Luna Network HSM using the DataPower CLI. Execute the following command from the DataPower Virtual Appliance, which will prompt you to enter the password for the Luna Network HSM:
idg(config) copy temporary:///<Client certificate.pem file> scp://<Safenet Network HSM>:
For example:
copy temporary:///10.164.76.245.pem scp://admin@10.164.76.114:
Register the DataPower Gateway on the HSM
After the certificate is successfully copied, the next step is to register the DataPower Gateway as an authorized client and assign the HSM partitions that the DataPower Gateway can access. Access the Luna Network HSM through the PuTTY utility and execute the client register and client assign partition commands:
client register -c <IP of the client machine> -h <Hostname of the machine>
client assignpartition -c <IP of the client machine> -par <Partition Name>
Configure the connection to the Luna Network HSM
Register the Luna Network HSM as a trusted server to the DataPower Gateway and set the secure option for the connection between the DataPower Gateway and the HSM.
Obtain the server certificate from the Luna Network HSM that the DataPower Gateway connects to, using the PSCP command on Windows or the scp command on Linux.
RHEL:    scp admin@<Luna Network HSM IP Address>:server.pem <Destination Folder>
Windows: PSCP.EXE admin@<Luna Network HSM IP Address>:server.pem <Destination Folder>
Copy the certificate to the machine from which you are accessing the IBM DataPower GUI so that you can upload it.
In the DataPower WebGUI, in the search field, enter Luna HSM. Click Luna HSM.
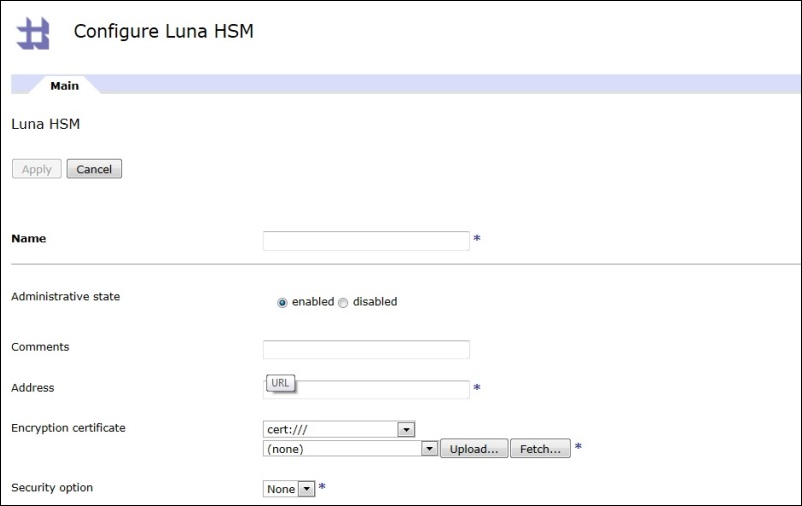
Upload the server certificate using the Upload button. Enter all the details on the screen and click Apply. Check the op-state of the HSM; it should be up.
| Name | Status | Op-State | Logs | Address | Encryption Certificate | Security Option |
|---|---|---|---|---|---|---|
| myluna | saved | up | View | 10.164.73.114 | cert:///server.pem | None |
Specify Luna Network HSM partitions on DataPower
The HSM partition defines which HSM partition to use for secure storage on the Luna Network HSM. Before configuring the partition, validate the following:
-
Configure the connection to the Luna Network HSM where the partition is located and ensure that the operation state of the configuration is up.
-
Assign the partition that the DataPower Gateway can access on the Luna Network HSM.
-
Know the password to access the assigned partition.
-
Use the
partition showcommand on the Luna Network HSM to obtain the serial number of the partition.
Perform the following steps once you have all the details:
In the search field, enter Luna.
From the search results, click Luna HSM Partition.
Click Add.
Define the basic properties: Name, administrative state, and descriptive summary.
Enter the name that identifies the partition on the Luna HSM.
Enter the serial number of the partition.
Select the password alias for the partition password.
Click the '+' button to Configure Password Map Alias and enter the details of the partition password.
Click Apply to save the changes to the running configuration.
Click Save Configuration or Save changes to save the changes to the persisted configuration.
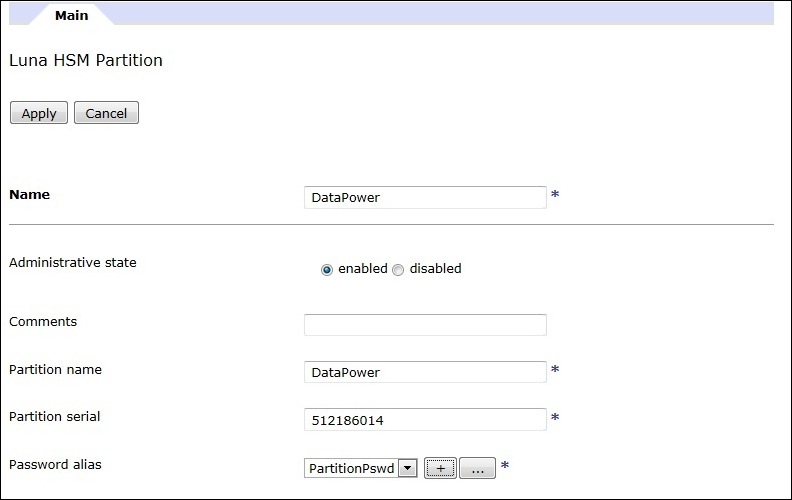
After the partition is configured successfully, the following screen displays. Check the op-state of the partition; it should be up.
| Name | Status | Op-State | Logs | Administrative State | Comments |
|---|---|---|---|---|---|
| DataPower | saved | up | View | enabled |
Add a Crypto Key object located on the Luna Network HSM
Once the HSM is configured with DataPower and the partition is successfully registered, add key objects located on the Luna Network HSM to DataPower.
In the search field, enter Crypto Key.
From the search results, click Crypto Key.
Click Add.
Enter the details as shown on the screen.
Click Apply.
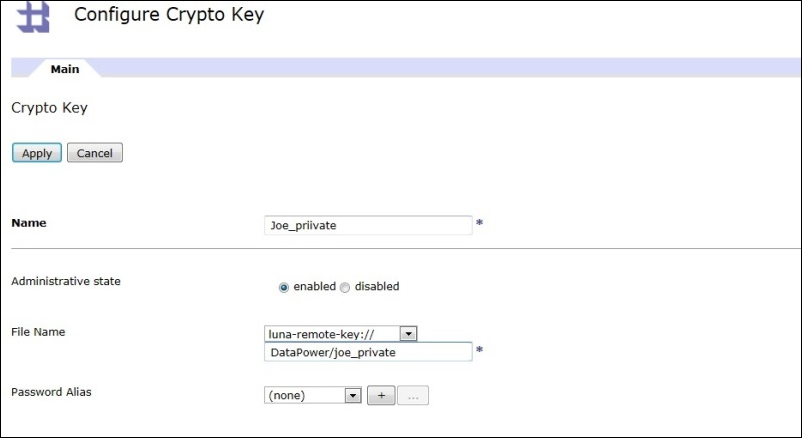
Key format: luna-remote-key://<partition obj name>/<key label name>
Configure the Crypto Certificate in a similar way.
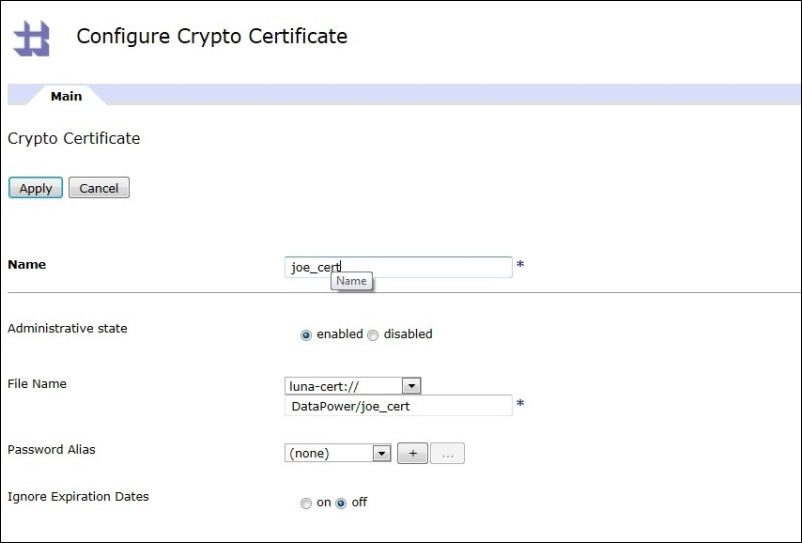
Configure supported operations
The following cryptographic operations are supported for this integration:
Decrypt operation
In the search field, enter XML Firewall Policy.
From the search results, click XML Firewall Policy.
Click Add New Policy.
Drag the Decrypt icon to the configuration path.
Double-click the Decrypt icon.
Enter the details as shown on the screen.
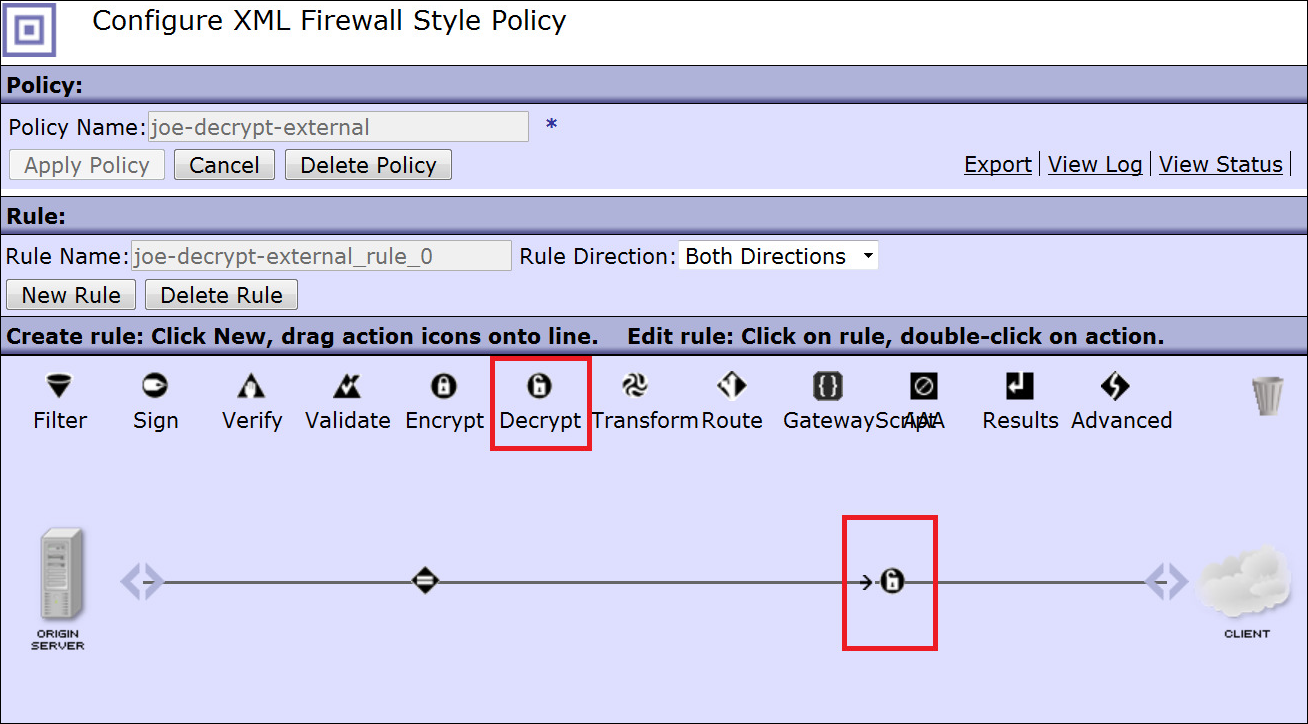
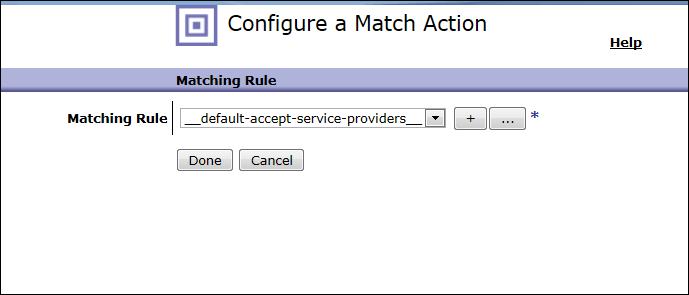
Double-click the Action icon to configure a Match Action. From the drop-down menu, select the matching rule.
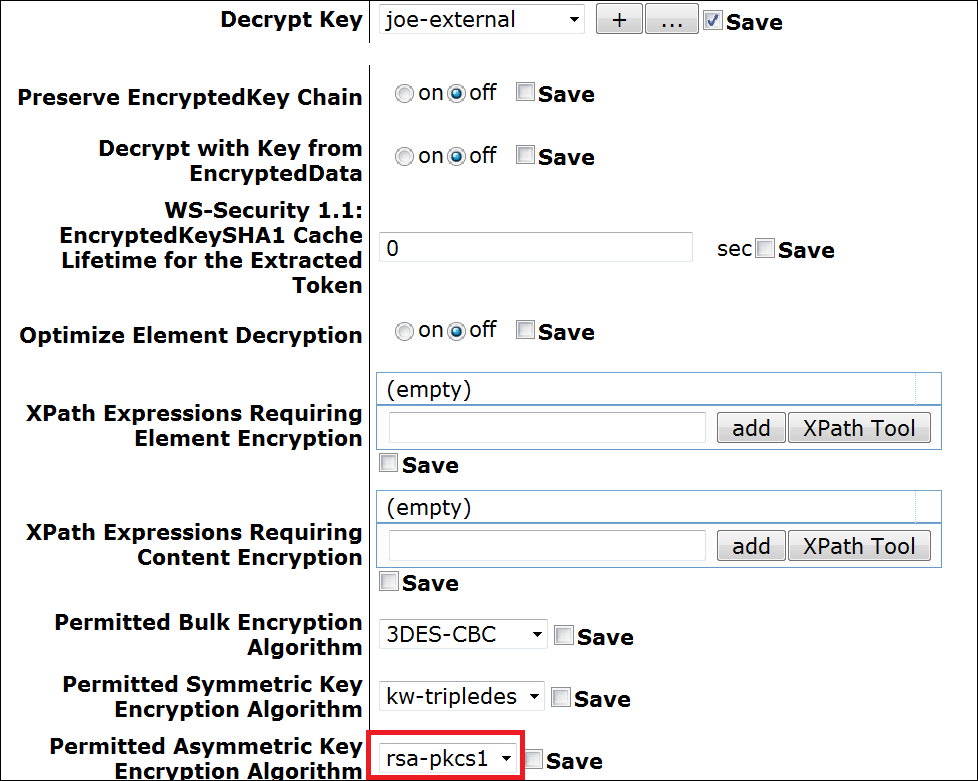
Click the Decrypt icon to configure the Decrypt action and select the configuration as shown below.
Click Apply Policy after all settings are configured.
Encrypt operation
In the search field, enter XML Firewall Policy.
From the search results, click XML Firewall Policy.
Click Add New Policy.
Drag the Encrypt icon to the configuration path.
Double-click the Encrypt icon.
Enter the details as shown on the screen.
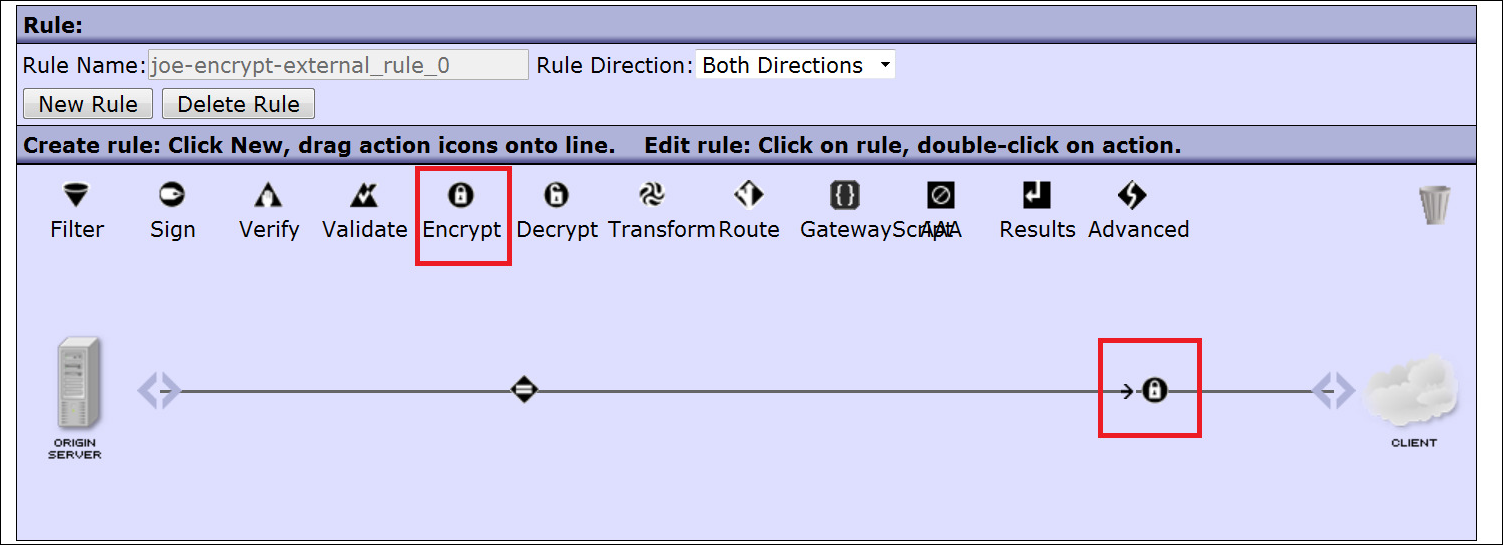
Double-click the Action icon to configure a Match Action. From the drop-down menu, select the matching rule.
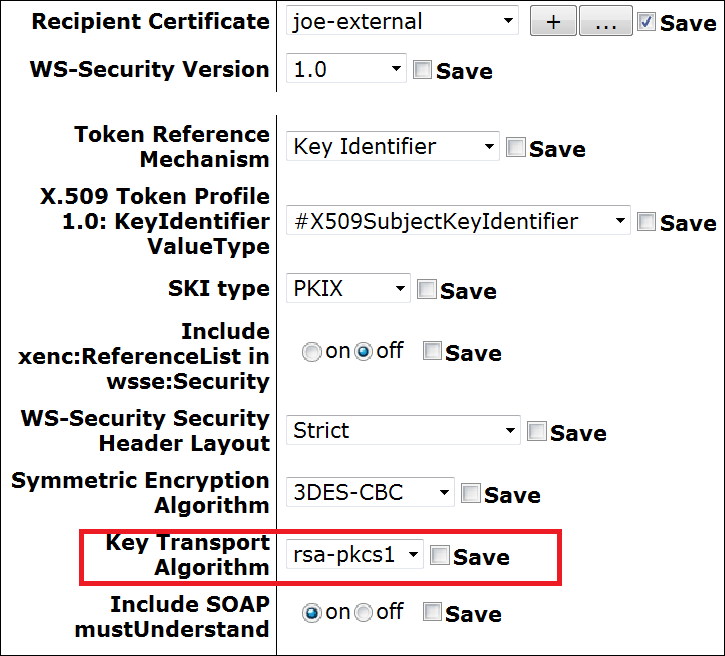
Click the Encrypt icon to configure the Encrypt action and select the configuration as shown below.
Click Apply Policy after all settings are configured.
Sign operation
In the search field, enter XML Firewall Policy.
From the search results, click XML Firewall Policy.
Click Add New Policy.
Drag the Sign icon to the configuration path.
Double-click the Sign icon.
Enter the details as shown on the screen.
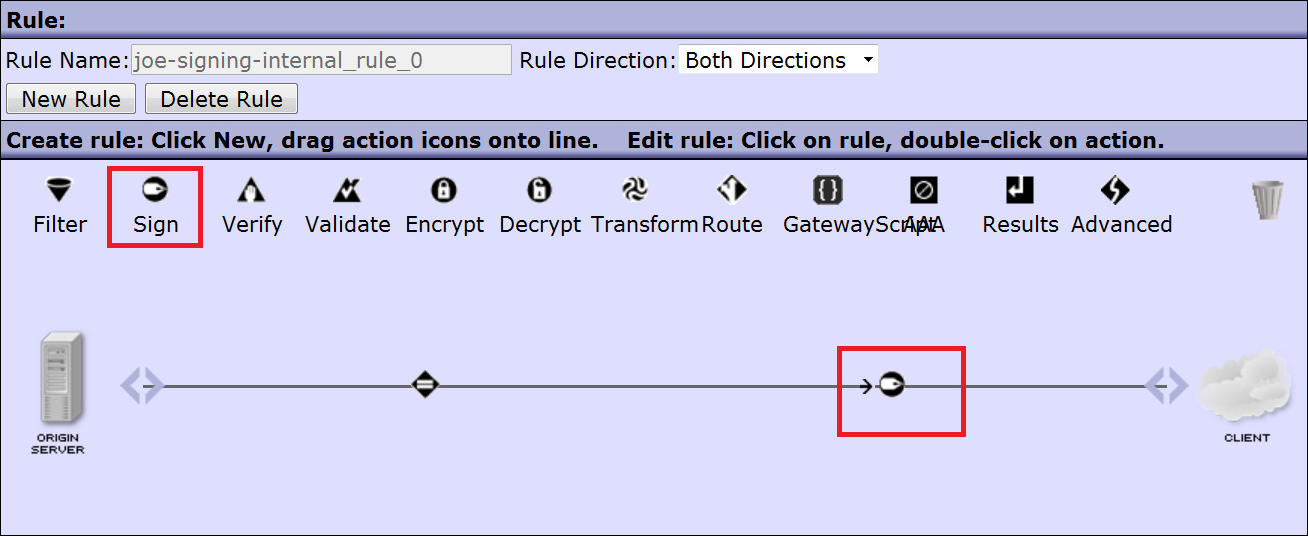
Double-click the Action icon to configure a Match Action. From the drop-down menu, select the matching rule.
Click the Sign icon to configure the Sign action and select the configuration as shown below. Select the matching rule as described in the Decrypt operation section.
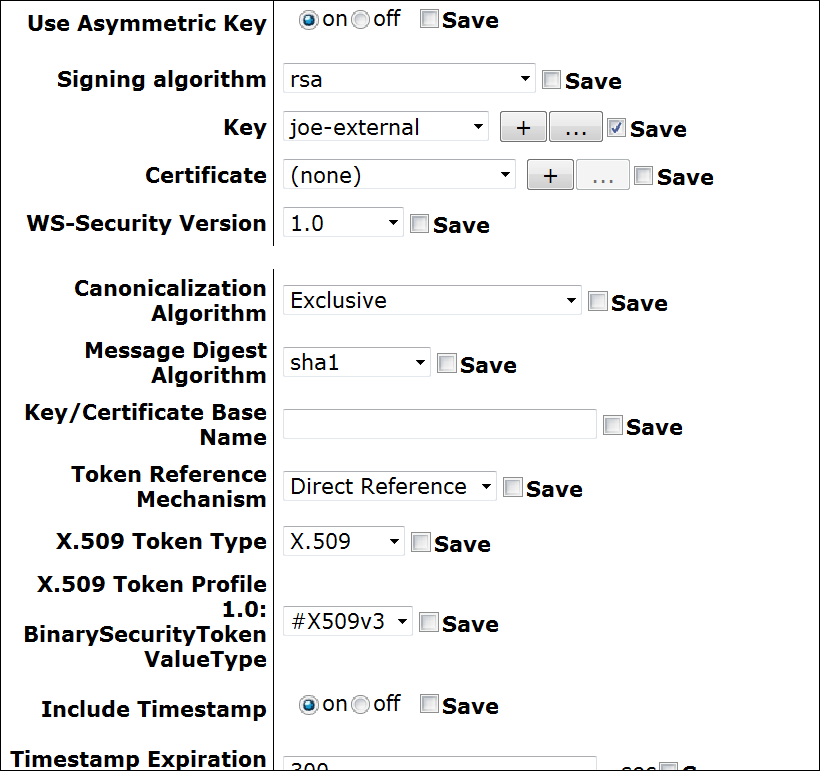
Click Apply Policy after all settings are configured.
Verify operation
In the search field, enter XML Firewall Policy.
From the search results, click XML Firewall Policy.
Click Add New Policy.
Drag the Verify icon to the configuration path.
Double-click the Verify icon.
Enter the details as shown on the screen.
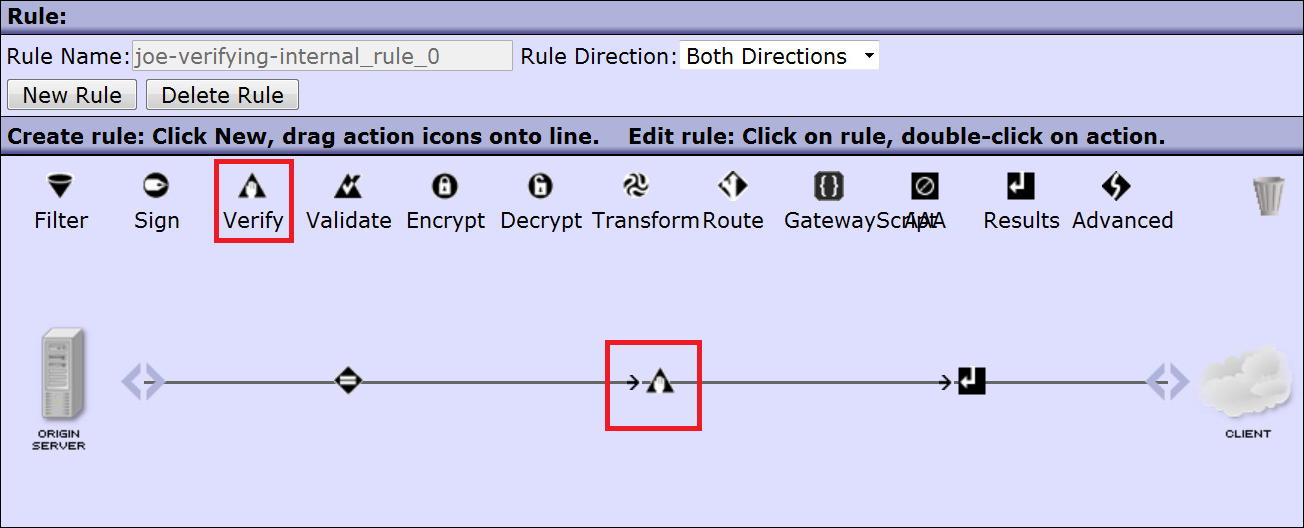
Double-click the Action icon to configure a Match Action. From the drop-down menu, select the matching rule.
Click the Verify icon to configure the Verify action and select the configuration as shown below. Select the matching rule as described in the Decrypt operation section.
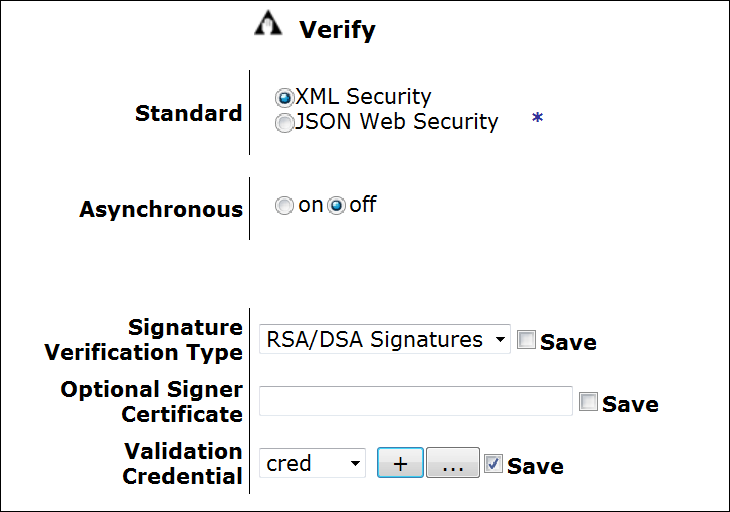
Click the '+' button in the Validation Credential field to configure the credentials. Enter the details as shown below.
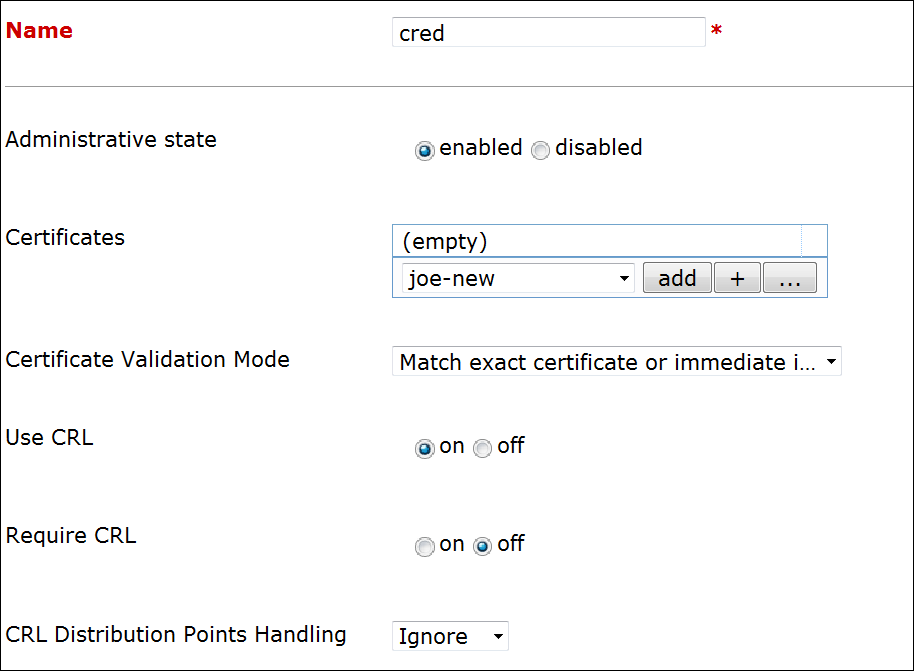
Click Apply Policy after all settings are configured.
Configure Crypto Identification Credentials
In the search field, enter Crypto Identification Credentials.
From the search results, click Crypto Identification Credentials.
Click Add.
Enter the details as shown on the screen.
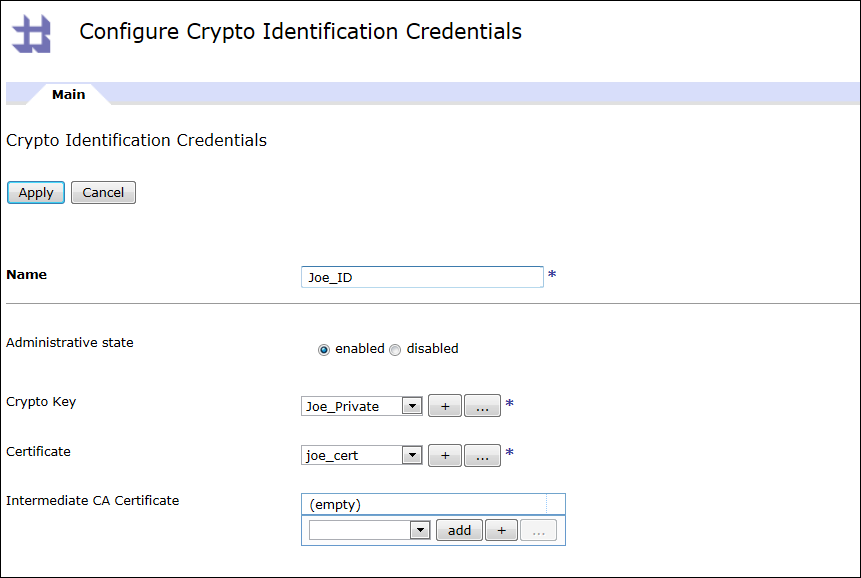
After applying the above changes, verify that the op-state is up.
View Luna HSM transaction latency
You can view the following information about the HSM partitions that the DataPower Gateway uses:
-
The latency of the last transaction in milliseconds.
-
The decayed average latency of the last 10 transactions in milliseconds, where more weight is applied to the newest transaction. The decayed average is calculated as 10% for the newest transaction plus 90% for the last average: Decayed average = latency of the newest transaction * 0.1 + last average * 0.9
-
The number of transactions that the partition has processed for the DataPower Gateway.
To view this information from the DataPower WebGUI, perform the following steps:
In the search field, enter Luna.
From the search results, click Luna HSM Transaction Latency. The GUI displays the transaction information for each partition that the DataPower Gateway can access. The transaction information for each partition displays as follows:
| Partition | Last (ms) | Average (ms) | Count |
|---|---|---|---|
| DataPower | 27 | 240 | 2 |
Alternatively, use the following commands on the DataPower CLI to verify the loads and view the slot information:
Run luna-list-slots to view the slots detected on the appliance:
idg(diag)# luna-list-slots
Number of slots: 4

The following slots were found:

Slot #    Description    Label       Serial #      Status
========  =============  ==========  ============  ==========
slot #1   LunaNet Slot   DataPower   512186014     Present
slot #2   -              -           -             Not present
slot #3   -              -           -             Not present
slot #4   -              -           -             Not present
idg(diag)#
Run luna-list-servers to view the registered Luna Network HSM servers:
idg(diag)# luna-list-servers
Server: 10.164.73.114   HTL required: no
idg(diag)#
Run show load to view the current load on the appliance, including the luna and lunaClient tasks:
idg# show load

Task ID  Task name    Load  Work list  CPU  Memory  File count
-------  -----------  ----  ---------  ---  ------  ----------
1        main         1     0          0    22      89
3        lunaClient   0     0          0    1       13
4        luna         0     0          0    1       14

idg#

