Configure SafeNet App Gateway with SAS PCE
Configuring SafeNet App Gateway with SAS PCE is a two-step process:
Identity Provider (SafeNet Access Exchange) Setup
Configuring the IdP (for example, SafeNet Access Exchange) requires:
Creating a Client
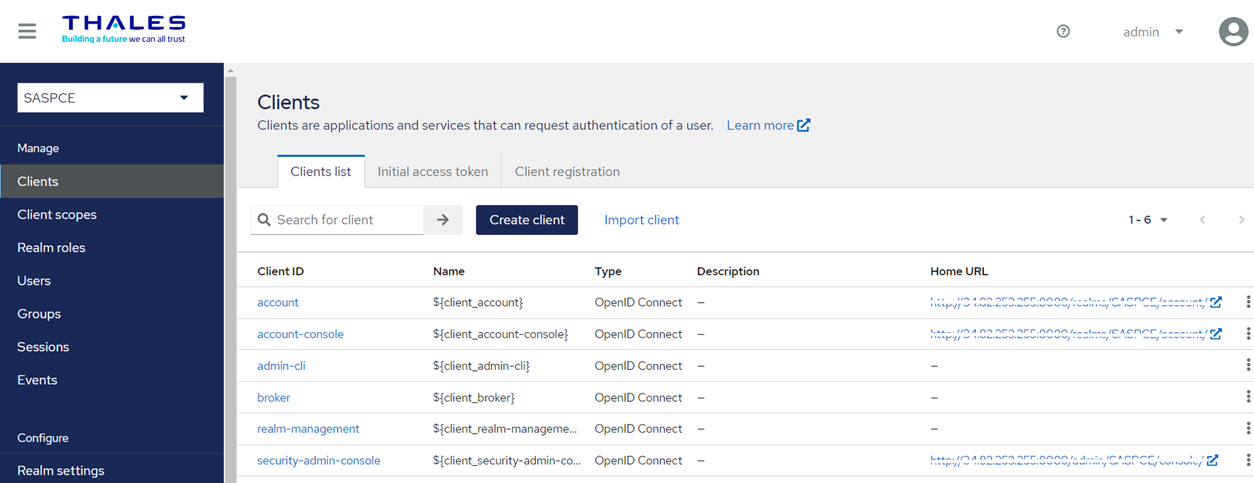
Perform the following steps to create a client in SAE:
-
Log into SAE as an administrator.
-
On the administrator console, select your realm (for example, SASPCE).
-
In the left pane, under Manage, click Clients, and in the right pane, click Create client.
-
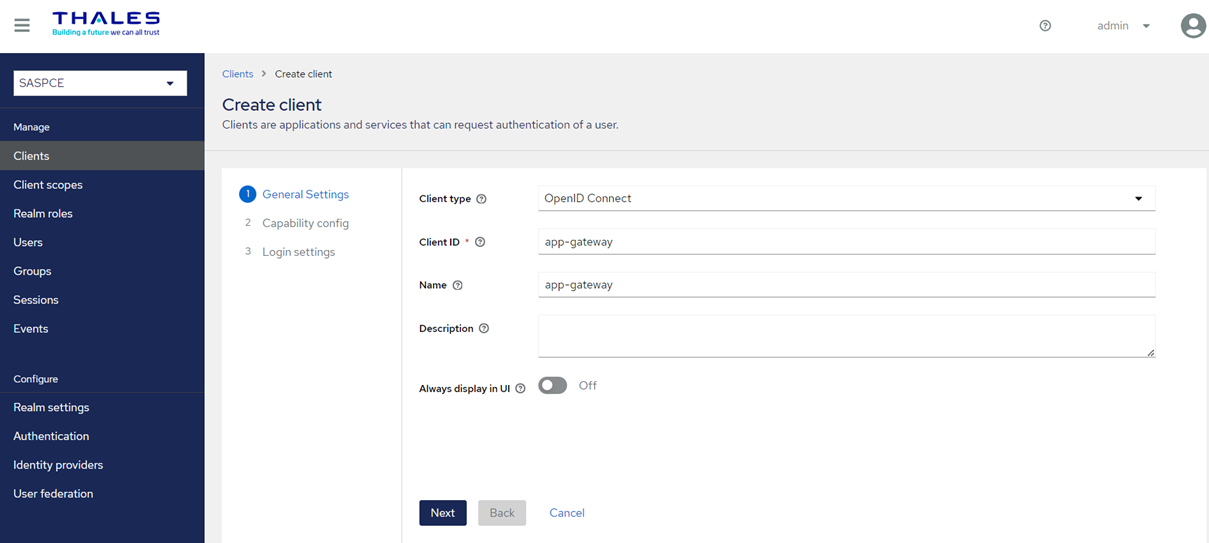
Under Create Client, perform the following steps:
-
Under General Settings, perform the following steps:
-
In the Client type field, select OpenID Connect.
-
In the Client ID field, enter a client ID (for example, app-gateway).
This ID is an alpha-numeric string that is used to identify the client in OIDC requests.
-
(Optional) In the Name field, enter a name of your choice (for example, app-gateway).
-
Click Next.
-
-
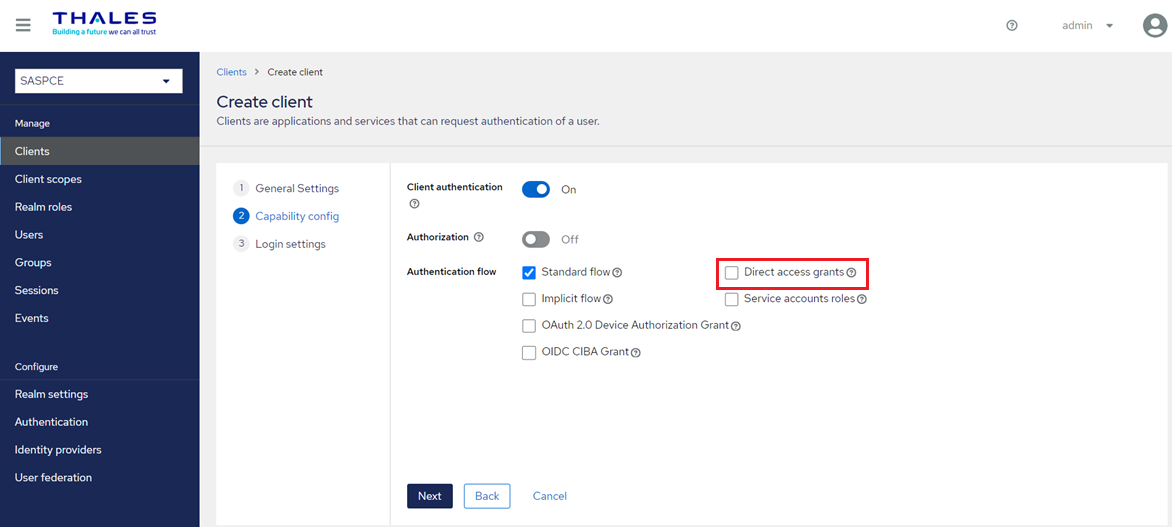
Under Capability config, perform the following steps:
-
Turn on the Client authentication toggle.
-
Under Authentication flow, clear the Direct access grants checkbox.
-
Click Next.
-
-
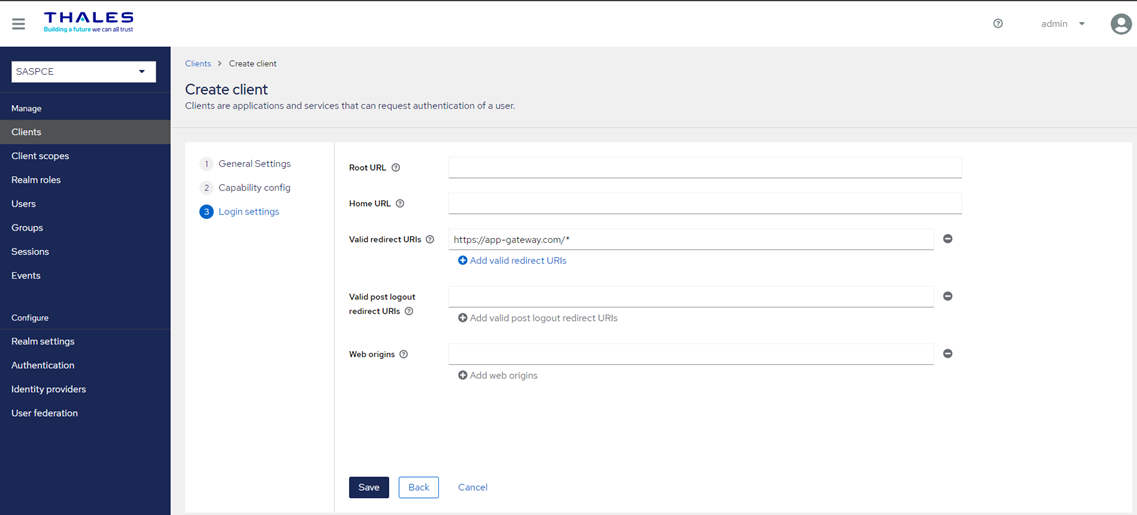
Under Login settings, perform the following steps:
-
In the Valid Redirect URIs field, enter the App Gateway instance URL (for example, https://app-gateway.com/*).
-
Click Save to complete the client configuration.
-
-
Generating a Private Key and Selecting the Credentials Type for the Client
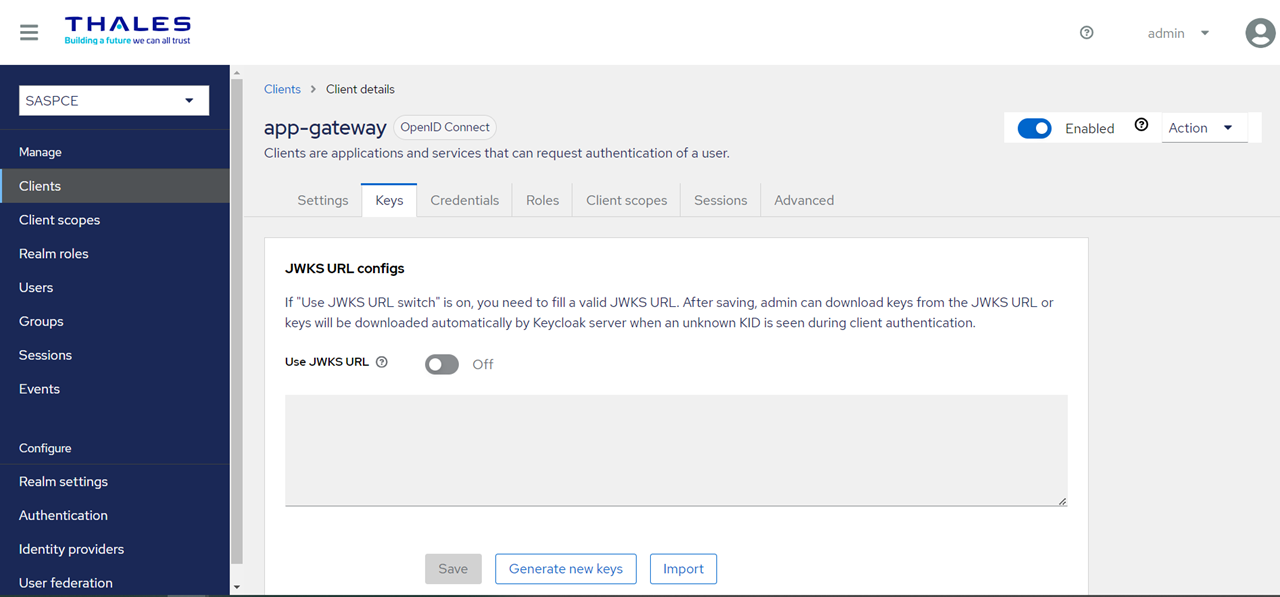
Under App-gateway, perform the following steps:
-
Perform the following steps to generate a private key for the client:
-
Go to the Keys tab, and click Generate new keys.
-
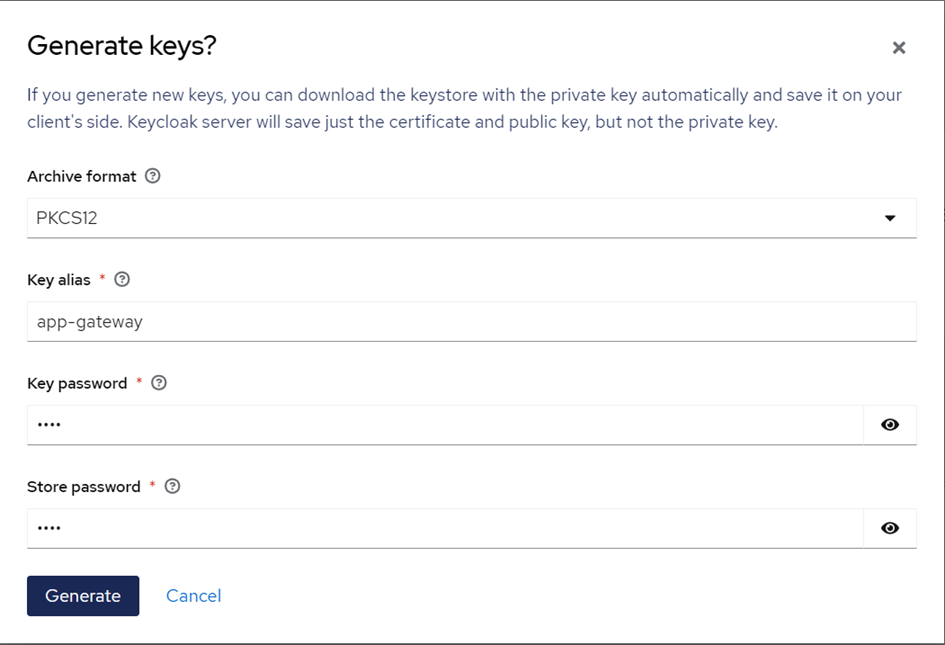
Under Generate keys?, perform the following steps:
-
In the Archive format field, select PKCS12.
-
In the Key alias field, ensure that client ID is present (for example, app-gateway)
-
In the Key password field, enter a value as per your preferred configuration.
-
In the Store password field, enter a value as per your preferred configuration.
-
Click Generate. Your keystore.p12 file will be downloaded on your local machine. The keystore.p12 file contains the private key.
-
-
-
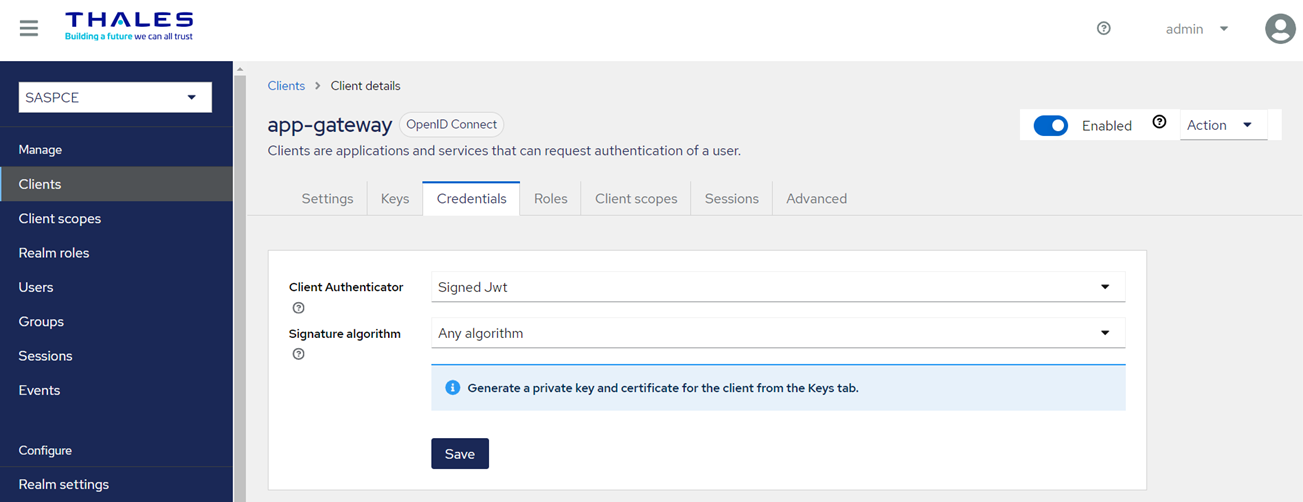
Go to the Credentials tab and perform the following steps:
- In the Client Authenticator field, select Signed Jwt.
-
Click Save.
-
On an Ubuntu machine, run the following command to extract the RSA Private key from the keystore.p12 file:
openssl pkcs12 -in keystore.p12 -nodes -nocerts | openssl rsa -out OUTFILE.key
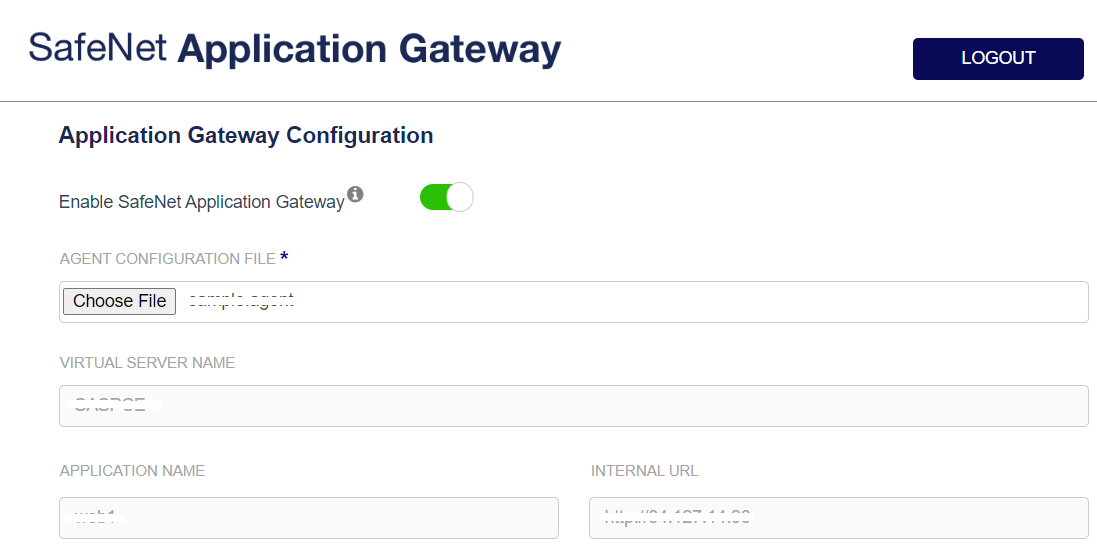
Configuring and Uploading the Agent File
The Agent file (.agent) contains details of IdP (SAE) and non-SAML/OIDC web applications. Configuring the agent file requires:
Obtaining Values for the Agent File
Before configuring the Agent file, it is required to obtain certain values. Perform the following steps:
-
Go to the administrator console of your SAE instance.
-
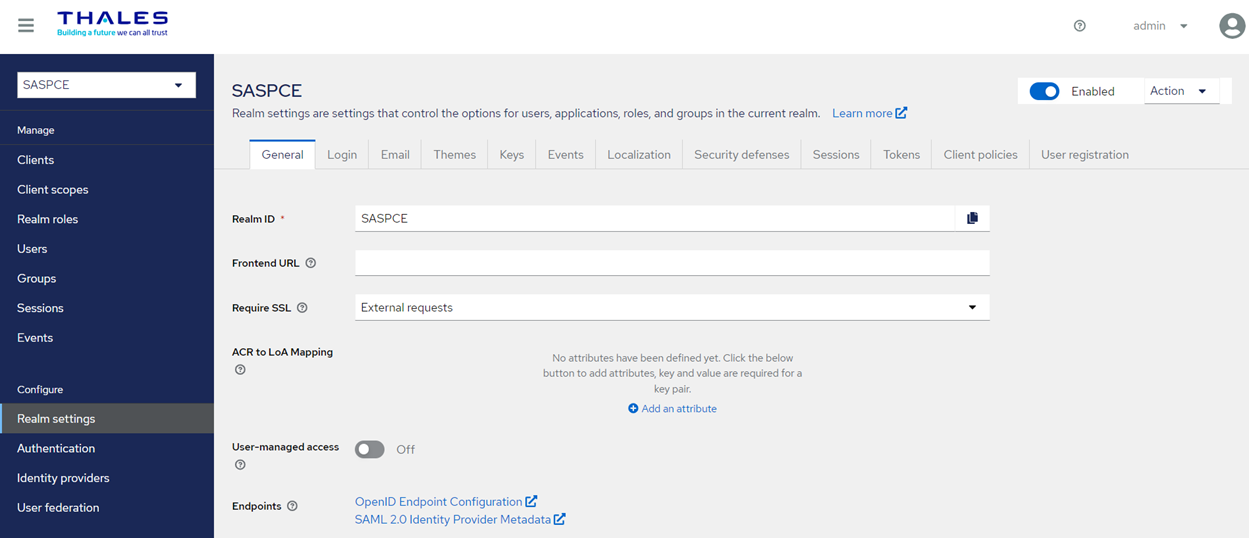
In the left pane, under Configure, select Realm Settings, and in the right pane, on the General tab, perform the following steps:
-
Copy the Realm ID field's value and paste it into a text editor.
-
In the Endpoints field, click OpenID Endpoint Configuration, and you will be redirected to another window. Copy the Issuer URL and paste it into the text editor.
-
-
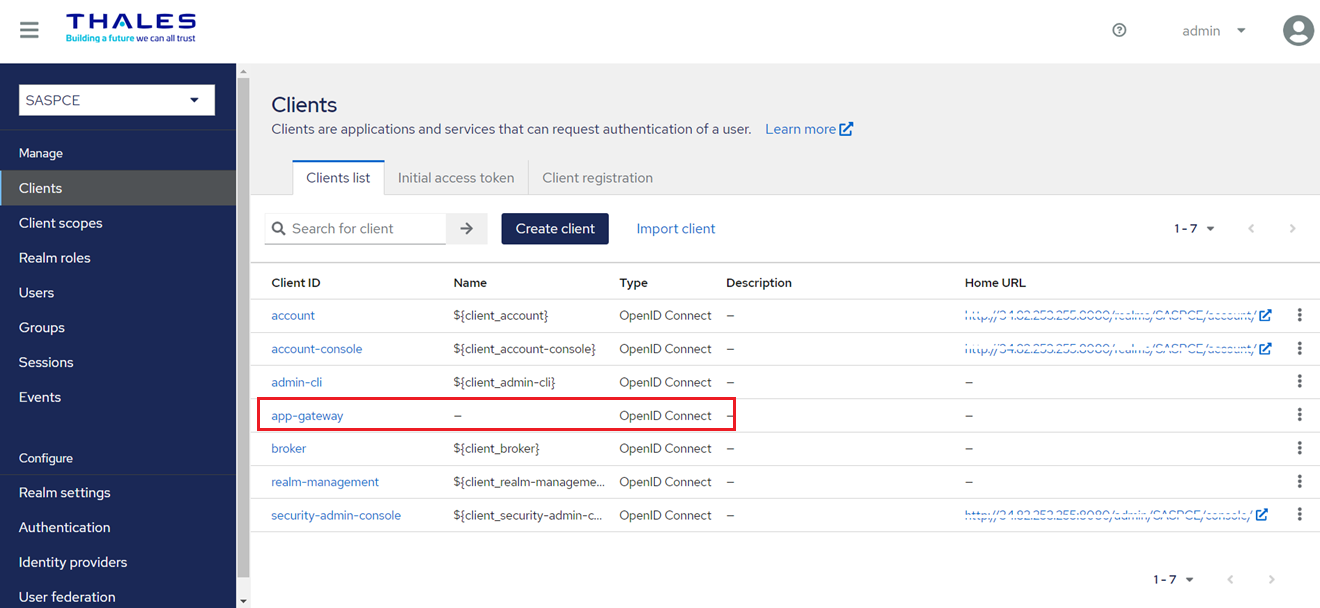
In the left pane, click Clients, and copy the Client ID (for example, app-gateway) of the client you created earlier. Paste the value into the text editor.
Updating the Agent File
Perform the following steps to update the Agent file:

-
Open the .agent file in a text editor such as Notepad++.
-
Next to the VirtualServer field, paste the Realm ID field’s value you obtained in step 2(a) of the Obtaining Values for the Agent File section.
"VirtualServer":"SASPCE" -
Next to the IssuerUrl field, paste the Issuer URL you obtained in step 2(b) of the Obtaining Values for the Agent File section.
"issuerurl":"http://your-sae-url/realms/SASPCE" -
Next to the ApplicationName field, paste the Client ID you obtained in step 3 of the Obtaining Values for the Agent File section.
"ApplicationName":"app-gateway" -
Replace the value of PrivateKey with the key you retrieved in step 3 of Generating a Private Key for the Client.
"PrivateKey":"-----BEGIN RSA PRIVATE KEY-----\r\nMIIEowIBAAKCAQEA19IMnQMjSYF5pCVYtceIUP+WhJpBETcXzfqYpPJV9MqDBVR4kzZpQaRWX29lTl0myQ4cVe4hkvvBcLoeAiWXXDIyc9z1VHdh4+cNgrWZwQf8cguyOsqLPuKx967IdPbaUKyTnJDf1Z89tG7mlw9hexiC/nwfNAi2JOv/WB0M4Z3r1x/01hNqe9Cz0qY+IvhDi6QbFYsJVMN7dU7UJJlk/hl87oAMGbi2W4ziYcRtC3Itr5BUR6wK51TSJbJN0CNLmMaBepgVDEKReYikhHYgxuOgJlUdIbAxkRGae9ww2hEwUfJTRLXlqt3qGKl1d1tpOWDjASgMuZCQSkb87o/1CwIDAQABAoIBADFnpbiJv9mzWH/BhuGyCBwWrkOztiJ1PK9L5waXbSLo+v5M3H9CrOy4bIdTTlsWiurqnoTzSt9FX35pNLZkGZai7RbF5alM3O1ZdqfN36EnLVyEHexEcoTWS0w6SCwyWD6wiugD6CGUXwE/g+zfuf5+WXpdOp1kQyIHnj/zAoBhBTYLnOQYrUMSsaAR7DnJBBKGMQqz9ywIxrJQwzYnmDdvFNqOXdyq7aeu/D/HJjH1SWlxMFHtTptJ0J8rIuI6T7C1cignkjJJwJeWQ/bJ+dBX15hrWryBupNniJD1pROF2Ak+DugDjaIfk7g3GjHK3BS4s3ve3/pdlWpjblZIy4UCgYEA8QDUErroH6qkdEkILzKz5FDKrL+29RJU8EnBM1WxoI32TUBX5SGsDo3QUc3OH5dI1ACTgPV0PYPKbgpT2lszEJ/pL0De1hsMjYWxcz7QKzrcwt1rYo/tumDS2O2uC+MJzlbxMvOuaACp2eOZ7DH72cR6HDea3chEuqwRdvlMiz0CgYEA5UAPnWmCCeKNmAsJg0JSqCbE7Xz21O1YDLEG85PktxFra8kHUqSpgCmY5wteMjN0sHdbmhzbc8speFYbVF5rWxPOVTocuNKvSBLzS7P3h/DLaBPWOw/0qnrjk3dUBFYIdO2q24fw+y7uRDRLvSnzZ0updEPz5KJQtbwXJ4PApecCgYAKX7PBPqRhQJIlo0Mj7PXLXSLsPrBcajaXxUT4tbaYp6OzfZKK/WEPm1EdRFOcDoIHBiNTSL2BLFwZUn57hrNzAr8h1pQA+VcX/GpAALMrOTRpeuh1bKaaADLzPX/haRtx81IclFqshWLKSz7D6P7jR87NyiLzavxyYJe73E1MLQKBgAyJdFEnc/UWbqfh8qM6/Uo01JAoRVdfo3EOPVMUw20/hqBeXggm+R4JKFN6S6xzI+6CmH/VFCtA8QOjsdrrTvOsIZyHkQqKewt1/dgl/2Nvx6/pZc3VEYxBLDDkVbPnAI9kb/ORe5xA9MbGFV5C7Qy5FotFLBFUzxUhNCL1EZQBAoGBAIPkOCe7XH03OWtiZZvYb3/ID5gdXJx9UHW/i7Ybqkl0a08Pew7B0bHzZDcURTxCT7S4eh4ClxscDEHv7aGNYxpBHhUdvCHfY4aG6UGyzEZ/cSH1yBTU7sbPBroRcZZsmTDM0GephjMm/D4o7C+0NugmEi9DC3Sd50+3ZhxT4wsn\r\n-----END RSA PRIVATE KEY-----\r\n -
Replace the value of RedirectUrl with the URL used for accessing SafeNet App Gateway (for example, https://app-gateway.com).
"RedirectUrl":"https://app-gateway.com" -
Under SubApps, replace the values of the following fields with the information of the non-SAML/OIDC web application you want to secure:
- PublicUri: Name of the non-SAML/OIDC web application.
- InternalUrl: The URL where your non-SAML/OIDC web application is hosted.
- AuthenticationScheme: Authentication type such as CUSTOM, HTTP BASIC, or FORM as per your application.
- FriendlyName: Name of the non-SAML/OIDC web application.
"SubApps":[{"PublicUri":"web","InternalUrl":"http://34.110.20.70","AuthenticationScheme":"HTTP BASIC","HeaderAttributes":"[]","FriendlyName":"web","LoginUrl":"/","LogoutUrl":"/logout"}]To secure more than one application, you need to enter the details of each application under SubApps.

-
Save the .agent file.
Uploading the Agent File
On the SafeNet App Gateway agent admin console, upload the .agent file you saved earlier.