
Access and Risk Management
This feature brings access and risk management capabilities to Safenet Access Exchange. This feature authorizes valid users based on user, role, group, times of the day, Regex, client, and client scope after authentication. This approach reduces the overall risk of the system by adding a layer of security after a user authenticates.
This feature complements context-based workflow selection, such as application-level requirements, client based rules, and user base or tenant workflows.
This authorization mechanism is supported for OIDC-based applications only.
Clients and resources
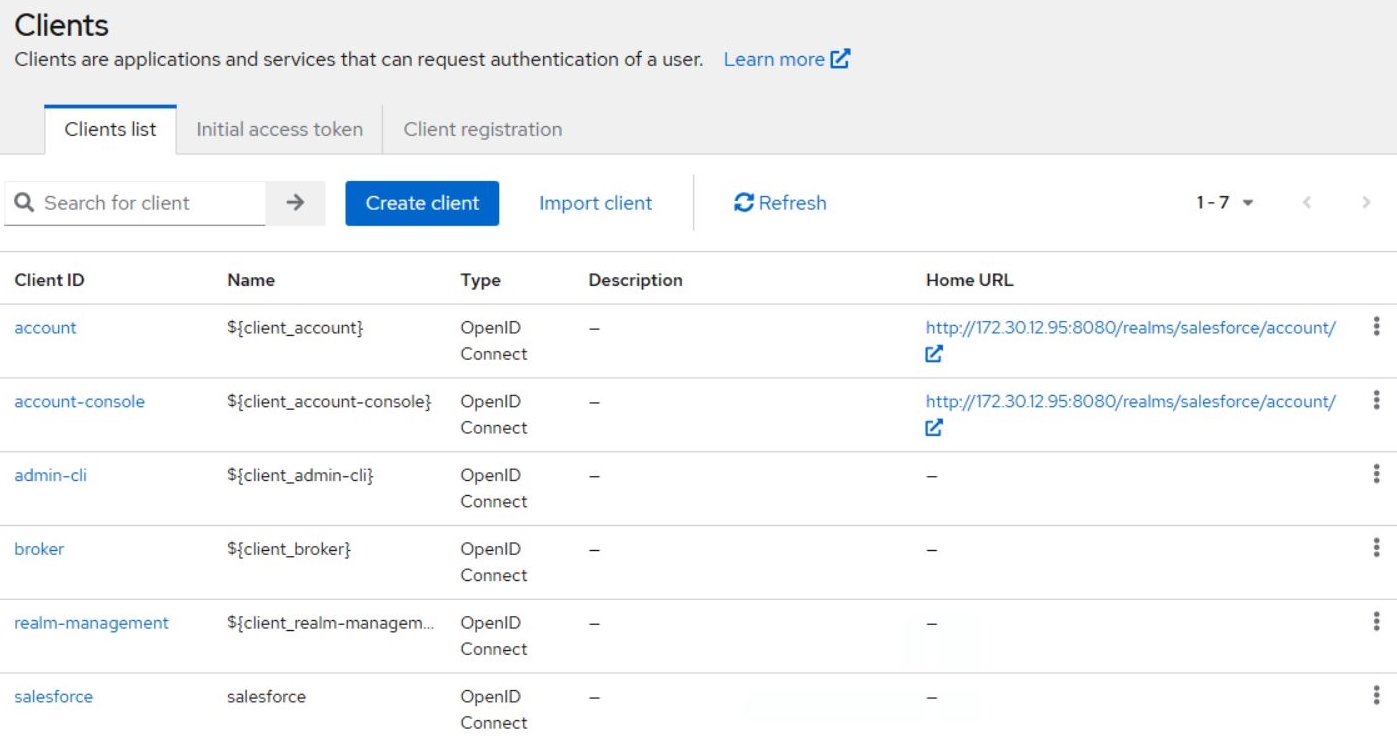
Client - A client is any configured application in SafeNet Access Exchange. For example, Salesforce.
Resource - A resource is any URL or webpage in the application. For example, an admin page or home page.
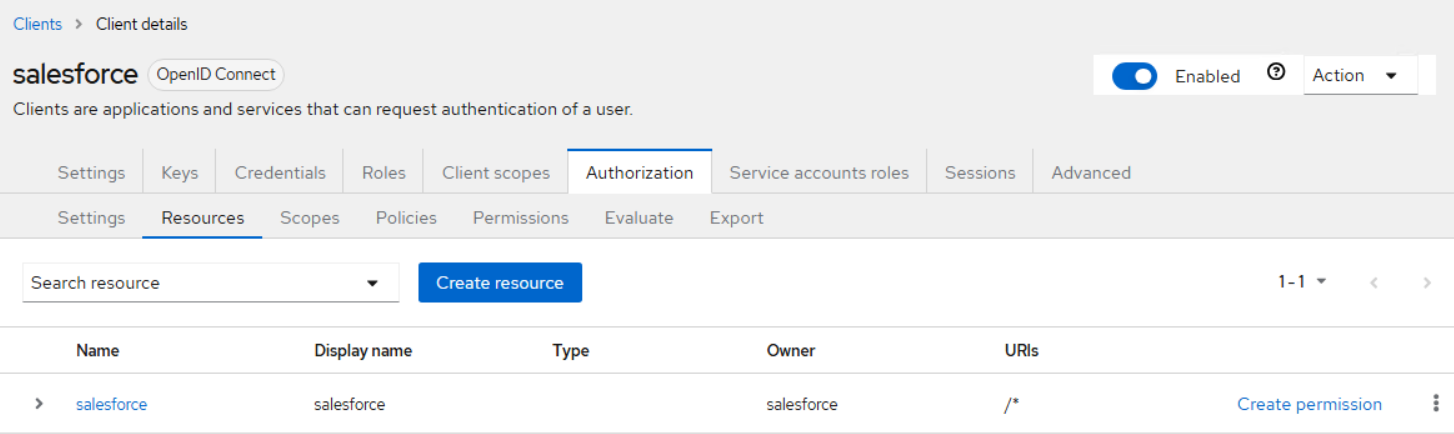
Setting permissions
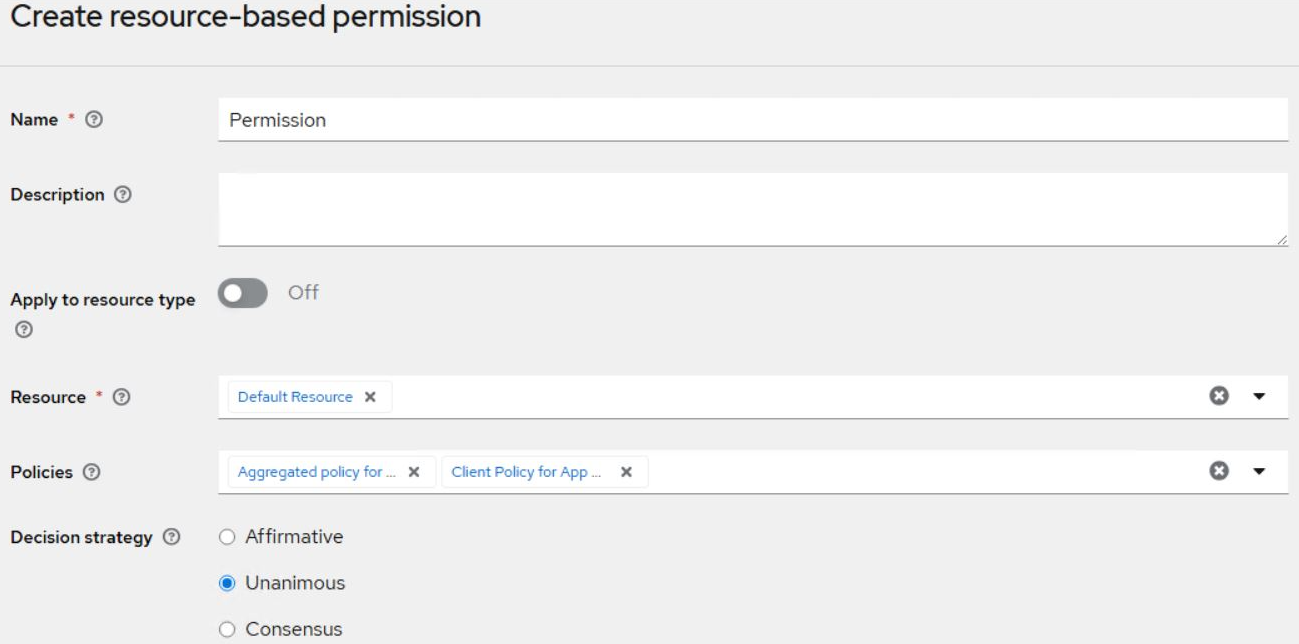
A permission is a rule that links a resource (something you want to protect) to a policy (the logic that determines whether access is granted).
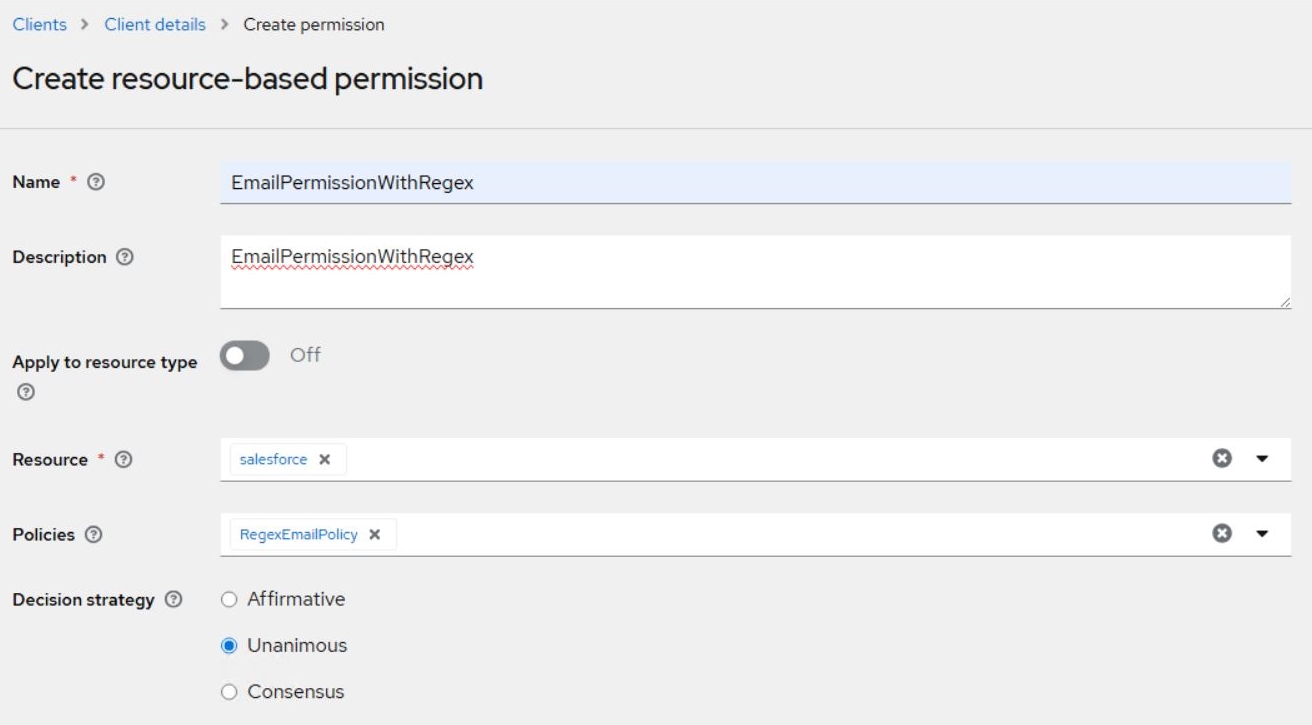
Decision strategies
The decision strategy controls the access decision when multiple policies are configured in a single permission. The following decision strategy options are supported:
-
Unanimous: Access is granted only if all policies return a positive decision.
-
Consensus: Access is granted only if a mojority of policies return a positive decision; a tie results in denial.
-
Affirmative: Access is granted if at least one policy returns a positive decision.
Authorizing users
To enable authorization:
- Go to Clients > Select Client > Settings >
- Set Client authentication = On.
- Set Authorization = On.
User policy, role policy, and group policy are not supported for SAS user federation.
Policy modes and strategies
This section describes SafeNet Access Exchange enforcement modes and strategies.
Policy enforcement modes
-
Enforcing: Access is denied by default if no policy is associated with a resource.
-
Permissive: Access is granted by default if no policy is associated with a resource.
-
Disabled: Access is granted to all resources, regardless of policies.
Decision strategy
A decision strategy is required if multiple permisions are configured.
The following decision strategy options are supported:
-
Affirmative: At least one permission must evaluate to a positive decision in order to grant access to a resource.
-
Unanimous: All permissions must evaluate to a positive decision in order to grant access to a resource.
If you use multiple permissions with Decision strategy = Affirmative, then the resources for which you apply permissions must be associated with at least one scope.
Steps:
1. Create a scope in Client Details -> Authorization -> Scopes.
2. Open the resource in Client Details -> Authorization -> Resources.
3. Associate a scope with the resource.
4. Set Decision strategy = Affirmative on Client Details -> Authorization -> Settings.
The resource will be accessible if at least one of the multiple permissions grants access.
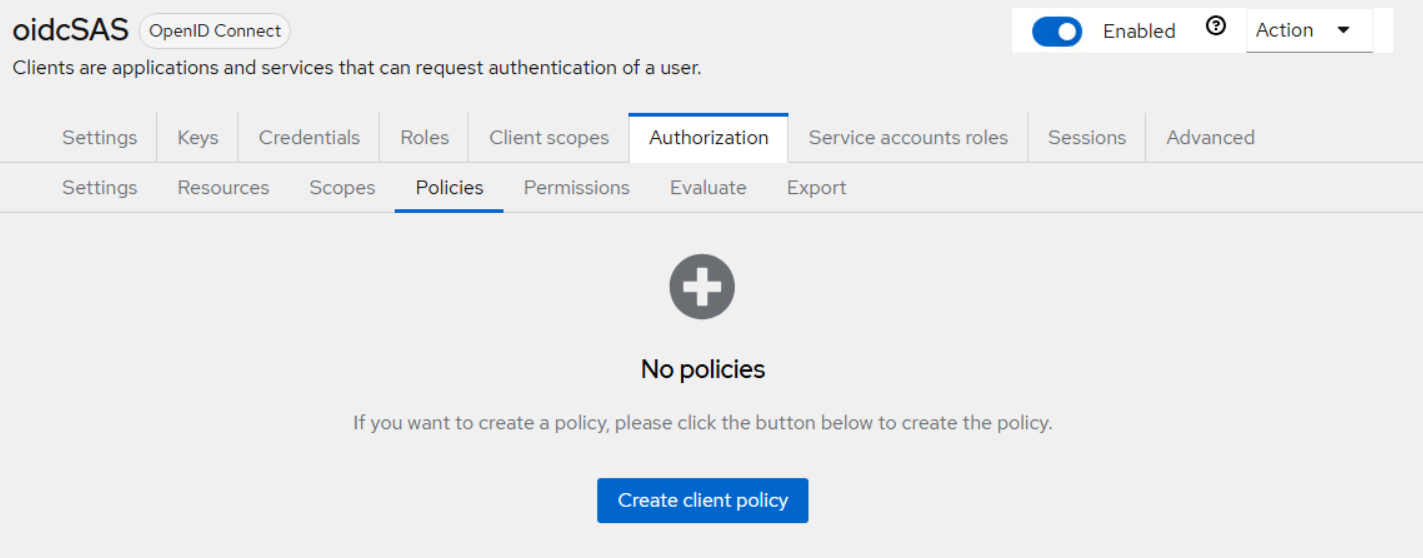
Creating policies
A policy is a rule or a set of rules that define the conditions under which access is granted to a resource.

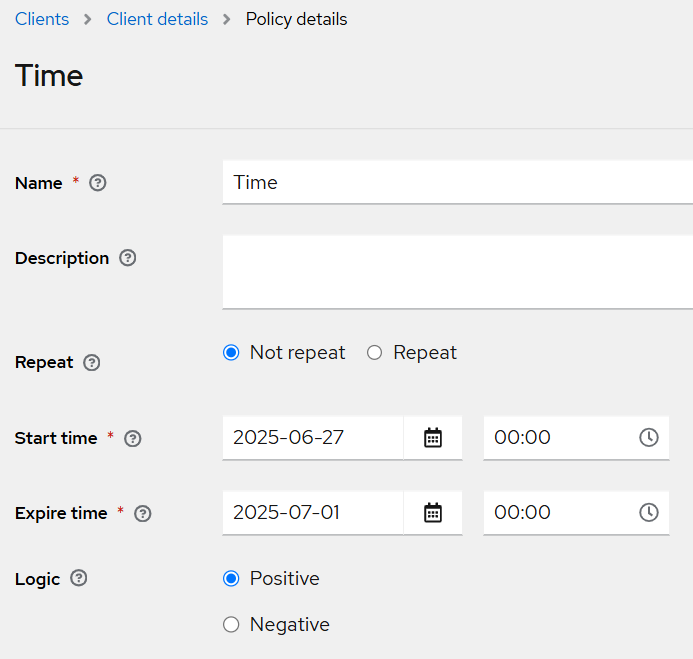
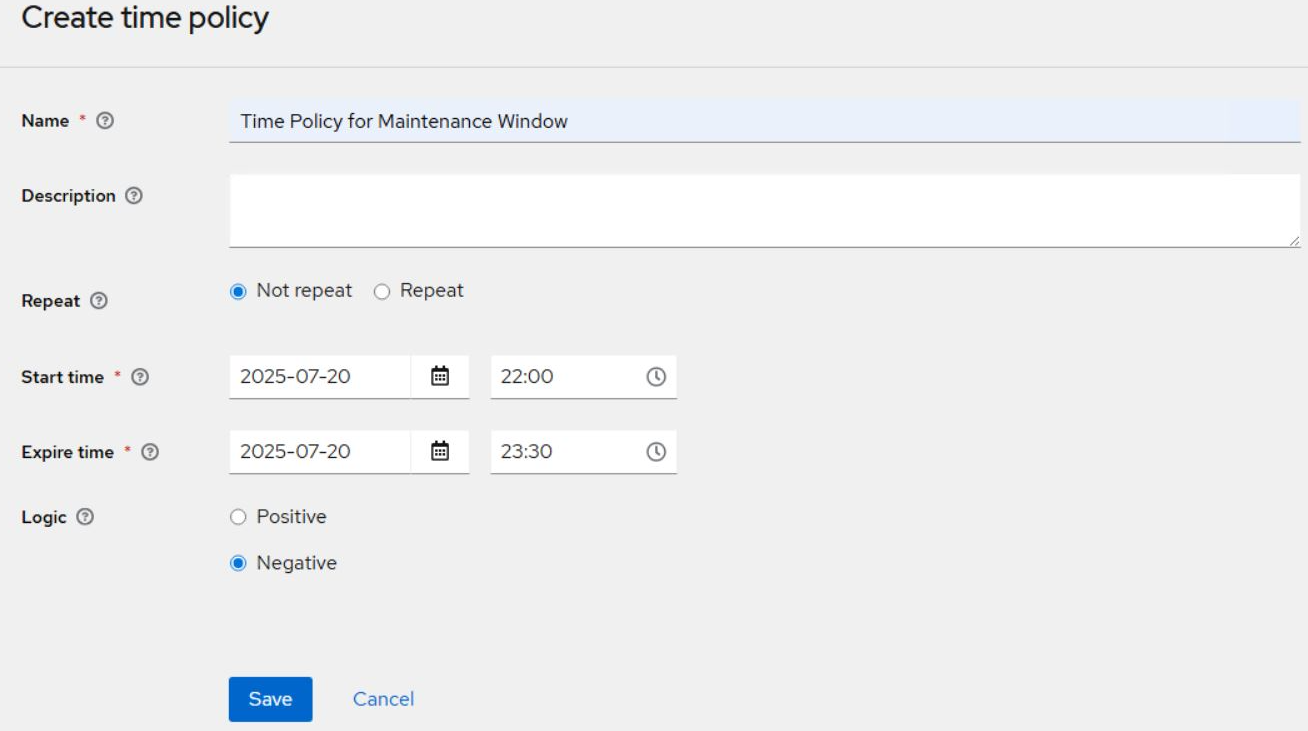
Time policy
A time policy restricts access based on time conditions. Use this policy to define business hours or temporary access windows, for example.
Only the date range and time range functions are supported. The repeat function is not supported.
To create a time policy:
- Go to Clients > Your Client > Authorization > Policies > Create Client Policy > Policy Type.
- Select Time from the policy type list.
- Enter a policy name and description in the fields provided.
- Select Not repeat.
- Select dates and times for when the policy starts and ends.
- Select the logic state that applies to the policy:
- Positive
- Negative
- Save your changes.
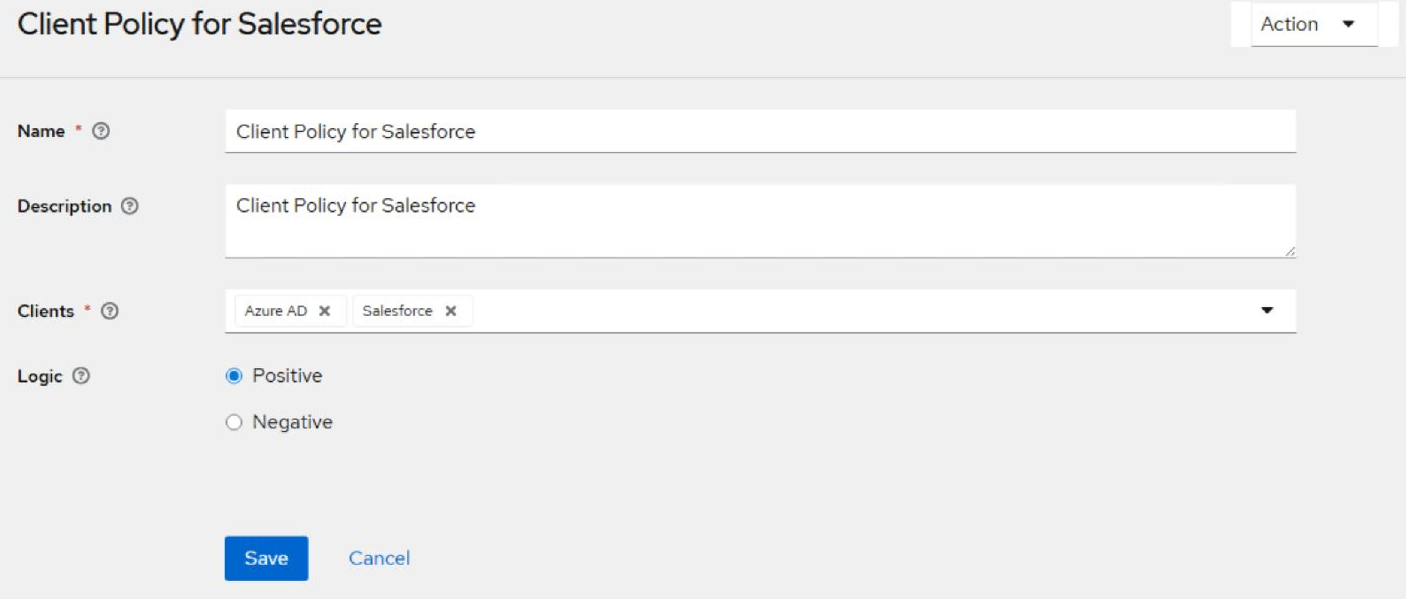
Client policy
This policy ensures that access requests are coming from the configured client only. A client policy can be used to restrict access to specific applications or APIs. This capability is especially useful in emergency or security breach situations, where access from a compromised or suspicious client needs to be immediately denied by applying negative-logic policies.
To create a client policy:
- Go to Clients > Your Client > Authorization > Policies > Create Client Policy > Policy Type.
- Select Client from the policy type list.
- Enter a policy name and description in the fields provided.
- Select a client to add from the drop-down list.
- Select the logic state that applies to the policy:
- Positive
- Negative
- Save your changes.
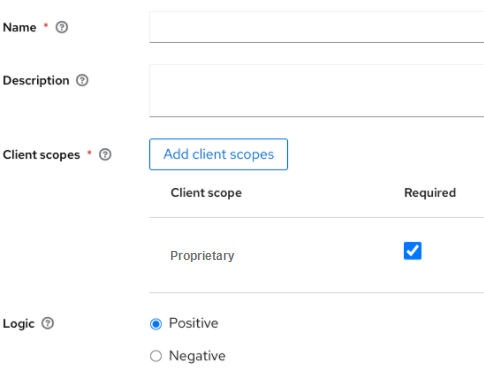
Client scope policy
A client scope policy defines access rules based on the Scope field of the access token payload. For example, openid email profile. Use this policy to control which data a client can access.
To create a client scope policy:
- Go to Clients > Your Client > Authorization > Policies > Create Client Policy > Policy Type.
- Select Client Scope from the policy type list.
- Enter a policy name and description in the fields provided.
- Select Add client scopes and choose a scope from the list that displays.
- Select Required if the policy will grant access
- Select the logic state that applies to the policy:
- Positive
- Negative
- Save your changes.
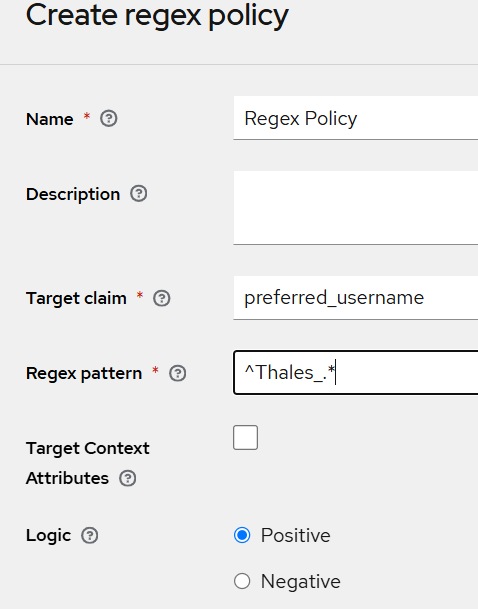
Regex policy
A regex policy uses regular expressions to define flexible access control rules. With this policy, you can define the regular expressions for:
-
Context-based attributes such as jti, iss, aud, typ, azp, nonce, session_state, c_hash, s_hash, sid, acr, allowed-origins, realm_access, resource_access, and scope.
-
Identity-based attributes such as sub, name, preferred_username, given_name, family_name, email, email_verified, and custom attributes.
To create a client scope policy:
- Go to Clients > Your Client > Authorization > Policies > Create Client Policy > Policy Type.
- Select Regex from the policy type list.
- Enter a policy name and description in the fields provided.
- Enter a target claim.
- This is the name of the target claim in the token. JSON claims use "." for nesting paths and "[]" to access arrays by index. For example, client.address[0].country. For target claims that reference a JSON object, map the first path (for example, client) to the attribute name with the JSON object.
- Enter a regular expression in the field provided.
- Select the logic state that applies to the policy:
- Positive
- Negative
- Save your changes.
The Target Context Attributes button is unsupported. Leave it unchecked.
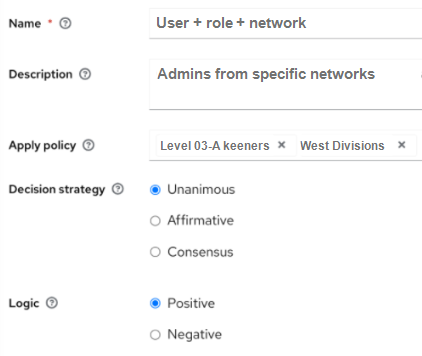
Aggregated policy
An aggregated policy combines multiple policies into a single policy. This function is useful for creating complex access rules based on multiple, individual policies.
To create an aggregated policy:
- Go to Clients -> Your Client -> Authorization -> Policies -> Create Client Policy -> Policy Type.
- Select Aggregated from the policy type list.
- Enter a policy name and description in the fields provided.
- Select a policy to add from the drop-down list.
- Select the decision strategy that applies to the policy:
- Unanimous: Access is granted only if all policies return a positive decision.
- Affirmative: Access is granted if at least one policy linked to a permission returns a positive decision.
- Consensus: Access is granted only if a majority of policies return a positive decision. A tie results in denial.
- Select the logic state that applies to the policy:
- Positive
- Negative
- Save your changes.
Use Case Scenarios
Use Case 1: Time Policy | Restrict Access during Maintenance Window
-
Purpose:
The IT team schedules a one-time maintenance on July 20th from 10:00 PM to 11:30 PM. During this period, employees will not have access to the internal admin portal (/admin-tools).
-
Preconditions:
-
The /admin-tools must be configured in SAE as a client with Authorization enabled.
-
A resource with the URI pattern (/*) must be added.
-
-
Configuration:
-
Create a Time-based policy that denies access between July 20th, 10:00 PM and July 20th, 11:30 PM.
-
Assign this policy to a permission that includes the resource.
-
-
Result:
Between 10:00 PM and 11:30 PM on July 20th, users will not be able to access the admin portal. Access will be automatically restored once the maintenance window ends—no manual intervention is required.
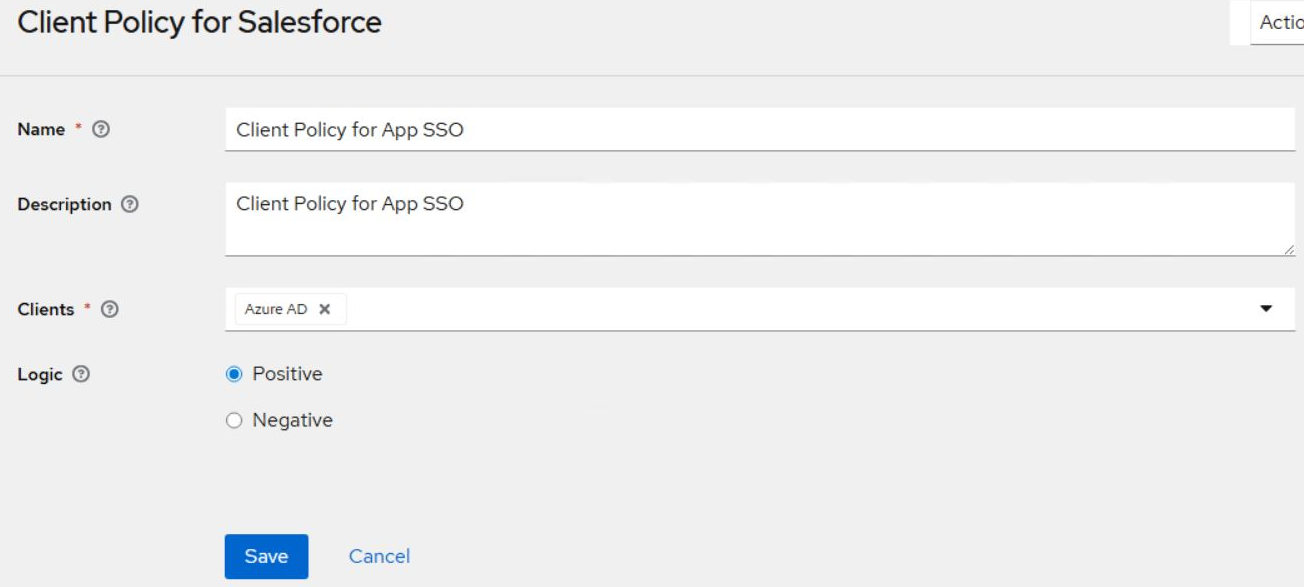
Use Case 2: Client Policy | Restrict SSO Access between specific Clients
-
Purpose:
To restrict which applications are permitted to perform Single Sign-On (SSO) into Salesforce. For security and compliance reasons, you want to allow SSO into Salesforce only if the session originates from Salesforce itself or from Azure AD. If the session comes from any other applications like ServiceNow, access must be denied—even if the user has a valid session.
-
Preconditions:
-
Salesforce, Azure AD, ServiceNow must be configured as clients in SAE.
-
Authorization is enabled on the Salesforce client in SAE.
-
A resource with the URL(/*) is created under the Salesforce client.
-
-
Configuration:
-
Create a client policy and select Salesforce and Azure AD from the Clients field.
-
Assign this policy to a permission that includes the resource.
-
-
Result:
Users can access Salesforce only if their active SSO session originates from Salesforce or Azure AD. If a session initiated from ServiceNow attempts to access Salesforce via SSO, the login will be blocked.
This policy ensures that only approved SSO flows are permitted for Salesforce and prevents unauthorized or backdoor access from other applications like ServiceNow.
Use Case 3: Client Scope Policy | Control Access to Operations based on Client Scope
-
Purpose:
Your company maintains a backend API (HR-API) that supports multiple operations via scopes. Two client applications consumes this API:
- Internal App – has both read and write access
- External App – has read-only access
Enforce the following access control:
- The External App can only request the read scope.
- The Internal App can request both read and write scopes.
- If the External App attempts to request the write scope, the token request must be denied.
-
Preconditions:
-
Both Internal App and External App are configured as clients.
- Client scopes read:employee and write:employee have been created in the Realm.
-
Scopes are assigned to the Clients as follows:
-
Internal App → read:employee, write:employee
-
External App → read:employee only
-
-
Configuration:
Create Client Scope Policy inside each Client.
-
Internal App
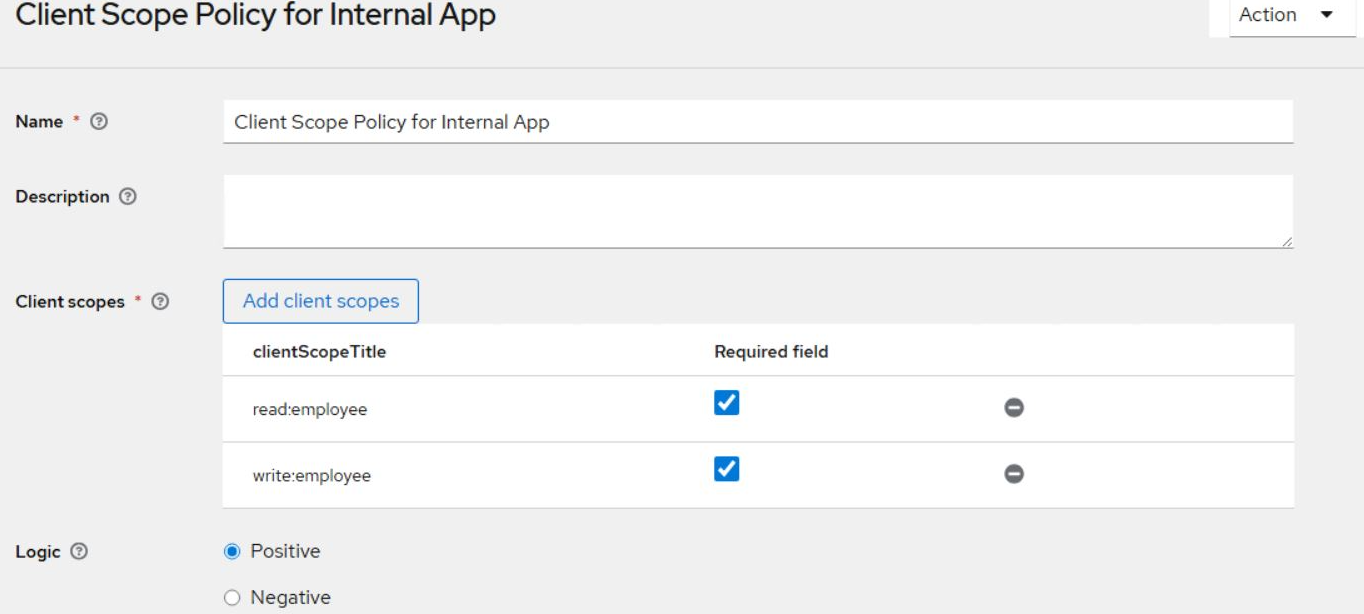
-
External App
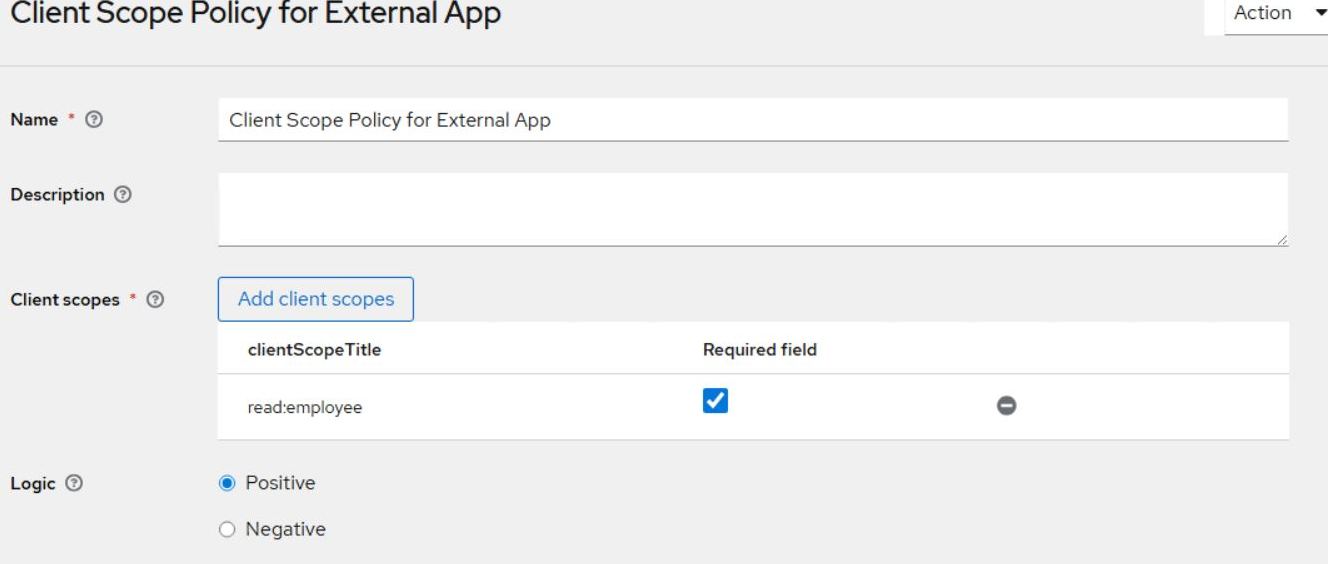
-
-
Result:
When the External App (used by partners or vendors) requests access to employee data with read-only permissions, the request is successfully processed. However, if it attempts to request write access, the system automatically blocks the request.
In contrast, the Internal App can request both read and write scopes without any issues.
This enforcement ensures that each application receives only the level of access it is authorized for, keeping sensitive operations restricted to trusted internal systems and maintaining compliance with security policies.
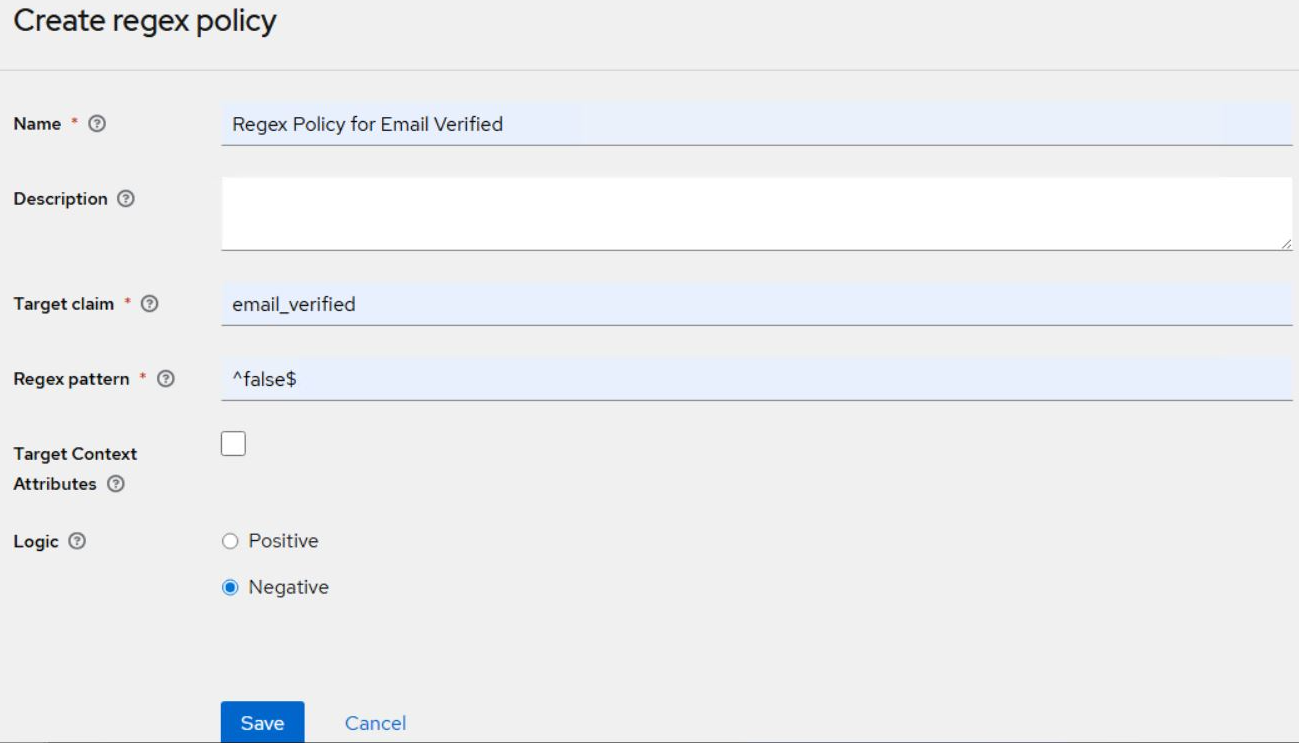
Use Case 4: Regex Policy | Deny Access if Email is not verified
-
Purpose:
Block access to users whose email addresses have not been verified.
-
Preconditions:
-
The client application is configured in SAE with Authorization enabled.
-
A resource with the URI pattern (/*) is added to the client.
-
The email_verified attribute is included in the token.
-
-
Configuration:
Create a Regex Policy on the email_verified field:
-
Target claim: email_verified
-
Regex pattern: ^false$
-
-
Result:
Users with unverified email addresses (whose tokens include "email_verified": false) are denied access to the protected resource. This ensures that only users with a verified email address can proceed.
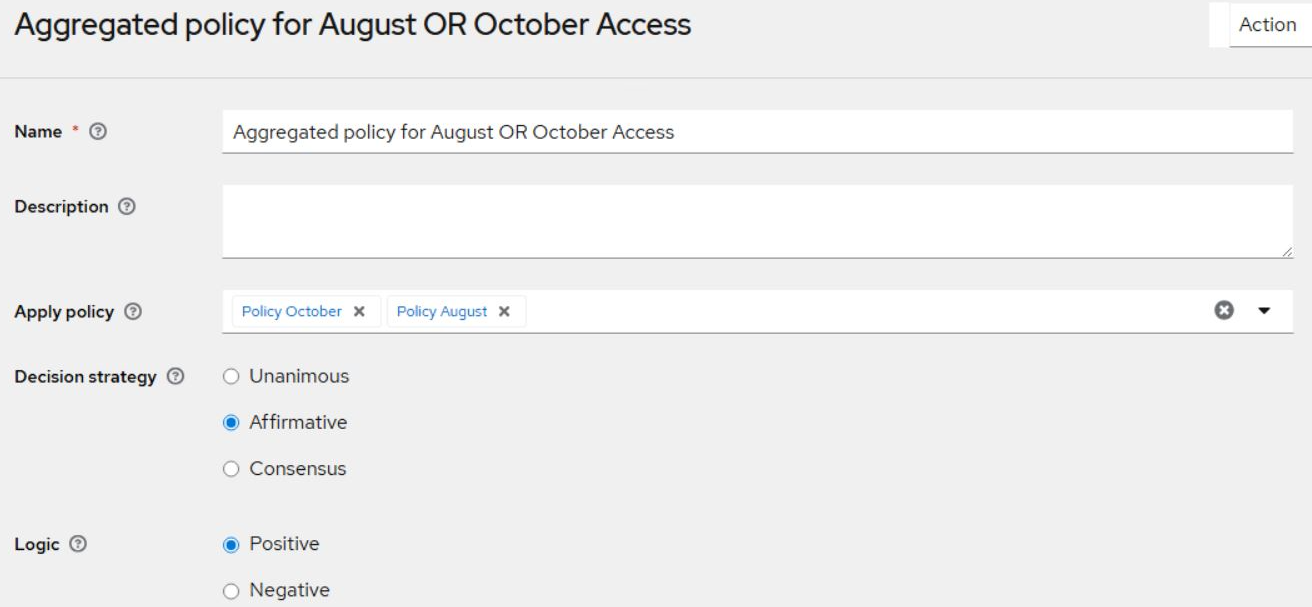
Use Case 5: Aggregated Policy | Complex logic creation with combination of AND and OR conditions
-
Purpose:
Company A runs secure partner access campaigns twice a year during the following periods:
-
August 1st to August 30th
-
October 1st to October 30th
To ensure that only verified users access the application during these time windows — and that access occurs exclusively through a secure login path — Azure AD SSO is enforced as the only allowed client.
-
-
Preconditions:
-
The client is configured in SAE with Authorization enabled.
-
A resource with the URI pattern (/*) is added to the client.
-
-
Configuration:
-
Create two Time-based Policies:
-
Policy August: Restricts access to the period from August 1st to August 30th
-
Policy October: Restricts access to the period from October 1st to October 30th
-
-
Add both the policies (Policy August and Policy October) in Aggregated policy.
-
Create a Client Policy:
-
Policy Azure AD: Allows access only if the client is Azure AD SSO
-
-
Combine both the above Policies (Aggregated policy and Client Policy) in resource-based permission to enforce both time and client restrictions.
-
-
Result:
-
If a user logs in using Azure AD SSO between August 1–30 or October 1–30, access is granted.
-
If the login occurs outside these date ranges, access is denied.
-
If the login is from any client other than Azure AD SSO (for example, ServiceNow, Salesforce), access is denied.
-