
Security Recommendations
This section provides guidelines on how to maintain a safe computer and SafeNet IDPrime Virtual (IDPV) environment.
This section outlines the following best practices for maintaining a secure computer and SafeNet IDPrime Virtual (IDPV) environment:
- Ensuring Security in the IDPV Desktop Application
- Securing the SafeNet IDPrime Virtual Environment
- Restricting Non-Secure Database Connections
- Configuring Enhanced Security Settings
- Implementing Docker Security Guidelines
- Deploying TLS Securely
- Recommendations for Azure Virtual Desktop (AVD) Multi-User Sessions
Ensuring Security in the IDPV Desktop Application
Secure Environment
- Administrators must manage all configurations and installations. Access restrictions should prevent end users from installing or modifying IDPV application settings.
- Avoid user accounts with administrative privileges.
- Install anti-virus software on every computer and schedule periodic scans.
- Set up a network firewall and relevant network security utilities.
- Regularly update IDPV Client and IDPV Server as the latest build contains fixes against newly identified vulnerabilities.
- Apply security restrictions on the end-user computer to protect it against malicious applications such as fake credential providers, key loggers, and trojans.
Secure Installation
Windows
- Only use Thales product installers. Before installing the software, verify its integrity using the checksums provided in the release guidelines.
-
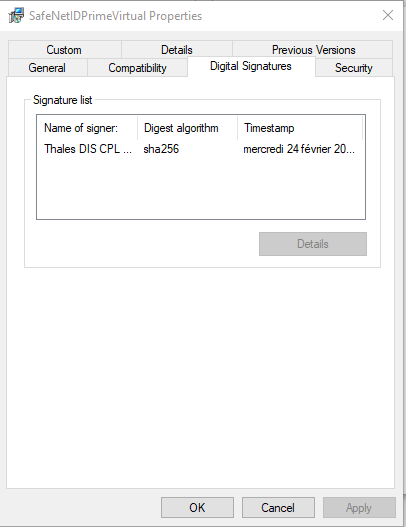
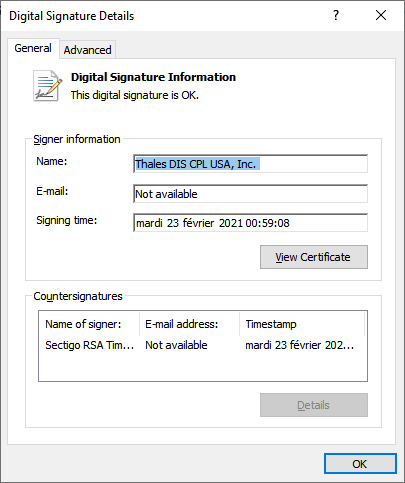
Only download and install the IDPV Client package from the official Thales website. Perform the following steps to ensure that the Thales certificate is in use:
-
After downloading the package (MSI/EXE), right-click the file, and select Properties.
-
On the Properties window, go to the Digital Signatures tab, and verify that the Thales signature is listed.
-
Select the Thales signature and click Details.
-
On the Digital Signature Details window, go to the General tab, and verify that the text "The digital signature is OK." is displayed.
-
-
Install managed applications into a target installation folder for which non-admin users do not have modification privileges.
- Secure local machine registries to avoid configuration modifications.
Mac
Validate the digital signature of the downloaded software to ensure its authenticity and integrity. For more information, click here.
Secure Usage
- Restrict access to logs (Windows logs and applications logs) and offline bundle.
- Use MFA when the end-user authenticates through the identity provider server. Do not rely only on the traditional password mechanism.
- Do not share your IDPV virtual token PIN or IDP password with anyone.
- Administrators should periodically review logs for suspicious activities such as authentication and user access & changes.
- Implement regular backups of critical application data and test backup restoration procedures.
- Understand and comply with end-user license agreements (EULAs).
Note
Logs should be regularly reviewed and securely archived as per the organization's log retention policy.
Securing the SafeNet IDPrime Virtual Environment
This section provides recommendations and guidelines on maintaining a safe computer and SafeNet IDPrime Virtual (IDPV) environment.
Recommendations to Manage Security Information and Assets
- Restrict the exposure of sensitive information, including certificates, keys, and passwords.
- Distribute the responsibility for managing security assets (for example, certificates, keys, and passwords) among multiple personnel.
- No single individual should oversee all servers, such as IDPV, database, and HSM.
Guidlines Based on Microsoft Security Recommendations
The following guidelines are based on the security recommendations defined by Microsoft.
Strong PIN Policy
A strong PIN policy is highly recommended to ensure secured SafeNet IDPV environment. Use a PIN with a minimum length of eight characters. The PIN must be a combination of at least one numeric character, uppercase, lowercase, and a special character.
Admin Key Policy
The default Admin key of a token is 48 times zeros. If it is required to change the admin key, then its new value will depend on the FIPS configuration of Luna HSM.
If you divide the admin key into the following three parts of the same size:
-
k1[1-16]
-
k2[17-32]
-
k3[33-48]
The two cases available are:
-
In Luna non-FIPS mode, you can use any combination of k1, k2 & k3.
-
If Luna is configured in FIPS mode, then you can choose all three keys unique from one another such as:
- k1≠k2≠k3 (All three keys must be unique)
- k1≠k3=k2 (k2 can be identical to k1 or k3)
This is depicted with examples in the following table.
| Luna HSM Mode | Key Combination | Permission | Example |
|---|---|---|---|
| Non-FIPS | k1=k2=k3 or k1≠k2≠k3 (any combination) | Allowed |
|
| FIPS | k1≠k2≠k3 or k1≠k3=k2 ( k2 can be identical to k1 & k3) | Allowed |
|
| FIPS | k1=k2=k3 or k1=k3≠k2 (k1 & k3 can be identical) | Disallowed |
|
Windows Malware Prevention
Up-to-date security software is the best way to help protect your computer from a malware attack. Microsoft provides security software that is regularly updated to protect against the latest threats.
For more information, go to https://www.microsoft.com/en-us/security.
Enabling Automatic Windows Updates
Automatic Windows updates ensure that you are running software with the latest security enhancements. When new updates are available, Windows sends you a notification. Accept the updates with a click and they download and install automatically.
Anti-Virus Software
Make sure to choose an effective Anti-Virus/Malware software to protect your client machines. It is essential to keep the Anti-Virus/Malware software updated.
MYSQL Version
To prevent unauthorized access, ensure that the MySQL version in use is higher than v5.7.26.
SAC Package
Install the SAC Package only from the Official Thales Site.
Perform the following steps to ensure Thales certificate is being utilized:
-
After downloading the package (MSI/EXE), right-click the file and select Properties.
-
On the Properties window, go to the Digital Signatures tab, and verify that the Thales signature is listed.
-
Select the Thales signature and click Details.
-
On the Digital Signature Details window, click the General tab, and verify that the text "The Digital Signature is OK" is displayed.
Malware Awareness
Malware creators use various common tricks to install malicious software on your PC. Being aware of these methods can help you stay protected.
-
Email: Malware frequently reaches your PC through email attachments. Avoid opening attachments from unknown senders or suspicious emails. Malware can also spread via instant messages and file transfer requests.
-
Websites: Avoid clicking on links to unfamiliar or untrusted webpages, especially those sent by unknown individuals. Malicious websites can install malware on your PC simply by visiting them.
-
Use caution: If a website looks suspicious or behaves unexpectedly, close your browser immediately. Update your security software and run a quick scan on your PC to ensure safety.
-
Pirated software: Malware is often hidden within pirated software. Installing a pirated software may unintentionally install malware as well.
-
Social engineering: Malware creators often use deceptive tactics to trick you into taking harmful actions, such as clicking on a fake link, opening a file that appears legitimate, paying money to "unlock" your PC, or visiting a malicious website. These tactics are referred to as social engineering.
-
Passwords: Attackers may attempt to guess your Windows account or other passwords. Always create strong passwords that are hard to guess. A strong password should be at least eight characters long and contain letters, numbers, and symbols.
-
Removable drives: Malware like worms can spread by copying itself to USB flash drives or other removable devices connected to your PC. Always exercise caution when sharing removable drives and ensure they are scanned for threats.
Limit User Privileges
Many malware threats require full access to your computer to function effectively. Windows 10, Windows 8.1, Windows 7, and Windows Vista use User Account Control (UAC) to restrict program actions without your permission.
With UAC enabled, you'll receive a notification whenever a program or application attempts to make changes to your system. This feature helps prevent malware and unwanted software from installing or altering your computer's settings.
Windows 10 Elevated Security
In Windows 10 and Windows Server 2016, you should use Credential Guard to enhance security.
For more information, refer to the Microsoft site.
Additional Environment Recommendations
To enhance the security of your information, consider the following actions:
-
Enable Windows Defender to provide real-time protection against threats.
-
Lock your screen after a period of inactivity to control access to your computer.
-
Set up secure file sharing to ensure only authorized access to shared files.
-
Limit sharing services by running only those that are necessary.
-
Use a local account for greater security. Unlike a Microsoft account, a local account reduces the risk of remote logon if compromised.
-
Enable secure boot and UEFI instead of legacy BIOS to improve system integrity.
-
Disable Flash and Java, as they are commonly associated with security vulnerabilities.
-
ncrypt your hard drive to safeguard your data from unauthorized access, even if your computer is physically accessed.
Restricting Non-Secure Database Connections
As an enhanced security measure, it is recommended to enable TLS on the Database and restrict non-secure connections. For more information on guidelines for securing connections to MySQL Database, refer to Setting up and Accessing MySQL Server. For other databases including MSSQL and MariaDB, refer to their official websites respectively.
Configuring Enhanced Security Settings
HSM Partition Ownership by IDPV Server
To connect to the HSM partition, a TokenPin (HSM crypto officer pin placed in the appsettings.yml file) and a TokenSerial (partition serial number) are required.
The presence of HSM PIN in the .yml file makes it vulnerable to unauthorized access. To prevent this, a TokenPasscode value is used to change the TokenPin by the IDPV server when it boots for the first time. As this changed PIN is managed by the IDPV server, the server takes complete ownership of the HSM partition and this prevents any unauthorized access to the HSM partition.
Security Error Messages
| HTTP Status Code/Error Code | Error Description | Intended Recipient |
|---|---|---|
| 412 | A precondition provided in the request (such as an if-match header) does not match the resource's current state. | Admin User |
| 401 | For security reasons, you must change the token password. | Admin User |
| 401 | Login with admin key to unlock the token. The token authentication failed. | Admin Users |
| 401 | Authorization Failed. | Admin User |
| 401 | Resource cannot be accessed with the provided claim. Authorization Failed. | Admin User |
| 57 (Error Code) | Tenant record (Id:{0}) integrity might have been compromised |
Admin User |
| 500 | Key record (Id:{0}) integrity might have been compromised. Internal Server Error Occurred. |
Admin User |
| 500 | Token record (Id:{0}) integrity might have been compromised. Internal Server Error Occurred. |
Admin User |
Implementing Docker Security Guidelines
Security holds prime importance for critical business applications. This section lists the security risks of using SafeNet IDPrime Virtual Server Docker images and containers. Additionally, it suggests best practices to mitigate those risks.
Recommendations
-
You should not expose the Docker API to the general public.
-
If you choose to expose the Docker API, secure it with TLS certificates.
-
Confirm that users are trained not to reveal their credentials.
-
Security of containers
-
Don’t execute processes as root.
-
Don’t group security-sensitive containers.
-
Run AppArmor or SELinux.
Note
Only a valid System Administrator should access the IDPV container.
-
For more information, refer to CIS Docker Benchmarks.
Securing Docker with TLS
Docker implements access controls for its network API using Transport Layer Security (TLS). This protocol secures the websites with https URLs and uses Public Key Cryptography to encrypt connections.
In this technique, keys are signed with certificates that are maintained by a trusted party, and each transaction is encrypted and authenticated. Docker provides mechanisms to authenticate both the server and the client. Additionally, it provides strong authentication, authorization, and encryption for any API connection over the network.
Perform the following steps to secure docker with TLS:
-
Prepare the environment: Ensure the following:
-
OpenSSL version 1.0.1 is installed on your machine.
-
Directory is created for all files and it is protected and backed up.
-
Files are similar to the root password.
-
-
Create a Certificate Authority: Initialize the CA serial file and generate CA private and public keys as:
$ echo 01 > ca.srl $ openssl genrsa -des3 -out ca-key.pem 4096 $ openssl req -new -x509 -days 365 -key ca-key.pem -out ca.pemca.pemfile will be used to sign all other keys later. -
Create and Sign the Server Key: After getting the CA, you need to create a server key and certificate signing request. Confirm that the CN matches the hostname on which you run the Docker daemon:
    $ openssl genrsa -des3 -out server-key.pem 4096
    $ openssl req -subj '/CN=<Your Hostname Here>' -new -key server-key.pem –out server.csr
    $ openssl rsa -in server-key.pem -out server-key.pem
Thereafter, sign the key with your CA:
$ openssl x509 -req -days 365 -in server.csr -CA ca.pem -CAkey ca-key.pem -out server-cert.pem -
Create and Sign the Client Key: Create the client key and certificate signing request as:
    $ openssl genrsa -des3 -out client-key.pem 4096
    $ openssl req -subj '/CN=client' -new -key client-key.pem -out client.csr
    $ openssl rsa -in client-key.pem -out client-key.pem
Create the
extensions configfile to make the key suitable for client authentication:$ echo extendedKeyUsage = clientAuth > extfile.cnfThereafter, sign the key with your CA:
$ openssl x509 -req -days 365 -in client.csr -CA ca.pem -CAkey ca-key.pem -out client-cert.pem -extfile extfile.cnf -
Configure the Docker Daemon for TLS: To configure the Docker daemon for TLS, enable remote connections using the –H flag and mention the port as 2376:
$ sudo docker -d –tlsverify --tlscacert=ca.pem --tlscert=server-cert.pem --tlskey=server-key.pem -H=0.0.0.0:2376Modify the startup scripts on your server and the keys should be placed in a secure system directory, such as
/etc/docker. -
Configure the Docker Client for TLS: To secure Docker client connections, move the key files to .docker directory, located in your home directory. Additionally, set the DOCKER_HOST variable:
    $ cp ca.pem ~/.docker/ca.pem
    $ cp client-cert.pem ~/.docker/cert.pem
    $ cp client-key.pem ~/.docker/key.pem
    $ export DOCKER_HOST=tcp://:2376
Next, run Docker with the
--tlsverifyoption as$ docker --tlsverify ps
Deploying TLS Securely
Transport Layer Security (TLS) is the cryptographic protocol for securing communications between web applications and server. When secured with TLS, communication between the client and server must follow the recommendations listed below.
The TLS certificate must be kept secure and must not be exposed.
Mandatory Recommendations
- Do not use any version of SSL. Disable support for SSL.
- Currently, IDPV solution supports TLS v1.2 and TLS v1.3 so accordingly configure on the client machines. Disable protocols at proxy server level if configured.
- Support the extension Signaling Cipher Suite Value
TLS_FALLBACK_SCSV. This prevents the protocol downgrade attacks on TLS. -
Do not use the following cipher suites:
- Ciphers offering Null encryption: eNULL, NULL (the suites that offer no encryption).
- Ciphers offering Null authentication: aNULL (the suites that offer no authentication). aNULL includes anonymous cipher suites such as ADH (Anonymous Diffie-Hellman) and AECDH (Anonymous Elliptic Curve Diffie-Hellman).
- Ciphers using export encryption algorithms: EXP.
- Ciphers suites with LOW encryption, i.e. using symmetric keys’ length less than 128-bits.
- Cipher suites using MD5 as hashing algorithm.
- Cipher suites using IDEA.
- Cipher suites using RC4.
- Cipher suites using Non-Ephemeral (Elliptic Curve) DH.
- Cipher suites using DHE with DHE key-length less than 1024.
- Cipher suites using DSA/DSS (Digital Signature Algorithm/Digital Signature Standard) authentication Using DSA/DSS may result in weak signature operation if a bad entropy source is used.
Example:
    Nginx:ssl_ciphers HIGH:!aNULL:ECDH+AESGCM:
    ECDH+AES256:ECDH+AES128:DH+3DES:!ADH:!AECDH:!MD5;
The above list is not exhaustive and may change when new vulnerabilities of the cipher suites are identified.
-
Once a secure session is established, a renegotiation may be possible (renegotiation refers to an attempt to repeat the negotiation on an existing connection). There are four types of renegotiation:
- Secure Client Renegotiation
- Insecure Client Renegotiation
- Secure Server Renegotiation
- Insecure Server Renegotiation
Either disable the renegotiation, or if renegotiation is required, use only secure renegotiation.
-
Disable compression in SSL/TLS and SPDY.
-
Configure TLS cipher suite order preference. The TLS server shall define the CipherSuites Order. A TLS server determines the CipherSuites Order using a flag. This ensures that the cipher preferences defined in server setup are followed instead of those provided by the client. The method or the flag for selecting the order is not standardized. That is, it depends on the application server.
Example:
Flag or Method for the server to define the CipherSuites order:
Apache SSLHonorCipherOrder on Nginx ssl_prefer_server_ciphers On Tomcat useCipherSuitesOrder="true" honorCipherOrder="true" Pure Java SSLParameters.setUseCipherSuitesOrder(true)
Other Recommendations
-
The use of Authenticated Encryption (AE) or Authenticated Encryption with Associated Data (AEAD) ciphersuites, e.g. GCM (providing encryption + authentication) is preferred instead of CBC (only encryption).
-
Always use Diffie-Hellman algorithm with key-strength same as your RSA/EC key-size. The recommended key-length for DHE cipher suites with RSA is 4096 while for ECDHE, the recommended key-length is 224.
-
Use cipher suites with DHE or ECDHE key exchange. This key exchange(s) use ephemeral keys and have forward secrecy property.
-
To ensure compatibility in a Medium Term, use the following configuration:
- TLS v1.2 or TLS v1.3
- Support for Server Name Indication (SNI)
- At least TLS6+_ECDHE_RSA_WITH_AES_128_GCM_SHA256 cipher suite should be enabled.
The flags or options listed below can be added as Cryptography TLS guidelines:
Example (Nginx configuration):
ssl_session_cache shared:SSL:1m; ssl_session_timeout 10m; ssl_ciphers HIGH:!aNULL:!MD5; # Use only TLS ssl_protocols TLSv1.2 TLSv1.3; # Tell client which ciphers are available ssl_prefer_server_ciphers on; ssl_ciphers ECDH+AESGCM:ECDH+AES256:ECDH+AES128:DH+3DES:!ADH:!AECDH:!MD5; # Enable HSTS add_header Strict-Transport-Security "max-age=31536000; includeSubDomains"; # Enable session tickets ssl_session_tickets on; -
Use a reverse proxy while deploying an IDPV server container. It manages and optimizes traffic between clients and servers enabling organizations to improve their web services.
Key Functions of a Reverse Proxy
- Load Balancing: Distributes incoming network traffic across multiple servers to optimize resource utilization and improve performance.
- Caching: Stores copies of frequently requested content to reduce load times and server strain by serving cached responses directly to users.
- Security: Filters and inspects incoming traffic, providing SSL termination, and hiding backend server details to protect against threats and attacks.
- Traffic management: Directs and controls incoming requests to appropriate backend servers based on rules, load, and performance criteria.
- SSL offloading: Handls SSL/TLS encryption and decryption on behalf of backend servers to improve performance by reducing their processing load.
Implementation Considerations
When implementing a reverse proxy, consider the following factors:
- Choice of Software: Popular software solutions for reverse proxies include NGINX, HAProxy, and Apache. The choice depends on factors, such as ease of configuration, performance requirements, and community support.
- Configuration: Proper configuration is essential for a reverse proxy to function effectively. This includes setting up DNS records, configuring virtual hosts, and ensuring that backend servers are correctly set up to handle requests forwarded by the proxy.
- Testing: After configuration, thorough testing is required to ensure that the reverse proxy operates as intended and efficiently handles requests and responses between clients and backend servers.
Note
For more information, refer to the official documentation of the above tools.
Recommendations for Azure Virtual Desktop (AVD) Multi-User Sessions
For Azure Virtual Desktop (AVD) multi-user session, Microsoft has recommended a minimum of 8 vCPUs, 16-GB RAM, and 32-GB storage.
For more information, refer to Microsoft documentation.