
How to reprotect data
This section outlines the complete File-to-File transformation process for CSV files. The example provided here demonstrates how to reprotect data of a CSV file. The reprotect operation protects the plaintext data with the latest version of the protection policy and returns the ciphertext based on the protection policy selected in the job configuration.
Important Points
We have provided the following sample files with this example.
Input.csv: Contains the data to be processed. Download and save this file on the host machine specified during volume mapping when deploying BDT.
Output.csv: Contains the processed data. This file will get created on the host machine specified during volume mapping when deploying BDT.
Column of the
input.csvfile that will be reprotected in this example is: latitude.We will modify some of the attributes of the protection policy that was used during protect (fpeProtectionPolicy). Doing this will increment the version of the protection policy.
BDT application must be registered on the CipherTrust Manager. Refer to Quick Start for details.
BDT must be deployed. Refer to Quick Start for details.
A compatible CipherTrust Manager must be up and running. Refer to CipherTrust Manager Deployment for details.
Steps
The transformation steps provided in this example can be performed using the CipherTrust Manager UI or API playground.
Create source and destination data-sources. The source data-source contains the data to be processed while the destination data-source will store the processed data.
API:
post /v1/data-protection/data-sourcesRequest
    {
    "name": "sourcefileforreprotect",
    "description": "source details",
    "type": "CSV File",

    "file_properties":

    {"file_path": "/opt/app/tmp/input/inputReprotect", "delimiter": ",", "column_count": 12, "has_header_row": true}
    }
Response
    {
        "id": "060f5f02-0020-4391-8622-986a17a67242",
        "uri": "kylo:kylo:adp-management:data-sources:sourcefilefor-reprotect-060f5f02-0020-4391-8622-986a17a67242",
        "account": "kylo:kylo:admin:accounts:kylo",
        "createdAt": "2025-04-10T11:45:11.181451365Z",
        "updatedAt": "0001-01-01T00:00:00Z",
        "name": "sourcefileforreprotect",
        "description": "source details",
        "type": "CSV File",
        "file_properties": {
            "file_path": "/opt/app/tmp/input/inputReprotect",
            "delimiter": ",",
            "qualifier": "\"",
            "column_count": 12,
            "has_header_row": true,
            "encoding": null,
            "record_length": null,
            "line_separator": null
        }
    }
In response, ID of sourcefileforreprotect (
060f5f02-0020-4391-8622-986a17a67242) is returned.Request
    {
    "name": "destinationfileforreprotect",
    "description": "destination details",
    "type": "CSV File",
    "file_properties":

    {"file_path": "/opt/app/tmp/output/outputReprotect-2025-03-26.10.54.05.326.csv", "delimiter": ",", "column_count": 12,"has_header_row": true}
    }
Response
    {
        "id": "f1092d62-c64d-4dd5-ba21-0a30a1b7d17f",
        "uri": "kylo:kylo:adp-management:data-sources:destinationfileforreprotect-f1092d62-c64d-4dd5-ba21-0a30a1b7d17f",
        "account": "kylo:kylo:admin:accounts:kylo",
        "createdAt": "2025-04-10T11:46:54.504532806Z",
        "updatedAt": "0001-01-01T00:00:00Z",
        "name": "destinationfileforreprotect",
        "description": "destination details",
        "type": "CSV File",
        "file_properties": {
            "file_path": "/opt/app/tmp/output/outputReprotect-2025-03-26.10.54.05.326.csv",
            "delimiter": ",",
            "qualifier": "\"",
            "column_count": 12,
            "has_header_row": true,
            "encoding": null,
            "record_length": null,
            "line_separator": null
        }
    }
In response, ID of destinationfileforreprotect (
f1092d62-c64d-4dd5-ba21-0a30a1b7d17f) is returned.To create a data source from CipherTrust Manager's UI, follow this link.
Similarly, you can also create data sources for fixed length file and databases. For fixed length file follow the link. For databases, refer to Managing Data Sources.
Update protection policy. The updated protection policy will be used to reprotect data.
Create job configuration.
API:
post /v1/data-protection/bdt/job-configurationsAPI Request
    {
    "name": "job configuration for reprotect",
    "in_place_update": false,
    "source_id": "060f5f02-0020-4391-8622-986a17a67242",
    "destination_id": "f1092d62-c64d-4dd5-ba21-0a30a1b7d17f",
    "tables": [
        {
        "columns": [

    { "source_column_name": "latitude", "operation": "reprotect",     "protection_policy": "fpeProtectionPolicy"}
        ]
        }
    ]
    }
API Response
    {
    "id": "7e5a96f6-d8ff-4e07-8017-62329e52c22f",
    "uri": "kylo:kylo:adp-management:bdt-job-configurations:job-configuration-for-reprotect-7e5a96f6-d8ff-4e07-8017-62329e52c22f",
    "account": "kylo:kylo:admin:accounts:kylo",
    "createdAt": "2025-04-10T11:59:26.798803671Z",
    "updatedAt": "2025-04-10T11:59:26.798803671Z",
    "version": 1,
    "name": "job configuration for reprotect",
    "description": "",
    "case_sensitive": false,
    "source_id": "060f5f02-0020-4391-8622-986a17a67242",
    "destination_id": "f1092d62-c64d-4dd5-ba21-0a30a1b7d17f",
    "in_place_update": false,
    "unprocessed_record_file": "",
    "tables": [
        {
            "id": "0d77a4cc-6b7e-49de-a7f0-6ea4fbab0439",
            "uri": "kylo:kylo:adp-management:bdt-job-configurations-tables:0d77a4cc-6b7e-49de-a7f0-6ea4fbab0439",
            "account": "kylo:kylo:admin:accounts:kylo",
            "createdAt": "2025-04-10T11:59:26.803556607Z",
            "updatedAt": "2025-04-10T11:59:26.802711961Z",
            "source_table": "",
            "source_schema": "",
            "destination_table": "",
            "destination_schema": "",
            "create_destination_table": false,
            "subset": {
                "limit": 0,
                "offset": 0,
                "recurrency": 1,
                "order_by": "",
                "order": "ASC",
                "filters": null
            },
            "columns": [
                {
                    "id": "54c8a33c-a06b-4308-99c3-9326b79db087",
                    "uri": "kylo:kylo:adp-management:bdt-job-configurations-tables-columns:54c8a33c-a06b-4308-99c3-9326b79db087",
                    "account": "kylo:kylo:admin:accounts:kylo",
                    "createdAt": "2025-04-10T11:59:26.808796141Z",
                    "updatedAt": "2025-04-10T11:59:26.807903746Z",
                    "source_column_name": "latitude",
                    "operation": "reprotect",
                    "protection_policy": "fpeProtectionPolicy"
                }
            ]
        }
    ],
    "meta": {
        "job_running": false
    }
    }
In response, ID of the job configuration (
7e5a96f6-d8ff-4e07-8017-62329e52c22f) is returned.To create job configuration from CipherTrust Manager's UI, follow this link.
To reprotect, select operation type as reprotect.
Tip
Multiple columns can be configured in a single job configuration, and each column can be associated with different protection policies.
Run job.
To run a job, at least one active client must be registered with the application.
There is slight difference in the
Run JobAPI call depending on the CipherTrust Manager version you are using. Choose the preferred tab to view the details.API:
post /v1/data-protection/run-jobPass the job configuration ID (generated in step 4) and client profile ID (generated in deployment steps) in the API request.
API Request
    {
    "job_configuration_id": "7e5a96f6-d8ff-4e07-8017-62329e52c22f",
    "client_profile_id": "ab2e3f89-b277-4821-9939-4e5ee6e82352"
    }
API Response
{ "job_status_id": "b960a20c-4852-4fee-a18b-302710f67170"}In response, a job status ID (
b960a20c-4852-4fee-a18b-302710f67170) is returned, use this ID to check the intermediate status of the job.API:
post /v1/data-protection/bdt/job-configurations/{id}/runPass the job configuration ID (generated in step 4) and client profile ID (generated in deployment steps) in the API request.
API Request
    post /v1/data-protection/bdt/job-configurations/{7e5a96f6-d8ff-4e07-8017-62329e52c22f}/run
    { "client_profile_id": "ab2e3f89-b277-4821-9939-4e5ee6e82352" }
API Response
{ "job_status_id": "b960a20c-4852-4fee-a18b-302710f67170"}In response, a job_status_id (
b960a20c-4852-4fee-a18b-302710f67170) is returned. Use this ID to check the status of the job.To run a job from CipherTrust Manager's UI, follow this link.
Check status of the job.
There is slight difference in the
Job StatusAPI call depending on the CipherTrust Manager version you are using. Choose the preferred tab to view the details.API:
get /v1/data-protection/job-status/{id}Pass the
job_status_id(generated in step 5) in the API request.API Request
{ /v1/data-protection/job-status/{b960a20c-4852-4fee-a18b-302710f67170} }API:
get /v1/data-protection/jobs/{id}Pass the
job_status_id(generated in step 5) in the API request.API Request
/v1/data-protection/jobs/b960a20c-4852-4fee-a18b-302710f67170To run a job from CipherTrust Manager's UI, follow this link.
In response, information about the jobs in various stages, total number of records processed, error messages are returned.
Verify Results
After the job status gets completed, Check the Output.csv for transformed data.
Note
For transformations, where destination is file, the output file name (provided on UI) will also contain a timestamp appended to it. For example, <output-name-as-per-ui>-2025-04-01.17.57.01.521.csv
For CSV file, the output file will be formatted as:
<file-name><timestamp>.csvFor fixed length file, the output file will be formatted as:
<file-name><timestamp>.txt
In the Input.csv file, the latitude column was protected with older veriosn of protection policy (1002008), after transformation, the data is reprotected with the latest version of protection policy (1003008).
| Before Transformation | After Transformation |
|---|---|
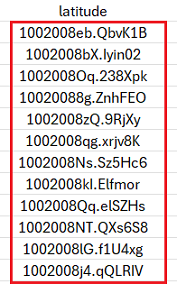 | 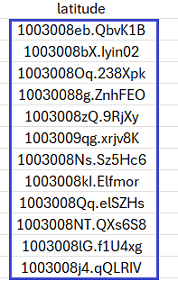 |
In the output, you can see that the incremented version header is prepended to the ciphertext (1003008eb.QbvK1B).