
Quick Start
This section describes how to get BDT up and running in less than 10 minutes using a Helm Chart. Refer to Alternative Deployment Methods for instructions on deployment as a standalone container or deployment without a Helm Chart.
Prerequisites
Kubernetes environment is up and running and kubectl is installed.
Helm is installed. Refer to https://helm.sh/docs/intro/install/ for details.
CipherTrust Manager 2.19 or higher is up and running. Refer to CipherTrust Manager Deployment for details.
Docker hub must be accessible.
BDT image repository, thalesciphertrust/ciphertrust-batch-data-transformation, is accessible. This repository contains images for BDT. The image path with the latest tag always points to the latest release.
Note
The instructions provided in this section are for deploying BDT in the default namespace.
The user is responsible for maintaining the security of their deployment environment.
This sample values are enclosed within < >, for example,
<target_directory>. Replace these values with the actual values per your environment.
Following section provides instructions for deploying BDT within the Kubernetes Pod for both File-to-File and DB-to-DB transformations. Click the tab of your choice.
Steps for DB-to-DB
Create a BDT application from the Application Data Protection tile on CipherTrust Manager. Click the desired tab to view the instructions.
To create an application from CipherTrust Manager's UI, follow this link.
The application is created on the CipherTrust Manager and a registration token is returned in response. This token is passed in the deployment scripts to register BDT client on the CipherTrust Manager as shown in the below steps.
API:
/v1/data-protection/client-profilesRequest
        {
        "name": "client_profile_bdt",
        "app_connector_type": "BDT",
        "heartbeat_threshold": 5,
        "configurations":

        {

        "log_level": "WARN",
        "heartbeat_interval": 300,
        "heartbeat_timeout_count":5,
        "thread_count": 1,
        "batch_size": 1000
        }
        }
Response
        {
            "id": "9f3edcb1-38e8-4bc7-8c41-99e897560328",
            "uri": "kylo:kylo:adp-management:client-profiles:client-profile-bdt-9f3edcb1-38e8-4bc7-8c41-99e897560328",
            "account": "kylo:kylo:admin:accounts:kylo",
            "createdAt": "2025-03-24T03:26:15.949341161Z",
            "updatedAt": "2025-03-24T03:26:15.949341161Z",
            "name": "client_profile_bdt",
            "app_connector_type": "BDT",
            "configurations": {
                "thread_count": 1,
                "batch_size": 1000,
                "enable_performance_metrics": true,
                "tls_to_appserver": {
                    "tls_skip_verify": true,
                    "tls_enabled": false
                },
                "auth_method_used": {
                    "scheme_name": "Basic"
                },
                "symmetric_key_cache_enabled": true,
                "symmetric_key_cache_expiry": 43200,
                "size_of_connection_pool": 300,
                "load_balancing_algorithm": "round-robin",
                "connection_timeout": 30000,
                "connection_read_timeout": 7000,
                "connection_idle_timeout": 600000,
                "connection_retry_interval": 600000,
                "maximum_idle_connection": 10000,
                "maximum_idle_connection_per_host": 10000,
                "dial_timeout": 10,
                "dial_keep_alive": 60,
                "log_level": "WARN",
                "log_rotation": "Daily",
                "log_size_limit": "100K",
                "log_max_backup_index": -1,
                "log_type": "Console",
                "log_gmt": false,
                "heartbeat_interval": 300,
                "heartbeat_timeout_count": 5
            },
            "csr_parameters": {
                "csr_cn": "Application Data Protection"
            },
            "ca_id": "04d7f146-684b-47a2-a2c2-e8690be50e18",
            "enable_client_autorenewal": false,
            "client_management_profile_id": "0a3b495c-26c2-4a1a-a722-f46bec47e689",
            "registration_token_id": "0850f54a-dc42-4f3e-a2d3-0b49e19c5ece",
            "meta": {
                "has_active_clients": false,
                "status": "Healthy"
            }
        }
In response, a registration token is returned. The registration token is passed in the deployment script to register BDT client on the CipherTrust Manager as shown in the below steps.
Download and copy the following files:
deployment.yaml to
<target_directory>/templates.Warning
The
deployment.yamlfile should not be modified.values.yaml to
<target_directory>.Chart.yaml to
<target_directory>.
Navigate to the
<target_directory>.Before proceeding to the next step, we recommend reviewing the concept of environment variables. While the variable names may differ, their purpose and usage remain consistent.
In the
values.yamlfile, update the following values:kmsHost: IP address of your CipherTrust Manager instance.regToken: Registration token generated on the CipherTrust Manager.dbCertValue: (Optional) Certificate value required for SSL connection with databases.jdbcDriverDownloadUrl: (Optional) URL or location from where BDT will download/load the driver jars required for JDBC connection.
Deploy the BDT application in your Kubernetes environment. This section uses
bdtas the release name.When you are in the
<target_directory>, run the below command:helm install bdt .When you are in some other directory, run the below command:
helm install bdt <target_directory>
Note
Here,
<target_directory>is the location where you have kept all the configuration files.The status
DEPLOYEDindicates a successful deployment.
Verify the deployment
List the deployed BDT pods.
kubectl get podsThe output should list the deployed BDT pod.
Test your deployment.
curl -X GET http://<node ip>:32082/livenessReplace
<node ip>with the actual IP address of your Kubernetes node where the BDT pod is deployed.
Additional commands
To get the IP address of your Kubernetes node, you can run the following command.
kubectl get nodes -o wideTo fetch BDT logs, run the following command.
kubectl logs -f <bdt pod name>
Sample Transformation
This section explains how to perform a db-to-db transformation, demonstrated using an Oracle database. The high-level steps include:
Tip
The transformation steps provided in this example can be performed using the CipherTrust Manager UI or API playground.
Create data source
Here, we are using the option where the source and destination data-sources are same.
To create a data source from CipherTrust Manager's UI, follow this link.
API: post /v1/data-protection/data-sources
Create source data-source
Request
    {
    "name": "Oracle_ds1",
    "description": "",
    "type": "Oracle",
    "database_properties": {
        "password": "asdf1234",
        "username": "USER5",
        "connection_url": "jdbc:oracle:thin:@<db_host_ip>:orcl",

    }
    }
Response
    {
    "id": "17a6f8d0-5db4-4435-984f-fc2a5dbac72e",
    "uri": "kylo:kylo:adp-management:data-sources:oracle_ds1-17a6f8d0-5db4-4435-984f-fc2a5dbac72e",
    "account": "kylo:kylo:admin:accounts:kylo",
    "createdAt": "2025-07-08T03:27:35.049159948Z",
    "updatedAt": "0001-01-01T00:00:00Z",
    "name": "Oracle_ds1",
    "description": "",
    "type": "Oracle",
    "database_properties": {
        "connection_url": "jdbc:oracle:thin:@<db_host_ip>:orcl",

    }
    }
In response, ID of source data-source (17a6f8d0-5db4-4435-984f-fc2a5dbac72e) is returned.
Create access policy
To create access policy from CipherTrust Manager's UI, follow this link.
API: post /v1/data-protection/access-policies
API Request
    {
    "name": "ap",
    "description": "access policy description",
    "default_reveal_type": "Plaintext",
    "default_error_replacement_value": "",
    "user_set_policy": [

        {
        "user_set_id": "39738cd0-c7f9-4450-99ea-96b5257d0700",
        "reveal_type": "Plaintext"
        }
    ]
    }
API Response
    {
        "id": "396eb554-d167-46f4-a8a5-8a2c9a99648d",
        "uri": "kylo:kylo:adp-management:access-policies:ap-396eb554-d167-46f4-a8a5-8a2c9a99648d",
        "account": "kylo:kylo:admin:accounts:kylo",
        "createdAt": "2025-07-08T04:28:18.702065393Z",
        "updatedAt": "2025-07-08T04:28:18.706185882Z",
        "created_by": "local|5bb48a34-b391-4886-8f7c-31f7ac6f2fd9",
        "name": "ap1",
        "description": "access policy description",
        "default_reveal_type": "Plaintext",
        "default_error_replacement_value": "",
        "default_masking_format_id": null,
        "user_set_policy": [
            {
                "user_set_id": "39738cd0-c7f9-4450-99ea-96b5257d0700",
                "reveal_type": "Plaintext",
                "error_replacement_value": null,
                "masking_format_id": null
            }
        ],
        "version": 1
    }
In response, ID of access policy (396eb554-d167-46f4-a8a5-8a2c9a99648d) is returned.
Create protection policy
When creating protection policy, the key should exist on the CipherTrust Manager, if it does not exist, create one following the instructions mentioned here.
Note
Ensure the key used in protection policy has correct permissions. For more details on key permissions, refer to Supported key types.
The protection policy will be created with the following specifications:
Algorithm: AES/CBC/PKCS5Padding
Versioning: Internal
To create protection policy from CipherTrust Manager's UI, follow this link.
API: post /v1/data-protection/protection-policies
API Request
    {
    "name": "ppinternal1",
    "key": "bdtkey",
    "algorithm": "AES/CBC/PKCS5Padding",
    "use_external_versioning": false,
    "access_policy_name": "ap"
    }
API Response
    {
    "id": "9b2237ea-315f-4e20-96e6-38e6be76cb8c",
    "uri": "kylo:kylo:adp-management:protection-policies:ppinternal1-9b2237ea-315f-4e20-96e6-38e6be76cb8c",
    "account": "kylo:kylo:admin:accounts:kylo",
    "createdAt": "2025-07-08T03:37:39.934151665Z",
    "updatedAt": "2025-07-08T03:37:39.920679472Z",
    "name": "ppinternal1",
    "version": 1,
    "latest_version": true,
    "key": "bdtkey",
    "algorithm": "AES/CBC/PKCS5Padding",
    "use_external_versioning": false,
    "disable_versioning": false,
    "access_policy_name": "ap"
    }
In response, ID of protection policy (9b2237ea-315f-4e20-96e6-38e6be76cb8c) is returned.
Create job configuration
Here, we are creating a job configuration to protect latitude using the protection policy ppinternal1. Similarly, you can also reveal and reprotect any columns by changing the operation type as required.
To create job configuration from CipherTrust Manager's UI, follow this link.
API: post /v1/data-protection/bdt/job-configurations
API Request
    {
    "name": "ora-ora-pr",
    "source_id": "17a6f8d0-5db4-4435-984f-fc2a5dbac72e",
    "destination_id": "17a6f8d0-5db4-4435-984f-fc2a5dbac72e",
    "tables": [
        {
        "source_table": "EXPORT18",
        "source_schema": "",
        "destination_table": "EXPORT20",
        "destination_schema": "",
        "create_destination_table": true,
        "columns": [
            {
            "source_column_name": "latitude",
            "operation": "protect",
            "protection_policy": "ppinternal1"
            }
        ]
        }
    ]
    }
API Response
    {
    "id": "f448f111-adef-46e1-ad56-d9d67e723e27",
    "uri": "kylo:kylo:adp-management:bdt-job-configurations:ora-ora-pr-f448f111-adef-46e1-ad56-d9d67e723e27",
    "account": "kylo:kylo:admin:accounts:kylo",
    "createdAt": "2025-07-08T03:40:23.784226773Z",
    "updatedAt": "2025-07-08T03:40:23.784226773Z",
    "version": 1,
    "name": "ora-ora-pr",
    "description": "",
    "case_sensitive": false,
    "source_id": "17a6f8d0-5db4-4435-984f-fc2a5dbac72e",
    "destination_id": "17a6f8d0-5db4-4435-984f-fc2a5dbac72e",
    "in_place_update": false,
    "unprocessed_record_file": "",
    "tables": [
        {
        "id": "7c176862-4109-4820-a31a-36bff6c02eea",
        "uri": "kylo:kylo:adp-management:bdt-job-configurations-tables:7c176862-4109-4820-a31a-36bff6c02eea",
        "account": "kylo:kylo:admin:accounts:kylo",
        "createdAt": "2025-07-08T03:40:23.792579732Z",
        "updatedAt": "2025-07-08T03:40:23.787905169Z",
        "source_table": "EXPORT18",
        "source_schema": "",
        "destination_table": "EXPORT20",
        "destination_schema": "",
        "create_destination_table": true,
        "subset": {
            "limit": 0,
            "offset": 0,
            "recurrency": 1,
            "order_by": "",
            "order": "ASC",
            "filters": null
        },
        "columns": [
            {
            "id": "0ce7ebf9-e6ac-44d9-bd96-29838fa632a9",
            "uri": "kylo:kylo:adp-management:bdt-job-configurations-tables-columns:0ce7ebf9-e6ac-44d9-bd96-29838fa632a9",
            "account": "kylo:kylo:admin:accounts:kylo",
            "createdAt": "2025-07-08T03:40:23.803205011Z",
            "updatedAt": "2025-07-08T03:40:23.801725918Z",
            "source_column_name": "latitude",
            "operation": "protect",
            "protection_policy": "ppinternal1"
            }
        ]
        }
    ],
    "meta": {
        "job_running": false
    }
    }
In response, ID of the job configuration (f448f111-adef-46e1-ad56-d9d67e723e27) is returned.
Run job
Here, we will run the job by passing the job configuration ID (generated in Create job configuration) and client profile ID (generated in step 1) in the API request. To run a job, at least one healthy BDT client must be registered with the application.
To run a job from CipherTrust Manager's UI, follow this link.
There is slight difference in the Run Job API call depending on the CipherTrust Manager version you are using. Choose the preferred tab to view the details.
API: post /v1/data-protection/run-job
API Request
    {
    "job_configuration_id": "f448f111-adef-46e1-ad56-d9d67e723e27",
    "client_profile_id": "9f3edcb1-38e8-4bc7-8c41-99e897560328"
    }
API Response
        {
        "job_status_id": "29994ae1-acd0-415b-bf92-a23cf68a3fb8"
        }
In response, a job status ID (29994ae1-acd0-415b-bf92-a23cf68a3fb8) is returned, use this ID to check the intermediate status of the job.
API: post /v1/data-protection/bdt/job-configurations/{id}/run
API Request
    post /v1/data-protection/bdt/job-configurations/{f448f111-adef-46e1-ad56-d9d67e723e27}/run
    { "client_profile_id": "9f3edcb1-38e8-4bc7-8c41-99e897560328"}
API Response
        {
        "job_status_id": "29994ae1-acd0-415b-bf92-a23cf68a3fb8"
        }
In response, a job status ID (29994ae1-acd0-415b-bf92-a23cf68a3fb8) is returned, use this ID to check the intermediate status of the job.
Check job status
Here, you will check the status of the job by passing the job status ID generated in above step in the API request.
To run a job from CipherTrust Manager's UI, follow this link.
There is slight difference in the Job Status API call depending on the CipherTrust Manager version you are using. Choose the preferred tab to view the details.
API: get /v1/data-protection/job-status/{id}
API Request
    {
    /v1/data-protection/job-status/{29994ae1-acd0-415b-bf92-a23cf68a3fb8}
    }
In response, information about the job in various stages, total number of records processed, error messages are returned.
API: get /v1/data-protection/jobs/{id}
API Request
/v1/data-protection/jobs/29994ae1-acd0-415b-bf92-a23cf68a3fb8
In response, information about the job in various stages, total number of records processed, error messages are returned.
Verify results
After the job status gets completed, Check the destination table, EXPORT20 for transformed data. The column named latitude will contain the protected data as shown here:
| Input Data | Protected Data |
|---|---|
 | 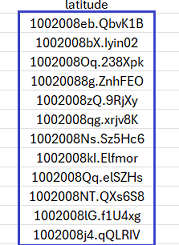 |
In the output, you can see that the version header is prepended to the ciphertext (1002008eb.QbvK1B).
Steps for File-to-File
Create a BDT application from the Application Data Protection tile on CipherTrust Manager. Click the desired tab to view the instructions.
To create an application from CipherTrust Manager's UI, follow this link.
The application is created on the CipherTrust Manager and a registration token is returned in response. This token is passed in the deployment scripts to register BDT client on the CipherTrust Manager as shown in the below steps.
API:
/v1/data-protection/client-profilesRequest
        {
        "name": "client_profile_bdt",
        "app_connector_type": "BDT",
        "heartbeat_threshold": 5,
        "configurations":

        {

        "log_level": "WARN",
        "heartbeat_interval": 300,
        "heartbeat_timeout_count":5,
        "thread_count": 1,
        "batch_size": 1000
        }
        }
Response
        {
            "id": "9f3edcb1-38e8-4bc7-8c41-99e897560328",
            "uri": "kylo:kylo:adp-management:client-profiles:client-profile-bdt-9f3edcb1-38e8-4bc7-8c41-99e897560328",
            "account": "kylo:kylo:admin:accounts:kylo",
            "createdAt": "2025-03-24T03:26:15.949341161Z",
            "updatedAt": "2025-03-24T03:26:15.949341161Z",
            "name": "client_profile_bdt",
            "app_connector_type": "BDT",
            "configurations": {
                "thread_count": 1,
                "batch_size": 1000,
                "enable_performance_metrics": true,
                "tls_to_appserver": {
                    "tls_skip_verify": true,
                    "tls_enabled": false
                },
                "auth_method_used": {
                    "scheme_name": "Basic"
                },
                "symmetric_key_cache_enabled": true,
                "symmetric_key_cache_expiry": 43200,
                "size_of_connection_pool": 300,
                "load_balancing_algorithm": "round-robin",
                "connection_timeout": 30000,
                "connection_read_timeout": 7000,
                "connection_idle_timeout": 600000,
                "connection_retry_interval": 600000,
                "maximum_idle_connection": 10000,
                "maximum_idle_connection_per_host": 10000,
                "dial_timeout": 10,
                "dial_keep_alive": 60,
                "log_level": "WARN",
                "log_rotation": "Daily",
                "log_size_limit": "100K",
                "log_max_backup_index": -1,
                "log_type": "Console",
                "log_gmt": false,
                "heartbeat_interval": 300,
                "heartbeat_timeout_count": 5
            },
            "csr_parameters": {
                "csr_cn": "Application Data Protection"
            },
            "ca_id": "04d7f146-684b-47a2-a2c2-e8690be50e18",
            "enable_client_autorenewal": false,
            "client_management_profile_id": "0a3b495c-26c2-4a1a-a722-f46bec47e689",
            "registration_token_id": "0850f54a-dc42-4f3e-a2d3-0b49e19c5ece",
            "meta": {
                "has_active_clients": false,
                "status": "Healthy"
            }
        }
In response, a registration token is returned. The registration token is passed in the deployment script to register BDT client on the CipherTrust Manager as shown in the below steps.
Download and copy the following files:
deployment.yaml to
<target_directory>/templates.Warning
The
deployment.yamlfile should not be modified.values.yaml to
<target_directory>.Chart.yaml to
<target_directory>.
Navigate to the
<target_directory>.Before proceeding to the next step, we recommend reviewing the concept of environment variables. While the variable names may differ, their purpose and usage remain consistent.
In the
values.yamlfile, update the following values:kmsHostis the IP address of your CipherTrust Manager instance.regTokenis the registration token generated on the CipherTrust Manager.volumeHostPathis the location of the directory on the host machine where input file exists. In this sample we are using the same path for generating output file. If required, you can mount different paths.volumeMountPathis the path of directory inside the BDT container to be mounted to thevolumeHostPath.Caution
Volume mounting is mandatory in the following cases during deployment to allow BDT to read or create a file.
When using file as source/destination
When configuring unprocessed record file path
When loading the JDBC driver from the host machine
Use
/opt/app/tmp/to map the external volume with container. Ensure the BDT container has permission to read, write, and execute on the mounted volume else, the deployment will fail.
Deploy the BDT application in your Kubernetes environment. This section uses
bdtas the release name.When you are in the
<target_directory>, run the below command:helm install bdt .When you are in some other directory, run the below command:
helm install bdt <target_directory>
Note
Here,
<target_directory>is the location where you have kept all the configuration files.The status
DEPLOYEDindicates a successful deployment.
Verify the deployment
List the deployed BDT pods.
kubectl get podsThe output should list the deployed BDT pod.
Test your deployment.
curl -X GET http://<node ip>:32082/livenessReplace
<node ip>with the actual IP address of your Kubernetes node where the BDT pod is deployed.
Additional commands
To get the IP address of your Kubernetes node, you can run the following command.
kubectl get nodes -o wideTo fetch BDT logs, run the following command.
kubectl logs -f <bdt pod name>
Sample Transformation
This section explains how to perform a File-to-File transformation, demonstrated using a CSV file. The high-level steps include:
Tip
The transformation steps provided in this example can be performed using the CipherTrust Manager UI or API playground.
Important Points
We have provided the following sample files with this example.
Input.csv: Contains the data to be processed. Download and save this file on the host machine specified during volume mapping when deploying BDT.
Output.csv: Contains the processed data. This file will get created on the host machine specified during volume mapping when deploying BDT.
Column of the
input.csvfile that to be protected: latitude.
Create data source
To create a data source from CipherTrust Manager's UI, follow this link.
API: post /v1/data-protection/data-sources
Create source data-source
Request
    {
    "name": "sourcefile",
    "description": "source details",
    "type": "CSV File",
    "file_properties":

    {"file_path": "/opt/app/tmp/input/inputProtect.csv", "delimiter": ",",   "column_count": 12, "has_header_row": true}
    }
Response
    {
        "id": "5c22a447-f8dd-4c4c-af7d-149123ecf974",
        "uri": "kylo:kylo:adp-management:data-sources:sourcefile-5c22a447-f8dd-4c4c-af7d-149123ecf974",
        "account": "kylo:kylo:admin:accounts:kylo",
        "createdAt": "2025-03-20T11:08:05.940999Z",
        "updatedAt": "0001-01-01T00:00:00Z",
        "name": "sourcefile",
        "description": "source details",
        "type": "CSV File",
        "file_properties": {
            "file_path": "/opt/app/tmp/input/input.csv",
            "delimiter": ",",
            "qualifier": "\"",
            "column_count": 12,
            "has_header_row": true,
            "encoding": null,
            "record_length": null,
            "line_separator": null
        }
    }
In response, ID of sourcefile (5c22a447-f8dd-4c4c-af7d-149123ecf974) is returned.
Create destination data-source
Request
    {
    "name": "destinationfile",
    "description": "destination details",
    "type": "CSV File",
    "file_properties":

    {"file_path": "/opt/app/tmp/output/outputProtect-2025-03-26.10.35.15.348.csv", "delimiter": ",", "column_count": 12,"has_header_row": true}
    }
Response
    {
        "id": "9b9520e2-2d86-46bd-a615-375b689ee03b",
        "uri": "kylo:kylo:adp-management:data-sources:destinationfile-9b9520e2-2d86-46bd-a615-375b689ee03b",
        "account": "kylo:kylo:admin:accounts:kylo",
        "createdAt": "2025-03-20T10:56:19.706092Z",
        "updatedAt": "0001-01-01T00:00:00Z",
        "name": "destinationfile",
        "description": "destination details",
        "type": "CSV File",
        "file_properties": {
            "file_path": "/opt/app/tmp/output/output.csv",
            "delimiter": ",",
            "qualifier": "\"",
            "column_count": 12,
            "has_header_row": true,
            "encoding": null,
            "record_length": null,
            "line_separator": null
        }
    }
In response, ID of destinationfile (9b9520e2-2d86-46bd-a615-375b689ee03b) is returned.
Create access policy
To create access policy from CipherTrust Manager's UI, follow this link.
API: /v1/data-protection/access-policies
Request
    {
    "name": "access_policy",
    "description": "access policy ",
    "default_reveal_type": "Plaintext"
    }
Response
    {
        "id": "24e1f7eb-63a8-4b9f-abc3-0295098ad98f",
        "uri": "kylo:kylo:adp-management:access-policies:access-policy-24e1f7eb-63a8-4b9f-abc3-0295098ad98f",
        "account": "kylo:kylo:admin:accounts:kylo",
        "createdAt": "2025-03-18T11:30:54.511291Z",
        "updatedAt": "2025-03-18T11:30:54.513016Z",
        "created_by": "local|238dfbe5-dff4-4c56-8474-480fb3c51701",
        "name": "access_policy",
        "description": "",
        "default_reveal_type": "Plaintext",
        "default_error_replacement_value": "",
        "default_masking_format_id": null,
        "user_set_policy": [],
        "version": 1
    }
In response, ID of the access policy (24e1f7eb-63a8-4b9f-abc3-0295098ad98f) is returned.
Create protection policy
When creating protection policy, the key should exist on the CipherTrust Manager, if it does not exist, create one following the instructions mentioned here.
Note
Ensure the key used in protection policy has correct permissions. For more details on key permissions, refer to Supported key types.
The protection policy will be created with the following specifications:
Algorithm: FPE/FF1v2
Versioning: Internal version
Character set: Alphanumeric
To create protection policy from CipherTrust Manager's UI, follow this link.
API: post /v1/data-protection/protection-policies
API Request
    {
    "name": "fpeProtectionPolicy",
    "description": "FPE protection policy",
    "key": "aakey",
    "algorithm": "FPE/FF1v2/UNICODE",
    "tweak": "121212121212",
    "tweak_algorithm": "SHA1",
    "character_set_id": "2d00cfdb-c422-46ac-8a05-6152806a5715",
    "access_policy_name": "access_policy"
    }
API Response
    {
        "id": "ed2efc0b-bf78-4b0f-bb0a-2077475fe5ba",
        "uri": "kylo:kylo:adp-management:protection-policies:fpeprotectionpolicy-v10-ed2efc0b-bf78-4b0f-bb0a-2077475fe5ba",
        "account": "kylo:kylo:admin:accounts:kylo",
        "createdAt": "2025-04-02T06:29:16.772448Z",
        "updatedAt": "2025-04-02T06:29:16.771811Z",
        "name": "fpeProtectionPolicy",
        "version": 10,
        "latest_version": true,
        "description": "",
        "key": "aakey",
        "iv": "",
        "tweak": "121212121212",
        "tweak_algorithm": "SHA1",
        "character_set_id": "2d00cfdb-c422-46ac-8a05-6152806a5715",
        "character_set": {
            "id": "2d00cfdb-c422-46ac-8a05-6152806a5715",
            "uri": "kylo:kylo:adp-management:character-sets:alphanumeric-2d00cfdb-c422-46ac-8a05-6152806a5715",
            "account": "kylo:kylo:admin:accounts:kylo",
            "createdAt": "2025-01-31T07:15:53.167752Z",
            "updatedAt": "2025-01-31T07:15:53.167752Z",
            "name": "Alphanumeric",
            "description": "",
            "range": "0030-0039,0041-005A,0061-007A",
            "encoding": "UTF-8",
            "predefined": true
        },
        "masking_format_id": "",
        "algorithm": "FPE/FF1v2/UNICODE",
        "use_external_versioning": false,
        "disable_versioning": false,
        "access_policy_name": "access_policy",
        "prefix": "",
        "data_format": "",
        "nonce": "",
        "tag_length": 0,
        "allow_small_input": true
    }
In response, ID of protection policy (ed2efc0b-bf78-4b0f-bb0a-2077475fe5ba) is returned.
Create job configuration
Here, we are creating a job configuration to protect column latitude using the protection policy fpeProtectionPolicy. Similarly, you can also reveal and reprotect any columns by changing the operation type as required.
To create job configuration from CipherTrust Manager's UI, follow this link.
API: post /v1/data-protection/bdt/job-configurations
API Request
    {
    "name": "job configuration for file",
    "in_place_update": false,
    "source_id": "5c22a447-f8dd-4c4c-af7d-149123ecf974",
    "destination_id": "9b9520e2-2d86-46bd-a615-375b689ee03b",
    "tables": [
        {
        "columns": [

    { "source_column_name": "latitude", "operation": "protect",     "protection_policy": "fpeProtectionPolicy"}
        ]
        }
    ]
    }
API Response
    {
        "id": "142b84d8-22ba-4b66-8fec-16076911ec7a",
        "uri": "kylo:kylo:adp-management:bdt-job-configurations:job-configuration-for-file-142b84d8-22ba-4b66-8fec-16076911ec7a",
        "account": "kylo:kylo:admin:accounts:kylo",
        "createdAt": "2025-03-18T11:43:40.577668Z",
        "updatedAt": "2025-04-04T09:14:59.905281Z",
        "version": 26,
        "name": "job configuration for file",
        "description": "",
        "case_sensitive": false,
        "source_id": "5c22a447-f8dd-4c4c-af7d-149123ecf974",
        "destination_id": "9b9520e2-2d86-46bd-a615-375b689ee03b",
        "in_place_update": false,
        "unprocessed_record_file": "/opt/app/tmp/unProcessedRecordFiles/",
        "tables": [
            {
                "id": "2eefe155-7bee-41a9-aacf-546c52f75880",
                "uri": "kylo:kylo:adp-management:bdt-job-configurations-tables:2eefe155-7bee-41a9-aacf-546c52f75880",
                "account": "kylo:kylo:admin:accounts:kylo",
                "createdAt": "2025-04-04T08:11:39.328142Z",
                "updatedAt": "2025-04-04T08:11:39.327642Z",
                "source_table": "",
                "source_schema": "",
                "destination_table": "",
                "destination_schema": "",
                "create_destination_table": false,
                "subset": {
                    "limit": 0,
                    "offset": 0,
                    "recurrency": 1,
                    "order_by": "",
                    "order": "ASC",
                    "filters": []
                },
                "columns": [
                    {
                        "id": "dfd71200-1c83-40c5-921d-e941496a72b2",
                        "uri": "kylo:kylo:adp-management:bdt-job-configurations-tables-columns:dfd71200-1c83-40c5-921d-e941496a72b2",
                        "account": "kylo:kylo:admin:accounts:kylo",
                        "createdAt": "2025-04-04T08:11:39.332823Z",
                        "updatedAt": "2025-04-04T08:11:39.332262Z",
                        "source_column_name": "latitude",
                        "operation": "protect",
                        "protection_policy": "fpeProtectionPolicy"
                    }
                ]
            }
        ],
        "meta": {
            "job_running": false
        }
    }
In response, ID of the job configuration (142b84d8-22ba-4b66-8fec-16076911ec7a) is returned.
Tip
Multiple columns can be configured in a single job configuration, and each column can be associated with different protection policies.
Run job
Here, we will run the job by passing the job configuration ID (generated in above step) and client profile ID (generated in step 1) in the API request. To run a job, at least one healthy BDT client must be registered with the application.
To run a job from CipherTrust Manager's UI, follow this link.
There is slight difference in the Run Job API call depending on the CipherTrust Manager version you are using. Choose the preferred tab to view the details.
API: post /v1/data-protection/run-job
API Request
    {
    "job_configuration_id": "142b84d8-22ba-4b66-8fec-16076911ec7a",
    "client_profile_id": "9f3edcb1-38e8-4bc7-8c41-99e897560328"
    }
API Response
{ "job_status_id": "a960a20c-4852-4fee-a18b-302710f67170"}
In response, a job status ID (a960a20c-4852-4fee-a18b-302710f67170) is returned, use this ID to check the intermediate status of the job.
API: post /v1/data-protection/bdt/job-configurations/{id}/run
API Request
post /v1/data-protection/bdt/job-configurations/{142b84d8-22ba-4b66-8fec-16076911ec7a}/run
{ "client_profile_id": "9f3edcb1-38e8-4bc7-8c41-99e897560328"}
API Response
{ "job_status_id": "a960a20c-4852-4fee-a18b-302710f67170"}
In response, a job_status_id (a960a20c-4852-4fee-a18b-302710f67170) is returned. Use this ID to check the status of the job.
Check job status
Here, you will check the status of the job by passing the job status ID (generated in above step) in the API request.
To run a job from CipherTrust Manager's UI, follow this link.
There is slight difference in the Job Status API call depending on the CipherTrust Manager version you are using. Choose the preferred tab to view the details.
API: get /v1/data-protection/job-status/{id}
Pass the job_status_id (generated in step 5) in the API request.
API Request
{
/v1/data-protection/job-status/{a960a20c-4852-4fee-a18b-302710f67170}
}
In response, information about the job in various stages, total number of records processed, error messages are returned.
API: get /v1/data-protection/jobs/{id}
Pass the job_status_id (generated in step 5) in the API request.
API Request
/v1/data-protection/jobs/a960a20c-4852-4fee-a18b-302710f67170
In response, information about the jobs in various stages, total number of records processed, error messages are returned.
Verify results
After the job status gets completed, Check the Output.csv for transformed data.
Note
For transformations, where destination is file, the output file name (provided on UI) will also contain a timestamp appended to it. For example, <output-name-as-per-ui>-2025-04-01.17.57.01.521.csv
For CSV file, the output file will be formatted as:
<file-name>-<timestamp>.csvFor fixed length file, the output file will be formatted as:
<file-name>-<timestamp>.txt
In the Input.csv file, the latitude column was in plaintext, after transformation, the data is in ciphertext.
| Before Transformation | After Transformation |
|---|---|
| |
In the output, you can see that the version header is prepended to the ciphertext (1002008eb.QbvK1B).