Show the Table of Contents
 HSM Administration
Using the Remote PED Feature
First Time
To use Remote PED for the first time, you will need:
- a Luna PED 2.5.0-2 (or later) with Remote PED feature installed (the SafeNet label on the back has the words "REMOTE PED CAPABLE", top center, between the SafeNet logo and the FCC declaration)
- a power adapter for the Remote PED (when the PED is not connected to a Luna SA, via the PED port, it requires the separate power adapter to supply its power - the USB connection is insufficient for that purpose)
- a complete set of PED Keys, including an orange Remote PED key (either new/empty or already containing a Remote PED vector)
- local access to the Luna SA (for the first session only)
- HSM/appliance that supports the Remote PED feature (includes the Remote PED Client)
- a workstation/PC with the PEDserver.exe (Remote PED Server application) running, and with the appropriate PED driver already installed
You will need physical access to your Luna SA when first setting up Remote PED, because the Remote PED vector must be created by the HSM and imprinted on a blank PED Key, or it must be acquired from a previously imprinted orange PED Key and stored in the HSM. Thereafter, the orange PED Key is used with the Remote PED from a remote location, and the connection is secured by having the matching Remote PED vector at both the HSM and the Remote PED server (your remote workstation with Remote PED attached).
If you encounter timeout problems (possible if you are using M of N with many keys, or if you are reading instructions as you go, or are otherwise not speedy while following prompts), you can adjust timeout values to allow for a more relaxed pace. For PedServer.exe, you can do:
pedserver -mode config set -socketreadrsptimeout <seconds>
but you would also need to increase the timeout in the crystoki.ini client software configuration file.
Moreover, the PEDServer -socketreadrsptimeout must always be larger than the timeout in the configuration file.
In general, do not change settings (especially in the crystoki.ini file) unless you have good reason to do so, or are instructed to do so, by SafeNet Customer Support.
Use static IP addressing for PED Client / PED Server. PED Client can fail to find a server if a dynamic address is indicated.
An example error might look like this:
lunash:>hsm ped connect -ip 192.20.11.67 -port 1503
Luna PED operation required to connect to Remote PED - use orange PED Key(s).
Ped Client Version 1.0.5 (10005)
Ped Client launched in startup mode.
readIPFromConfigFile() : config file did not contain an IP address.
Startup failed. : 0xc0000404 RC_FILE_ERROR
Command Result : 65535 (Luna Shell execution)
lunash:>
If the HSM host (a Luna SA appliance or a host computer with Luna PCI-E or Luna G5) has more than one Luna HSM connected, then you might need to specify the "-serial" option, to identify the desired HSM by its serial number.
If "-serial" is not specified in commands
hsm ped vector init
hsm ped vector erase
hsm ped connect
hsm ped disconnect
then the action defaults to the first HSM that is found.
Setup Instructions
The steps to set up Remote PED are:
- Initialize the HSM [if you have not already done so]- the creation of the orange Remote PED key requires HSM login; HSM login requires an initialized HSM, all of which must be done with a local PED connection the first time.
- Have the Luna PED connected to the PED port of the HSM, and set to Local PED mode.
- Login as SO:
[myluna] lunash:>hsm login
Luna PED operation required to login as HSM Administrator - use blue PED key(s).
'hsm login' successful.
Command Result : 0 (Success)
[myluna] lunash:>
- Have a blank PED Key, with orange label, ready. Create and imprint the RPV (Remote PED Vector):
[myluna] lunash:>hsm ped vector init
WARNING !! This command will initialize remote PED vector (RPV).
If you are sure that you wish to proceed, then enter 'proceed', otherwise this command will abort.
> proceed
Proceeding...
Luna PED operation required to initialize remote PED key vector - use orange PED key(s).
(At this time, go to the Luna PED and respond to the prompts by providing either a "fresh" orange PED key (which prompts creation and imprinting of a new/unique RPV) or an already-imprinted orange PED Key (which prompts the PED to ask you to reuse the existing PED Key data), along with additional blanks if you intend to make duplicates.)
The PED says:
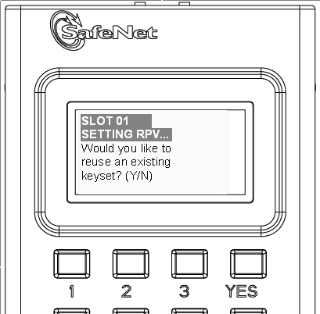
If this is the first RPV that you are creating, then answer [NO].
If you have an existing RPV on an orange PED Key, then answer [YES] if you want to preserve it and add it to this current HSM, or [No] if you have made a mistake and wish to find a different blank (or outdated) key to imprint.
For this example, we will assume no existing RPV.
The PED says:
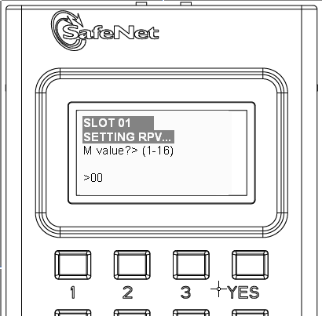
If you wish to split the RPV secret over several RPKs, for MofN split-knowledge, multi-person access control of the Remote PED function, then input a value for M that is greater than "1". This is the number of persons - each holding an orange key containing a split of the RPV secret - who must come together and present their portions whenever the RPK is required. If you prefer not to invoke MofN, then press [ 1 ], followed by [Enter].
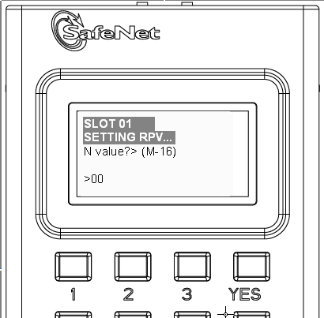
If you have invoked MofN with an M value greater than "1", then you must enter a value for N that is equal to, or greater than, M. N is the total pool of orange keys over which your RPV will be split, from which sub-groups of quantity M will be required for authentication. The simplest scheme is to declare a value for M that gives you the desired security oversight of the Remote PED function, and then specify N slightly larger so that you can always have at least quantity M key-holders available, even when some are absent for vacation, travel, illness or other reasons. Example: M=3, N=5, where any 3 of the total 5 splits can combine to reconstitute the secret.
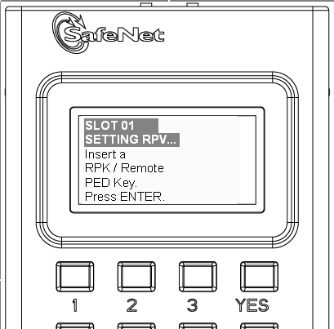
Do as prompted, inserting an unused PED Key into the PED's key slot (top-right of the PED), and press [ENTER].
For a fresh, new, never-before imprinted PED Key, the PED says:
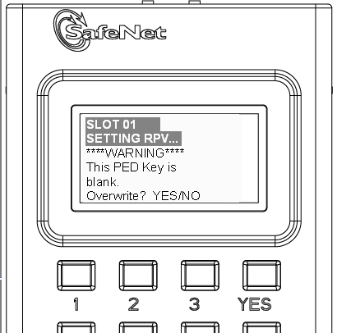
Answer [YES] so that the HSM can create an RPV and transfer it to the PED, where it is imprinted onto the blank PED Key that you have inserted. If you invoked M of N, then the PED will prompt you to continue inserting orange PED Keys for imprinting with portions of the secret until you have imprinted quantity N of them.
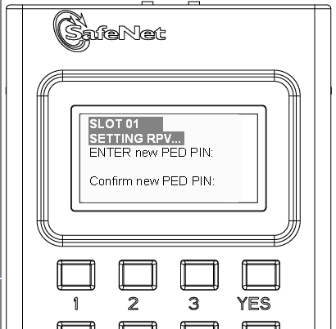
If you need two-part security to protect the Remote PED function, and wish to add a "something you know" component to the "something you have" (physical PED Key), type a series of digits on the keypad, then type them again to confirm. Now, whenever you are prompted to present the orange RPK, you must also input the code - called a PED PIN - that you have just added. The secret that unlocks the HSM to perform Remote PED operation is now a combination of a data secret contained in the physical key, and a typed-in numeric code that you must remember.
Press [Enter] with no digits, if you do not wish an additional "something you know" secret attached to this PED Key. In future, Luna PED will nevertheless prompt you for a PED PIN whenever you present the RPK, but you will always just press [Enter] (with no digits) at that prompt - no PED PIN required.
This completes the imprinting of the key (or keys if you opted for MofN).
While the imprinted orange PED Key is still in the PED's slot, Luna PED then wants to know if you intend to make some copies of the currently-inserted PED Key (that now carries the RPV for the HSM) or group of PED Keys:
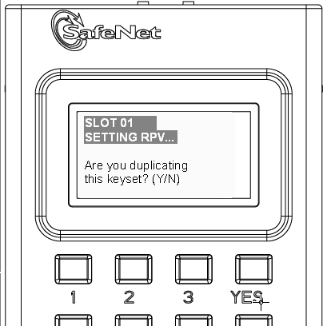
Answer [YES] if you wish to make copies, and follow the instructions to insert keys and press ENTER. Respond to the prompts about overwriting, and PED PIN, etc.
When you have made all the copies that you wish, respond [NO] to the final prompt.
Control is returned to the lunash command line.
Ped Client Version 1.0.0 (10000)
Ped Client launched in shutdown mode.
Ped Client is not currently running.
Shutdown passed.
Command Result : 0 (Success)
[myluna] lunash:>
(If you see references to "shutdown mode", that's the Luna shell [lunash] exchanging messages with the Remote PED Client application (also found on your Luna appliance), which is called, runs in the background, and shuts down, possibly multiple times, depending upon the task that you have initiated via [lunash:>] commands.)
- At this point, you have an HSM with an RPV (Remote PED Vector) set, and one or more orange PED Keys carrying that same RPV. Bring a SafeNet Luna PED 2 with Remote PED capability, the PED Keys (blue and black and red), and at least one imprinted orange PED Key to the location of your workstation computer (anywhere in the world with a suitable network connection). You should already have the most recent PED driver software and the PedServer.exe software installed on that computer
[ The software and driver are provided on the Luna SA Client CD, but are optional during the installation process. If you intend to use Remote PED (and therefore need the PED driver and the PedServer executable program, ensure that Remote PED is among the options selected during installation. Alternatively, you can launch the installer at a later time and modify the existing LunaClient installation to include Remote PED at that time.
When you connect your Luna PED2 Remote to electrical mains power (AC power outlet) and to your computer's USB port, the operating system detects the new hardware and should locate the appropriate driver. If that does not happen, then the system presents a dialog for you to help if find the location where the LunaPED driver has been placed. ].
- Connect the Remote PED to its power source via the power adapter.
- Connect the Remote PED to the workstation computer via the USB cable.
- When the PED powers on and completes its self-test, it is in Local PED mode by default.
Press the [<] key to reach the "Select Mode" menu.
Press [7] to enter Remote PED mode.
- Open a Command Prompt window on the computer (for Windows 7, this must be an Administrator Command Prompt), locate and run PedServer.exe (we suggest that you try it out beforehand, to become familiar with the modes and options - if you experience any problem with PED operation timeout being too short, use "PedServer -mode config -set <value in seconds>" to increment the "sreadrsptimeout" value).
Set PedServer.exe to its "listening" mode.
c: > PedServer -m start
Ped Server Version 1.0.5 (10005)
Ped Server launched in startup mode.
Starting background process
Background process started
Ped Server Process created, exiting this process.
c:\PED\ >
NOTE: if you encounter a message "Failed to load configuration file...", this is not an error. It just means that you have not changed the default configuration, so no file has been created. The server default values are used.
- Open an ssh session to the Luna SA appliance and login as admin.
- Start the PED Client (the Remote PED enabling process on the appliance):
lush:> hsm ped connect -i 183.21.12.161 -port 1503
Luna PED operation required to connect to Remote PED - use orange PED key(s).
Ped Client Version 1.0.0 (10000)
Ped Client launched in startup mode.
Starting background process
Background process started
Ped Client Process created, exiting this process.
Command Result : 0 (Success)
[luna27] lush:>
NOTE: the serial number option on command hsm ped connect is needed if you are using Remote PED with an HSM other than the onboard Luna SA HSM (such as a connected Luna G5 HSM for PKI). If a serial number is not specified, the internal HSM is assumed by default.
- To verify that the Remote PED connection is functional, try some HSM commands that require PED action and PED Key authentication - the simplest is hsm login. First logout, because you were already logged in to the HSM...
[luna27] lush:>hsm logout
'hsm logout' successful.
Command Result : 0 (Success)
[luna27] lush:>hsm login
Luna PED operation required to login as HSM Administrator - use Security Officer (blue) PED key.
'hsm login' successful.
Command Result : 0 (Success)
[luna27] lush:>
- At this point, you have successfully set up a Remote PED link between a workstation computer (with PED attached to its USB port) and a distant Luna SA/appliance. You have demonstrated that success by performing an HSM operation that demanded SO/HSM Admin PED Key authentication, without being physically near to the Luna SA/appliance, and without having a Luna SA PED directly attached to the Luna SA/appliance.
You can now perform any HSM administration chores (including Cluster creation/administration) as though you were physically adjacent to the HSM, with equal confidence in the security of the system [HSM products that include Remote PED are now routinely submitted to approving agencies (like NIST/FIPS) for validation].
- To disconnect:
[luna27] lush:>hsm ped disconnect
WARNING !! This command will disconnect remote PED.
If you are sure that you wish to proceed, then enter 'proceed', otherwise this command will abort.
> proceed
Proceeding...
Ped Client Version 1.0.0 (10000)
Ped Client launched in shutdown mode.
Shutdown passed.
Command Result : 0 (Success)
[luna27] lush:>
( Note 1: If a Remote PED session is in effect and you press the [<] key on the PED (to go to the PED's "Select mode" menu), that action amounts to exiting the Remote PED mode. Therefore, the PED displays a message:
** WARNING **
Exiting now will
invalidate the RPK.
Confirm ? YES/NO
If you press [YES], the RPK-validated Remote PED session is dropped and must be re-established from the HSM (with "hsm ped connect <network-target>" before you can resume activity with the Remote PED.
In other words, if you want to use that PED for any other purpose than the current connection with one remote HSM, you have to drop the current session to make such other use of the PED, and then have the appropriate RPK available when you are ready to re-establish the prior Remote PED connection. )
( Note 2: The above note talks about a "session" that exists only between the Remote PED and the computer (actually the PedServer software running on that computer) to which the Remote PED is connected. That is separate from the session that was established between the distant appliance/HSM and the PedServer on your computer. The session between computer and HSM is time-sensitive - it is in existence while needed and is either dropped intentionally or times out after brief inactivity. The session between the Remote PED and its attached computer persists until you disconnect the PED or change modes, or until you stop the PedServer.exe process on the computer. )
( Note 3: PED KEY MIGRATION from older classic-PED Datakeys (the PED Keys that look like toy plastic keys) is NOT SUPPORTED over Remote PED, because the old classic PED 1.x has no way to connect to the PED Server. Migration of PED Keys from DataKeys to iKeys must be done locally. )
If you encounter problems with Remote PED, "Troubleshooting Remote PED".
Show the Table of Contents