
Create a Standard Policy
-
In the Applications page of the CipherTrust Manager Console, select the Transparent Encryption application.
-
In the sidebar on the Clients page, click Policies.
-
Click Create Policy. CipherTrust Manager displays the Create Policy Wizard.
-
On the General Info page, set the following options:
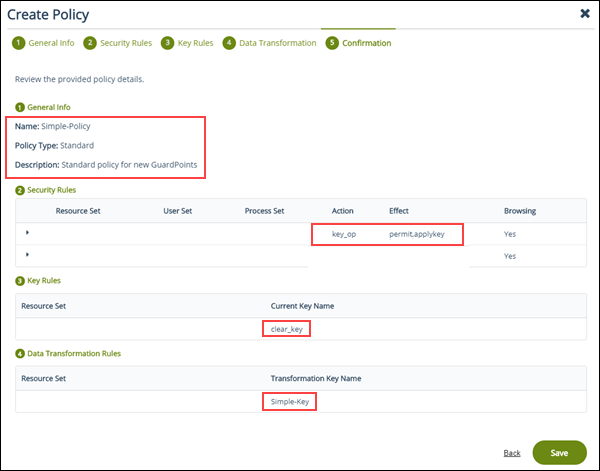
Field Description Name A unique name for the policy. Make sure you use a name that is descriptive and easy to remember so that you can find it quickly when you want to associate it with a GuardPoint..
This example uses "Simple-Policy".Policy Type The type of policy you want to create..
In this example, we will create a Standard policy.Description A user-defined description to help you identify the policy later..
For example: Standard policy for new GuardPointsLearn Mode Learn Mode provides a temporary method for disabling the blocking behavior of CTE/LDT policies. While useful for quality assurance, troubleshooting, and mitigating deployment risk, Learn Mode is not intended to be enabled permanently for a policy in production. This prevents the policy Deny rules from functioning as designed in the policy rule set..
Ensure that the policy is properly configured for use in Learn Mode. Any Security Rule that contains a Deny effect must have Apply Key applied as well. This is to prevent data from being written in mixed states, resulting in the loss of access or data corruption.
Apply Key will have no effect when combined with a Deny rule unless the policy is in Learn Mode.Data Transformation If you select Standard as the policy type, also select the Data Transformation option to tell CTE that you want to change the current encryption key used on the data in the GuardPoint, or that you want to encrypt clear-text data for the first time..
This option is only displayed for Standard policies.When you are done, click Next.
-
On the Security Rules page, define the security rules that you want to use.
CipherTrust Manager automatically adds a default security access rule with an action of
key_opand the effectsPermitandApply Key. This rule permits key operations on all resources, without denying user or application access to resources. This allows it to perform a rekey operation whenever the encryption key rotates to a new version.To add additional security rules, click Create Security Rule and enter the requested information. For details about adding security rules, see the CipherTrust Manager documentation.
When you are done, click Next.
-
On the Create Key Rule page, click Create Key Rule and enter the following information:
Field Description Resource Set If you want to select a resource set for this key rule, click Select and either choose an existing resource set or create a new one.
Resource sets let you specify which directories or files will either be encrypted with the key or will be excluded from encryption with this key.Current Key Name Click Select to choose an existing key or create a new one.
If the data has not yet been encrypted, select clear_key. Otherwise select the name of the non-versioned key that is currently being used to encrypt the data.
In this example, select clear_key.Transformation Key Name Click Select to choose an existing versioned key or to create a new one.
CTE uses the versioned key specified in this field to encrypt the data in the GuardPoint. If the data is currently encrypted, CTE decrypts it using the key specified in the Current Key Name field and re-encrypts it using the key specified in this field.When you are done, click Next.
-
On the Data Transformation page, click Create Data Transformation Rule and enter the following information:
Field Description Resource Set If you want to select a resource set for this key rule, click Select and either choose an existing resource set or create a new one.
Resource sets let you specify which directories or files will either be encrypted with the key or will be excluded from encryption with this key.Transformation Key Name Click Select to choose an existing key or to create a new one.
CTE uses the key specified in this field to encrypt the data in the GuardPoint. If the data is currently encrypted, CTE decrypts it using the key specified in the Current Key Name field and re-encrypts it using the key specified in this field.
For this example, select the key Simple-Key you created in Create an Encryption Key.When you are done, click Next.
-
Click Next.
-
On the confirmation page, review the information for the policy and click Save.
Security Rule Ordering for Polices
If you want to enforce restrictions when guarding NFS/CIFS shares using an LDT or standard policy with a CBC-CS1 key, note the following:
CipherTrust Transparent Encryption embeds the LDT and/or IV (initialization vector) attributes in the first 4K of files for NFS/CIFS shares guarded with an LDT or standard policy with a CBC-CS1 key. Embedding CipherTrust Transparent Encryption attributes increases the actual file size by 4K. CTE hides that extra 4K when reporting the file size to users, or processes, that access the file with the Apply Key effect.
If you need the actual file size, or read/write access on the embedded header, for backup/restore processes for example, then you need a rule that permits access without Apply Key.
LDT Policies
Example 1: Permits Backup and Restore
A policy that allows backup and restore of encrypted data, clear-text access to certain processes, and denies access to all others:

| Rule | Purpose |
|---|---|
| 1 | Default LDT rule required for LDT policies. |
| 2 | Allows for processes in the backup Process Set to access the real file size and backup the CipherTrust Transparent Encryption attributes along with the encrypted file data. |
| 3 | Allows for processes in the authorized-processes Process Set to access the clear-text data, but it hides the additional 4K from the CipherTrust Transparent Encryption attribute. |
| 4 | Denies all other processes access to the data. |
Example 2: Permits access to certain Processes
A policy that only allows certain processes clear-text access but allows all others to see the OS file attributes.

| Rule | Purpose |
|---|---|
| 1 | Default LDT rule required for LDT policies. |
| 2 | Allows for processes in the authorized-processes Process Set to access the clear-text data. |
| 3 | Allows for processes not in the authorized-processes Process Set to read the OS file and directory attributes. Note: Processes that match this rule obtain the file size with the 4K header. If a process that is not in the authorized-processes Process Set needs the file size without the header, then the Apply Key must be present in the Effect or you will need an additional rule granting Apply Key to that specific process. That rule must be defined before this rule. |
| 4 | Denies processes not in the authorized-processes Process Set from reading any data from the files. |
Standard Policies
Example 1: Permits access to certain Processes
A policy that allows backup and restore of encrypted data, clear-text access to certain processes, and denies access to all others:

| Rule | Purpose |
|---|---|
| 1 | Allows for processes in the backup Process Set to access the real file size and backup the CipherTrust Transparent Encryption attributes along with the encrypted file data. |
| 2 | Allows for processes in the authorized-processes Process Set to access the clear-text data, but it hides the additional 4K from the CipherTrust Transparent Encryption attribute. |
| 3 | Denies all other processes access to the data. |
Example 2: Permits access to certain Processes
A policy that only allows certain processes clear-text access but allows all others to see the OS file attributes.

| Rule | Purpose |
|---|---|
| 1 | Allows for processes in the authorized-processes Process Set to access the clear-text data. |
| 2 | Allows for processes not in the authorized-processes Process Set to read the OS file and directory attributes. Note: Processes that match this rule obtain the file size with the 4K header. If a process that is not in the authorized-processes Process Set needs the file size without the header, then the Apply Key must be present in the Effect or you will need an additional rule granting Apply Key to that specific process. That rule must be defined before this rule. |
| 3 | Denies processes not in the authorized-processes Process Set from reading any data from the files. |
For more information, see Adding Security Rules in the CipherTrust Manager documentation.
Using Auto Mount with Standard Policies
For CTE v7.7.0 and previous versions, Auto Mount is supported with standard policies, with CBC/CBS-CS1 keys, on both NFS and local file systems. For v7.8.0 and subsequent versions, Auto Mount will be supported with LDT.
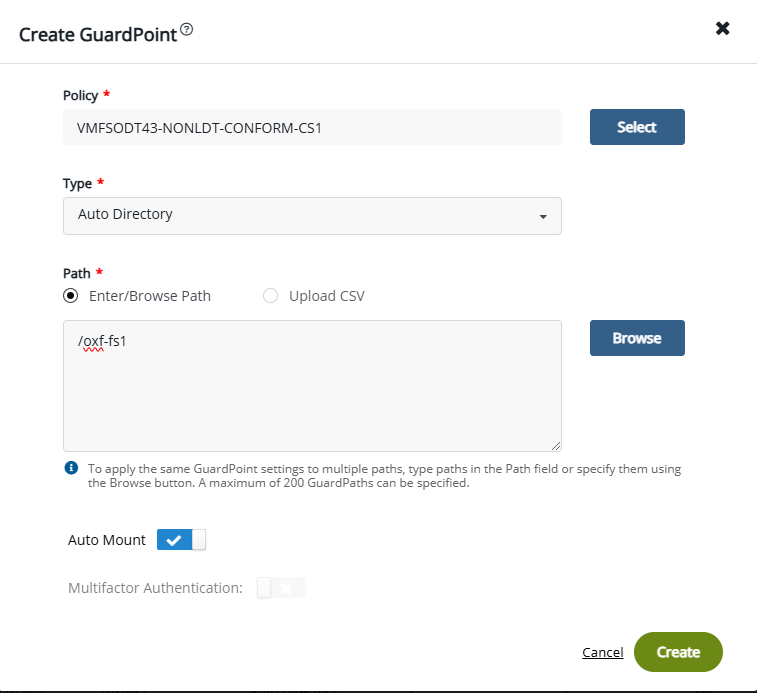
Auto Mount is an option provided for guarding a GuardPoint. When selected, it enables automatic guarding of the GuardPoint when accessed, rather than immediately after policy deployment.
A GuardPoint configured with a standard policy using auto mount must use GuardPoint type: Auto Directory. The Auto Mount option is not supported with GuardPoint type: manual. When you select GuardPoint type: Auto Directory in a Linux policy, the Auto Mount option displays.
Note
For GuardPoint type: Auto raw, see File System Mount Points on Linux.
Behavior of Auto Mount GuardPoints
After you push a policy on a CTE agent, if you check the status, you'll find that the auto mount GuardPoint is not yet guarded because the guard operation is not yet triggered:
secfsd -status guard
Example Response
GuardPoint Policy Type ConfigState Status Reason
------ ---- ----------- ------ ------
/nfs-oxf-fs1/test VMFSODT40-AUTOMOUNT-POL auto mount guarded not guarded Inactive
In the CTE CLI, Auto Mount is controlled by autofs. When autofs is enabled, accessing the GuardPoint triggers the guard operation. To trigger autofs, type one of the following:
systemctl start autofs

systemd.auto mount
Example
ls /nfs-oxf-fs1/test

secfsd -status guard
Example Response
${gp} Policy Type ConfigState Status Reason
------ ---- ----------- ------ ------
/nfs-oxf-fs1/test VMFSODT40-AUTOMOUNT-POL auto mount guarded guarded N/A
Note
When adding the auto mount GuardPoint, the mount point should be unmounted. If the mount point is mounted with auto mount, then you must manually unmount the mount point so that the next time the mount point is accessed, secfsd will guard the GuardPoint.
Limitations
-
CTE does not support nested GuardPoints with auto mount enabled
-
The GuardPoint path must be at the same level as the mount point when enabling auto mount on an
autofsmount point. This ensures that auto mount unguards when theautofsmount point times out. If the GuardPoint path is set at any level deeper than the configuredautofsmount point, theautofsmount point will never timeout because the GuardPoint will continue to keep the mount point in a busy state.