BYOK for Salesforce
Salesforce provides the ability to import keys from Key Manager. You can use the imported keys in all Salesforce services and custom applications.
The high-level steps involved in using Cache-Only Key service of Bring Your Own Key (BYOK) with CADP for Java (sfbyok.war) are:
Creating Self-signed Certificate in Salesforce and downloading it on the target machine.
Creating two key custom attributes CEKNAME and CLOUD_CERTIFICATE.
Creating two AES-256 keys, one to be used as Data Encryption Key (DEK) and the other as Content Encryption Key (CEK) using Key Manager.
Adding custom attributes CEKNAME and CLOUD_CERTIFICATE to the DEK.
Creating Named Credentials in Salesforce.
Setting the cache-only key feature in Salesforce.
Requesting Callout from Salesforce. Response from SFBYOK server for the callout request includes: Protect header, wrapped data, IV, and Auth tag. These response are provided in JSON Web Encryption (JWE) format.
Create Self-signed Certificate
To create self-signed certificate:
Log on to the Salesforce account. the Salesforce homepage is displayed.
In the Quick Find text box, enter certificate and key management and then click
 . The following screen is displayed.
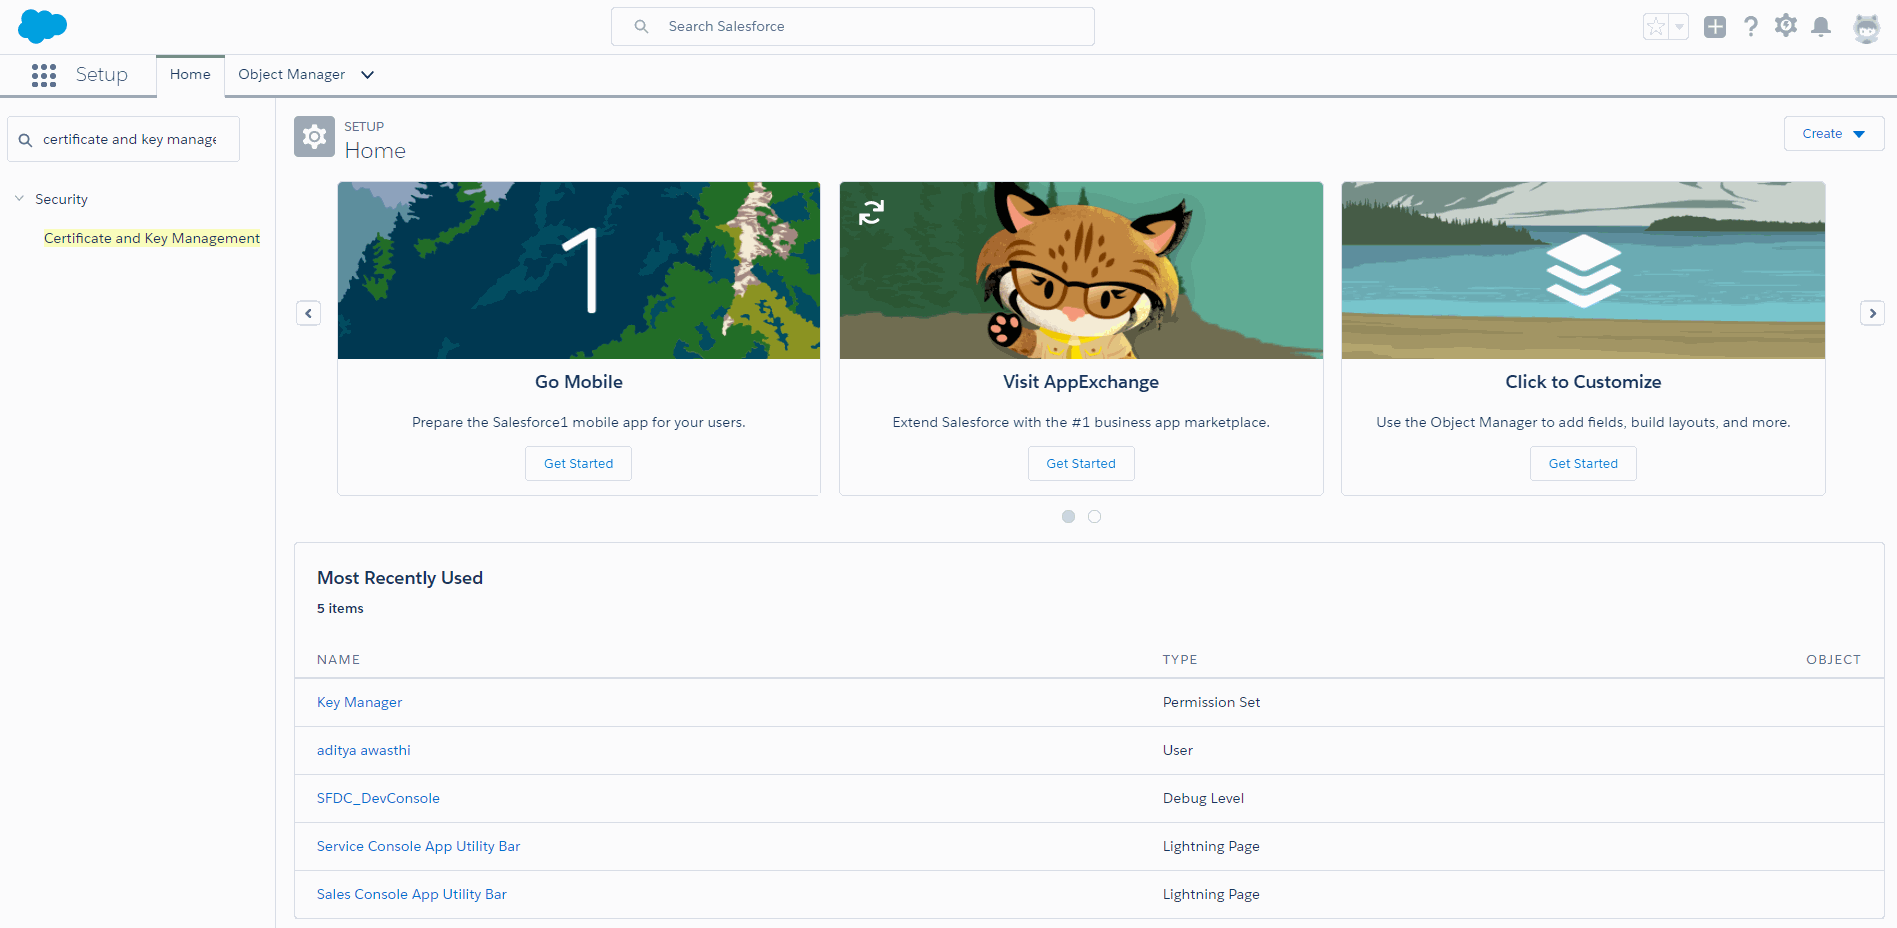
In the search result list, click Certificate and Key Management. The Certificate and Key Management screen is displayed.
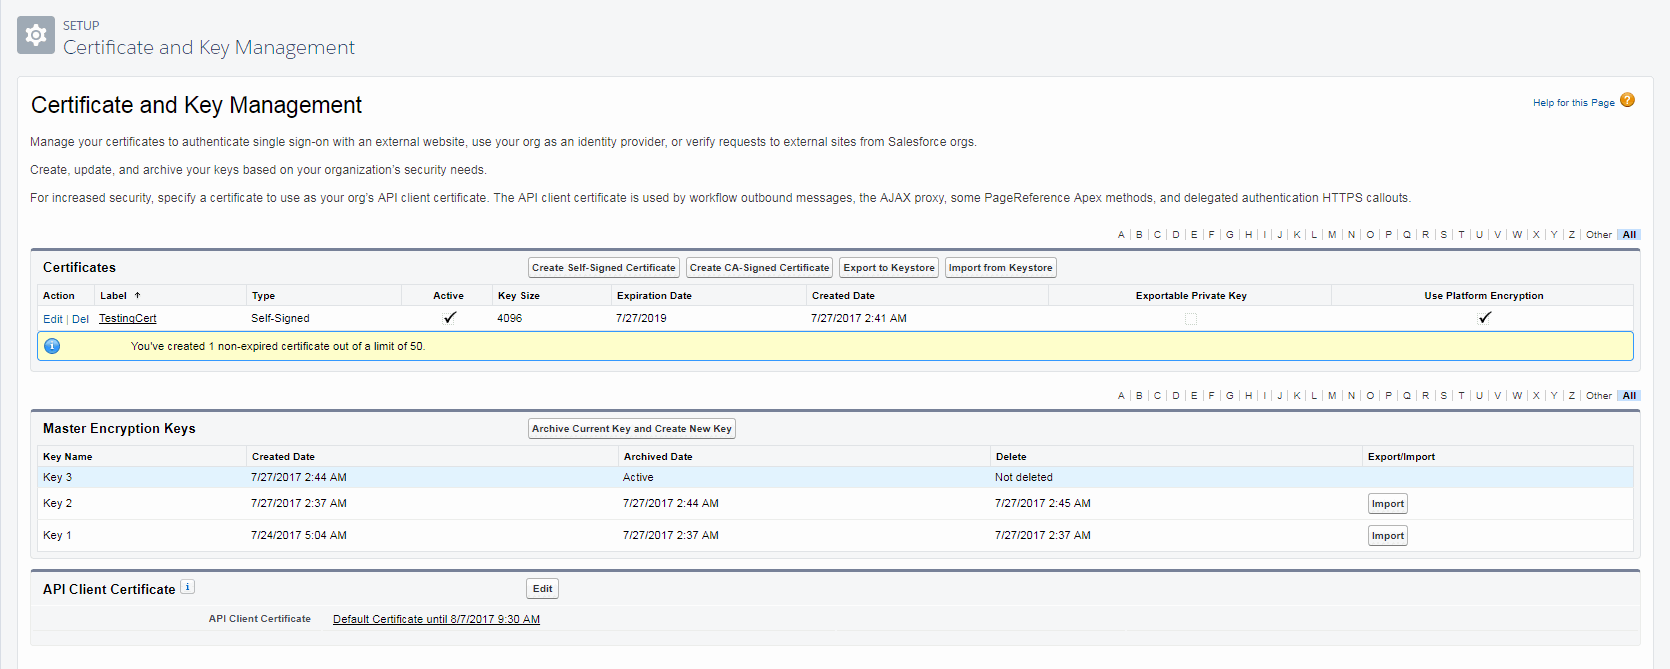
In the Certificates section, click Create Self-Signed Certificate. The Certificates page is displayed.

Provide the following details:
Enter the Label and Unique Name for the certificate. The Unique Name should be assigned as per the Salesforce instructions. To view the recommendation, take the mouse pointer over
 next to the Unique Name text box.
From the Key Size drop-down list, select 4096.
Select the Use Platform Encryption check box.
Don’t select the Exportable private Key check box.
Click Save. The Certificates page is displayed with details of the certificate generated.
Click Download Certificate. Specify the directory in the system where the certificate (.crt file) is to be saved. The certificate created is listed in the Certificates section on the Certificate and Key Management page. The page also provides the link to edit or delete the certificate created.
Create DEK and CEK and add custom attributes to DEK
Use the java code snippet provided here to generates CEK and the DEK keys respectively and add custom attributes to the DEK.
private static NAESession session;
private static NAEParameterSpec spec;
private static String userName,password;
private static KeyGenerator keygen;
private static String cekName,dekName;
private static String filePath;
private static final String CLOUD_CERTIFICATE = "CLOUD_CERTIFICATE";
private static final String CEKNAME = "CEKNAME";
public static void generateCEKandDEKKey(String dekName,String crtFilePath,String cekName) throws Exception
{
//creating CEK(content encryption key)
spec = new NAEParameterSpec(cekName, true, true, true, 256, null,session);
KeyGenerator keygen = KeyGenerator.getInstance("AES","IngrianProvider");
keygen.init(spec);
keygen.generateKey();
//creating DEK(data encryption key) and assigning custom attributes to the DEK
File file = new File(crtFilePath);
try(
InputStream is = new FileInputStream(file)) {
byte[] buffer = new byte[is.available()];
is.read(buffer);
String certificate = new String(buffer, Charset.forName("UTF-8"));
CustomAttributes attributes = new CustomAttributes (CLOUD_CERTIFICATE, certificate);
attributes.addAttribute(CEKNAME, cekName);
spec = new NAEParameterSpec(dekName, true, true, 256, attributes, session);
keygen = KeyGenerator.getInstance("AES", "IngrianProvider");
keygen.init(spec);
keygen.generateKey();
}
}
Create Named Credentials in Salesforce
Log on to the Salesforce account.
In the Quick Find text box, enter named credentials and then click
 .
.In the search results, click the Named Credentials link.

Click New Named Credential. The New Named Credential screen is displayed.
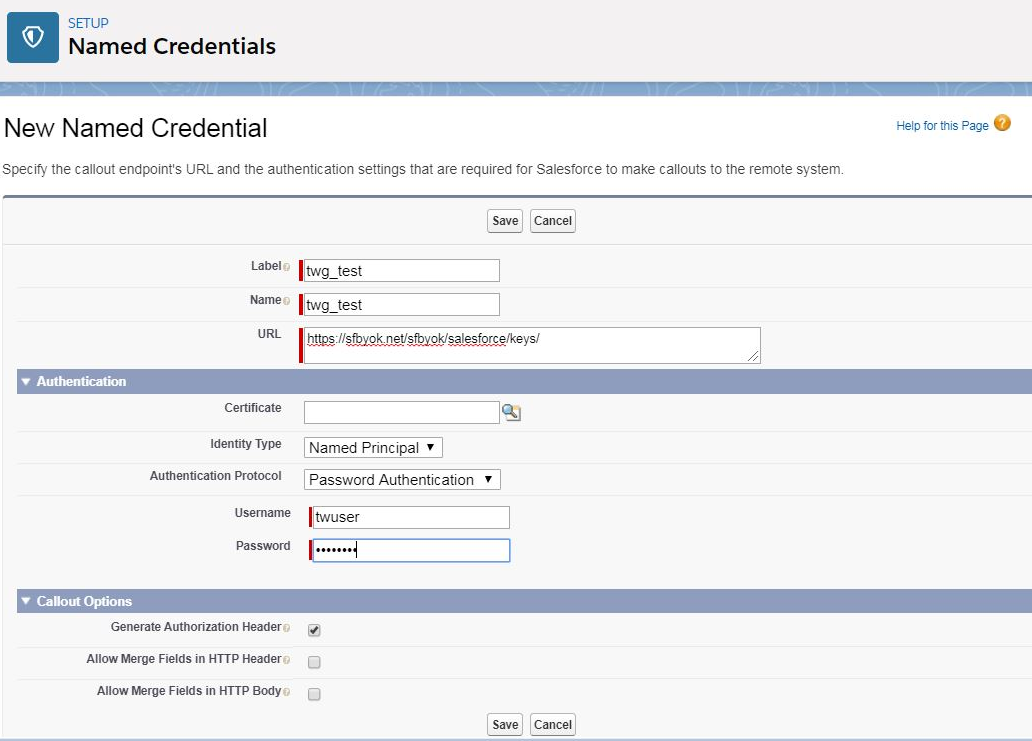
Enter details of the new named credential:
Input Parameter Description Label Provide a label for the new named credential. Name Provide a name for the new credential. It is used to refer to the named credential definition using the API. URL Provide the sfbyok service URL: https://<domain_name>/sfbyok/salesforce/keys/For example:https://sfbyok.net/sfbyok/salesforce keys/Authentication Identity Type Select Named Principal as the identity type. Authentication Protocol Select Password Authentication as the authentication protocol. Username Provide the user name (DEK and CEK owner). Password Provide password of the user. Callout Options Generate Authorization Header Select this option for the callout request. Click Save.
Set up Cache-Only Key
In the Quick Find text box, enter Platform Encryption and click
 .
.In the search results, click the Key Management link under Platform Encryption. The Key Management screen is displayed.
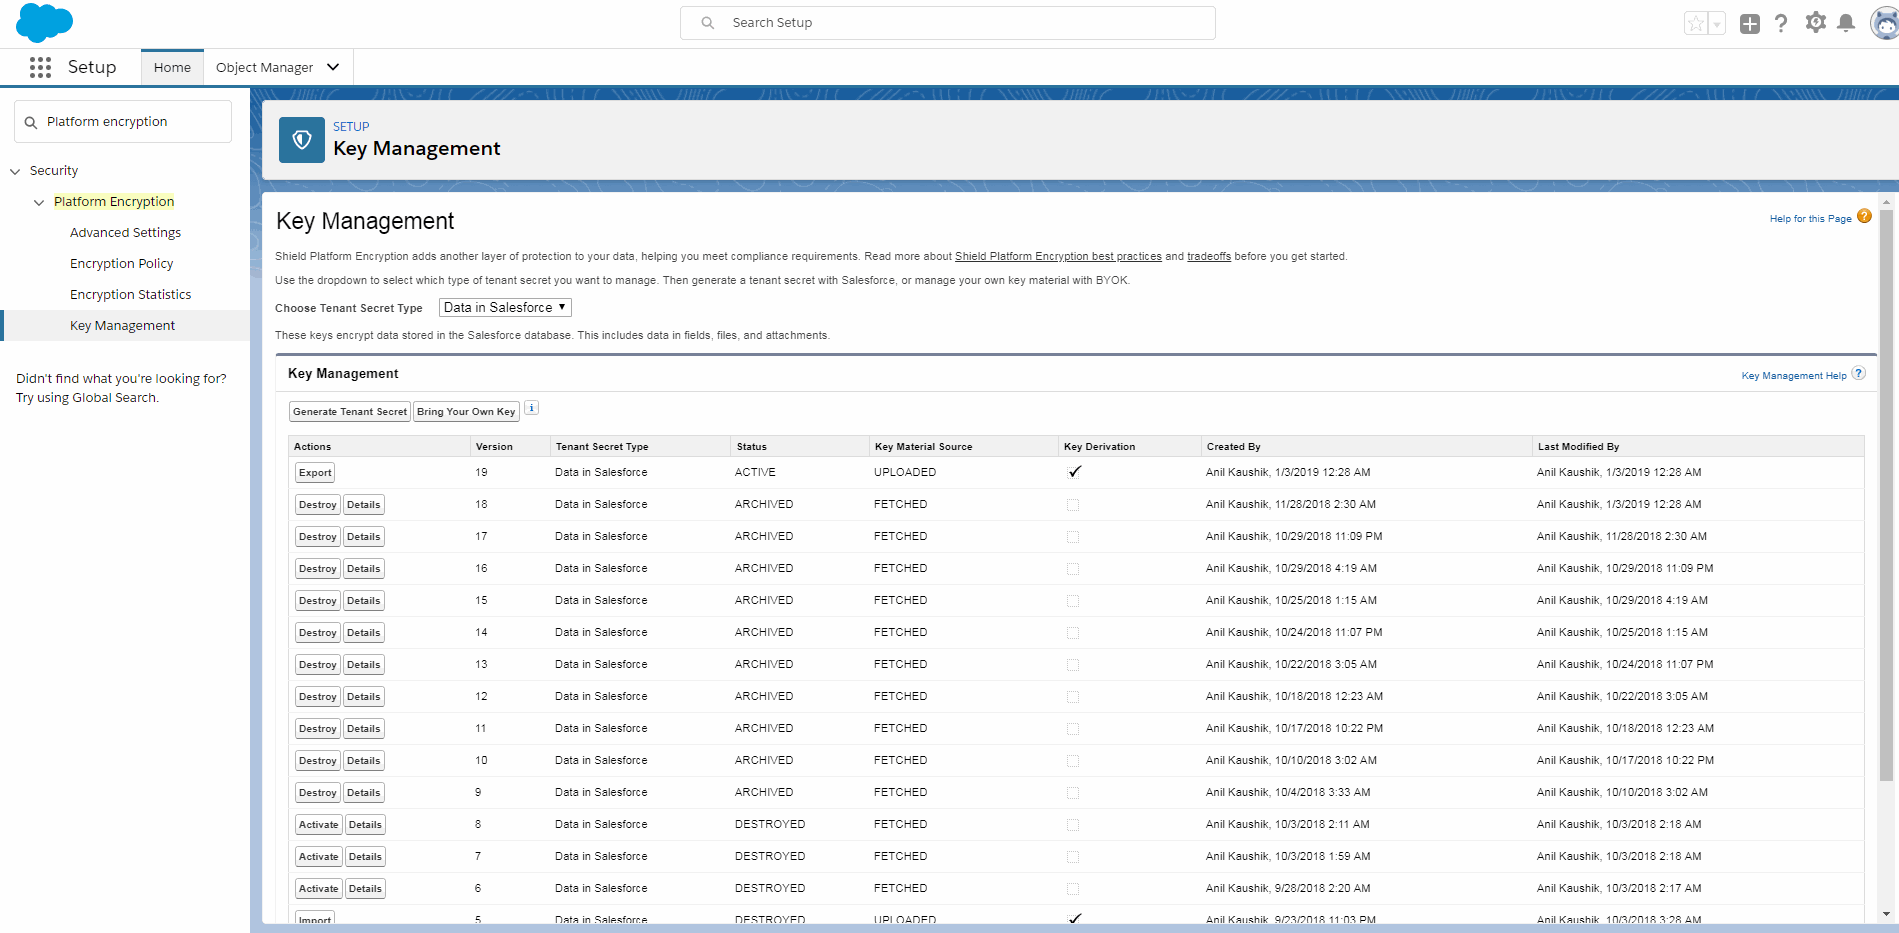
In the Key Management section, click Bring Your Own Key.
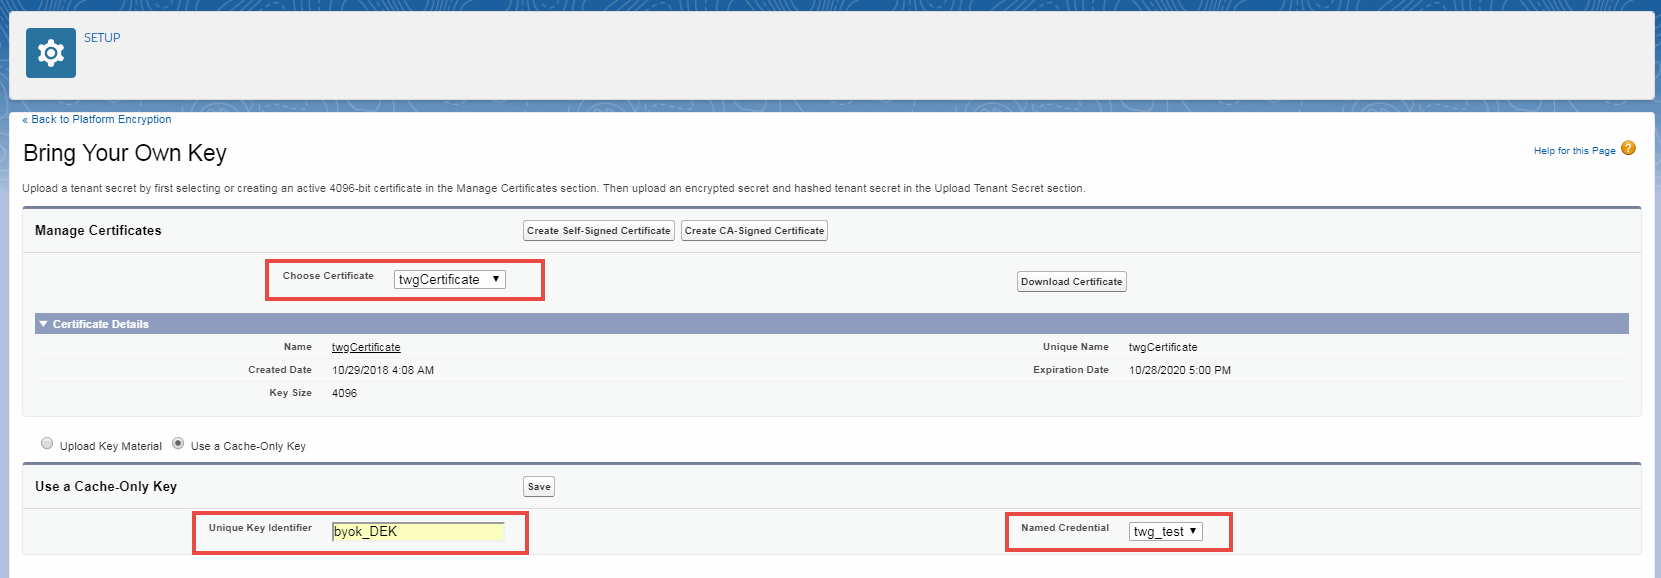
From the Choose Certificate drop-down list, select the certificate that was used in the
CLOUD_CERTIFICATEattribute of the DEK.Select the Use a Cache-Only Key option.
In the Unique Key Identifier field, provide the name of the DEK as created on Key Manager.
From the Named Credential drop-down list, select the named credential created for the corresponding DEK.
Click Save.
Enable replay detection for cache-only keys.
Replay Detection for Cache-only Keys
The replay detection for cache-only keys feature is used to protect the cache-only keys from malicious interception. When this feature is enabled, replay detection inserts a RequestIdentifier to every callout. The request identifier includes the key identifier, a nonce generated for that callout, and the nonce required from the endpoint. The request identifier is a unique identifier for each valid callout.
To enable replay detection for cache-only keys:
Log on to the Salesforce account.
In the Quick Find text box, enter Platform Encryption and click
 .
.In the search results, under the Platform Encryption heading, click Advanced Settings. The Advanced Settings screen is displayed.
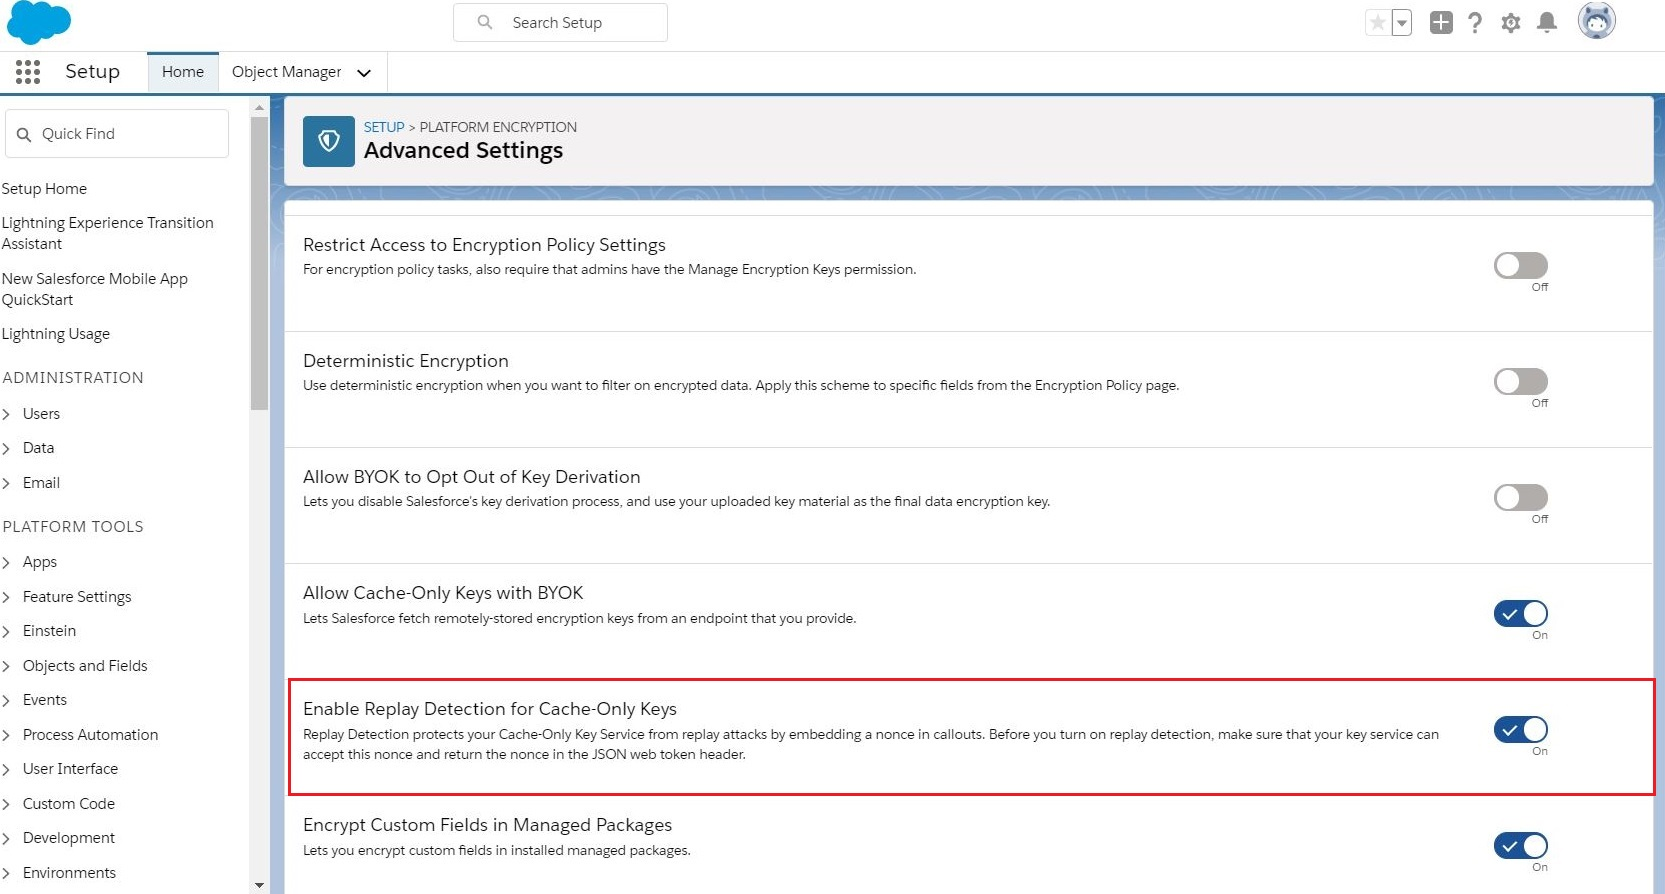
Click the Enable Replay Detection for Cache-Only Keys toggle button.
Callout Request
After the setting for the Cache-Only Key is saved, the Key Management screen is displayed. The counter in the Version column increases when the cache-key only setting is saved.
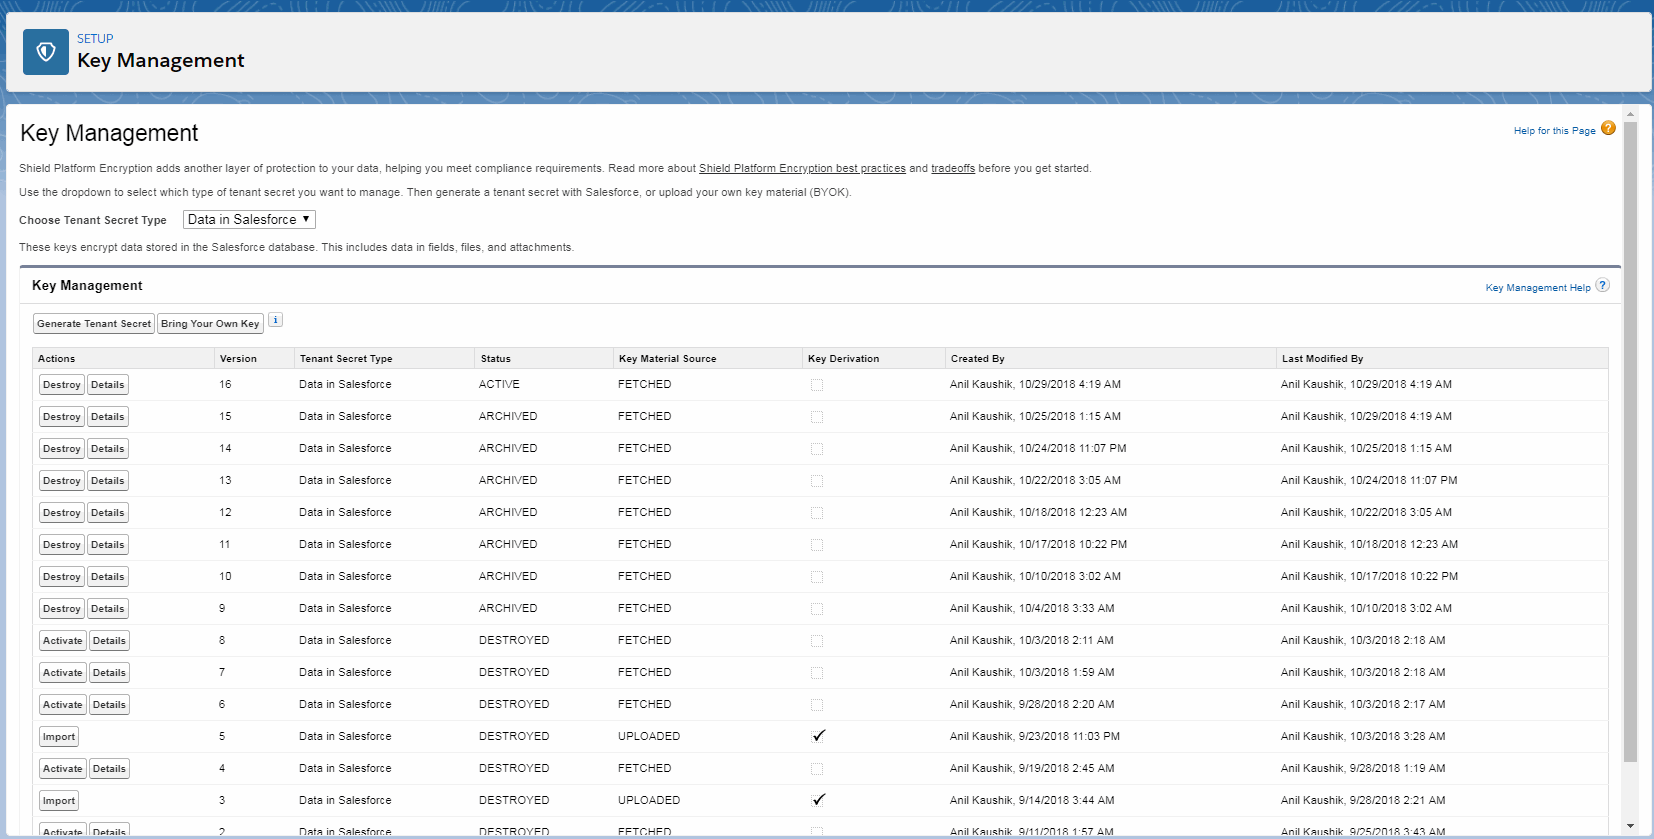
To initiate callout for a named credential:
In the Key Management section, under Actions, click Details to initiate callout for a particular named credential. The Cache-Only Key: Callout Check screen is displayed for named credential.

Click Check. The callout result is displayed.

The callout request lands at the endpoint URL
https://<domain_name>/sfbyok/salesforce/keys/<dek-name>. For example, for the named credentialtwg_testand unique identifierbyok_DEK, shown in the above screen, the request goes to the sfbyok service URL https://sfbyok.net/sfbyok/salesforce/keys/aes_sf_dek.

