Installing ProtectToolkit on Windows
This section provides instructions for installing ProtectToolkit on a Windows client. If you would like to upgrade a ProtectToolkit component, you must first uninstall the component (See Uninstalling ProtectToolkit) and then reinstall it by following the instructions in this section.
This section contains the following subsections:
>Installing the ProtectServer HSM Access Provider on Windows
>Installing ProtectToolkit-C on Windows
>Installing ProtectToolkit-J on Windows
>Installing ProtectToolkit-M on Windows
Prerequisites
>Review the System Requirements to ensure your operating system is supported and that you have installed the required Java runtime, MSVC, and .NET components.
>Review the Operating Modes as they apply to your HSM deployment.
>Ensure that your ProtectServer HSM is installed and configured for access over a network (if applicable):
•ProtectServer PCIe 2 Installation
•Installing the ProtectServer External 2 Hardware
•Installing the ProtectServer External 2 Plus Hardware
If you are planning to operate ProtectToolkit in PCIe or network mode, you must install the ProtectServer HSM Access Provider software before installing ProtectToolkit components. See Installing the ProtectServer HSM Access Provider on Windows
If you are setting up ProtectToolkit to run in Software-only mode, HSM setup and ProtectServer HSM Access Provider installation are unnecessary.
>Download the latest ProtectToolkit product installation packages from the Thales Customer Portal.
>Ensure that you have administrator privileges on the system.
>For ProtectToolkit-M:
•Microsoft Internet Information Services (IIS) should be installed, configured, and working if integration with IIS is desired.
•A ProtectServer HSM must be available.
Installing the ProtectServer HSM Access Provider on Windows
This section provides instructions for installing the ProtectServer HSM Access Provider software on a Windows client. The following Access Provider installation packages are available:
>PTKpcihsmK6.msi installs the device driver for a compatible, locally-installed cryptographic services adapter such as the ProtectServer PCIe 2.
>PTKnethsm.msi installs the Net Client software required to provide cryptographic services using SafeNet hardware devices over a TCP/IP network.
>PTKnetsrv.msi installs the components required to make an installed ProtectServer PCIe 2 HSM available on the network to other ProtectToolkit clients.
To install the ProtectServer HSM Access Provider on Windows
1.Run the ProtectServer HSM Access Provider installation package that is relevant to your HSM deployment:
•ProtectServer External 2 in Network Mode:
–Install PTKnethsm.msi on the local machine.
•ProtectServer PCIe2 in Network Mode:
i.Install PTKpcihsmK6.msi on the server machine.
ii.Install PTKnetsrv.msi on the server machine.
iii.Install PTKnethsm.msi on the local machine.
•ProtectServer PCIe2 in PCIe Mode:
–Install PTKpcihsmK6.msi on the local machine.
2.Work through the installation wizard to complete the installation.
NOTE The following information applies to the installation of PTKpcihsmK6.msi and PTKnethsm.msi:
>If you are installing PTKpcihsmK6.msi, a reboot may be required to successfully load the driver.
>If you are installing PTKnethsm.msi the following command window appears during installation:

Specify the hostname or IP address of one or more HSMs on the network, separated by single spaces. The server listening port is 12396. If you do not enter a configuration string, the default server Localhost is used. This setting can be used for testing purposes, to simulate access to HSM slots across a network when the HSM is in fact located in the local (client) machine.
The server configuration string is stored in the Windows registry as a configuration item (ET_HSM_NETCLIENT_SERVERLIST). After installation, change this configuration item’s value to permanently change server details. To change server details temporarily, use an environment variable to override the registry setting.
For more information about configuration items, see Configuration Items.
Installing ProtectToolkit-C on Windows
This section provides instructions for installing ProtectToolkit-C on a Windows client.
To install ProtectToolkit-C on Windows
1.Run the installation package for the ProtectToolkit-C component that you would like to install:
•PTKcprt.msi installs all the necessary tools and interfaces for a PTK-C Cryptoki service provider.
•PTKcpsdk.msi installs the PTK-C software development platform. Header files are included, in addition to the PTK-C Runtime.
NOTE The PTK-C Runtime and PTK-C SDK packages cannot be installed at the same time. To switch between them, first uninstall the package you no longer wish to use.
–PTKfmsdk.msi installs the Functionality Module (FM) development platform. Install this component if you plan to develop FMs to add custom functionality to the ProtectServer HSM. Requires the PTK-C SDK component as a prerequisite.
NOTE Thales recommends that you develop and test FMs in Software Emulation mode before installing them on your production HSMs. This installation package is located in the folder for your architecture in the installation directory.
2.Work through the installation wizard to complete the installation.
If you selected the ProtectToolkit-C SDK package, a command window is displayed during the installation process (shown below) that gives the option to update the PATH to include the required Cryptoki provider. This will make the correct installed programs and libraries available from the command prompt.
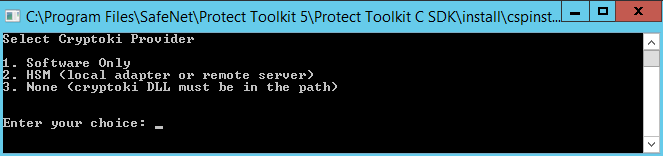
| If... | then select... |
|---|---|
|
The SDK is to be used without access to a HSM (software-only mode) CAUTION! Software-only mode is not secure, as cryptographic material is stored on the host system and not a ProtectServer HSM. |
Software Only |
| An HSM will be available (PCI or network operating modes) | HSM |
| The Cryptoki provider required is already in the path (this might be the case if you are upgrading) | None |
For more information about the available options see Operating Modes.
NOTE The Cryptoki provider can be changed after installing the PTK-C SDK package. For more information about changing the Cryptoki provider, see Changing the Cryptoki Provider below.
Installing ProtectToolkit-J on Windows
This section provides instructions for installing ProtectToolkit-J on a Windows client.
The Provider may be statically installed into the Java Runtime Environment by adding an entry, similar to the following, into the java.security properties file located in $JAVA_HOME/lib/security/java.security security.provider.2 = au.com.safenet.crypto.provider.SAFENETProvider
Alternatively, the Provider may be installed dynamically by an application at runtime by using the java.security.Security.addProvider() method. For example:
Security.addProvider(new au.com.safenet.crypto.provider.SAFENETProvider());
If the Provider is to be used on a specific Slot, the format for the above references should be:
au.com.safenet.crypto.provider.slot <n>.SAFENETProvider
To install ProtectToolkit-J on Windows
1.Run the installation package for the ProtectToolkit-J component that you would like to install:
•PTKjprt.msi installs all the necessary tools and interfaces for a PTK-J Cryptoki service provider, using the Java Cryptographic Architecture (JCA) / Java Cryptographic Extension (JCE) interface. NOTE: PTK-J requires the PTK-C Runtime component as a prerequisite.
–PTKjpsdk.msi installs the PTK-J software development platform, for developing Java applications for use with your ProtectServer HSM.
2.Work through the installation wizard to complete the installation.
The installation program will create a new program group named Safenet\ProtectToolkit J\Runtime and add it to your Start menu. Program files are saved to C:\Program Files\SafeNet\Protect Toolkit 5.
Installing ProtectToolkit-M on Windows
This section provides instructions for installing ProtectToolkit-M on a Windows client.
Full support for ProtectToolkit-M is provided on 64-bit versions of Windows only. 32-bit versions support KSP only.
To install ProtectToolkit-M on Windows
1.Run the installation package for the ProtectToolkit-M component that you would like to install:
• PTKmprt32.msi or PTKmprt64.msi installs the necessary tools and interfaces tor a PTK-M Cryptoki service provider, using Microsoft's cryptographic API. NOTE: PTK-M requires the PTK-C Runtime component as a prerequisite.
• Win32\SafenetKSP32.msi or Win64\SafenetKSP64.msi installs components for using PTK-M with Microsoft's updated Cryptography Next Generation API (CNG).
2.Work through the installation wizard to complete the installation.
Configuring ProtectToolkit
When you have completed the installation, refer to Configuration Items for additional PTK client configuration options, then to the guides for your installed components:
>About the ProtectToolkit-C Administration Guide
>About the ProtectToolkit-J Reference Guide
>About the ProtectToolkit-M User Guide
>About the FM SDK Programming Guide
If you have installed ProtectToolkit-C and intend to use PCIe or network operating modes:
>Configure the secure messaging system (SMS). Refer to Secure Messaging.
>Establish network communication (network operating mode only) by configuring the client to use one or more servers that are available on the same network. Refer to Specifying the Network Server(s).
If you have installed ProtectToolkit-C and intend to use software-only mode:
>Customize the installation to optimize performance. Refer to Software-Only Mode Configuration.
Changing the Cryptoki Provider
The setmode executable binary file allows the user to toggle between software-only and HSM (PCI or network HSM) operating modes, after installing the PTK-C SDK package.
CAUTION! Software-only mode is not secure, as cryptographic material is stored on the host system and not a ProtectServer HSM.
To change the active Cryptoki provider
1.Execute setmode from the command line or open the SetMode.cmd file in the SafeNet install directory (default path: C:\Program Files\SafeNet\Protect Toolkit 5\Protect Toolkit C SDK\bin\SetMode.cmd).
NOTE This tool edits the Windows registry, so you must have Administrator privileges on the client machine or an Unauthorized Access error will be returned. If you receive this error, open the command prompt or SetMode.cmd file by right-clicking and selecting Run as Administrator.
The Select Cryptoki Provider dialog appears.
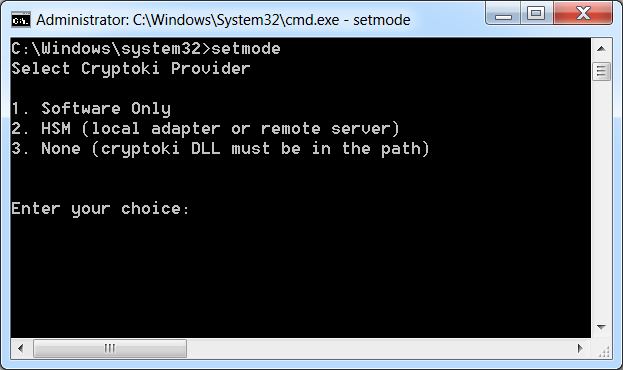
2.Select your desired operating mode and click Next to complete the operation.
Uninstalling ProtectToolkit
You can modify an existing ProtectToolkit client installation/configuration or upgrade a PTK component by uninstalling and then reinstalling the PTK component.
To uninstall ProtectToolkit components from Windows
1.Navigate to Programs and Features in the Windows Control Panel.
2.Locate and select the PTK component that you would like to uninstall.
NOTE If you are uninstalling ProtectToolkit-M:
>Tamper the HSM to destroy key information stored on the HSM that is no longer required. See Tampering the HSM for more information.
>Uninstall the PCIe HSM access provider (if it is installed) before uninstalling the ProtectToolkit-M software. Failure to do so may prevent the ProtectToolkit-M software from uninstalling correctly.
3.Select Uninstall.