|
Home > |
Administration Guide > Backup and Restore HSMs and Partitions > Backup HSM Installation, Storage, and Maintenance
|
|---|
This section describes how to install and maintain your SafeNet Remote Backup HSM (Backup HSM) , and prepare it for storage. It contains the following sections:
•Backup HSM Storage and Maintenance
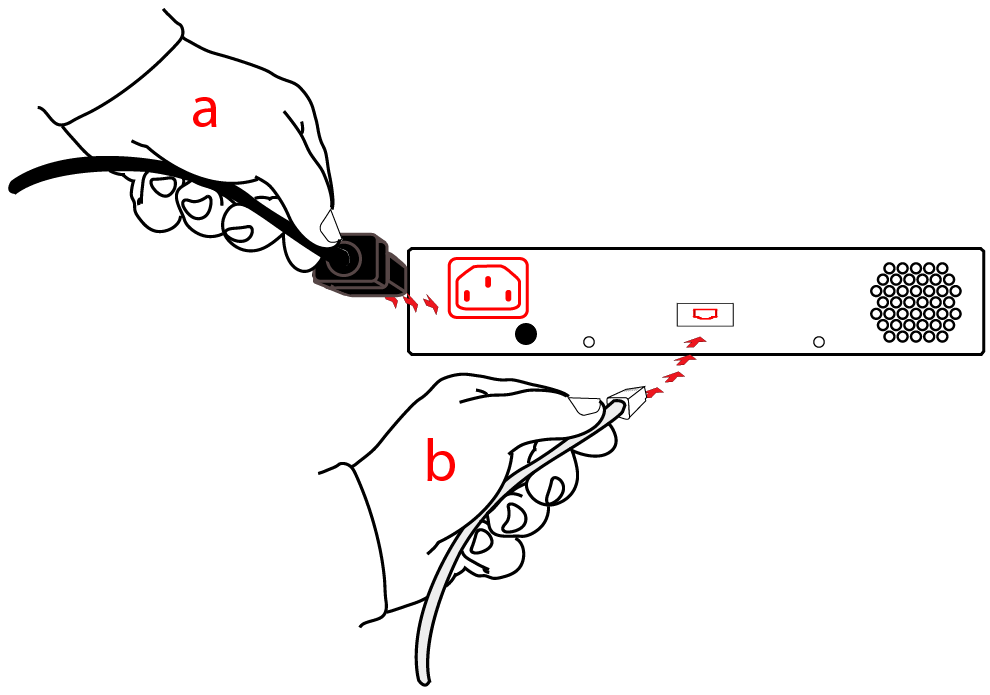
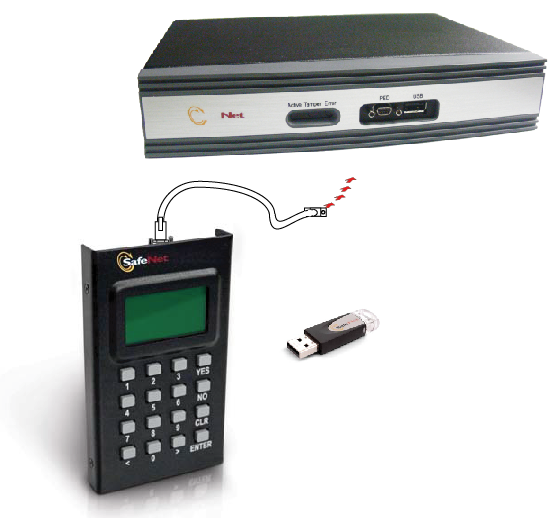
For local backup, connect the Backup HSM to a power source, and via USB cable to the SafeNet Network HSM USB port.
For remote backup, connect the Backup HSM to a power source, and via USB cable to a USB port on your computer.
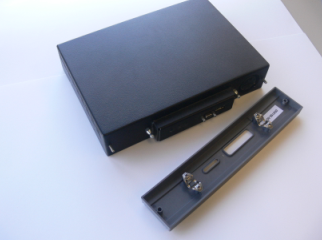
In both cases, the cable attaches to the port on the back panel of the Backup HSM, which requires a mini-USB at that end of the cable (similar cable as used to connect computers to cameras, older cellphones, etc.)
At the front panel, connect the SafeNet PED, using the supplied cable between the micro-D subminiature (MDSM) receptacle on top of the PED, and the matching MDSM receptacle on the front panel of SafeNet Remote Backup HSM (the receptacle labeled "PED").
You can connect a SafeNet DOCK2 card reader for limited use with SafeNet Backup tokens (legacy G4 PCMCIA removable token-format HSMs). The removable-token backup HSM was used to backup legacy SafeNet Network 4.x HSMs and can be connected to SafeNet Network HSM 5.x or 6.x to restore the legacy key material as part of a one-way migration.
You can connect the more modern SafeNet USB HSM as an externally connected PKI slot, for use in the PKI Bundle option. Some customers use this arrangement to hold a root CA. The following caveats apply:
•The token backup commands can see and manage only the backup device, and not PKI devices.
• The token pki commands can see and manage only the PKI devices, and not backup devices.
•The PKI device must use PED authentication only, to be deployed.
• The token pki update commands update the capability and firmware for PKI devices.
• The process to move keys off G4 token HSMs (SafeNet CA4) is to migrate the keys to a K6 HSM (either the K6 inside SafeNet Network HSM, or the standalone K6 (SafeNet PCI-E HSM inside a host computer)) and then to SafeNet USB HSM. Cloning between G4 and G5 devices is not supported.
CAUTION: Migration is not supported to firmware 6.22.0. Migrate first to an HSM at a firmware version older than 6.22.0, and then update the HSM firmware to version 6.22.0 or newer.
CAUTION: Beginning with SafeNet HSM 6, we do not support PKI bundle using removable PCMCIA token HSMs (SafeNet CA4) and the SafeNet DOCK 2 reader. The SafeNet DOCK 2 reader is supported only for migration. If you need the PKI bundle function from removable tokens, do not upgrade.
Note: PPSO is not supported for the PKI-bundle configuration using SafeNet USB HSM. There is no provision to apply PPSO capability via SafeNet Network HSM to the externally connected SafeNet USB HSM. If the SafeNet USB HSM was removed to a host computer and updated to firmware 6.22.0 and had the PPSO capability applied (destructive operation), then returned to the SafeNet Network HSM to resume PKI-bundle operation, the interface has no provision to create a PPSO partition in the external HSM. Rather, a legacy-style partition would be created for PKI-bundle operation.
The Backup HSM is a USB device. It is not equipped with a power switch. There is no special procedure for disconnecting or shutting down a SafeNet Backup HSM.
If the Backup HSM is used in remote configuration for SafeNet Network HSM, therefore connected to a workstation acting as backup server, then your only action is to do the usual dismount of a USB device (for the benefit of your workstation, not the Backup HSM - “It is now safe to disconnect your USB Device”). Linux and UNIX platforms have their equivalent unmount actions for USB. Then disconnect the cables.
If the Backup HSM is connected to SafeNet Network HSM for local backup, you have no access to the SafeNet Network HSM’s internal hardened kernel, so you cannot issue an un-mount instruction. Simply disconnect the cables and the system figures it out at either end. Both SafeNet Network HSM and the Backup HSM accept this treatment very robustly.
The battery that powers the NVRAM and RTC in the SafeNet Remote Backup HSM is shipped uninstalled, in the packaging.This preserves the battery in case the unit spends a long time in transit or is stored in your warehouse as a spare. With the battery not inserted, the real-time clock and NVRAM are not depleting its charge to no purpose. If you are preparing a fresh-from-the-factory Backup HSM to place it into service, then you must install the battery before using the device.
| 1 |
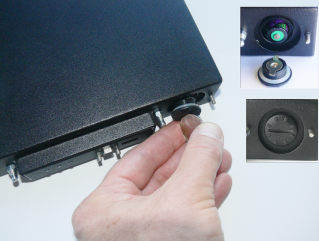
Begin by removing the front face-plate. It is held in place by two spring clips. Grasp the face-plate firmly and pull to disengage the clips. Set the face-plate aside. |
| 2 |
The battery compartment is to the right as you face the unit. The compartment cover is circular and has both raised dots and a recessed slot. Use finger-pressure against the dots, or the edge of a coin in the slot, to twist the battery compartment cover ¼ turn in a counter-clockwise direction. The cover should fall out easily. |
| 3 |
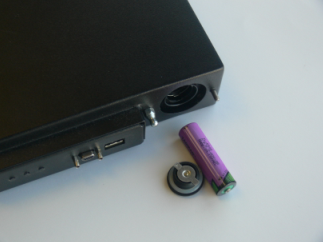
Remove the battery from its packaging and align it at the opening of the SafeNet USB HSM (or SafeNet Backup HSM) battery compartment. The battery has a “+” sign near the end with the raised nub/bump. The flat end of the battery is the negative pole (-). |
| 4 |
Insert the battery, negative end first. The positive end (+) should protrude. The compartment is spring-loaded. |
| 5 |
Use the battery compartment cover to push the battery into the compartment, against the spring tension. Maintaining the pressure, align the two tabs on the inside of the cover with the two recessed indentations at the top and bottom of the compartment opening. With a little jiggling and a few trial pushes, the tabs should settle into those recesses, allowing the cover to seat flush with the front of the SafeNet Remote Backup HSM. Maintain the inward pressure and twist the cover ¼ turn clockwise to lock it in place. The battery is installed. |
| 6 |
Replace the front-panel cover by aligning the clips with their respective posts and pushing until the clips grab the posts and the cover snaps in place. |
The SafeNet Remote Backup HSM (for backing up and restoring HSM and partition contents) and the SafeNet USB HSM (for PKI options) can be stored, with valuable contents, when not in use. The battery that powers the NVRAM and RTC in either device must be installed for use, but some questions commonly arise if the device is to be stored for long periods.
It is generally good practice to remove batteries when storing electronic devices, to preclude accidental damage from battery leakage. We use high-quality, industrial-grade batteries, that are unlikely to fail in a damaging fashion, but prudence suggests removing them, regardless. Also, if the unit is not in use, there is no need to maintain power to the RTC and NVRAM, so an externally stored battery will last longer (see specifications, below).
If main power is not connected, and the battery dies, or is removed, then NVRAM and the system's Real Time Clock lose power. The working copy of the MTK is lost.
The only key material that is lost is session objects (including working copies of stored keys) that are in use at the time. If the "originals" of those same objects are stored as HSM/partition objects, then they reside in non-volatile memory, and those are preserved.
There is no corruption of stored objects.
From any supplier that can match the specifications.
Technical Specifications:
3.6 V Primary lithium-thionyl chloride (Li-SOCl2)
Fast voltage recovery after long term storage and/or usage
Low self discharge rate
10 years shelf life
Operating temperature range -55 ºC to +85 ºC
U.L. Component Recognition, MH 12193
Storage Conditions:
Cells should be stored in a clean & dry area (less than 30 % Relative Humidity)
Temperature should not exceed +30 ºC
There is not a low battery indicator or other provision for checking status.
The battery discharge curve is such that the voltage remains constant until the very end of the battery life, at which point the discharge is extremely steep.
If your HSM is a Password-authenticated version, or if your HSM is a PED-authenticated version, but you have not moved an MTK split out of the HSM (onto a purple SRK), then simply insert the battery, connect the HSM, power it up, and resume using it.
The MTK that was deleted by the tamper event (battery removal/discharge) is reconstituted from stored portions as soon as you log in. All your stored material is available for use.
If your HSM is a PED-authenticated version, and you have previously enabled SRK (moved one split of the MTK out of the HSM, onto a purple PED Key - the SRK), then the first time you attempt to use the HSM (after battery replacement and power-up), the HSM is unable to find the "missing" portion, in order to reconstitute the MTK. You are prompted to present the purple PED Key. As soon as the correct SRK is received, the MTK is reconstituted, and all your stored material is available for use.