
Installing Crypto Command Center
The installation procedure explained on this page is intended for system administrators and other qualified professionals who are responsible for installing and configuring Thales Crypto Command Center for their organization.
Before You Begin
Before you begin Crypto Command Center (CCC) installation, review the minimum hardware and software requirements that are listed here.
Install CCC
You can install CCC using Podman, Kubernetes, or Helm.
Install CCC using Podman
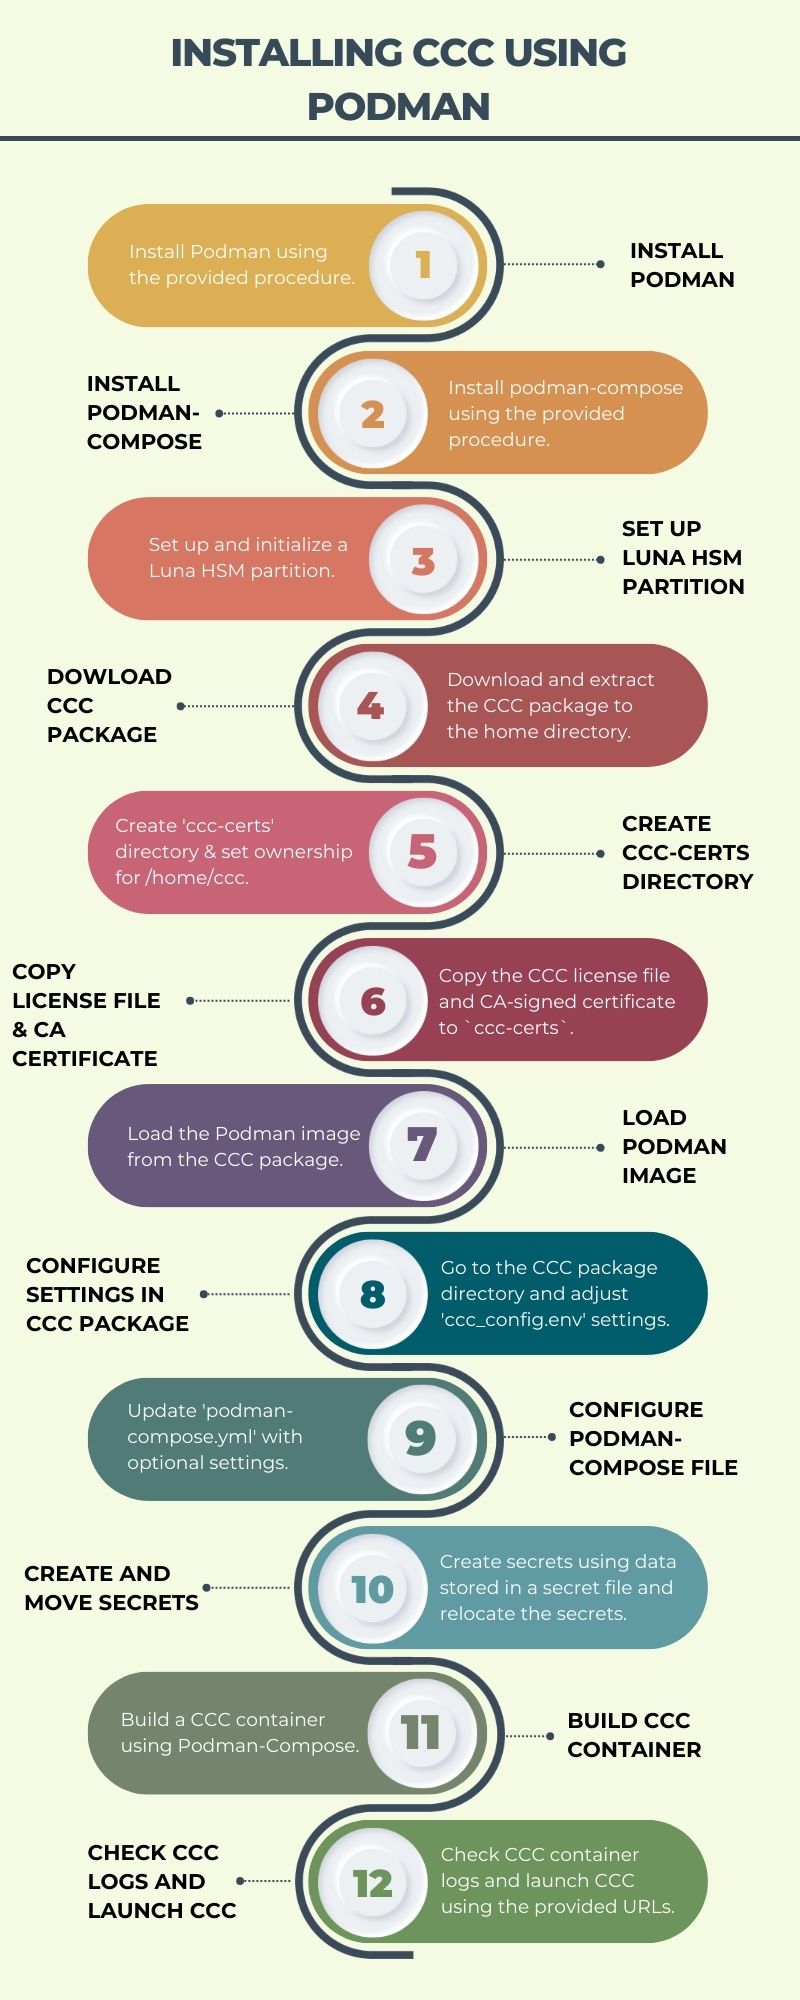
Explore CCC's installation process using the infographic below. Click on the image to enlarge and view it in a new window:
Navigate through the CCC installation process with our video guide:
The steps involved in installing CCC using Podman are as follows:
Install Podman using the procedure explained here.
Install podman-compose using the procedure explained here.
Set up and initialize a Luna HSM partition. This partition will be used to create a CCC root of trust (ROT). You'll be required to provide the partition-related details while modifying the environment file in a later step.
In case you want to use an HA ROT, you need to set up and initialize two partitions that have the same domain. You'll be required to provide the details related to these partitions while modifying the environment file in a later step.
Download and extract the CCC package.
Extract the CCC package inside the home directory of the user who is going to initialize the CCC container. For example, if the username is podmanuser, then the CCC package needs to be placed in the /home/podmanuser directory.
Create a directory named ccc-certs:
mkdir -p /home/ccc/ccc-certs
Change the ownership of /home/ccc directory:
chown -R `<podmanUser>:<podmanUser> /home/ccc
Replace podmanUser with the appropriate username or user group.
Copy the CCC license file and paste it inside the ccc-certs directory.
You have the option to upload the license file later, after logging in to CCC. You can do so by accessing the Administration tab from the menu bar at the top, followed by selecting the Licenses option from the navigation pane on the left, and then clicking the Upload button.
If you are using a CA-signed certificate:
a. Create a PKCS#12 or JKS certificate.
b. Copy the certificate and paste it inside the ccc-certs directory.
c. Provide the following CA-signed certificate related details while updating the environment file in a later step:
- CA_CERTIFICATE
- CA_CERTIFICATE_FILE_NAME
- CA_CERTIFICATE_PASSWORD
- CA_CERTIFICATE_ALIAS
Optional Step: If you prefer to use a signed and verified image of CCC for enhanced security and reliability, follow the procedure described on the page Using a Signed and Verified CCC Container Image. Once you have completed the procedure, return to this page to continue with the CCC installation, following steps 10 through 20.
This step is optional and provides an additional layer of security for your CCC installation. If you choose not to follow this procedure, you can continue with the CCC installation as outlined in steps 9 through 20.
Go to the CCC package and load the Podman image.
podman load -i ccc-4.2.0_signed.tar
Navigate to the podman directory within the CCC package. Open the file named ccc_config.env within the podman directory and adjust the settings to align with your specific requirements.
If you want to use an external database, you need to provide the required details while modifying the environment file.
If you want to use an HA ROT, you need to follow the cloning protocol and ensure that:
(i) ROT_HA_ENABLE is set to Y
(ii) IP address for the second device is specified under HSM_IP2
(iii) Both the partitions have the same PARTITION_LABEL
(iv) Both the partitions have the same domain
(v) Partition on the second device is specified under PARTITION_NAME2
(vi) REMEMBER_CREDENTIAL is set to Y
Ensure that you've specified the name of the CCC license file under CCC_LICENSE_FILE_NAME.
The secure service deletion functionality, designed to ensure an additional layer of authentication before service deletion, is enabled by default in CCC. If, for any specific requirement, you wish to deactivate this feature, please follow these instructions:
a. Locate the environment file situated within the podman or kubernetes directory.
b. Within the file, locate the flag labeled ENABLE_SAFE_SERVICE_DEL.
c. To disable the safe service deletion functionality, modify the value of the flag to N.
Please exercise caution and evaluate the potential implications before disabling this essential security measure.
If you have mapped HSM_IP1 or HSM_IP2 with the hostname/DNS, then you need to update the hostAliases section in the podman-compose.yml file, as indicated below:
extra_hosts:
- "Hostname/DNS of HSM1:IP address of HSM1"
- "Hostname/DNS of HSM2:IP address of HSM2"
If you are an LDAPS user, follow these steps to configure LDAPS for CCC:
Additional Steps for LDAPS Users.
Optional Step: Within the podman directory, locate and open the file named podman-compose.yml. Check for lines beginning with # network_mode: host and # hostname: hostname. Remove the # symbol at the beginning of these lines to activate them. Finally, replace hostname with the IP address assigned to your machine. Although optional, we recommend completing this step for optimal configuration.
Navigate to the podman directory, and ensure the secretfile file is accessible. Input all passwords, including those for the crypto officer, HSM1, HSM2, CCC administrator, CCC keystore, CCC credentialstore, CCC truststore, CA certificate, and CCC database, into the secretfile.
Move the secretfile file from the podman directory to /home/ccc/ccc-certs directory:
mv secretfile /home/ccc/ccc-certs
Run the following command to create secrets using the passwords stored in the secretfile:
podman secret create ccc_password secretfile
After the installation process is finished, any passwords stored in the secretfile file will be automatically deleted for security reasons. However, if you wish to keep these passwords for future reference, you are advised to create a backup of this file.
Use the following command to view a list of the secrets that have been created, along with their associated metadata:
podman secret ls
Build a CCC container.
podman-compose up -d
If you've encountered the error message ERRO[0000] failed to move the rootless netns slirp4netns process to the systemd user .slice: dial unix /run/user/0/bus: connect : permission denied while executing the podman-compose up -d command, here's what you need to understand: Podman's default network mode, CNI, has been updated to Netavrak and Adarvark in version 4 onwards. This change, highlighted by Red Hat, offers advanced networking options without impacting CCC deployment. To address any issues arising from this update, we recommend configuring Netvarak properly on your host machine. Please refer to https://docs.podman.io/en/v4.4/markdown/podman-network.1.html and https://github.com/containers/netavark for detailed instructions on resolving this matter effectively.
Run the following command to check the logs of CCC container, if needed.
podman logs -f ccc
Launch CCC on any of the nodes using one of the following URLs, depending on whether the machine is identified by an IP address or hostname:
Log on to CCC as an admin user. If you are logging in for the first time, use the following credentials:
-
Username: admin
-
Password: PASSWORD
Change the password. You can now start exploring various functions and features of CCC.
If the Administrator requires that you use two-factor authentication, you are prompted to configure a one-time password (OTP). Using a two-factor authentication application on a mobile device, scan the displayed QR code or manually type in the displayed secret key, excluding spaces. Add your account. A 6-digit OTP code is generated. Enter this code in the login page, excluding spaces. You are prompted to change the password in case you are a local user.
If the CCC Administrator edits the credentials of a user that has two-factor authentication enabled, the user needs to re-enroll in the two-factor authentication process.
The clock for your two-factor authentication application must be synchronized within 2 seconds of the clock for the CCC server. Otherwise the OTP code will be rejected due to a validation error.
If you ever choose to update any of the passwords within the secretfile file, remember to first remove the previous secrets by executing the command podman secret rm ccc_password, and then repeat steps 12 through 16.
Install CCC using Kubernetes
The steps involved in installing CCC using Kubernetes are as follows:
Log on to both the Linux machines that you intend to use for CCC installation.
There should be full network connectivity between these machines. During installation, you will be using one of the machines as the Master node and the other one as the Worker node. Depending on your requirements, you can have more than one Master node and Worker node.
Set up Kubernetes Cluster on the Master node as well as the Worker node, using the steps explained here. Kubernetes enables you to install CCC and all its dependencies in a cluster of containers that run on virtualized host OS.
Set up and initialize a Luna HSM partition. This partition will be used to create a CCC root of trust (ROT). You'll be required to provide the partition-related details while modifying the configuration settings in a later step.
In case you want to use an HA ROT, you need to set up and initialize two partitions that have the same domain. You'll be required to provide the details related to these partitions while modifying the configuration settings in a later step.
Download and extract the CCC package on the Master node as well as the Worker node.
Extract the Crypto Command Center package inside your home directory.
Create a directory named ccc-certs on all the Worker nodes:
mkdir -p /home/ccc/ccc-certs
Copy the CCC license file and paste it inside the ccc-certs directory under the CCC package.
You have the option to upload the license file later, after logging in to CCC. You can do so by accessing the Administration tab from the menu bar at the top, followed by selecting the Licenses option from the navigation pane on the left, and then clicking the Upload button.
If you are using a CA-signed certificate:
a. Create a PKCS#12 or JKS certificate.
b. Copy the certificate and paste it inside the ccc-certs directory.
c. Provide the following CA-signed certificate related details while updating the environment file in a later step:
- CA_CERTIFICATE
- CA_CERTIFICATE_FILE_NAME
- CA_CERTIFICATE_PASSWORD
- CA_CERTIFICATE_ALIAS
Optional Step: If you prefer to use a signed and verified image of CCC for enhanced security and reliability, follow the procedure described on the page Using a Signed and Verified CCC Container Image. Once you have completed the procedure, return to this page to continue with the CCC installation, following steps 11 through 21.
This step is optional and provides an additional layer of security for your CCC installation. If you choose not to follow this procedure, you can continue with the CCC installation as outlined in steps 9 through 21.
Check your container runtime environment on the Worker node by executing the following command:
crictl config --get image-endpoint
Navigate to the Crypto Command Center package on your Worker node and select one of the following methods to import the CCC image, based on the output of the previous step:
Method 1 (for containered): If the output you received was unix:///run/containerd/containerd.sock, it indicates that your Worker node is using containerd as the container runtime. In this case, you can import the CCC images by using the following command:
ctr -n=k8s.io images import ccc-4.2.0_signed.tar
Method 2 (for CRI-O): If the output you received was unix:///var/run/crio/crio.sock, it indicates that your Worker node is using CRI-O as the container runtime. To import the images in this case, you'll first need to install Podman on your Worker node and then execute the following command:
podman load -i ccc-4.2.0_signed.tar
After successfully importing the images using Method 2, open the CCC package on your Master node and access the kubernetes directory. Within the kubernetes directory, open the deployment.yaml file, navigate to the section that defines containers, and update the image value from ccc:4.2.0 to localhost/ccc:4.2.0. This action ensures that your Kubernetes deployment uses the desired image.
Run the following command on the Worker node to list all the images:
crictl images
Go the the ccc directory in the Master node and open the kubernetes directory.
Create secrets by running the following command:
kubectl create secret generic ccc-password \
--from-literal=CCC_TRUSTSTORE_PASSWORD='password' \
--from-literal=CCC_KEYSTORE_PASSWORD='password' \
--from-literal=CCC_CREDENTIALSTORE_PASSWORD='password' \
--from-literal=HSM_PASSWORD1='password' \
--from-literal=CRYPTO_OFFICER_PASSWORD='password' \
--from-literal=HSM_PASSWORD2='password' \
--from-literal=CCC_ADMIN_PASSWORD='password' \
--from-literal=CA_CERTIFICATE_PASSWORD='password' \
--from-literal=CCC_DB_PASSWORD='password'
Update the CCC image name in the deployment.yaml file located in the kubernetes directory by replacing the current image name with docker.io/thalesdiscpl/ccc:4.2.0 using the vi editor.
Modify the configuration settings on the Master node as per your requirements:
vi config-map.yaml
When updating a key's value, remember to separate the key and value with a colon (:) and include a space. For example, use key: value instead of key:value.
If you want to use an external database, you need to provide the required details while modifying the configuration settings.
If you want to use an HA ROT, you need to follow the cloning protocol and ensure that:
(i) ROT_HA_ENABLE is set to Y
(ii) IP address for the second device is specified under HSM_IP2
(iii) Password for the second device is specified under HSM_PASSWORD2
(iv) Both the partitions have the same PARTITION_LABEL
(v) Both the partitions have the same CRYPTO_OFFICER_PASSWORD
(vi) Both the partitions have the same domain
(vi) Partition on the second device is specified under PARTITION_NAME2
(vii) REMEMBER_CREDENTIAL is set to Y
Ensure that you've specified the name of the CCC license file under CCC_LICENSE_FILE_NAME.
If you have mapped HSM_IP1 or HSM_IP2 with the hostname/DNS, then in the deployment.yaml file, please update the hostAliases section with the corresponding hostname/DNS, making sure to use lowercase letters for the hostname:
hostAliases:
- ip: "IP address of HSM1"
hostnames:
- "hostname/DNS of HSM1"
- ip: "IP address of HSM2"
hostnames:
- "hostname/DNS of HSM2"
Edit the deployment.yaml file on the Master node if you are using LDAPS:
vi deployment.yaml
If you are an LDAPS user, follow these steps to configure LDAPS for CCC:
Additional Steps for LDAPS Users.
Launch CCC:
sh launch.sh
Check whether CCC installation is successful by verifying the output of the following command:
sudo kubectl get all -o wide
Launch CCC on any of the nodes using one of the following URLs, depending on whether the machine is identified by an IP address or hostname:
Log on to CCC as an admin user. If you are logging in for the first time, use the following credentials:
-
Username: admin
-
Password: PASSWORD
Change the password. You can now start exploring various functions and features of CCC.
If the Administrator requires that you use two-factor authentication, you are prompted to configure a one-time password (OTP). Using a two-factor authentication application on a mobile device, scan the displayed QR code or manually type in the displayed secret key, excluding spaces. Add your account. A 6-digit OTP code is generated. Enter this code in the login page, excluding spaces. You are prompted to change the password in case you are a local user.
If the CCC Administrator edits the credentials of a user that has two-factor authentication enabled, the user needs to re-enroll in the two-factor authentication process.
The clock for your two-factor authentication application must be synchronized within 2 seconds of the clock for CCC. Otherwise the OTP code will be rejected due to a validation error.
If you want to use HA configuration, you need to use an external database.
If you want to use HA configuration, run the following command to specify the number of replicas:
kubectl scale --replicas=2 deployment ccc-deployment
Install CCC using Helm
The steps involved in installing CCC using Helm are as follows:
Log on to both the Linux machines that you intend to use for CCC installation.
There should be full network connectivity between these machines. During installation, you will be using one of the machines as the Master node and the other one as the Worker node. Depending on your requirements, you can have more than one Master node and Worker node.
Set up Kubernetes Cluster on the Master node as well as the Worker node, using the steps explained here. Kubernetes enables you to install CCC and all its dependencies in a cluster of containers that run on virtualized host OS.
Install Helm on Master node.
Set up and initialize a Luna HSM partition. This partition will be used to create a CCC root of trust (ROT). You'll be required to provide the partition-related details while modifying the configuration settings in a later step.
In case you want to use an HA ROT, you need to set up and initialize two partitions that have the same domain. You'll be required to provide the details related to these partitions while modifying the configuration settings in a later step.
Download and extract the CCC package on the Master node as well as the Worker node.
Extract the Crypto Command Center package inside your home directory.
Create a directory named ccc-certs on all the Worker nodes:
mkdir -p /home/ccc/ccc-certs
Copy the CCC license file and paste it inside the ccc-certs directory under the CCC package.
You have the option to upload the license file later, after logging in to CCC. You can do so by accessing the Administration tab from the menu bar at the top, followed by selecting the Licenses option from the navigation pane on the left, and then clicking the Upload button.
If you are using a CA-signed certificate:
a. Create a PKCS#12 or JKS certificate.
b. Copy the certificate and paste it inside the ccc-certs directory.
c. Provide the following CA-signed certificate related details while updating the environment file in a later step:
- CA_CERTIFICATE
- CA_CERTIFICATE_FILE_NAME
- CA_CERTIFICATE_PASSWORD
- CA_CERTIFICATE_ALIAS
Optional Step: If you prefer to use a signed and verified image of CCC for enhanced security and reliability, follow the procedure described on the page Using a Signed and Verified CCC Container Image. Once you have completed the procedure, return to this page to continue with the CCC installation, following steps 12 through 21.
This step is optional and provides an additional layer of security for your CCC installation. If you choose not to follow this procedure, you can continue with the CCC installation as outlined in steps 10 through 21.
Check your container runtime environment on the Worker node by executing the following command:
crictl config --get image-endpoint
Navigate to the Crypto Command Center package on your Worker node and select one of the following methods to import the CCC image, based on the output of the previous step:
Method 1 (for containered): If the output you received was unix:///run/containerd/containerd.sock, it indicates that your Worker node is using containerd as the container runtime. In this case, you can import the images by using the following command:
ctr -n=k8s.io images import ccc-4.2.0_signed.tar
Method 2 (for CRI-O): If the output you received was unix:///var/run/crio/crio.sock, it indicates that your Worker node is using CRI-O as the container runtime. To import the images in this case, you'll first need to install Podman on your Worker node and then execute the following command:
podman load -i ccc-4.2.0_signed.tar
After successfully importing the images using Method 2, open the CCC package on your Master node and access the helm directory. Within the helm directory, open the deployment.yaml file located in the templates subdirectory. In the deployment.yaml file, navigate to the section that defines containers and update the image value from ccc:4.2.0 to localhost/ccc:4.2.0. This action ensures that your Helm deployment uses the desired image.
Run the following command on the Worker node to list all the images:
crictl images
Go the the ccc directory in the Master node and open the helm directory.
Create secrets by running the following command:
kubectl create secret generic ccc-password \
--from-literal=CCC_TRUSTSTORE_PASSWORD='password' \
--from-literal=CCC_KEYSTORE_PASSWORD='password' \
--from-literal=CCC_CREDENTIALSTORE_PASSWORD='password' \
--from-literal=HSM_PASSWORD1='password' \
--from-literal=CRYPTO_OFFICER_PASSWORD='password' \
--from-literal=HSM_PASSWORD2='password' \
--from-literal=CCC_ADMIN_PASSWORD='password' \
--from-literal=CA_CERTIFICATE_PASSWORD='password' \
--from-literal=CCC_DB_PASSWORD='password'
Update the CCC image name in the deployment.yaml file within the helm/templates directory by replacing the current image name with docker.io/thalesdiscpl/ccc:4.2.0 using the vi editor.
Modify the configuration settings on the Master node as per your requirements:
vi values.yaml
When updating a key's value, remember to separate the key and value with a colon (:) and include a space. For example, use key: value instead of key:value.
If you want to use an external database, you need to provide the required details while modifying the configuration settings.
If you want to use an HA ROT, you need to follow the cloning protocol and ensure that:
(i) ROT_HA_ENABLE is set to Y
(ii) IP address for the second device is specified under HSM_IP2
(iii) Password for the second device is specified under HSM_PASSWORD2
(iv) Both the partitions have the same PARTITION_LABEL
(v) Both the partitions have the same CRYPTO_OFFICER_PASSWORD
(vi) Both the partitions have the same domain
(vi) Partition on the second device is specified under PARTITION_NAME2
(vii) REMEMBER_CREDENTIAL is set to Y
Ensure that you've specified the name of the CCC license file under CCC_LICENSE_FILE_NAME.
If you have mapped HSM_IP1 or HSM_IP2 with the hostname/DNS, then in the values.yml file, please update the hostAliases section with the corresponding hostname/DNS, making sure to use lowercase letters for the hostname:
hostAliases:
- ip: "IP address of HSM1"
hostnames:
- "hostname/DNS of HSM1"
- ip: "IP address of HSM2"
hostnames:
- "hostname/DNS of HSM2"
Launch CCC:
helm install ccc .
Check whether CCC installation is successful by verifying the output of the following command:
sudo kubectl get all -o wide
Launch CCC on any of the nodes using one of the following URLs, depending on whether the machine is identified by an IP address or hostname:
Log on to CCC as an admin user. If you are logging in for the first time, use the following credentials:
-
Username: admin
-
Password: PASSWORD
Change the password. You can now start exploring various functions and features of CCC.
If the Administrator requires that you use two-factor authentication, you are prompted to configure a one-time password (OTP). Using a two-factor authentication application on a mobile device, scan the displayed QR code or manually type in the displayed secret key, excluding spaces. Add your account. A 6-digit OTP code is generated. Enter this code in the login page, excluding spaces. You are prompted to change the password in case you are a local user.
If the CCC Administrator edits the credentials of a user that has two-factor authentication enabled, the user needs to re-enroll in the two-factor authentication process.
The clock for your two-factor authentication application must be synchronized within 2 seconds of the clock for CCC. Otherwise the OTP code will be rejected due to a validation error.
If you want to use HA configuration, you need to use an external database.
If you want to use HA configuration, run the following command to specify the number of replicas:
kubectl scale --replicas=2 deployment ccc-deployment
Additional Steps for LDAPS users
If you are using LDAPS, follow the steps below, depending on whether you installed CCC using Podman, Kubernetes, or Helm:
Podman Users
If you've used Podman for CCC installation:
Place the LDAPS certificate in the /home/ccc/ccc-certs directory. Ensure the certificate is in PEM format and contains both the public key and the certificate chain.
Open the podman-compose.yml file in your preferred text editor and modify the extra_hosts section as shown below:
extra_hosts:
- "Hostname/DNS of LDAPs:IP address of LDAPs"
Start the CCC container by executing the following command:
`podman-compose up`
Import SSL certificate into the truststore by running the following command:
podman exec ccc bash -c 'ldaps --truststore <CCC truststore password> --cccpass <CCC admin password> --alias <alias for certificate> --cert <certificate name> --copass <crypto officer password>'
If your admin password contains one or more special characters, you need to add a backslash before every special character to ensure proper execution of the command.
Kubernetes Users
If you've used Kubernetes for CCC installation:
Put the LDAPS certificate in the /home/ccc/ccc-certs directory. Ensure the certificate is in PEM format with the public key and certificate chain.
Open the deployment.yaml file and modify the hostAliases section, as shown below:
hostAliases:
- ip: "IP address of LDAPs"
hostnames:
- "hostname/DNS of LDAPs"
Run the following command to launch the CCC container:
sh launch.sh
Import the SSL certificate into the truststore by executing the following command:
kubectl exec <pod-name> -- bash -c 'ldaps --truststore <CCC truststore password> --cccpass <CCC admin password> --alias <alias for certificate> --cert <certificate name> --copass <crypto officer password>'
If your admin password contains one or more special characters, you need to add a backslash before every special character to ensure proper execution of the command.
Helm Users
If you've used Helm for CCC installation:
Put the LDAPS certificate in the /home/ccc/ccc-certs directory. Ensure the certificate is in PEM format and contains both the public key and the certificate chain.
Open the values.yaml file and modify the hostAliases section, as shown below:
hostAliases:
- ip: "IP address of LDAPs"
hostnames:
- "hostname/DNS of LDAPs"
Start the CCC container by running the following command:
helm upgrade ccc .
Import the SSL certificate into the truststore by executing the following command:
kubectl exec <pod-name> -- bash -c 'ldaps --truststore <CCC truststore password> --cccpass <CCC admin password> --alias <alias for certificate> --cert <certificate name> --copass <crypto officer password>'
In case your admin password contains one or more special characters, you need to add a backslash before every special character to ensure proper execution of the command.