
Collecting signals from a web page
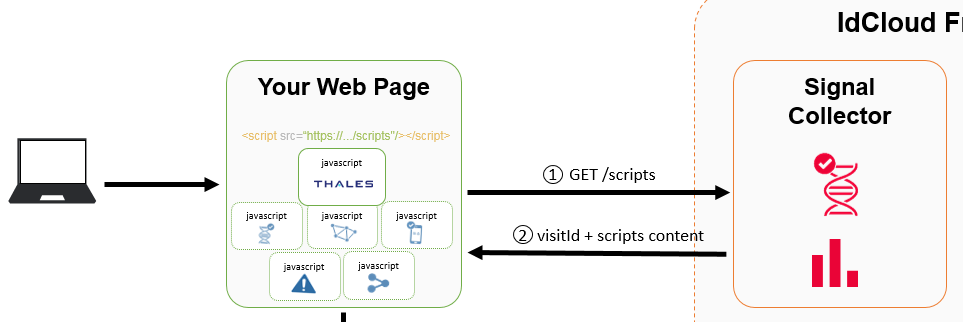
This section describes how to embed the OIP Risk Management signal collection scripts into your web application. In other words, it focuses on the exchanges shown as (1) and (2) in the following use case diagram.
OIP Risk Management, as well as the partners involved, have been tested on the last two major versions of Internet Explorer, Chrome, and Firefox.
Add signal collector to your website
The risk assessment in OIP Risk Management is based on the analysis of signals provided by the end user’s devices (browsers, handsets). The first integration step is to provide these signals to the OIP Risk Management’s signal collector for each page including a risk assessment.
Include the line below into your HTML page:
<script src="<%= signalCollectorUrl %>/api/v2/tenants/<%= tenantId %>/scripts"></script>
When the web page is loaded, the browser requests the signal collection scripts from the signal collector of OIP Risk Management.
The downloaded script includes the definition of a property called visitId. This is assigned by the OIP Risk Management back-end for this connection. The visitId is unique and identifies the signals collected during this visit to the page. The visitId will be used later on, to make calls to the OIP Risk Management back-end.
Caution
The collected signals request takes a few milliseconds to reach the OIP Risk Management back-end and to be processed. As a result, a minimal delay of a few milliseconds should be respected before calling the OIP Risk Management back-end for a policy evaluation.
See Script Integration method for details.
First View of a Use Case
The second integration step is to configure the use case and the view.
Include the line below into your HTML page:
   ...
   ifp_initUseCaseAndView(partnersConfigurations, callback);
   ...
See ifp_initUseCaseAndView method for details.
Visit identifier
In order to communicate with the OIP Risk Management back-end, you need to obtain a visitId value before using it in your code. This value is embedded in the signal collection scripts returned by OIP Risk Management. It is stored in a property called revisitid (Risk Engine Visit Id).
If you are using an HTML form to submit your data, simply include a hidden field with id="revisitid" in your form:
<input style=”display:none;” type="text" id="revisitid" name="revisitid"/>
The visitId will be automatically populated in this field, and it will come along with the other parameters in the form in your back-end.
If you are using an Ajax call to authenticate, you can just use revisitid as a global variable in the page, and add it in your Ajax call as a new parameter.
Finalize the view
Just before the user leaves a View or a page, the if_finalizeView method has to be called. This method sends the latest information about this page to the signal collector.
Include the line below into your HTML page:
   ...
   ifp_finalizeView(visitId, callback);
   ...
See ifp_finalizeView method for details.
Send request to back-end
At this point, a request will be sent to the OIP Risk Management back-end. Thales suggests handling this by just clicking the login button.
Cross-origin scripting
Please ensure you read about how to enable cross-origin scripting in the Preparing for cross-origin scripting section.
Examples of integration
See examples of integration for single page application website and multi page website
Next step