
iOS
You have to perform the following steps in sequential order to use the OIP Risk Management in the host application.
This quickstart contains the following sections:
- Step 1: Adding OIP Risk Management and TrustDefender dependencies to project
- Step 2: Adding permissions
- Step 3: Creating configuration objects
- Step 4: Certificate pinning
- Step 5: Initialising OIP Risk Management SDK
- Step 6: Starting prefetch signals
- Step 7: Requesting for prefetch status
- Step 8: Requesting and processing of visitID
- Step 9: Clearing transaction resources
- Step 10: Stopping prefetch signals
Step 1: Adding OIP Risk Management and TrustDefender dependencies to project
A set of files are stored in deliverable package folder for you to perform the following steps:
- Clone the github repository from https://github.com/gemalto/idcloud-fpp-tutorials-ios and name the project as
IFP Demo - Create a
Frameworksfolder inIFP Demo. - Copy the Debug version of
GAHRiskEngine.xcframeworkfrom the deliverable packageexternal/Debugto theFrameworks/GAHRiskEngine/Debugfolder.

- Copy the Release version of
GAHRiskEngine.xcframeworkfrom deliverable packageexternal/Releaseto theFrameworks/GAHRiskEngine/Releasefolder.

- Copy
TrustDefender.frameworkfrom deliverable package path3ptyto theFrameworks/TrustDefenderfolder.

- Open the
IFP Demo/ObjectiveC/01-ProjectSetup/01-ProjectSetup.xcodeproj. Drag the entire new Frameworks folder and drop it in the Xcode project.
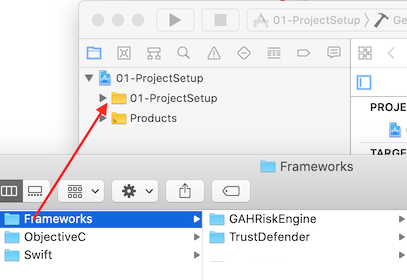
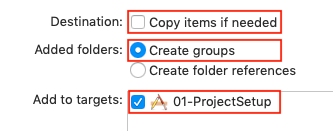
- From the pop-up window, clear the Copy items if needed box, select Create Groups and your application target.
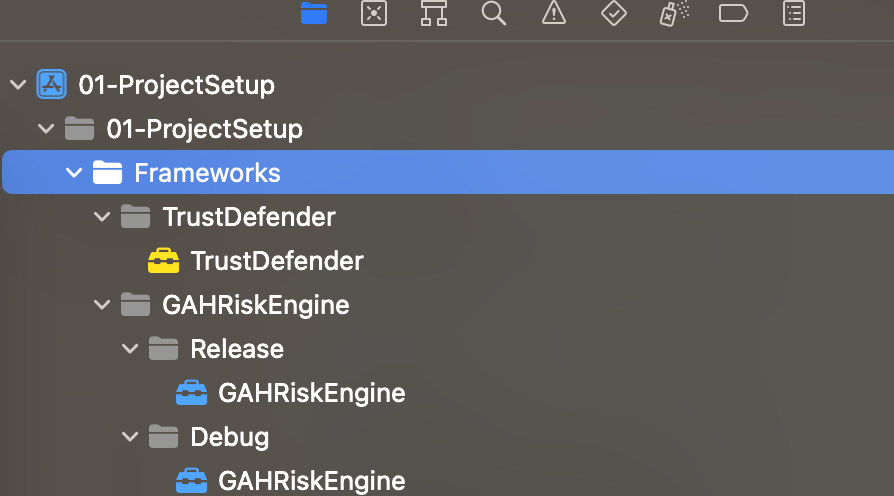
The final project structure will be as follows:
- In Build Settings > Search Paths > Framework Search Paths, update the framework search paths based on the build configuration from the respective folders of the frameworks so that the debug and release versions of the app will use the correct binaries.


//:configuration = Debug
FRAMEWORK_SEARCH_PATHS = $(inherited) "$(SRCROOT)/../../Frameworks/GAHRiskEngine/Debug/GAHRiskEngine.xcframework"
"$(SRCROOT)/../../Frameworks/TrustDefender/TrustDefender.framework"

//:configuration = Release
FRAMEWORK_SEARCH_PATHS = $(inherited) "$(SRCROOT)/../../Frameworks/GAHRiskEngine/Release/GAHRiskEngine.xcframework"
"$(SRCROOT)/../../Frameworks/TrustDefender/TrustDefender.framework"
-
Set
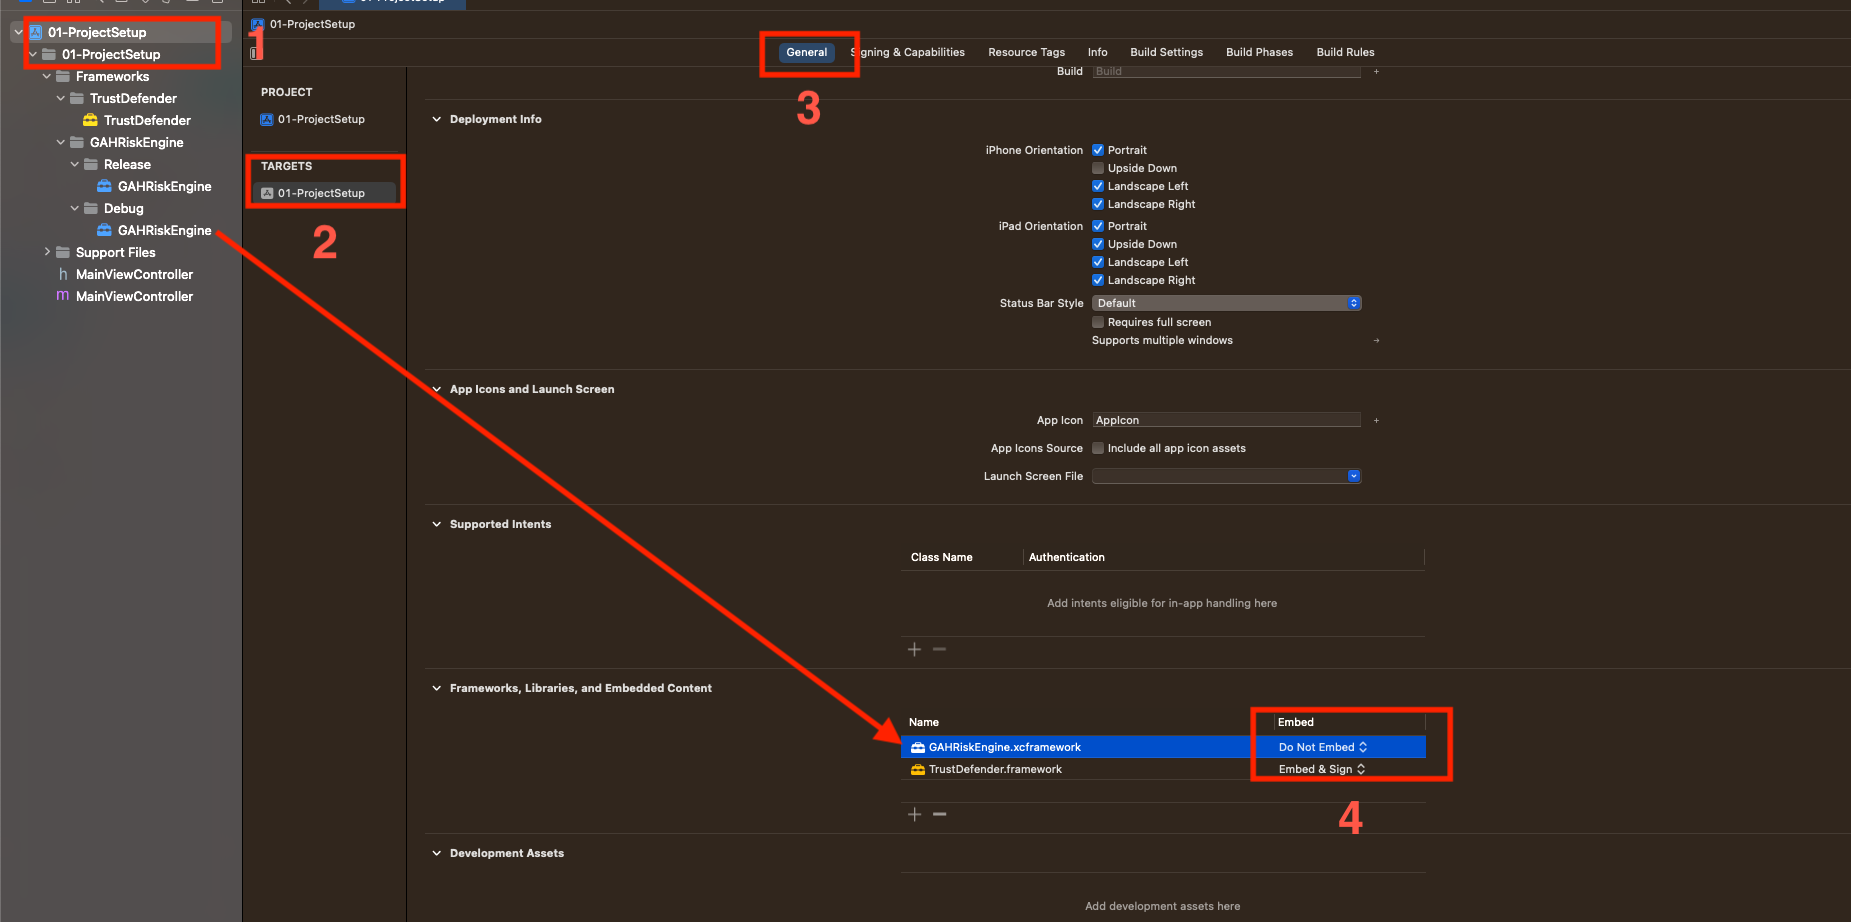
TrustDefender.frameworkas the embedded frameworks: -
In Xcode 10.4 and earlier, add TrustDefender framework to the General > Embedded Binaries tab.
- In Xcode 11, set TrustDefender framework from
Do not EmbedtoEmbed & Signin General > Frameworks, Libraries and Embedded Content.


-
Make sure
GAHRiskEngine.xcframeworkas theDo Not Embedframeworks: -
In Xcode 10.4 and earlier, add GAHRiskEngine xcframework to the General > Embedded Binaries tab.
- In Xcode 11, set GAHRiskEngine xcframework from
Do Not Embedin General > Frameworks, Libraries and Embedded Content.
- Remove unwanted architectures from TrustDefender framework:
-
TrustDefender.framework
By default,TrustDefender.frameworkembedded in the application contains all the architectures: -
For Device: arm64, armv7
- For Simulator: i386, x86
Since simulator architectures are not necessary when building device, these architectures can be removed.
- Load
Strip_Unused_Architectures.shto the Xcode project using the following steps:
a. Drag the Strip_Unused_Architectures.sh file from the deliverable package example/objc and drop it in the Xcode project.
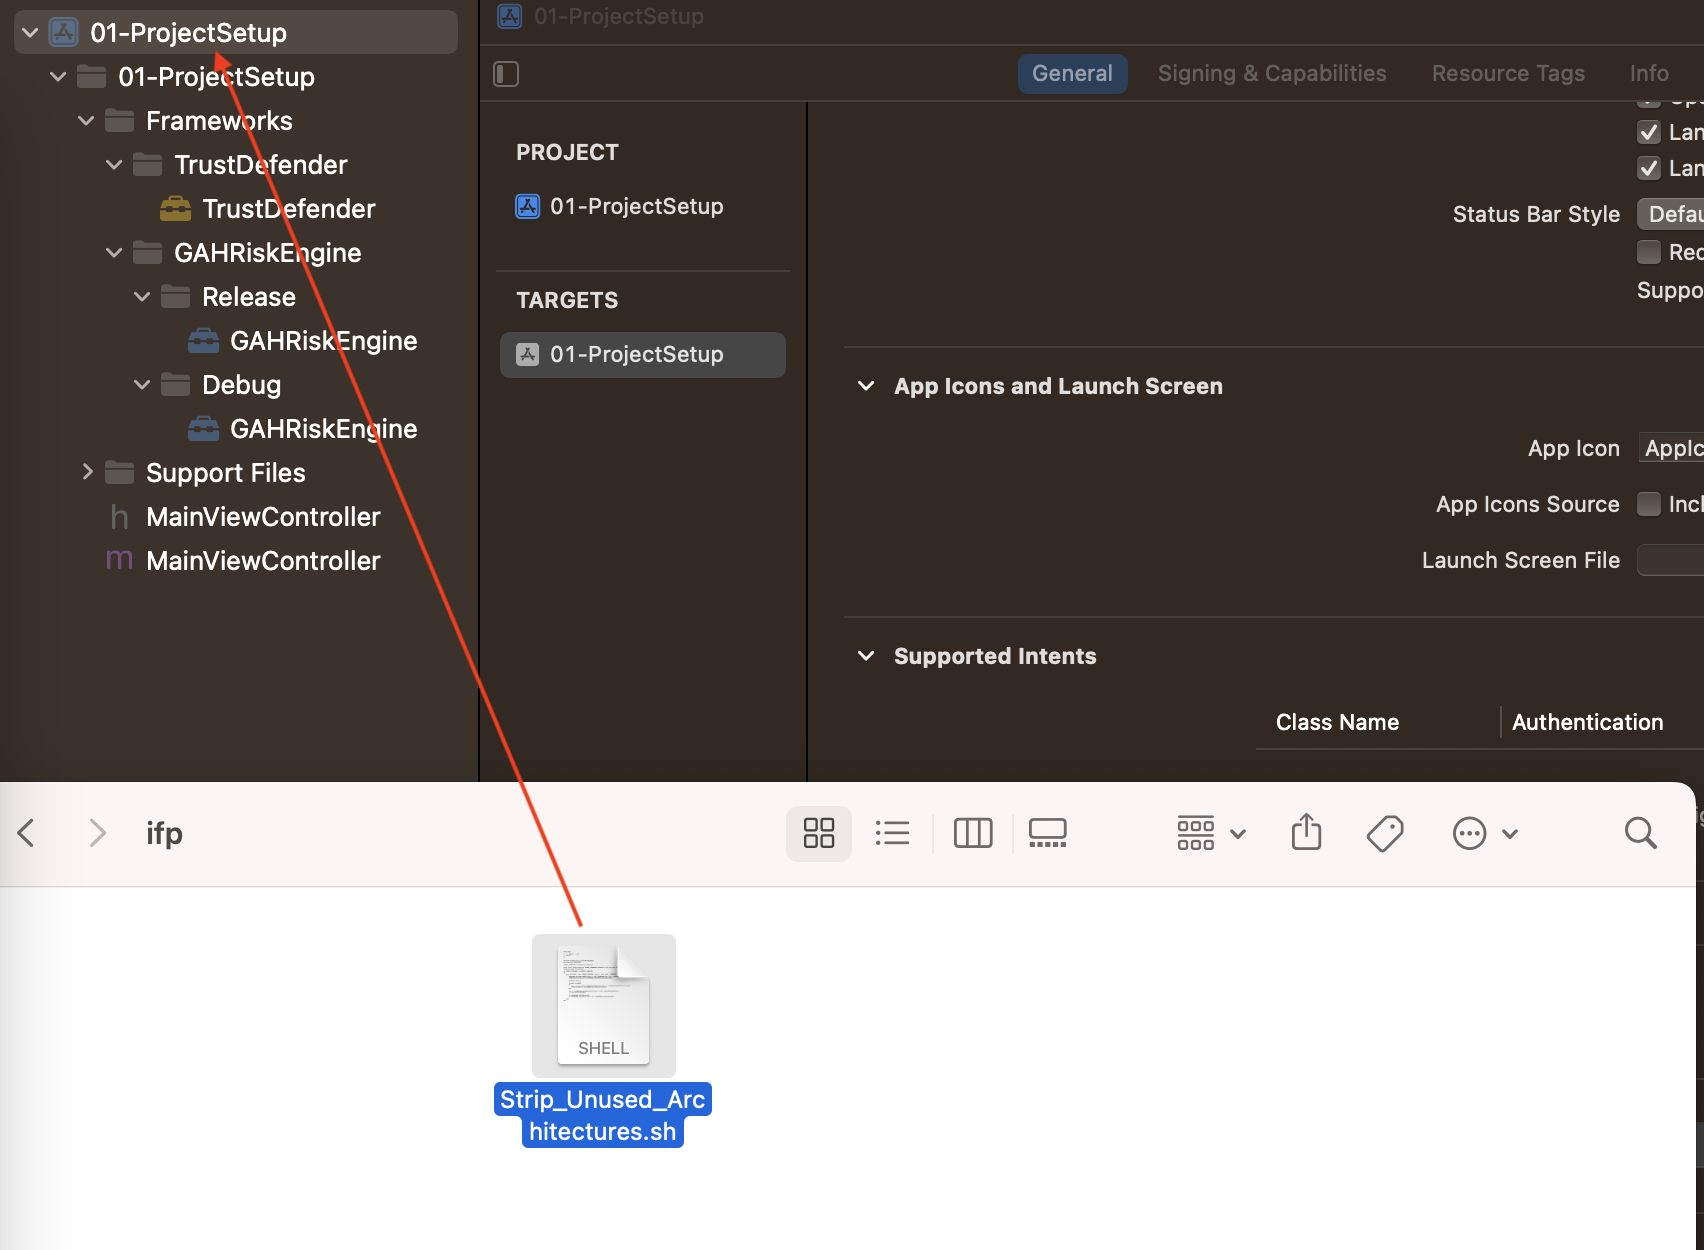
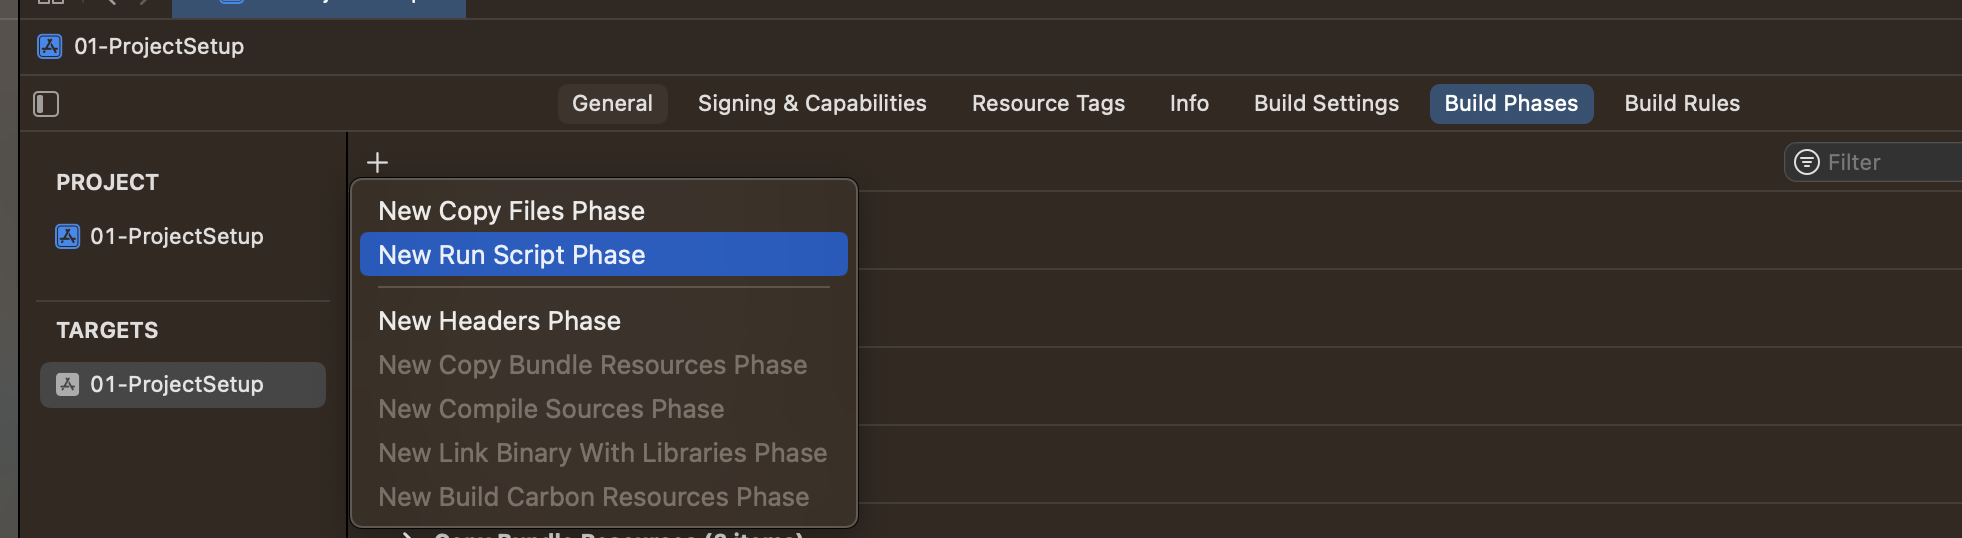
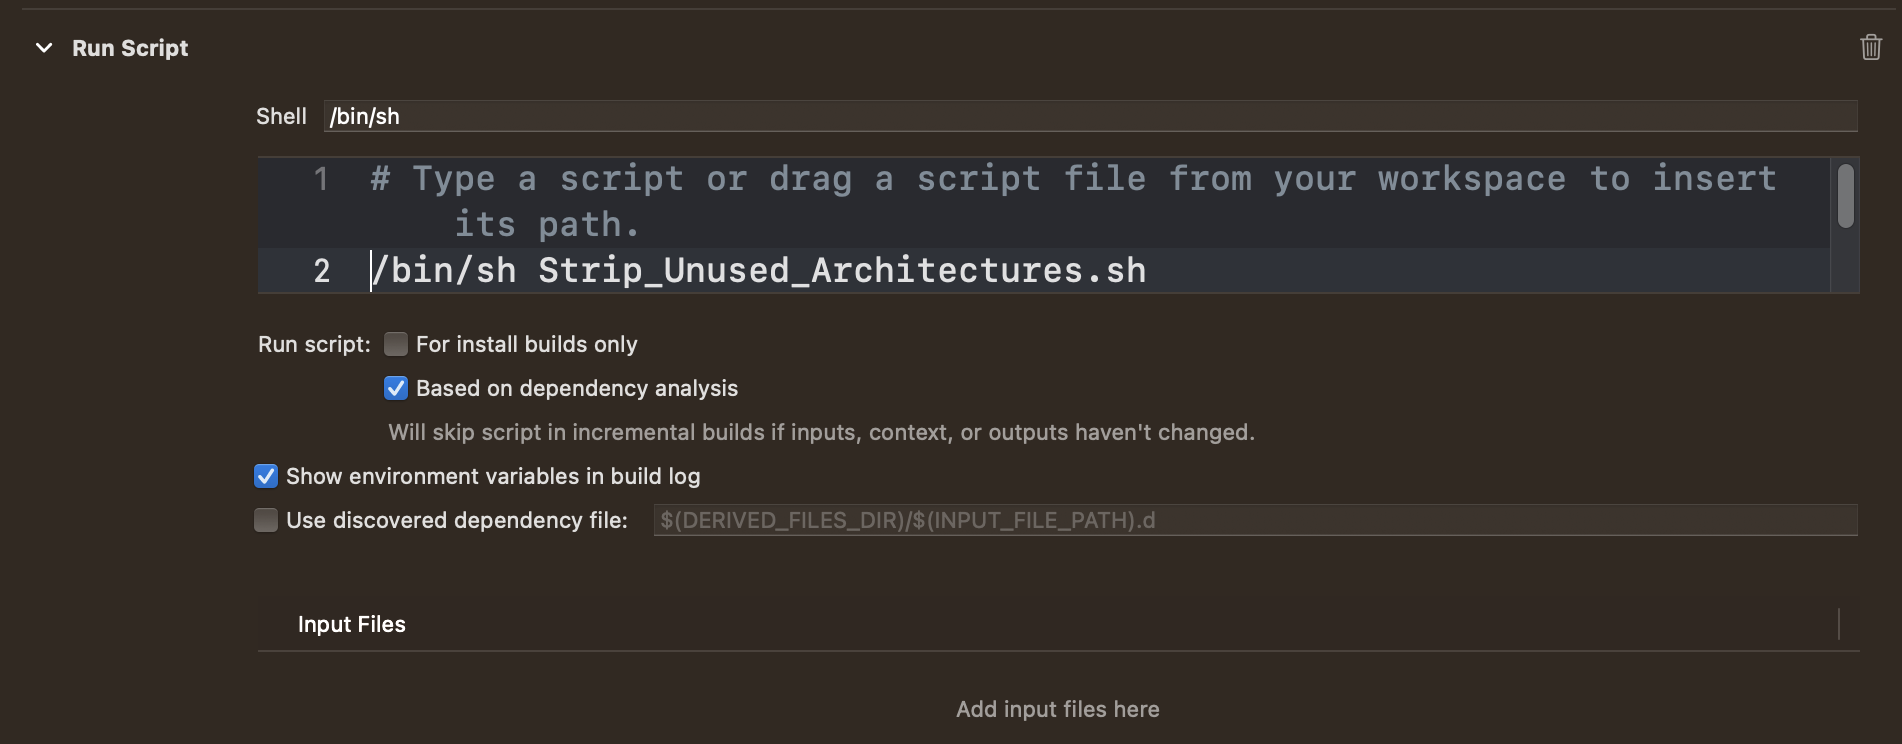
b. In the Build Phases tab, add a new New Run Script Phase and add this script to the console:
/bin/sh Strip_Unused_Architectures.sh
c. Before you can build and run the project, verify that the simulator architectures are removed and TrustDefender framework are in your final .app file in
{ProductName}.app/Frameworks/TrustDefender.framework/TrustDefender
Run the LIPO command via a terminal and observe the required architectures:
$ lipo -info {ProductName}.app/Frameworks/TrustDefender.framework/TrustDefender

Output:

Architectures in the fat file: {ProductName}.app/Frameworks/TrustDefender.framework/TrustDefender are: arm64
- Update the linker flags by adding the link flag from Build Settings > Other Linker Flags.
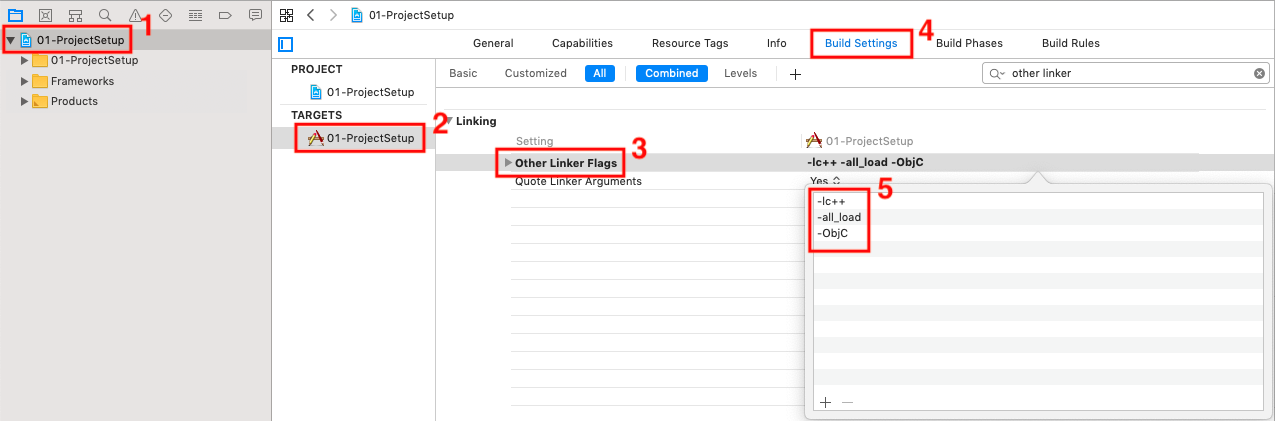
Where:
OTHER_LDFLAGS = -lc++ -all_load -ObjC
- Disable the bitcode. As OIP Risk Management does not support bitcode, a compilation error is generated when the application tries to use it.

Where:
ENABLE_BITCODE = NO
- Set the Strip Style to
Non-Global SymbolsorAll Symbolsso that all internal symbols or all symbols are removed to reduce symbol visibility. This is shown in the following figure:

Where:
STRIP_STYLE = all
- Set the valid architectures. As OIP Risk Management supports only arm64 architectures (Refer to OIP Risk Management variants), a compilation error is generated when the application is built for armv7 architecture.

Where:
VALID_ARCHS = arm64 arm64e
- Enable the access WiFi capability settings for application in Xcode to get the network information for a given network interface. If the device is using Wi-Fi, it requires the Access WiFi Information capability to get the WiFi information.

Note
This setting is only available for Xcode version 10 and later.
Step 2: Adding permissions
The following permissions in the project Info.plist file are required to allow OIP Risk Management to work properly:
To add the permissions:
-
Select
Info.plistfrom the application, and click Add, -
Select the required option from the list.
| Key | Description | iOS Version |
|---|---|---|
| NSLocationAlwaysUsageDescription | Specifies the reason for your app to access the user’s location information at all times. | 8.0+ |
| NSLocationWhenInUseUsageDescription | Specifies the reason for your app to access the user’s location information while your app is in use. | 8.0+ |
| NSLocationAlwaysAndWhenInUseUsageDescription | Specifies the reason for your app to access the user’s location information at all times and supports iOS 11 and later. | 11.0+ |
These permissions are required to collect all the signals.
Refer to OIP Risk Management Permissions for details on the permissions needed for different signals.
Note
See https://developer.apple.com/documentation/bundleresources/entitlements for the iOS guidelines on handling the required permissions in iOS version 9.0 and later.
The code snippet for displaying the location permission pop-up window is as follows:
Objective C: Code placeholder for permissions
/* This triggers the popup to give permission to access location while using the app
Location is one of the signal category which is collected and used for risk calcualation
*/
- (void)getUserAccessPermissionToUseLocationService{
    self.locationManager = [CLLocationManager new];
    [_locationManager setDelegate:self];
    [_locationManager requestWhenInUseAuthorization];
}
Swift: Code placeholder for permissions
/* This triggers the popup to give permission to access location
while using the app Location is one of the signal category which
is collected and used for risk calcualation
*/
func getUserAccessPermissionToUseLocationService() {
    self.locationManager = CLLocationManager.init()
    self.locationManager!.delegate = self
    self.locationManager!.requestWhenInUseAuthorization()
}
Note
To provide location services in the background, use the
locationManager requestAlwaysAuthorizationAPI.
Step 3: Creating configuration objects
There are different configuration objects to be configured for OIP Risk Management.
These two configuration objects are mandatory:
GAHCoreConfig: A mandatory configuration which is used to initialise the core components of OIP Risk Management.GAHGemaltoSignalConfig: A mandatory configuration which is used to initialise all parameters related to Thales signals.
The remaining configurations are optional and are used for proprietary signal groups:
GAHBSecConfig: Specific to the proprietary signal group BehavioSec. Use this configuration if you want to enable the BehavioSec group signal collection for the risk calculation.GAHTMXConfig: Specific to the proprietary signal group ThreatMetrix. Use this configuration if you want to enable the ThreatMetrix group signal collection for the risk calculation.
The following tables list the configurable parameters from the different configuration classes of OIP Risk Management.
GAHCoreConfig object
Table 1: Configurable Parameters of GAHCoreConfig
| Configurable Parameter | Description | Mandatory/Optional |
|---|---|---|
| Application (Applicable to Android only) | Application Instance | Mandatory |
| Context (Applicable to Android only) | Application context | Mandatory in deprecated API |
| URL | OIP Risk Management backend URL | Mandatory |
| HttpConnectionTimeout | HTTP connection timeout (seconds) for back-end communication. | Optional |
| SignalCollectionGlobalTimeout | Global timeout for the OIP Risk Management to collect all the signals. | Optional |
| SecureConnectionCertificates | Certificate for secure communication with OIP Risk Management back-end. | Optional |
| SecureConnectionPermits | Permission for secure communication with OIP Risk Management back-end. | Optional |
| SDKErrorListener | Listener to determine the action when hooking is detected. | Optional |
GAHGemaltoSignalConfig object
Table 2: Configurable Parameters of GAHGemaltoSignalConfig
| Configurable Parameter | Description | Mandatory/Optional |
|---|---|---|
| CustomData | Random byte array which is used as an extra factor for the computation of the device fingerprint. | Optional |
| LocationAllowedFreshTime | The time allowed to consider cached location signals in milliseconds. If the location value timestamp is within this time frame, the value will be used. Default is set to 900000 (15 mins). | Optional |
| LocationFetchTimeout | The time allowed to get the location in milliseconds. If the system does not return the location within this timeout, the location signals will be sent as “status not found”. Default value is set to 50 ms. | Optional |
| SignalFetchTimeout | The time allowed to get any signal in milliseconds. If the system does not return a signal within this timeout, the signal will be sent as status Timeout. Default value is set to 2000 ms. | Optional |
| LocationBackgroundCollectionTime | The time allowed to get location when the application is at the background in milliseconds. Default value is set to 30000 ms. | Optional |
| SignalPrefetchTime | The maximum time allowed to prefetch signals and cache the values in seconds. GAHPrefetchStatusCallback will be given to the application at the end of this timeout, with success/failure status of prefetch. Default value is set to 5 secs. | Optional |
| SignalCacheTime | The maximum time for which prefetched signals will be cached in seconds. Signal values older than this timeout will not be considered during risk calculation, OIP Risk Management SDK will collect a fresh value during very the next call to requestVisitId() after Signal cache timeout. Default value is set to 300 secs. | Optional |
| LocationAccuracy | Android only.In meters, Horizontal accuracy, radial with which location co-ordinates to be collected. Default value is set to 100 m. | Optional |
Note
Refer to your Thales representative on the following for your organisation: * ThreatMetrix: orgID
Caution
Without a Wi-Fi/data network, the SDK initialisation will not be successful and hence signals such as ThreatMetrix can never be collected until the initialisation is done again with the availability of the Internet.
ObjectiveC:
// Setup core config, set other optional params, if required
GAHCoreConfig *coreConfig = [GAHCoreConfig sharedConfigurationWithUrl:kRiskEngineURL];

// Gemalto Signal collection is mandatory.
GAHGemaltoSignalConfig *signalConfig = [GAHGemaltoSignalConfig sharedConfiguration];
Swift:
// Setup core config, set other optional params, if required
let coreConfig = GAHCoreConfig.sharedConfiguration(withUrl: riskEngineURL)!

// Gemalto Signal collection is mandatory.
let signalConfig = GAHGemaltoSignalConfig.sharedConfiguration()!
Step 4: Certificate pinning
This is used to check that the Risk Engine backend server’s certificate matches a known copy of that certificate at the application.
To use certificate pinning, the application sends the array of X509Certificate to OIP Risk Management’s GAHCoreConfig and sends the GAHCoreConfig object to initialize().
You can also configure the TLS connection settings. OIP Risk Management will take care of the default configurations if this is not set from the application.
Note
Ceritificate Pinning is mandatory for Release variant of SDK, it is optional for Debug.
It is not recommended to override the connection settings or attributes/parameters in a production environment. Allowing Self Signed and Host mismatch configurations will reduce the security of the communication link with the server. Insecure connections are not permitted in the Release mode.
ObjectiveC: Code placeholder for configuration
/* Set certificate array to GAH Core config */
GAHCoreConfig *reConfig = [GAHCoreConfig getsharedConfigManagerObject];
GAHTLSConfiguration *tlsConfiguration = [GAHTLSConfiguration new];

#ifdef DEBUG
[tlsConfiguration setHostnameMismatchAllowed:YES];
[tlsConfiguration setSelfSignedCertAllowed:YES];
[tlsConfiguration setInsecureConnectionAllowed:YES];
#else
[tlsConfiguration setSelfSignedCertAllowed:YES];
#endif


NSString *pathToCert = [[NSBundle mainBundle]pathForResource:@"Thales_eziocloud" ofType:@"cer"];
NSData *localValidCertificate = [NSData dataWithContentsOfFile:pathToCert];

[reConfig GRESTLSConfiguration:@[localValidCertificate] withRESDKTLSConfiguration:tlsConfiguration];
Swift: Code placeholder for configuration
/* Set certificate array to GAH Core config */

let reConfig:GAHCoreConfig = GAHCoreConfig.getsharedConfigManagerObject()
var tlsconfiguration:GAHTLSConfiguration = GAHTLSConfiguration.init()

#if DEBUG

tlsconfiguration.hostnameMismatchAllowed = true
tlsconfiguration.selfSignedCertAllowed = true
tlsconfiguration.insecureConnectionAllowed = true

#else

tlsconfiguration.selfSignedCertAllowed = true
#endif

let pathToCert = Bundle.main.path(forResource: "Thales_eziocloud", ofType: "cer")
let localValidCertificate = NSData.init(contentsOfFile: pathToCert!)

reConfig.grestlsConfiguration([localValidCertificate!] as [Any], withRESDKTLSConfiguration: tlsconfiguration)
Refer to App Transport Configuration for details on the ATS setup required for certificate pinning.
Step 5: Initialising OIP Risk Management SDK
Initialise the SDK by passing mandatory configurations GAHCoreConfig, GAHSignalConfig and optional configurations GAHTMXConfig and GAHBSecConfig. If GAHTMXConfig and GAHBSecConfig are not set, these signal groups will not be initiated, hence no signal collection under these will be made.
During the initialisation, OIP Risk Management SDK internally performs the initialisation and signal collection of proprietary SDKs such as ThreatMetrix. Once the corresponding initialisation/registration are successful, the proprietary SDK signals are collected and stored in the cache until SignalCacheTime (Configurable parameter in GAHGemaltoSignalConfig) so that these signals are readily available in the next events such as Login and Add beneficiary.
Note
- Initialisation and signal collection of proprietary groups are time-consuming. Signal collection completion can be verified using the
requestPrefetchStatusAPI explained in Step 6 of this codelab.- Initialisation of SDK is a one-time process for an app cycle.
- A
RuntimeExceptionis thrown if the mandatory configurations required forGAHCoreConfigandGAHGemaltoSignalConfigare not passed to theinitialize()method. If the optional configuration is not sent, the SDK assumes that the features are not needed by the application and subsequent use of the feature will cause exceptions/errors.
Objective C: Code placeholder for initialisation
// Pass configuration to core.
[GAHCore initialize:[NSSet setWithObjects:coreConfig, signalConfig, nil]];
Swift: Code placeholder for initialisation
// Pass configuration to core.
GAHCore.initialize([coreConfig, signalConfig])
Step 6: Starting prefetch signals
Prefetching signals means the collecting and storing of signal values in the cache for SignalCacheTime (configurable parameter in GAHGemaltoSignalConfig) so that collection time is reduced during the actual transaction action.
This method can either be called from the UI or non-UI thread. Signals which are time-consuming to collect are identified and prefetched.
Note
No API call to IdCloud Risk Management back-end is made during the execution of prefetching the signals.
Currently, prefetching collects and caches a few of the signals such as:
- Location signals: Sends a request to the operating system to get the latest location coordinates
- Browser signal (in iOS only): Sends a request to operating system to get the browser agent string
- ThreatMetrix signal: Sends a request to TMX SDK for a new sessionID.
It is recommended to call this method during the launch of a screen containing a transaction event such as Login and Add Beneficiary, so that signals are cached at an early stage before the actual transaction is made.
Caution
- If the signal values present in the cache are older than
SignalCacheTime, the signals will not be considered as part of the request to the OIP Risk Management back-end, instead they will be discarded and a request will be made to collect the new values.- The same signal collection and caching process is done for
ThreatMetrixsignal groups during OIP Risk Management initialisation. But if this needs to be done in some screen later after the initialisation, the Prefetch API can be called. Prefetching will first check if a valid signal is already present in the cache before actually collecting the signals.
Objective C: Code placeholder for prefetch
// Start Signal prefetch
[GAHCore startPrefetchSignals];
Swift: Code placeholder for prefetch
// Start Signal prefetch
GAHCore.startPrefetchSignals()
Step 7: Requesting for prefetch status
Ensure that the signals mentioned in step 5 (Location, Browser, ThreatMetrix) are collected and cached before requesting visitID from OIP Risk Management.
This can be ensured by requesting for a status callback using the requestPrefetchStatus() method. Callback will be invoked at the end of SignalPrefetchTime (Configurable in GAHGemaltoSignalConfig class). Error status will be received from the callback if all signals are not collected and cached within SignalPrefetchTime.
Note
It is not recommended for the application to perform any transaction such as login, fund transfer before signal collection is completed and statusCode is returned as GAHErrorCodes:
.PREFETCH_STATUS_OK.
OIP Risk Management has an internal default timeout of 5 seconds (configurable).
- If all signals are collected then the status is set as
GAHErrorCodes.PREFETCH_STATUS_OK - If any of the signals could not be collected then status would be
GAHErrorCodes.PREFETCH_STATUS_PARTIAL_OK - If no signal was collected then status is set as
GAHErrorCodes.PREFETCH_STATUS_FAILURE
Failure and partial_ok status can occur due to various reasons such as:
- Network latency
- Runtime permission is not granted.
- GPS feature is not enabled.
Ensure that all the integration steps are followed and the device is connected to the internet with feasible speed to avoid the erroneous condition.
Note
This method will wait for
SignalPrefetchTime(Configurable inGAHGemaltoSignalConfig) to get any signals before invoking the callback, in case the signals are not ready and present in the cache.
Objective C: Code placeholder for prefetch status
// Listen to prefetch status
[GAHCore requestPrefetchStatus:^(NSInteger statusCode, NSString *statusMessage) {
    [self processPrefetchStatusResponse:statusCode statusMessage:statusMessage];
}];
Swift: Code placeholder for prefetch status
// Listen to prefetch status
GAHCore.requestPrefetchStatus { (statusCode: Int, statusMessage: String?) in
    self.processPrefetchStatusResponse(statusCode, statusMessage)
}
Step 8: Requesting and processing of visitID
The application requests OIP Risk Management SDK for the visitID, this visitID can be forwarded by the application/bank back-end to the OIP Risk Management back-end to receive the “decision” based on the risk calculated from various signals that are collected by OIP Risk Management SDK.
Internally, this method fetches all the requested signal values as configured during initialisation, then sends the signal JSON to the OIP Risk Management back-end and gets the visitID corresponding to the set of signals present in the JSON request.
The signals mentioned in Step 5 will be taken from the cache and all other signals will be collected freshly every time the requestVisitID() call is made.
If the cached signal timestamp is older than SignalCacheTime, the signals cache will be discarded and a request will be made to collect the new values.
As a new request to collect the signal to be cached is time-consuming, it is recommended to call the Prefetch function to ensure that signals are cached before making the call to requestVisitID().
To get the visitID, the application has to call the requestVisitID method. This method internally runs on a separate worker thread.
The GAHResponseCallback interface is used to get the result from OIP Risk Management.
- If OIP Risk Management successfully fetches the
visitID, the application gets the callback insuccessmethod withvisitID. - If OIP Risk Management fails to get the
visitID, it returns the error code and error message in theerrorcallback method.
The requestVisitID method is called to decide the “next step” of every event such as:
- Login
- Add beneficiary
- Fund transfer
Objective C: Code placeholder for Request Visit Id
// Make sure that we have all signals prefetched.
if (statusCode == PREFETCH_STATUS_OK) {
    // With all signals in place. Request Visit ID.
    [GAHCore requestVisitID:^(NSString *visitID) {
        [self processVisitIDResponse:YES value:visitID];
    } failure:^(NSInteger errorCode, NSString *errorMessage) {
        [self processVisitIDResponse:NO value:errorMessage];
    }];
}
Swift: Code placeholder for Request Visit Id
// Make sure that we have all signals prefetched.
if (statusCode == PREFETCH_STATUS_OK) {
    // With all signals in place. Request Visit ID.
    GAHCore.requestVisitID({ (visitId: String?) in
        self.processVisitIDResponse(true, visitId)
    }) { (errorCode: Int, errorMessage: String?) in
        self.processVisitIDResponse(false, errorMessage)
    }
}
Step 9: Clearing transaction resources
This method is called after every transaction to clear the transaction resources used in OIP Risk Management.
A transaction may be an action in the application such as Login, Add Beneficiary and Fund transfer.
Note
If BehavioSec signal group is initialised, this method must be called from UI thread as this will clear some of the information pertaining to UI elements.
Objective C: Code placeholder for Clear Transaction Resources
//Clear transaction resources
[GAHCore clearTransactionResources];
Swift: Code placeholder for Clear Transaction Resources
//Clear transaction resources
GAHCore.clearTransactionResources()
Step 10: Stopping prefetch signals
Stopping the prefetching signals will result in the termination of background process of storing values in the cache.
This method can either be called from UI (main) or non-UI (background) thread.
Note
It is recommended to call this method during a transaction screen exit where
startPrefetchSignals()is called previously.
Objective C: Code Placeholder - Stop Prefetch
//Stop signal Prefetch
[GAHCore stopPrefetchSignals];
Swift: Code Placeholder - Stop Prefetch
//Stop signal Prefetch
GAHCore.stopPrefetchSignals()
Next