Importing and Exporting Keys
The process of exporting and importing keys ensures that keys, certificate objects, and other PKCS#11 objects can be recovered after a failure or tamper event. Keys can be exported to files on the host system or to smart cards. When exporting to smart cards, you may export keys to a single card (single-custodian) or split the key over multiple cards (multiple-custodian). All PKCS#11 attributes, including security attributes, and the key/object's value are backed up.
It is not possible to back up the security officer and user PINs for a token. Before a restore/import operation, the destination token must be already initialized and the SO and user PINs set. A number of additional keys are generated, used, and then deleted during the backup process.
Exporting Keys
This function allows keys to be encrypted and written to smart cards, files, or the screen. The keys can then be transferred to other machines. See Secure Key Backup and Restoration for background information on backup and recovery methods, key splitting schemes and key attributes.
Preparation
Before attempting a key backup, please ensure that you have:
>a valid key that can be backed up
>a smart card reader connected (if backing up to smart cards)
>sufficient initialized and erased smart cards or disk space to back up the required data
>created a wrapping key (if wrapping keys to be backed up). See Creating Keys for instructions.
To export a key (or set of keys)
1.On the Key Management Utility main interface (see Key Management Utility Main Interface), select the token containing the key(s) to be exported from the Select a token box, and log on to the token.
The Objects on Selected Token list displays the available keys on the token.
2.Select one or more keys to export from the Objects on Selected Token list.
3.Right-click on the selected key(s) or select Options> Export.
Alternatively, click on the Export Key button on the toolbar.

The Export Keys dialog box displays. Details of selections appear in the Selected Token and Selected Key(s) fields.
NOTE Wrapping keys must be created before the next step. See Creating Keys for instructions.
4.From the Wrapping Key drop-down list, select an appropriate wrapping key based on your choice of backup and recovery method. See the table below for further assistance.
| To use the: | Select: |
|---|---|
| Multiple custodians method | <Random key> |
| Single custodian method | The desired wrapping key. This key is used to encrypt the key (or set of keys) to be exported |
5.In the Options area, make further selections as appropriate for the backup and recovery method and destination backup media to be used.
When using the multiple custodians backup and recovery method, only Write to smart card(s) and associated options may be selected.
Continue with the following steps for the destination backup media required.
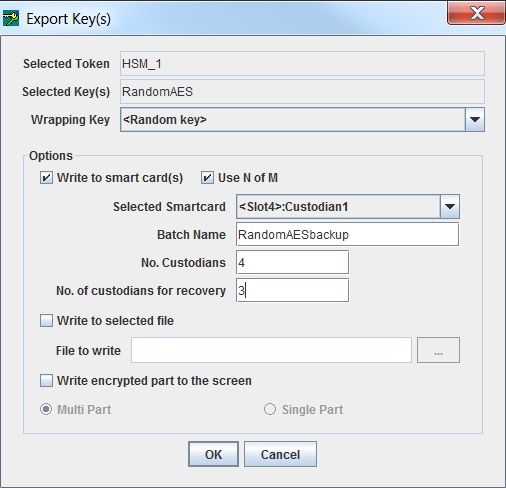
To export the selected key(s) to smart cards
1.In the Options area, select Write to smart card(s).
2.Enter an identifying name for the smart card set in the Batch Name field.
The batch name cannot be the same as the token label if the N of M key splitting scheme is to be used (see below).
3.If the multiple custodians backup and recovery method is to be used (<Random key> selected from the wrapping key drop-down list) enter the number of custodians required.
4.When using the multiple custodians backup and recovery method you may also elect to use the N of M key splitting scheme so that only N out of M custodians are needed to recover the key.
For example, if M = 3 and N = 2, only two out of the three custodians need to present their smart cards to recover the key. To use the N of M scheme select the Use N of M checkbox and enter the minimum number of custodians required to recover the key (N) in the No. of custodians for recovery field. This field only displays after Use N of M has been selected. Note that N may not equal M.
5.Click OK to begin the export operation or Cancel to abort it.
After clicking OK a dialog box displays and shows the Batch Name, a User Name entry field and a Smart card PIN entry field for a custodian (see Importing and Exporting Keys).
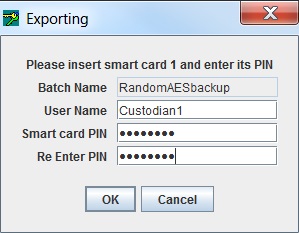
6.Insert a smart card in the smart card reader.
7.Any user name may be entered. The PIN entered can be that already established for the inserted smart card or a new one may be entered. The PIN must be entered again in the Re-Enter PIN field as an accuracy check. Click OK.
8.If a new PIN was entered, a prompt for the old PIN displays. Enter the old PIN to complete the change.
If an incorrect smart card PIN is entered, a prompt will display to enable re-entry. When logging in to a smart card, the card is locked after 7 consecutive incorrect PIN attempts. You must re-initialize the card to set a new PIN.
Data is now written to the smart card. If additional key shares are to be written to smart cards then a prompt for the next smart card displays.
9.Remove the smart card from the smart card reader and repeat steps 5-9 until all the key shares required have been written to smart cards.
When the operation is complete, an Export Successful message box displays.
10.Click OK to return to the main Key Management Utility interface.
To export the selected key(s) to a file
Available for the wrapping key backup and recovery method only.
1.In the Options area, select Write to selected file.
2.Enter the path and filename of the file to be created in the File to write field. If a file with the same filename already exists at this location then it will be overwritten. Alternatively, browse to a location and enter a filename by clicking on the “…” button next to the File to write field.
3.Click OK to begin the export operation or Cancel to abort it.
To export the selected key(s) to the console
Available for the wrapping-key backup and recovery method only.
1.In the Options area, select Write encrypted parts to the screen.
2.Select single or multi-part export.
3.Click OK to begin the export operation or Cancel to abort it.
Importing Keys
Importing allows keys, stored on smart cards, in files or as encrypted parts that were exported to the screen, to be restored to a token. See the section Secure Key Backup and Restoration for background information on backup and recovery methods, key splitting schemes and key attributes.
To import a key (or set of keys)
1.From the Token Selection drop-down box select the token that is to receive the imported keys and click the Import Keys button on the toolbar. Alternatively, select Options>Import from the menu bar.
The Import Key(s) dialog displays.
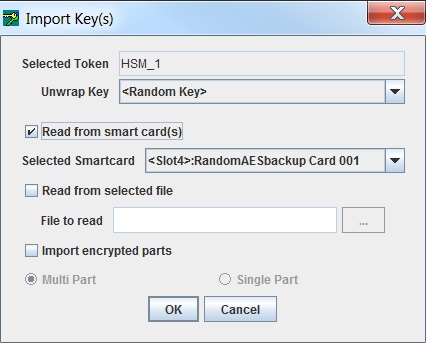
2.In the Options area, choose either Read from smart card(s), Read from selected file, or Import encrypted parts, depending on the media that was used to store the key(s).
When choosing to read from smart card(s)
1.Select the backup and recovery method that was used to back up the key(s), either the multiple custodians or the single custodian method, by making the appropriate selection from the Unwrap Key drop-down list.
| If the backup method was: | Select: |
|---|---|
| Multiple custodians | <Random key> |
| Single custodian | the particular wrapping key that was used to create the backup |
2.In the Options area, select Read from smart card(s).
3.Insert the smart card in the smart card reader.
4.Select the smart card from the Selected Smartcard drop-down list. Click OK to start the import operation, or Cancel to abort.
5.The following dialog box, displaying the current card number and batch name, prompts for the smart card PIN.

Enter the PIN for the smart card and click OK.
If an incorrect smart card PIN is entered, a prompt will display to enable re-entry. When logging in to a smart card, the card is locked after 7 consecutive incorrect PIN attempts. You must re-initialize the card to set a new PIN.
If a smart card is from a different batch is inserted or if the card has already been read it will be rejected. A prompt will display to insert another card.
Data is now retrieved from the smart card. If additional key shares are required to recover the key(s) then a prompt for the next smart card displays.
6.Remove the smart card from the smart card reader and insert the next one. Repeat the previous step until all the key shares required have been retrieved from smart cards.
When the operation has completed, the message Import Successful message is displayed. The newly imported key(s) also display in the Objects on Selected Token table in the main Key Management Utility interface.
7.Click OK to return to the main Key Management Utility interface.
When choosing to read from a selected file
1.From the Unwrap Key drop-down list, select the wrapping key that was used to create the backup.
If a wrong wrapping key is selected the error message, Key used to import was not the same as the key used to export, will display.
2.Select Read from selected file.
3.Enter the filename for the encrypted key file into the File to Read field. The “…” button can be used to find and select the file.
4.Click OK to import the selected key, or Cancel to abort this operation.
If the import key operation is a success, the message Import command succeeded is displayed. The newly imported key also displays in the Objects on Selected Token table in the main Key Management Utility interface.
When choosing to import encrypted parts
1.From the Unwrap Key drop-down list, select the wrapping key that was used to create the backup.
If a wrong wrapping key is selected, the error message Key used to import was not the same as the key used to export will display.
2.Select Import encrypted parts.
3.Select either Multi Part or Single Part as applicable and click OK to continue.
4.Enter the encrypted key (or key parts) and click OK to import the key.
If the import key operation is a success, the message Import command succeeded is displayed. The newly imported key also displays in the Objects on Selected Token table in the main Key Management Utility interface.