Administration Utility
The administration utility (gmadmin) is designed exclusively for use by the ProtectToolkit-M device administrator, and allows the following operations:
>Initialization of HSMs
>Synchronization of HSM clock with the system clock
>Setting of the adapter transport mode
>Setting security flags
>Changing of the ProtectToolkit-M device administrator password
>Upgrade of the HSM firmware
>Allocation of keyset space
>De-allocation of keyset space
>Creation of keysets
>Deletion of keysets
>Viewing the HSM event log
>Purging the HSM event log
>Tampering the HSM
This section is intended as a reference for gmadmin and outlines the following topics:
>Starting and Exiting the Administration Utility
When performing administrative tasks, the reader is strongly advised to refer to Administrative Tasks for details regarding each task.
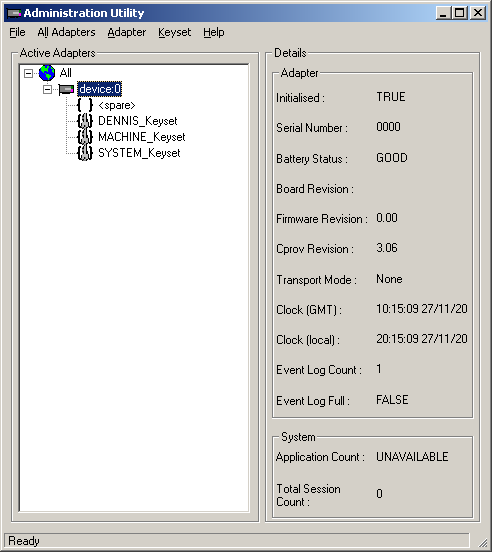
Figure 1: Administration Utility User Interface
Starting and Exiting the Administration Utility
To start the administration utility
Select Start > Programs > SafeNet > ProtectToolkit M > gmadmin. After an initial splash screen, the main user interface is shown.
To exit the utility
Select Exit from the File menu.
User Interface
The administration utility is presented as a Graphical User Interface (GUI), which is divided into three main areas. These are:
>The Menu Bar - shown along the top of the utility. All available utility commands can be activated via these menus.
>The Active Adapters display pane - shows all hardware HSMs found on the host system and their associated keysets. These are represented as a hierarchical tree view, with HSMs being the highest member and keysets or keyset spaces shown beneath each HSM.
>The Details pane - broken up into two sub-groups and displays the following information.
| Adapter Details | |
|---|---|
| Initialized | Shows whether the currently selected HSM has been initialized. Values are either TRUE or FALSE. |
| Serial Number | The serial number of the selected HSM. |
| Battery Status | Indicates the charge of the onboard battery of the selected HSM. This may either be GOOD or LOW. If this indicates LOW, the selected HSM may not be able to retain stored key information in the event of a system power failure. The HSM should be returned to your nearest Thales service centre for battery/HSM replacement. See Support Contacts. |
| Board Revision | Shows the hardware revision of the currently selected HSM. |
| Firmware Revision | Shows the firmware revision of the currently selected HSM. |
| Cprov Revision | Shows the revision of ProtectToolkit-C found on the currently selected HSM. This is a software component which forms part of the HSM firmware. This value may need to be quoted when contacting Thales support. |
| Transport Mode | Shows the transport mode which is set for the currently selected HSM. This value will be either “None”, “Single”, or “Continuous”. Refer below for details. |
| Clock (GMT) | Shows date and time (GMT) on the currently selected HSM. |
| Clock (local) | Shows the local date and time on the currently selected HSM. |
| Event Log Count | Gives a total for the number of event log entries on the currently selected HSM. |
| Event Log Full | Shows if the event log is full and needs purging. This value may be either “FALSE”, indicating that there is available space in the log, or “TRUE”, indicating that the log is full. |
| System Details | |
|---|---|
| Application Count | Shows the number of applications which are currently accessing the ProtectToolkit-M system. This value may show as “UNAVAILABLE” which denotes that the firmware on the selected HSM does not support application counting. |
| Total Session Count | Shows the number of open sessions to the ProtectToolkit-M system. |
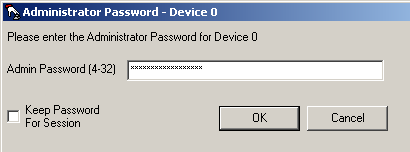
Password Entry Dialog Boxes
Most actions performed within the administration utility will require entry of the device administrator password. The device administrator password is case-sensitive and may consist of any alphanumeric characters, between 4 and 32 characters in length.
Figure 2: Device administrator password entry dialog box
Keep Password Feature
The utility can remember the device administrator password for the duration of the session. This eliminates the need to repeatedly enter the password for multiple operations.
To enable this feature, check the box next to Keep Password For Session when entering the device administrator password.
CAUTION! When this feature is enabled, take care not to leave the administration utility unattended. To ensure that unauthorized people do not obtain management access to HSMs, close the administration utility once you have finished with your task.
Keyboard Shortcuts
All available menu items may be activated via keyboard shortcuts. The menu bar can be selected by pressing the [Alt] key. Commands may then be selected by pressing the first unique letter of the required command. For example: [Alt] followed by [A] will open the Adapter menu.
There are also a number of key combination shortcuts which will immediately activate a command:
>CTRL+I = Initialize HSM
>CTRL+A = Allocate Keyset Space
>CTRL+V = View Event Log
>CTRL+P = Change Admin Password
>CTRL+U = Upgrade Firmware
>CTRL+T = Tamper HSM
>CTRL+D = De-allocate Space
>CTRL+K = Create Keyset
Context Menus
Right-clicking on an item in the Active Adapters display pane will bring up a context menu showing available commands specific to that item.
For details about these commands, please refer to the section appropriate to the menu in question.
All Adapters Menu
The All Adapters menu is only available if there is more than one HSM installed on the system. This menu allows the device administrator to affect all installed HSMs with a single command. The following actions can be performed via this menu:
Initialize Adapters
This option initializes all uninitialized HSMs found on the system. Only initialized HSMs can store key information.
Synchronize Clocks
This option synchronizes all HSMs found on the system with the value of the host system clock.
Set Transport Modes
This option sets the adapter transport mode for all adapters found on the system. The adapter transport mode allows an HSM to be removed from the host system's PCIe bus without causing a tamper condition. A tamper will remove all sensitive material from the adapter, including the adapter configuration, keys, and certificates.
The device administrator is prompted to choose one of three possible transport modes:
>None - To be applied when adapter is installed and configured. This mode will tamper the adapter if removed from the PCIe bus.
>Single - Adapter will not be tampered after its next removal from the PCIe bus. Adapter will automatically change transport mode to None the next time the adapter is reset or power is removed and restored.
>Continuous - Adapter will not be tampered by being removed from the PCIe bus.
Set Security Flags
This option allows the setting of a security mode using security flags. These flags affect both the services available to the various users of the system, as well as specific security features of the HSM. The flags may be specified individually to set a custom security mode, but a standard security mode is recommended. When a standard security mode is selected, the flags are assigned values automatically to meet the requirements for that mode. For further information see Initial Configuration: Mandatory Steps, Security Mode Descriptions, and Security Mode Flag Descriptions.
Set Secure Configuration
This option allows secure configuration items to be set.
A secure configuration item is one that is open for reading but requires authentication for writing. Such configuration items are stored on the HSM, protected by the password of the device administrator.
A single item is currently supported - Allow Clear Export of Private Keys. See Enabling Private Key Clear Export .
Set Admin Passwords
This option changes the current device administrator password for all HSMs on the host system.
Upgrade Firmware
This option performs a firmware upgrade for all HSMs on the host system. The device administrator is prompted to enter the path to the firmware update file.
Tamper All Adapters
This option causes a tamper of all HSMs found on the system. A tamper formats the secure memory of the HSM and thereby erases all configuration and key data.
Adapter Menu
The Adapters menu is used to perform the following administrative actions on a selected HSM:
Initialize
This option initializes the selected HSM. Only initialized HSMs can store key information.
Allocate Space
This option allocates one keyset space on the selected HSM. Keyset space is required to create user keysets.
View Event Log
This option opens the event log viewer. The dialog shows event log entries in chronological order, with the most current event showing last. The first, prev, next and last buttons can be used to navigate through the event details, should there be more than one page of entries.
If the event log is full, it can be purged by clicking the Purge button.
NOTE The Purge button is disabled until the event log is full.
Purge Event Log
This option purges the event log.
NOTE This menu option is disabled until the event log is full.
Synchronize Clock
This menu option synchronizes the clock of the selected HSM with the host system clock.
Set Transport Mode
This menu option is used to set the adapter transport mode for the selected adapter. The adapter transport mode allows an HSM to be removed from the host system's PCIe bus without causing a tamper condition. A tamper will remove all sensitive material from the adapter, including the adapter configuration, keys, and certificates.
The device administrator is prompted to choose one of three possible transport modes:
>None - To be applied when adapter is installed and configured. This mode will tamper the adapter if removed from the PCIe bus.
>Single - Adapter will not be tampered after its next removal from the PCIe bus. Adapter will automatically change transport mode to None the next time the adapter is reset or power is removed and restored.
>Continuous - Adapter will not be tampered by being removed from the PCIe bus.
Change Admin Password
This option changes the device administrator password for the currently selected HSM.
Upgrade Firmware
This option performs a firmware upgrade for the selected HSM. The device administrator is prompted to enter the path to the firmware update file.
Check Firmware Upgrade File
This option is used to check the validity of a firmware upgrade file. The device administrator is prompted to enter the path to the firmware update file.
Tamper
This option causes a tamper of the selected HSM. A tamper formats the secure memory of the HSM, erasing all configuration and key data.
Set Security Flags
This option allows the setting of a security mode using security flags. These flags affect both the services available to the various users of the system, as well as specific security features of the HSM. The flags may be specified individually to set a custom security mode, but a standard security mode is recommended. When a standard security mode is selected, the flags are assigned values automatically to meet the requirements for that mode. For further information see Initial Configuration: Mandatory Steps, Security Mode Descriptions, and Security Mode Flag Descriptions.
Set Secure configuration
This menu option allows the setting of security configuration items.
A secure configuration item is one that is open for reading but requires authentication for writing. Such configuration items are stored on the HSM, protected by the password of the device administrator.
A single item is currently supported - Allow Clear Export of Private Keys. See Enabling Private Key Clear Export.
Keyset Menu
The Keyset menu is used to perform the following administrative actions on a selected keyset:
Delete
This option will delete the currently selected keyset.
Create Keyset
This option creates a keyset within the currently selected keyset space.
Deallocate
This option removes the selected spare keyset space.