Initial Configuration: Mandatory Steps
Initializing the HSM
SafeNet ProtectToolkit-M uses a hardware encryption HSM to store sensitive key information. The HSM needs to be initialized prior to use, or following a tamper event. A tamper event occurs, for example, if the HSM detects that someone is trying to get inside the cover. It will then automatically erase its secure memory.
HSM management tasks can only be performed by a device administrator. During HSM initialization, the device administrator password is set, and the HSM clock is synchronized with the host.
To initialize the HSM
1.Open the Administration Utility by selecting Start > Programs > SafeNet > ProtectToolkit M > gmadmin. A prompt displays to set the new device administrator password.
2.Enter the password in both the Admin Password and Confirmation fields and, if required, check “Keep Password For Session”. For added security, leave the “Keep Password For Session” box unchecked. Password entry will then be required to complete every task. For convenience, check this box so that password entry will not be required again until after the utility is closed and reopened.
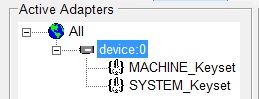
3.Click OK. The MACHINE and SYSTEM keysets are now created. The Administration Utility dialog box displays showing MACHINE and SYSTEM keyset icons under Active Adapters as shown below.
Setting Security Modes and Security Flags
The security mode for the HSM is chosen by specifying the value of a number of security flags. These flags affect both the services available to the various users of the system as well as specific security features of the HSM. These flags may be specified individually to set a custom security mode, however it is recommended that a standard security mode be used. When a standard security mode is selected the flags are assigned values automatically to meet the requirements for that mode.
NOTE The security mode should be set prior to commencing normal operation. It is recommended that the impact of any proposed security mode change be carefully assessed to be applicable prior to implementation.
To set a security mode
1.If it is not already open, launch the Administration Utility from the Start menu by selecting Start > Programs > Safenet > ProtectToolkit M > gmadmin.
2.From the Adapters menu, select Set Security Flags. The Set Security Flags – Device dialog box displays.

3.Either:
a.change flag values to those required (see Security Mode Flag Descriptions) in the Security Mode Flags group box
b.click a security mode button in the Security Modes group box to set a standard security mode. See Security Mode Descriptions.
4.Click OK and enter the administration password if prompted. A confirmation message is displayed.
5.Click OK to return to the Administration Utility dialog box.