Private Key Archiving and Recovery
When requesting a certificate using the Windows CA, users have the option to have their private key archived by the CA. In a catastrophic system failure that results in the user losing their entire system, this feature allows recovery of the user’s private key.
Support for this archival and recovery process is included in SafeNet ProtectToolkit-M. The following examples demonstrate the use of this capability.
Private Key Archiving Example
Here are the tasks required to archive a private key using a Microsoft certification authority (CA).
>Create a key recovery agent account
>Acquire the key recovery agent certificate
>Configure the certification authority to allow key recovery
>Create a new certificate template that allows key archiving
>Acquire a user certificate that has an archived key
Prerequisites
Before doing these tasks:
>You must have a Windows Server domain controller.
>The Windows Server domain controller must also be configured as an enterprise root or subordinate CA.
>A user keyset for the user must exist. Refer to Creating User Keysets for further information.
>The Allow Clear Export of Private Keys flag must be set. See the section Enabling Private Key Clear Export for the procedure.
Task 1—Creating a Key Recovery Agent Account
Configure and add the Key Recovery Agent certificate template as a template that can be issued by the enterprise CA.
To verify who can enroll the Key Recovery Agent template
1.Log on as administrator.
2.Click Start, Run, type certtmpl.msc, and press Enter.
This opens the Certificate Templates snap-in in the Microsoft Management Console.
3.In the console tree, click “Certificate Templates.”
4.In the details pane, right-click Key Recovery Agent and click Properties.Select the Security tab.
By default, the security groups that can enroll the Key Recovery Agent certificate template are Domain Administrators and Enterprise Administrators.
5.To allow other users or groups to enroll the Key Recovery Agent certificate template, click Add to add the user or group and grant them Read and Enroll permissions.
To change the default issuance behavior of the Key Recovery Agent template
1.In Key Recovery Agent Properties, click the Issuance Requirements tab.
2.Clear the CA certificate manager approval check box and click OK.
3.Close the Microsoft Management Console.
To change the request handling to allow the Safenet CSPs
1.In the Key Recovery Agent Properties, click the Request Handling tab.
2.Check the Allow Private Key to be Exported check box.
3.Click on the CSP button and click on the radio button to allow requests to use any CSP available on the subject’s computer.
To configure the Certification Authority (CA) to issue Key Recovery Agent certificates
1.On the Administrative Tools menu, click Certification Authority.
This opens the Certification Authority snap-in in the Microsoft Management Console.
2.In the console tree, double-click the CA, and then click Certificate Templates.
3.Right-click Certificate Templates, then click New CertificateTemplate to Issue.
4.In Enable Certificate Template, click Key Recovery Agent, and then click OK.
Task 2—Acquiring the Key Recovery Agent Certificate
In this series of steps, you will acquire a Key Recovery Agent Certificate for the purpose of recovering private keys. Begin by creating an MMC console with the Certificates snap-in loaded.
To ensure that you are logged on as the administrator
1.On the taskbar, click the Start button, and then click Run.
2.In Run, type mmc, and then click OK.
3.On the File menu, click Add/Remove Snap-in.
4.In Add/Remove Snap-in, click Add.
5.In Add Stand-alone Snap-in, click Certificates, and then click Add.
6.In Certificates, click My User account and then click Finish.
7.Click Close, and then click OK.
To acquire a Key Recovery Agent certificate
1.In the console tree of the newly-created MMC console, double-click Certificates - Current User.
2.In the console tree, right-click Personal, click All Tasks, Request New Certificate.
3.In the Certificate Request Wizard, click Next.
4.In Certificate Types, select Key Recovery Agent and the Advanced checkbox, and then click Next.
5.On the CSP page that now displays, choose the SafeNet provider for HSM key storage and any other appropriate settings such as Key is Exportable, etc. Then click Next and Next again.
6. On the Certificate Friendly Name and Description page, in the Friendly Name field, type Key Recovery, and then click Next.
7.In Completing the Certificate Request Wizard, click Finish.
8.In the console tree, double-click Personal and then click the Certificates folder.
9.Ensure that a certificate with the friendly name of Key Recovery exists.
10.Close the console without saving changes.
Task 3—Configuring the CA to allow key recovery
In this series of steps, configure the enterprise CA to use the Recovery Agent certificate acquired in Task 2. The CA must load the public key for the Key Recovery Agent to be used for encrypting the recovery data.
To configure the Recovery Agent to be the Administrator's Key Recovery Agent certificate
1.Ensure that you are logged on as the administrator.
2.In Administrative Tools, open Certification Authority.
This opens the Certification Authority snap-in in the Microsoft Management Console (MMC).
3.In the console tree, click the CA.
4.Right-click the CA, and then click Properties.
5.In the CA Properties, on the Recovery Agents tab, click Archive the key and then click Add.
6.In Key Recovery Agent Selection, click the certificate that is displayed, and then click OK. The key recovery agent certificate is shown with a status of Not loaded.
7.Click OK, and when prompted to restart the CA, click Yes.
To open the Certificates console, focused on the local computer
1.On the taskbar, click the Start button, and then click Run.
2.In Run, type mmc, and then click OK.
3.On the File menu, click Add/Remove Snap-in.
4.In Add/Remove Snap-in, click Add.
5.In Add Standalone Snap-in, click Certificates, and then click Add.
6.In Certificates Snap-in, click Computer account and then click Next.
7.In Select Computer, click Local Computer, and then click Finish.
8.Click Close, and then click OK.
To verify the installation of the Key Recovery Agent (KRA) certificate
1.In the console tree, double-click Certificates (Local Computer), double-click KRA, and then click Certificates.
2.In the details pane, double-click the certificate.
3.Verify that the intended use of the certificate is Key Recovery Agent and the certificate is issued to Administrator. This procedure ensures that the Key Recovery Agent has been successfully configured.
4.Click OK and then close the console without saving changes.
Task 4 — Creating a new certificate template that allows key archiving
In this series of steps, you define a new template that allows Key Archival and HSM key storage by using the Certificate Templates console. This will allow hardware key storage within a HSM at the client computer and key recovery in the domain in the event that the private key is lost or corrupted at the client computer.
To open the Certificate Templates console
1.Log on as the administrator.
2.On the taskbar, click the Start button, and then click Run.
3.In Run, type mmc, and then click OK.
4.On the File menu, click Add/Remove Snap-in.
5.In Add/Remove Snap-in, click Add.
6.In Add Standalone Snap-in, click Certificate Templates, and then click Add.
7.Click Close, and then OK.
A duplicate of the Users certificate template is now created and named Archive User. This is a shortcut to creating a template with permissions that allows both Domain Administrator and Domain User certificate enrollments. The template is then modified so that certificate enrollments made using this template will enable both key archival and the ability to use Safenet as a CSP.
To create a modified Archive User certificate template
1.In the console tree, click Certificate Templates.
2.In the details pane, right-click the User template, and click Duplicate Template.
3.In the Properties of New Template dialog box, in the General tab, in the Template display name box, type Archive User.
4.In the Request Handling tab, enable the Archive subject's encryption private key option (see the screen shot below). This option makes it possible for a Key Recovery Agent to recover the private key from the certificate store.

5.Click the CSPs button to enable HSM key storage using one or more SafeNet CSPs.
The dialog box allows selection of particular CSPs or all CSPs may be enabled by selecting the appropriate radio button.
Typically, only the Safenet RSA Full Cryptographic Provider is required. The SChannel Provider is only needed where SSL processing will be carried out.
6.After finalizing selections, click OK and OK again to apply changes and close the dialog boxes.
7.Close the console without saving changes.
Task 5—Acquiring a User certificate that has an archived key
In this series of tasks, you will configure the certification authority (CA) to issue Archive User certificates. Using a newly created account, you will act as a user to acquire an Archive User certificate from the CA and record the certificate's serial number for later use.
To configure CA to issue the new Archive User certificate template
1.Ensure that you are logged on as the administrator.
2.From Administrative Tools, open Certification Authority.
3.In the console tree, double-click the CA name, and then click Certificates Templates.
4.Right-click Certificate Templates, click New, and then click Certificate Template to Issue.
5.In Enable Certificate Templates, click Archive User and then click OK.
6.The Archive User certificate template now appears in the details pane.
7.Close Certification Authority.
To create a new user account
1.In Administrative Tools, open Active Directory Users and Computers.
2.Double-click the domain.
3.Select Users then click the Create a new user in the current container button.
4.Complete the following fields to create a user account:
a.First name
b.Last name
c.User logon name (e.g. JSmith@xxxx.com)
d.Password
5.Click Next, and then click Finish.
6.Double-click the new user account, select the General tab and enter the email address. e.g. JSmith@xxxx.com. This is required if the option to include the email name is set in the template used to create the user (Subject Name tab).
7.For the purpose of demonstration here, add the user to the Server Operators group so they are able to log on locally to the domain controller. This would not normally be required.
a.Select the Member of tab.
b.Click Add, in Select Groups, type Server Operators, click Check Names, and then click OK.
c.Click OK to close Properties.
8.Close Active Directory Users and Computers.
9.Close all open windows and log off the computer.
To open the Certificates console
1.Log on as the user.
2.On the taskbar, click the Start button, and then click Run.
3.In Run, type mmc, and then click OK.
4.From the File menu, click Add/Remove Snap-in.
5.In Add/Remove Snap-in, click Add.
6.In Add Stand-alone Snap-in, click Certificates, click Add, and then click Close.
7.Click OK to close the Add/Remove Snap-in dialog box.
To use the Certificates MMC to acquire an Archive User certificate
1.In the newly-created MMC console, in the console tree, double-click Certificates (Current User).
2.In the console tree, right-click Personal, click All Tasks, and then click Request New Certificate.
3.In the Certificate Request Wizard, click Next.
4.Under Certificate types, select Archive User and check the Advanced checkbox. Then click Next.
5.On the CSP page that is now visible, choose the SafeNet provider for HSM key storage and any other appropriate settings such as Key is Exportable, etc. Then click Next and Next again.
6.In Friendly name, type Archive User, and then click Next.
7.On Completing the Certificate Request Wizard, click Finish.
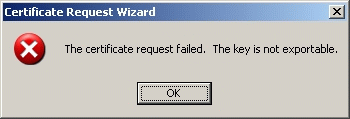
If the dialog box shown below displays, the most likely cause of the problem is that the Allow Clear Export of Private Keys flag has not been set. See Enabling Private Key Clear Export for details.
8.Double-click Personal, and then click Certificates.
9.In the details pane, double-click the certificate with the friendly name of Archive User.
10.In Certificate, click the Details tab.
Note that the certificate template used to generate this certificate was Archive User, then click OK.
11.Close the new console without saving changes.
12.Close all windows and log off of the computer.
Private Key Recovery Example
Here are the tasks required to recover a lost private key previously archived using a Microsoft certification authority (CA).
>Perform key recovery
>Import the recovered private key
Task 1—Performing a Key Recovery
In this series of tasks, perform a key recovery by using Certutil.exe. For more information on Certutil, see your Microsoft documentation.
First, ensure that the private key is recoverable by viewing the Archived Key column in the Certification Authority console and obtain the certificate serial number required for recovery.
To obtain the certificate serial number of the confirmed recoverable private key
1.Log on as the administrator.
2.From Administrative Tools, open Certification Authority.
3.In the console tree, double-click the CA, and then click Issued Certificates.
4.From the View menu, click Add/Remove Columns.
5.In Add/Remove Columns, in Available Column, select Archived Key, and then click Add. Archived Key should now appear in Displayed Columns.
6.Click OK and then, in the details pane, scroll to the right and confirm that the last issued certificate to the user has a Yes value in the Archived Key column.
NOTE A certificate template must have been modified so that the Archive bit and Mark Private Key as Exportable attributes were enabled. The private key is only recoverable if there is data in the Archived Key column.
7.Double-click the Archive User certificate.
8.Click the Details tab
9.Write down the serial number of the certificate. (Do not include spacing between digit pairs.) This is required for recovery.
The serial number is a 20 character, hexadecimal string. The serial number of the private key is the same as the serial number of the certificate.
For the purposes of this walkthrough, the serial number is referred to as serialnumber.
10.Click OK.
11.Close Certification Authority.
To recover the private key into a BLOB output file using certutil.exe
1.From a command prompt, type cd \ and then press Enter.
2.Ensure that you are in the c:\ directory.
3.At the command prompt, type:
Certutil -getkey serialnumber outputblob
4.At the command prompt, type dir outputblob
NOTE If the file outputblob does not exist, you probably typed the serial number incorrectly for the certificate. The outputblob file is a PKCS#7 file containing the KRA certificates and the user certificate and chain. The inner content is an encrypted PKCS#7 containing the private key (encrypted to the KRA certificates).
To recover the original private/public key pair using certutil.exe
1.From a command prompt, type:
Certutil -recoverkey outputblob <username>.pfx
2.When prompted, enter the following information:
a.Enter new password: password
b.Confirm new password: password
c.Type exit, and then press Enter.
3.Close all windows and log off as the current user.
Task 2—Importing the recovered private key
Restoration of the recovered private key to the users certificate store by importing the <username>.pfx file.
To log on as the user and start the Certificates mmc
1.Log on as the user.
2.On the taskbar, click the Start button, and then click Run.
3.In Run, type mmc, and then click OK.
4.On the File menu, click Add/Remove Snap-in.
5.In Add/Remove Snap-in, click Add.
6.In Add Standalone Snap-in, click Certificates, click Add, and then click Close and OK.
To delete all certificates issued by the CA to simulate a re-installed computer
1.Right-click Certificates - Current User, and then click Find Certificates.
2.In Find Certificates, in Contains, type the CA and then click Find Now.
3.On the Edit menu, click Select All.
4.On the File menu, click Delete.
5.In Certificates, click Yes.
6.In Root Certificate Store, click Yes.
7.Close Find Certificates.
To import the certificate at c:\ <username>.pfx and let the certificates be placed automatically
1.In the console tree, right-click Personal and then click All Tasks and then click Import.
2.In the Certificate Import Wizard, click Next.
3.On Files to Import, in the File name box, type c:\ <username>.pfx, and then click Next.
4.In Password, type password and then click Next.
5.On Certificate Store, click Automatically select the certificate store based on the type of certificate and then click Next.
6.On Completing the Certificate Import Wizard, click Finish.
7.If the Root Certificate Store dialog box appears, click Yes.
8.In Certificate Wizard Import, click OK.
Two certificates were imported. The Archive User certificate for the user is located in the Personal certificates store and the CA certificate is located in the Trusted Root Certification Authorities store.
To verify the serial number of the imported certificate
1.In the console tree, double-click Personal and then click Certificates.
2.Double-click the certificate.
3.In Certificate, click the Details tab. Verify that the serial number matches the original.
4.Close all open windows and log off.