Using a Hard Token to Store the STC Client Identity
By default, STC uses a software token to store the client identity. When using a software token, the client’s private key is intentionally portable. That is, it can be moved or copied to another host and used – so any client that possesses this identity pair is considered the authentic client. Allowing this enables an elastic client model – an important capability for many applications.
Alternatively, you can choose to use a SafeNet eToken 7300 hardware token to protect the client’s private key. When using hard tokens, the client’s private key is marked as non-extractable, so only a host with the hard token inserted can successfully authenticate to the HSM partition. The SafeNet eToken 7300 is a FIPS 140-2 Level 3 device. The eToken 7300 comes pre-configured for one of two certification types, Common Criteria or FIPS. STC supports the Common Criteria version only.
If you want to use a SafeNet eToken 7300 hardware token to store the client identity, you must initialize the hard token to prepare it for use with STC, as described in Initializing a SafeNet eToken 7300 Hardware Token.
If you want to recover a SafeNet eToken 7300 hardware token that is in a bad state, you must use the SafeNet Authentication Client software to re-initialize the token and reset the default password, as described in Recovering a SafeNet eToken 7300 Hardware Token.
Initializing a SafeNet eToken 7300 Hardware Token
This section describes how to initialize a new (out of the box) SafeNet eToken 7300 for use with STC. Hard token initialization is supported in Windows only. Once the hard token is initialized, you can use it with a Windows, Linux, or Solaris SafeNet Luna Client.
Prerequisites
You require the following software on the workstation used to initialize a SafeNet eToken 7300 hardware token:
>A supported Windows 64-bit operating system
>The SafeNet Luna Client software (6.0 or higher)
>The SafeNet Authentication Client software (64 bit, 8.3 or higher)
To initialize a SafeNet eToken 7300 hardware token:
1.Ensure that the required software is installed on the workstation you are going to use to initialize the token.
2.Edit the C:\Program Files\SafeNet\LunaClient\crystoki.ini file to specify the path to the client token library:
a.Go to the Secure Trusted Channel section and add or update the ClientTokenLib entry as follows:
ClientTokenLib=C:\Windows\System32\eToken.dll
3.Insert the SafeNet eToken 7300 token into an available USB slot.
4.Launch LunaCM and enter the following command to verify that the token is recognizable:
lunacm:>stc tokenlist
For example:
• Unitialized token:
lunacm:> stc tokenlist
Token Slot ID Token Label Serial Number Initialized
1 51ea973112 No
•Previously initialized token
lunacm:> stc tokenlist

Token Slot ID  Token Label                      Serial Number    Initialized
1              stcHWtoken                       51ea973112       Yes
5.Enter the following command to initialize the token:
lunacm:>stc tokeninit -label <label>
For example:
• Unitialized token:
lunacm:> stc tokeninit stcHWtoken

Successfully initialized the client token.
•Previously initialized token
lunacm:> stc tokenlist

The client token stcHWtoken is already initialized.
Are you sure you want to re-initialize?
     Type 'proceed' to continue, or 'quit' to quit now --> proceed
Successfully initialized the client token.
6.You can now take the token and use it for STC purposes. You can use it in Solaris, Linux, and Windows at this point. You must perform the following tasks on any SafeNet Luna Client workstations on which you intend to use the SafeNet eToken 7300 hardware token:
a.Install the SafeNet Authentication Client software (8.3 or higher)
b.Add the following line to the Secure Trusted Channel section of the crystoki.ini (Windows) or Chrystoki.conf (UNIX/Linux) file, to specify the path to the SafeNet Authentication Client eToken library:
| Windows | ClientTokenLib=C:\Windows\System32\eToken.dll |
| Linux/UNIX | ClientTokenLib=<path_to_libeToken.so>
For example, on CentOS, the path is /usr/lib/libeToken.so |
Recovering a SafeNet eToken 7300 Hardware Token
You can use the Windows SafeNet Authentication Client software (8.3 or higher, 64-bit) to recover a SafeNet eToken 7300 that is in an unresponsive state.
To recover an unresponsive SafeNet eToken 7300:
1.Update the registry to add or modify the following entries:
•HKEY_CURRENT_USER\Software\SAFENET\AUTHENTICATION\SAC\Init\KeepTokenInit = 1
•HKEY_LOCAL_MACHINE\Software\policies\SAFENET\AUTHENTICATION\SAC\PQ\pqMaxPin = 64
•HKEY_LOCAL_MACHINE\Software\policies\SAFENET\AUTHENTICATION\SAC\PQ\pqWarnPeriod = 0
2.Launch SafeNet Authentication Client Tools from Windows > All Programs > SafeNet > SafeNet Authentication Client, and click the Advanced View icon.
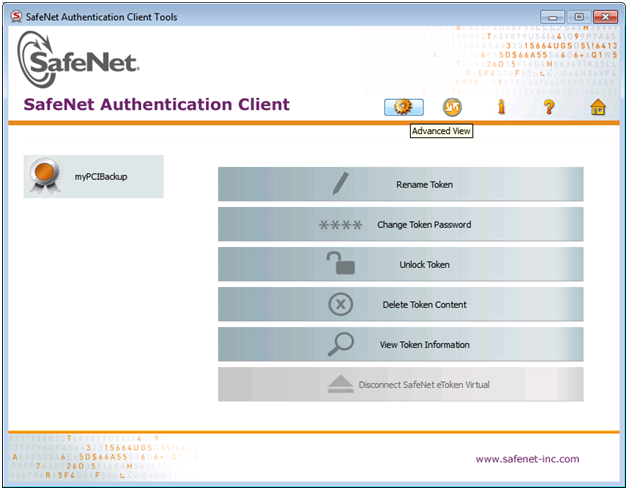
3.Under the Tokens heading in the left-hand column, select the eToken you want to initialize, and click the Initialize Token icon to start the initialization. 
4.On the Token Initialization dialog, apply a token name to distinguish this eToken 7300 from other SafeNet STC tokens, and reset the password as follows:
a.Set the new token password to password.
b.Uncheck the Token Password must be changed on first logon checkbox.

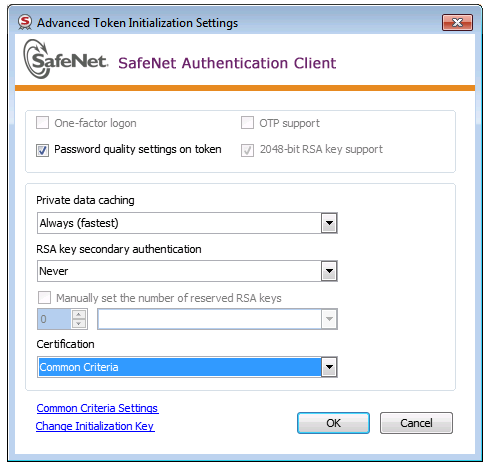
5.Select Advanced Settings at the bottom left of the dialog.
6.In the Advanced Settings dialog, ensure that the Certification type matches the type of the eToken (in this case, Common Criteria) and click OK to return to the Token Initialization dialog.
7.In Token Initialization, click Start to launch token initialization. Two progress bars are shown followed by a success announcement.