|
Home > |
|---|
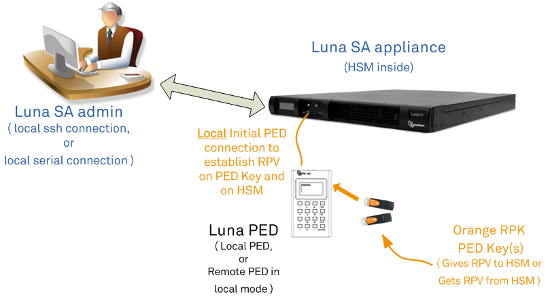
The HSM must initially be configured with a local PED, in order to set its authentication and create a relationship between the HSM and an orange PED key (RPV, or Remote PED Vector). Remote PED Setup and Configuration shows the preliminary imprinting step, where the HSM and (at least one) orange PED key are made to share an RPV. The administrator could be co-located with the HSM, or could be elsewhere issuing the commands, but someone must be present at the HSM to present the orange PED key for the RPV imprinting. Once that is completed, further PED operations can be moved anywhere along with the RPV-bearing orange PED key.
Figure 1: Remote PED connections during imprinting
The HSM is then shipped and installed at its remote location.
Using SSH, open an administrative session (connect and log in as "admin") on the remote HSM. Tell the HSM to expect a remote PED, rather than local PED.
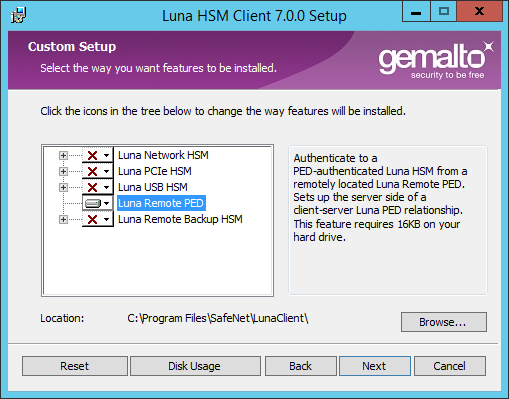
Remote PED is supported (and requires installation/configuration) in two parts:
•PED Client, which runs on the HSM host and allows the HSM to seek PED key data from a remotely located Luna PED. PED Client is part of the SafeNet Luna HSM Client software installation for every type of SafeNet Luna HSM except SafeNet Luna Network HSM (because PED Client is already present, by default, within the SafeNet Luna Network HSM appliance).
•PED Server, which runs on the Remote PED host. PED Server is installed if the "Remote PED" option is selected during SafeNet Luna Client software installation, and it includes PedServer.exe, along with the SafeNet PED device drivers. If the target computer is intended to be a PED Server, but is not going to be a Client to your SafeNet Luna HSM, then you can use SafeNet Luna HSM Client installer to install only the Remote PED option.
•An HSM host, configured as described elsewhere in this document, with PED Client available, and with its own working network connection
•A remote PED host computer with a supported operating system (see the Customer Release Notes for supported platforms) to run PED Server
•Sufficient privileges on the remote PED host, depending on platform and location (local network, WAN, VPN...)
•Current SafeNet Luna HSM Client installer (LunaClient.msi)
•Luna PED V.2.7.1 or newer (see the bottom of the PED's Select Mode menu for the version)
•The power block and cord that accompanied your Remote PED, and the USB-A to USB-Mini-b cable
•A complete set of PED keys, including an orange Remote PED key (either new/empty or already containing a Remote PED Vector)
•A network connection
•Local access to the SafeNet Luna HSM (for the first session only)
This configuration takes place in two locations:
•On the HSM host
•On the Remote PED host
1.Install/configure your HSM host.
2.With a Luna PED connected locally via USB, initialize a Remote PED Vector for the HSM and for an orange PED key.
3.Type hsm ped vector init and respond to the Luna PED prompts.
You can choose to have the HSM generate a new RPV to be held by both the HSM and a new orange PED key, or you can re-use an RPV already on an existing orange PED key, and imprint that on the HSM.
4.Bring an orange PED key, containing the RPV for this HSM, from the HSM to the location of the Remote PED server.
Luna PED should not yet be connected to the PED Server computer.
1.Install the SafeNet Luna HSM Client software, selecting the Remote PED option - for the purposes of Remote PED. Any additional SafeNet Luna HSM Client installation choices are optional for this host system.
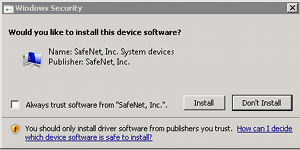
2.Click Install when prompted to install the driver.
3.Reboot the computer to ensure that the LunaPED driver is accepted by the operating system. This is not required for Windows Server Series.
4.Connect the Remote Capable Luna PED to AC power using the supplied power block, and to the PED Server computer using the supplied USB-A to USB-mini-b cable.
The Luna PED automatically detects the active interface that it is plugged into, and defaults to the appropriate mode after the first command is sent to it. The Luna PED should wait in Remote PED-USB mode until a command is received from the HSM it is connected to.
If you wish to manually change to Remote PED-USB mode instead of waiting for the PED to do so, press the < key to navigate to the main menu. Then, press 7 to enter Remote PED mode.
5.Ensure that your firewall does not block communication between PED Client and PED Server. If switching off the firewall for Home and Public Network is not an option, see Troubleshooting.
6.Open a Command Prompt window.
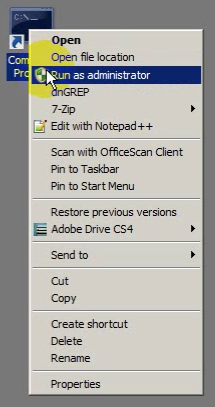
If PedServer.exe attempts to access the pedServer.ini file in C:\Program Files\... that is treated as an action in a restricted area in some versions of Windows. In that case, you should open the Command Prompt as Administrator, rather than as your normal user. To do so, right-click the Command Prompt icon and, from the pop-up menu, select Run as administrator.
Note: Windows Server 2008 launches Command Prompt as Administrator by default, so no special steps are necessary.
Note: By default, PedServer.exe attempts to access pedServer.ini if such a file exists in the expected location. If it does not exist, then default values are used by PedServer.exe until you perform a -mode config -set operation to create a pedServer.ini.
7.Go to the installed SafeNet Luna HSM Client directory by typing cd "\Program Files\SafeNet\LunaClient".
8.Launch the PED Server by typing pedserver -mode start.
9.Verify that the service has started by typing pedserver -mode show.
Look for mention of the default port "1503" (or other, if you specified a different listening port). In addition, "Ped2 Connection Status:" should say "Connected.” This indicates that the Luna PED that you connected was found by PED Server.
Note: If a port other than the default 1503 was specified in pedserver -mode start, for example pedserver -mode start -port 1523, then the pedserver -mode show command should pass in the same port, for example pedserver -mode show -port 1523.
10.Note the IP address of the PED Server host. We generally recommend using static IP, but if you are operating over a VPN, you will likely need to ascertain the current address each time you connect to the VPN server.
C:\windows\system32>ipconfig
[…]
   IPv4 Address. . . . . . . . . . . : 182.16.153.114  <<--- this one, in our example
[…]
Note: We advise not specifying the IP address when starting the PED server unless you have a specific reason to set an address there. In a volatile network or VPN situation, this means that when the host IP changes on the PED server, only PED Client needs restarting with the new PED Server IP address. Once started, PedServer.exe remains on, and listening until you explicitly tell it to stop, or until the host computer stops.
Note: For the purposes of the PED Client you can specify the PED Server's IP address and listening port each time you connect. Or you can use the hsm ped set command to configure either, or both of those parameters, which are then picked up by the hsm ped connect command when you wish to establish the connection.
1.Launch the PED Client on your HSM server, identifying the PED Server instance to which the HSM is to connect for its authentication requirements. Type hsm ped connect -ip <pedserver_IP> -port <pedserver_listening_port> where <pedserver> is your PED Server IP and <pedserver_listening_port> is your port.
At this point, the remote Luna PED should come to life, briefly saying "Token found..." followed by this prompt:
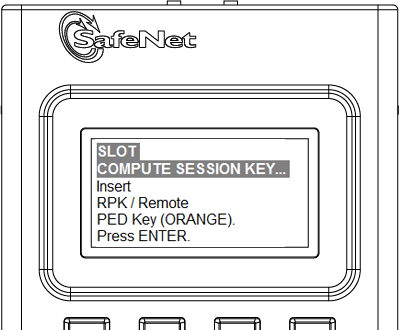
2.Insert the orange PED key that you brought from the HSM to the PED, and press Enter on the PED keypad.
Once you have reached this point, you can continue to issue HSM or Partition commands, and whenever authentication is needed, the Remote PED will prompt for the required PED key and associated key-presses.
Note: If the HSM host has more than one SafeNet Luna HSM connected, then you might need to specify the -serial option to identify the desired HSM by its serial number. If -serial is not specified then the action defaults to the first HSM that is found.
PedServer.exe (on the computer to which your Remote PED is attached) is run from the command line. If you accepted default locations when installing LunaClient (or Remote PED option from within LunaClient installer), then the software is installed on your C: drive under Program Files. This has implications regarding the permissions you have on the system.
To use PED Server from within a protected location on a Windows 7 computer, right-click the Command Prompt icon, and from the resulting menu select Run as Administrator.
Note: If you lack system permissions to operate as Administrator on the computer that is to host the PED Server, contact your IT department to address the situation. Alternatively, install LunaClient (or a subset of it, such as Remote PED) in a non-default location in your computer that is not subject to permission restrictions.
If you open a command-prompt window as an ordinary user in Windows 7, and run PedServer.exe, the program detects if it lacks access and permissions, and returns an error like the following:
C:\Program Files\SafeNet\LunaClient>pedserver mode start
Ped Server Version 1.0.6 (10006)

Failed to load configuration file.  Using default settings.

Ped Server launched in startup mode.
Starting background process
InternalRead: 10 seconds timeout
Failed to recv query response command: RC_OPERATION_TIMED_OUT c0000303
Background process startup timed out after 10 seconds.
Startup failed. : 0xc0000303 RC_OPERATION_TIMED_OUT

C:\Program Files\SafeNet\LunaClient>
If you encounter the error above, use Windows Task Manager to select the PED Server process, right-click, and select End process, before cleanly retrying PedServer.exe via an Administrator Command Prompt.