![]()
![]()
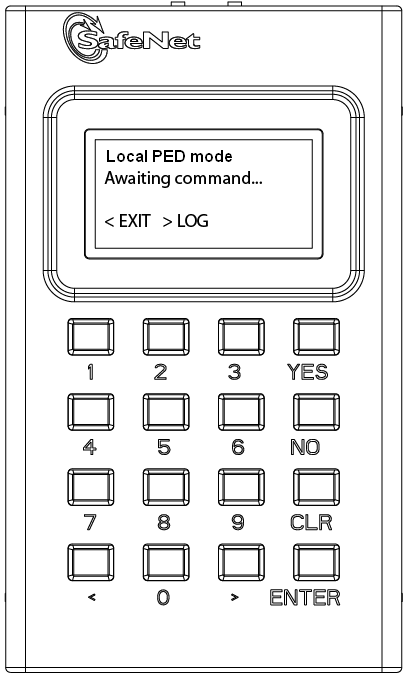
Front view
Top view![]() is required when you wish to authenticate to your HSM with PED (Trusted
Path) Authentication.
is required when you wish to authenticate to your HSM with PED (Trusted
Path) Authentication.
The requirement for Trusted Path Authentication, as opposed to Password Authentication, is part of the specific model of HSM, as configured at the factory (the one exception is the Luna Backup HSM, which configures itself, at backup time, as either Password-authenticated or PED-authenticated, depending on the type of primary HSM it is backing up).
The PED does not contain any authentication information. PEDs
are interchangeable (within the version range, PED
2.x) - it doesn't matter which local PED 2.x you use. The authentication
information is contained on the 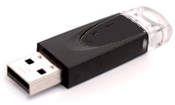 ,
and PED is the device that provides the interface so that authentication
data can pass between PED Key and HSM.
,
and PED is the device that provides the interface so that authentication
data can pass between PED Key and HSM.
A locally-connected PED is powered by its  to the HSM appliance. That connection - directly between the PED and
the HSM card inside the appliance - bypasses your computer bus and the
computer bus of the appliance. It is the only data path between the HSM
and the PED and therefore is considered much more secure (trusted) than
any authentication path that passes through the appliance's computer data
paths. The Trusted Path cannot be monitored by any software (whether authorized
by you or not) on your administrative or client computer. Also, because
you use the PED Keypad to input the optional PED
PIN password (to unlock the secret that, in turn, unlocks your
HSM), nothing is typed on a computer keyboard. No virus, trojan, spyware,
remote-session software or other method can be used to acquire those secrets,
because they never pass through the normal computer data pathways, never
reside in computer memory or on disk.
to the HSM appliance. That connection - directly between the PED and
the HSM card inside the appliance - bypasses your computer bus and the
computer bus of the appliance. It is the only data path between the HSM
and the PED and therefore is considered much more secure (trusted) than
any authentication path that passes through the appliance's computer data
paths. The Trusted Path cannot be monitored by any software (whether authorized
by you or not) on your administrative or client computer. Also, because
you use the PED Keypad to input the optional PED
PIN password (to unlock the secret that, in turn, unlocks your
HSM), nothing is typed on a computer keyboard. No virus, trojan, spyware,
remote-session software or other method can be used to acquire those secrets,
because they never pass through the normal computer data pathways, never
reside in computer memory or on disk.
With HSM appliances normally tucked away in server farms, which are often run as "lights-off" facilities with the minimum possible human intervention, the PED cannot always be conveniently connected directly to the HSM. Instead, a callback server arrangement (Remote PED) uses a Luna PED connected to a separate computer, at a convenient location, to serve PED interactions over a network connection. The connection is strongly secured and, like the direct connection, prevents unauthorized persons from gaining access to the authentication data.
The only way for another person to discover a PED PIN password while you are inputting it is if you allow that person to watch while you use the PED keypad.
You need to use the PED whenever you perform any action with the HSM that causes it to look for authentication (with some exceptions, see below). For example, using the Luna shell (lunash) you might login as Security Officer, login as User, or initialize the HSM. When the HSM receives such a command, it requests the appropriate data from the PED - or in the case of initialization, the HSM might send data to the PED.
Therefore, you should have the PED connected and in its ready state ("Awaiting command...") when you issue a command that invokes the PED. One MDSM connector attaches to the matching connector on the HSM or appliance, and the other MDSM (Micro-D Sub-Miniature) connector attaches to its matching connector on the top of the PED (tighten the connector screws if you intend to leave the PED connected; this makes the most reliable connection and provides strain relief to the cable-connector junction during handling of the device).
If you are using the Activation/autoActivation feature then, after authentication, the data is cached on the HSM, where it remains until you deactivate or you remove power to the HSM. In that case, once the authentication is performed, you can disconnect the PED and store it until the next time it is required.
If you are not using autoactivation, then authentication data is not cached and every time you or your client application needs access to the HSM, the HSM will look to the PED, which must remain connected.
As soon as it receives power from a 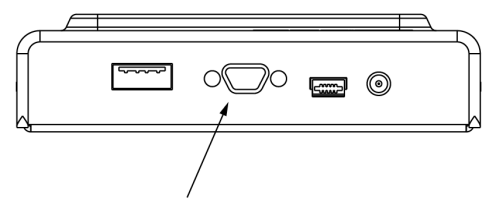 to a powered appliance, or from the supplied power block if you are using Remote PED, the PED performs its start-up and self-test
routines and then goes to its normal operating mode, displaying
the prompt "Awaiting command...". The
PED is ready for use in Local mode, by default.
to a powered appliance, or from the supplied power block if you are using Remote PED, the PED performs its start-up and self-test
routines and then goes to its normal operating mode, displaying
the prompt "Awaiting command...". The
PED is ready for use in Local mode, by default.
There are three things that you can do with the PED at this point:
To perform prompted actions, just do what is asked on the PED screen. Normally the prompts are:
 appropriate PED Keys, type passwords when requested, and so on. The particular
sequence depends upon the operation that the HSM needs at the time, which
in turn depends on the command-line administrative operations that you
are performing (with lunacm, lunadiag, multitoken2, or other SafeNet utilities),
or operations triggered by your applications.
appropriate PED Keys, type passwords when requested, and so on. The particular
sequence depends upon the operation that the HSM needs at the time, which
in turn depends on the command-line administrative operations that you
are performing (with lunacm, lunadiag, multitoken2, or other SafeNet utilities),
or operations triggered by your applications.
The "Initializing a PED-Authenticated HSM" and "About Creating a Partition (PED authenticated)" operations are described elsewhere in this Help.
As a networked HSM appliance, your Luna SA is expected to perform large volumes of client-requested cryptographic operations without human intervention. Therefore, in normal practice, you would perform initial configuration operations one time before placing the unit in service, then perform only monitoring and occasional maintenance thereafter. See the table below for a simple breakdown of the normal tasks and if/how the PED and PED Keys might apply.
|
Situation |
Needs |
Action with PED and PED Keys |
|
Setup/configuration |
Appliance admin password, blue, red and black PED Keys and PED. Network connection to the appliance from your administrative PC, and preferably also a local serial connection. |
You perform the HSM initialization, create Partition Groups, set up a redundant, load-sharing cluster with other SafeNet HSM appliance(s). This is the kind of chore you must perform before first putting the unit into "production", and then might never need to do again. The PED Keys are required at several stages, as well as the PED. |
|
Occasional Maintenance of HSM |
Appliance admin password, blue and black PED Keys, possibly the red if you need to initialize a new cluster member, and the PED. Network connection to the appliance. |
Add and remove cluster members, modify number and assignment of Partitions/Groups, enable and disable... you might need some or all PED Keys for authentication, depending on the activity. |
|
Occasional Maintenance of appliance (non-HSM part) |
Appliance admin password |
None. You just login as appliance admin and perform any needed task related to network settings, logging, snmp, or other non-HSM chores. No PED Key or PED use is needed when you are not logging into the HSM, within the appliance. |
|
Client access to their assigned cluster partitions |
Clients need their own authentication that is set up when clients are registered; no PED Key or PED required. Network connection from the Client(s) - which, depending on your application, might be other servers serving further downstream clients, or might be end-user Client computers. |
None. You would normally have activated/auto-activated the cluster members (in other sections of this table), and put the PED and PED Keys away in safe storage. They aren't needed in ongoing operation. |
|
PED Key administration |
A PED and whichever PED Keys you wish. You can connect to any SafeNet HSM that has the proper connector - this is to power the PED only. Alternatively, you can use the PED power supply kit provided with PED 2 (Remote Capable), and not need any HSM connection. |
While you can perform some PED Key admin during HSM operations (mentioned elsewhere), you can also just power up the PED, go to Admin mode (instead of the default "Local PED" mode), and perform actions like creating duplicates of your existing, imprinted PED Keys. No HSM access is required. See the next section on this page (below) for more detail. |
You can perform some operations on PED Keys without going through the HSM.
To perform standalone operations:
The Remote PED 2 functions as described above, when it is in Local or Admin mode. However, when it is placed in Remote mode, it is capable of setting up a secure connection, via a specially-configured computer workstation, to a remotely located HSM. The remote functionality is described separately at "About Remote PED".