High-Availability Configurations
This section describes a sample configuration for deploying CCC in a high availability configuration. CCC provides an open and flexible architecture that supports multiple configuration options, including high availability. By adding additional and standby components to the basic configuration you can create a high availability system that offers the following features:
>Server redundancy
>Load balancing
>Data replication
>Failover protection
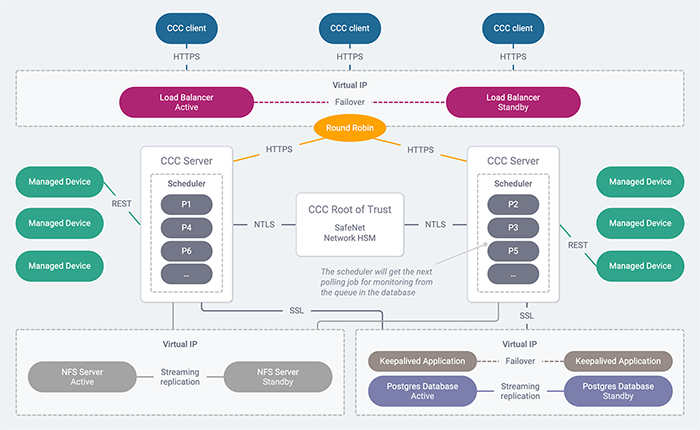
Deployment Architecture for CCC High Availability Setup
Here's an illustration of a CCC configuration that provides all of the features inherent in a high-availability system.
Figure 5: Example of a High Availability Configuration
Server Redundancy
A true high-availability system needs to continue to operate, without interruption, in the event that one of the system components fails. To deliver this capability, it is recommended that you set up two CCC servers, two PostgreSQL database servers, two NFS servers, and two load balancers, with the load balancer sending requests to the CCC servers in a round-robin fashion.
Although you can configure your system to use a single load balancer, it is recommended that you deploy standby load balancers to avoid having a single point of failure. If you plan on using standby load balancer servers, you need to configure the servers to use a single virtual IP address and to provide automatic failover in the event of a server outage.
NOTE If you wish to configure standby Oracle databases, please consult Oracle documentation.
Load balancing
The load balancers are installed on a separate server, and sit between the CCC clients and CCC server. When clients connect to CCC, they do so by pointing to the IP address/host name of the load balancer. The load balancer takes each request in order and routes it to one of the CCC servers. If one of the CCC servers goes down, the request is forwarded to the next server, with no impact to the end user. The load balancer must be configured to support persistent (or sticky) sessions, such that all requests for a specific user session are directed to the same CCC server. If a failover occurs, the user will be prompted to log in to another active server, and all future requests will be directed to the new server for the duration of the session.
Data replication
It is recommend that you configure PostgreSQL or Oracle database to provide streaming replication of the database between an active and standby database server. Any HA implementation should include this, or a similar feature, to ensure uninterrupted access to the data stored in the CCC database in the event of a failure.
It is recommended that you configure NFS server to provide streaming replication of CCC data between the active and standby NFS servers. Any HA implementation should include this, or a similar feature, to ensure uninterrupted access to the data stored on the NFS server in the event of a failure.
Failover protection
You can configure each of the standby components to provide failover.
Load balancers typically allow you to configure a virtual IP address for the server cluster, with one active server and one standby server. The servers communicate with each other using a keepalive mechanism. The virtual IP address is used by the active server, which accepts all client requests and routes them to the CCC servers in a round-robin fashion (or similar method, depending on how you configured your load balancer). If the active server goes down, the standby server takes the IP address and becomes the active server.
Database failover is managed by installing an application, such as keepalived, on each database server that allows you to use a virtual IP address to identify the active database server so that if the active server goes down, the standby server takes the IP address and becomes the active server. Notification of a failover is also required so that the databases can be re-synchronized when the failed database server is brought back online.
NFS server failover is managed by installing an application, such as keepalived, on each NFS server that allows you to use a virtual IP address to identify the active NFS server so that if the active server goes down, the standby server takes the IP address and becomes the active server.
NOTE Operations that are in progress when a failover occurs may fail.
Deploying CCC in HA Configuration
To deploy CCC in HA configuration and set up file sharing among CCC servers, follow these steps on each NFS server:
1.Run the enableNFSSharing.sh script on the NFS server that you've selected. This script will be available at the path /usr/safenet/ccc/scripts/enableNFSSharing.sh on a CCC server. Copy this script from the CCC server to NFS server. Following is the general command syntax for executing the enableNFSSharing.sh script:
./enableNFSSharing <NFSOption> <IPAddress(s)> NOTE Values allowed for <NFSOption> are: 1 for NFS Server and 2 for NFS Client.
NOTE If you execute the enableNFSSharing.sh script without any arguments or wrong arguments, you will get the following message: “Usage: enableNFSSharing NFSOption[1: For NFS Server 2: For NFS Client] IPAddress”.
NOTE Enter valid IP addresses to avoid getting an error.
2.Run the following command on the NFS server by navigating to the folder where enableNFSSharing.sh script is copied :
./enableNFSSharing.sh 1 <List of all the CCC servers to be setup in HA mode as NFS client, separated by a space>
Example:
./enableNFSSharing.sh 1 20.10.10.10 30.10.10.10
3.Run the following script on CCC servers to set up the NFS client:
./enableNFSSharing.sh 2 <IP of NFS Server/Virtual IP of NFS server cluster in case CCC is set up in high availability>./enableNFSSharing.sh 2 10.10.10.10
To Unmount NFS Dir during CCC Uninstall
1.To unmount NFS directory during uninstall, CCC administrator runs following command as 'root' user:
umount -f -l /usr/safenet/ccc/packages
NOTE
1. This step should be performed only if CCC is set up in HA mode.
2. This step should be performed on all CCC servers that have been set up as NFS client.
Tested Configuration
This section describes how to set up the HA configuration which was validated by the engineering team.
HAProxy load balancer
This is a Linux server that accepts the client requests and routes them to one of the active CCC servers in the cluster. You require HAProxy 1.5 or higher.
NOTE This tested procedure demonstrates setting up a single load balancer, instead of the recommended redundant configuration because of the wide variety of possible implementations. With a single load balancer, you will lose connectivity in the event of a server outage, although this will not affect the integrity of the data stored in CCC. You may wish to consult HAProxy documentation to set up two load balancers in active-standby mode.
Redundant CCC application servers
The CCC application is installed on two separate CentOS 7 workstations that receive requests from the load balancer. Requests are sent to the individual CCC servers from the load balancer in a round-robin fashion, so that if one of the servers goes down, the request is forwarded to the next available server. In addition, you must configure HAProxy to use "sticky sessions", so that once a client logs in using a certain CCC server, all further requests from that client session will be sent to the same CCC server.
NOTE While this example considers CentOS 7, the scenario is also valid for CentOS 8, RHEL 7, and RHEL 8.
PostgreSQL servers
PostgreSQL is installed on two separate Linux workstations and is configured to use streaming replication. Keepalived is installed on each database server to provide failover and notification.
High-Level Procedure
Deploying CCC in a high-availability configuration involves performing the following tasks:
1.Install the operating system and configure the network on each server required for the HA configuration, as described in Server OS Installation and Network Configuration.
2.Install and configure the primary and standby PostgreSQL database servers, as described in To Configure and Setup PostgreSQL Server in HA Mode . This involves performing the following tasks:
a.Installing PostgreSQL on each database server.
b.Configuring the primary and standby database servers and enabling streaming replication.
c.Testing streaming replication.
d.Installing and configuring keepalived on the primary and standby database servers.
e.Testing keepalived.
3.Install and configure primary and standby NFS servers, as described in Deploying CCC in HA Configuration . This involves performing the following tasks:
a.Installing NFS Utilities on each NFS server.
b.Configuring the primary and standby NFS servers and enabling streaming replication.
c.Testing streaming replication.
d.Installing and configuring keepalived on the primary and standby NFS servers.
e.Testing keepalived.
4.Set up and configure the CCC servers, as described in CCC Application Server Setup and Configuration. This involves performing the following tasks:
a.Installing and initializing a Thales Luna Network HSM partition to serve as the CCC root-of-trust HSM for both CCC servers.
b.Installing the CCC application server software on each CCC server.
c.Running the CCC server configuration script (config.sh) on each CCC server.
5.Set up and configure the HAProxy server to act as a load balancer for the CCC servers, as described in HAProxy Server Setup and Configuration.
Server OS Installation and Network Configuration
An HA deployment requires seven separate servers which exchange data with each other, over the network, to operate as a unified system. When you configure CCC in HA, you are required to specify the network address (IP address or host name) of specific servers in the deployment. To simplify the deployment and avoid potential misconfigurations, the first step in deploying an HA configuration is to perform the following tasks:
> install the operating system on each server used in the deployment.
>configure the IP address or host name that will be used to identify the server.
>assign a role to each server.
NOTE You must reserve two additional IP addresses - one for the database cluster and the other one for the NFS cluster. These IP addresses need to be specified during database configuration.
This document uses variables to identify each of the servers in the deployment, as listed in the following table. After you complete the OS installation and network configuration, record the IP address or host name of each server on the following table, so that you can easily refer to this information when performing the various configuration tasks.
| Server | Alias | IP address/Host name |
|---|---|---|
| Primary (active) PostgreSQL server | <db_primary_IP_or_hostname> | |
| Standby PostgreSQL server | <db_standby_IP_or_hostname> | |
| Keepalived database cluster virtual IP address | <keepalived_virtual_IP> | |
| Primary (active) NFS server | <nfs_primary_IP_or_hostname> | |
| Standby NFS server | <nfs_standby_IP_or_hostname> | |
| Keepalived nfs cluster virtual IP address | <keepalived_virtual_IP> | |
| CCC server 1 | <ccc1_IP_or_hostname> | |
| CCC server 2 | <ccc2_IP_or_hostname> | |
| HAProxy load balancer | <ha_proxy_IP_or_hostname> |
To install the OS and configure the network settings
Perform the following procedure on each server that will be used in the HA deployment:
1.Install the CentOS 7 distribution for your server architecture:
a. CentOS 7 is available for download from http://wiki.centos.org/Download. It is recommended that you install only the base software (the Minimal installation option) to avoid installing unnecessary software that could present a security risk. Refer to the CentOS documentation for detailed installation instructions.
b.After the installation is complete, reboot the system by entering the command systemctl reboot.
c. Log in as root and enter the yum update command to install the latest updates.
2.Configure a static IP address or host name on the server and record the information in the table above. Refer to the CentOS documentation for detailed network configuration procedures.
To Configure and Setup PostgreSQL Server in HA Mode
This section describes how to set up a PostgreSQL high availability (HA) cluster configuration consisting of a primary PostgreSQL server and a standby PostgreSQL server. The cluster is configured to use streaming replication. This procedure assumes PostgreSQL 10.
Refer to the PostgreSQL documentation at https://www.postgresql.org/docs/10/index.html for more information.
Installing PostgreSQL
You require two standalone Linux servers: one for the primary, and one for the standby. The tested and documented configuration uses CentOS 7 and PostgreSQL 10. Other operating systems may work, although they are not tested, and may use different paths for some components. To install PostgreSQL on an external server, refer to the Installing PostgreSQL on an External Server section.
Configuring the Primary PostgreSQL Database Server
This section describes how to perform the following tasks on the primary PostgreSQL database server:
>configure PostgreSQL to use streaming replication
>allow the standby PostgreSQL server and each CCC application server to access the primary PostgreSQL server
>create an SSL certificate to authenticate the connection between the CCC servers and the database
>create the database tables and users
>configure the firewall to provide access to the port used by the database
To configure the primary PostgreSQL database server
1.Log in as root to the server you identified as the primary PostgreSQL server and set the permissions for the session:
su root
umask 0022
2.Edit the /var/lib/pgsql/10/data/postgresql.conf file to uncomment and update the following entries, which are used to configure PostgreSQL to use streaming replication:
listen_addresses = '<db_primary_IP_or_hostname>,<keepalived_virtual_IP>'
ssl = on
wal_level = hot_standby
checkpoint_segments = 32
archive_mode = on
archive_command = 'cp %p /tmp/%f'
max_wal_senders = 3
wal_keep_segments = 32
NOTE listen_addresses is a comma separated list of the hosts the server will respond to. It must also include the keepalived virtual IP address for the database cluster (configured later), and may include other servers, if required. Access to the database is controlled by the pga_hba.conf file (next step).
3.Open the /var/lib/pgsql/10/data/pg_hba.conf file in a text editor and add an entry for CCC to the #IPv4 local connections section of the file. Add the following lines as the first entry in the section to allow connections from the CCC host:
NOTE To ensure that CCC can successfully connect to the database, the entry must be the first lines in #IPv4 local connections section.
host replication replicator <db_secondary_IP_or_hostname>/32 md5
hostssl lunadirectordb lunadirector <ccc1_IP_or_hostname>/32 md5
hostssl lunadirectordb lunadirector <ccc2_IP_or_hostname>/32 md5
NOTE If both of your CCC servers reside in the same subnet, you can add a single line to the file to allow access from all devices in that subnet. Add an entry for hostssl lunadirectordb lunadirector <subnet_IP>/24 md5 as the last line in the var/lib/pgsql/10/data/pg_hba.conf file.
4.Save and close the file.
5.Restart the PostgreSQL Service.
systemctl restart postgresql-10.service
6.The connection between the CCC application servers and the PostgreSQL servers uses SSL, which requires that you create a server certificate. Enter the following commands to create a self-signed certificate with the correct owner and permissions.
After entering the openssl req -new -text -out server.req -nodes command, you will be presented with a series of prompts asking you to specify the certificate attributes. The only important attribute is the server Common Name (CN), which must be set to the virtual IP of the database cluster, which is configured in Setting Up Keepalived On the PostgreSQL Servers. You must specify the virtual IP, since the same certificate will be used on the standby database server to handle failover.
cd /var/lib/pgsql/10/data
openssl req -new -text -out server.req -nodes
openssl rsa -in privkey.pem -out server.key
rm -f privkey.pem
openssl req -x509 -in server.req -text -key server.key -out server.crt
chmod og-rwx server.key
chown postgres:postgres server.key
systemctl restart postgresql-10
7.Enter the following commands to set up the replication and CCC users and tables in the database:
su - postgres -c "psql postgres postgres -c \"CREATE USER replicator REPLICATION LOGIN PASSWORD 'dbpass';\""
su - postgres -c "psql postgres postgres -c \"CREATE USER lunadirector encrypted PASSWORD '<password>';\""
where <password> is the password the lunadirector user will use to access the database.
NOTE Remember the password you specified for the lunadirector user. You will need it later when you configure CCC. This is the password that the CCC application server uses to connect to the PostgreSQL database cluster.
su - postgres -c "psql postgres postgres -c \"CREATE DATABASE lunadirectordb OWNER lunadirector;\""
8.Enter the following command to configure the firewall (iptables) to allow the CCC servers to access the database. By default, PostgreSQL listens on port 5432 for connections:
iptables -I INPUT 2 -p tcp -m tcp --dport 5432 -j ACCEPT
Configuring the Standby PostgreSQL Database Server
This section describes how to perform the following tasks on the standby PostgreSQL database server:
>configure PostgreSQL to use streaming replication
>allow the standby PostgreSQL server and each CCC application server to access the primary PostgreSQL server
>copy the SSL certificate used to authenticate the connection between CCC servers and the database from the primary server
>copy the database tables and users from the primary server to the standby server
>configure the firewall to provide access to the port used by the database
To configure the standby PostgreSQL database server
1.Log in as root to the server you identified as the primary PostgreSQL server and set the permissions for the session:
su root
umask 0022
2.Edit the /var/lib/pgsql/10/data/postgresql.conf file to uncomment and update the following entries, which are used to configure PostgreSQL to use streaming replication:
listen_addresses = '<db_standby_IP_or_hostname>,<keepalived_virtual_IP>'
ssl = on
wal_level = hot_standby
checkpoint_segments = 32
max_wal_senders = 3
wal_keep_segments = 32
hot_standby = on
3.Open the /var/lib/pgsql/10/data/pg_hba.conf file in a text editor and add an entry for CCC to the #IPv4 local connections section of the file. Add the following lines as the first entry in the section to allow connections from the CCC host:
NOTE To ensure that CCC can successfully connect to the database, the entry must be the first lines in #IPv4 local connections section.
host replication replicator <db_secondary_IP_or_hostname>/32 md5
hostssl lunadirectordb lunadirector <ccc1_IP_or_hostname>/32 md5
hostssl lunadirectordb lunadirector <ccc2_IP_or_hostname>/32 md5
NOTE If both of your CCC servers reside in the same subnet, you can add a single line to the file to allow access from all devices in that subnet. Add an entry for hostssl lunadirectordb lunadirector <subnet_IP>/24 md5 as the last line in the var/lib/pgsql/10/data/pg_hba.conf file.
4.Save and close the file.
5.Restart the PostgreSQL Service.
systemctl restart postgresql-10.service
6.Copy the database from the primary PostgreSQL server to the standby PostgreSQL server. Copying the database deletes the /var/lib/pgsql/10/data directory that contains the postgresql.conf configuration file, so the following step includes backing up the directory and restoring it after copying the database.
a.Ensure that you are not in the /var/lib/pgsql/10/data directory:
cd
b.Backup the PostgreSQL configuration files:
cp /var/lib/pgsql/10/data/postgresql.conf /tmp/postgresql.conf.bak
cp /var/lib/pgsql/10/data/pg_hba.conf /tmp/pg_hba.conf.bak
c.Stop the PostgreSQL service:
systemctl stop postgresql-10
d.Delete the /var/lib/pgsql/10/data/ directory. It will be restored later.
sudo -u postgres rm -rf /var/lib/pgsql/10/data/
e.Replicate the database from the primary database server to the standby database server:
sudo -u postgres pg_basebackup -h <db_primary_IP_or_hostname> -D /var/lib/pgsql/10/data -U replicator -v -P
where <db_primary_IP_or_hostname> is the IP address of host name of the primary database server.
You are prompted to enter the password for the 'replicator' user. The password is 'dbpass', as configured in Configuring the Primary PostgreSQL Database Server.
The following message may be displayed. It can be ignored.
could not change directory to "/root": Permission denied
f.Enter the following commands to configure the recovery.conf file:
sudo -u postgres bash -c "cat > /var/lib/pgsql/10/data/recovery.conf <<- _EOF1_
standby_mode = 'on'
primary_conninfo = 'host=<db_primary_IP_or_hostname> port=5432 user=replicator password=dbpass'
trigger_file = '/tmp/postgresql.trigger'
_EOF1_
"
g.Restore the postgresql.conf and pg_hba.conf files from the backups:
cp -f /tmp/postgresql.conf.bak /var/lib/pgsql/10/data/postgresql.conf
cp -f /tmp/pg_hba.conf.bak /var/lib/pgsql/10/data/pg_hba.conf
h.Start the PostgreSQL service:
systemctl start postgresql-10
7.Enter the following command to configure the firewall (iptables) to allow the CCC servers to access the database. By default, PostgreSQL listens on port 5432 for connections:
iptables -IINPUT 2 -p tcp -m tcp --dport 5432 -j ACCEPT
Testing the PostgreSQL Database Cluster
To verify that streaming replication is configured correctly, you can create a table on the primary database and verify that it is replicated on the standby database.
To test the PostgreSQL database cluster
1.Create a table (named test) on the primary database:
su - postgres -c "psql postgres postgres -c \"CREATE TABLE test (name char(10));\""
2.Verify that the table was replicated on the standby database:
a.Login to the standby database server as root:
su root
b.Start PostgreSQL.
systemctl start postgresql-10
c.Connect to the database:
su - postgres
psql -d postgres
d.List the tables in the database:
\dt *.*
If streaming replication is configured correctly, the test database table is listed in the output. If it is not, check your configuration and try again.
3.Delete the table (named test) on the primary database:
su - postgres -c "psql postgres postgres -c \"DROP TABLE test;\""
4.Attempt to create a table (named test) on the standby database:
su - postgres -c "psql postgres postgres -c \"CREATE TABLE test (name char(10));\""
5.Verify that the command fails with the following error:
“ERROR: cannot execute CREATE TABLE in a read-only transaction”
Setting Up Keepalived On the PostgreSQL Servers
You must install the keepalived software on each PostgreSQL server to manage failover to the standby server in the event of an outage on the primary server. Once keepalived is installed and configured, if the primary server goes down, the standby server takes over as the new primary server, and the old primary server becomes the standby server. Keepalived allows you to configure a virtual IP address for the database cluster, so that database failover is transparent to CCC. For more information, refer to the keepalived documentation, available at keepalived.org.
To install and configure keepalived on the PostgreSQL database servers
1.Install keepalived on both of the PostgreSQL database servers:
yum install keepalived
2.Edit the /etc/keepalived/keepalived.conf file on the primary server as follows, where:
| <email_address> | The email address used to send a notification message in the event of a failover. |
| <smtp_server_IP_or_hostname> | The IP address or hostname of the SMTP server used to send the notification message. |
| <db_cluster_virtual_IP> | The virtual IP address for the database cluster. |
| <eth0 | eth1 | eth2 | ...> |
The interface to bind to the virtual IP address.You can use the current interface, or a different interface, if available. To determine the current interface, enter the command ip addr. Unless you want to use a different interface, you can use the current interface for both the vrrp_instance and virtual_ipaddress entries. |
NOTE Replace all existing content so that your file contains only the following entries.
! Configuration File for keepalived
global_defs { notification_email {}
notification_email_from <email_address>smtp_server <smtp_server_IP_or_hostname>
smtp_connect_timeout 30
router_id CCC_DB_MONITOR
}
vrrp_instance VI_1 {state MASTER
interface <eth0 | eth1 | eth2 | ...>virtual_router_id 51
priority 101
advert_int 1
authentication {auth_type PASS
auth_pass PASSWORD
}
virtual_ipaddress {<db_cluster_virtual_IP> dev <eth0 | eth1 | eth2 | ...>
}
}
3.Edit the /etc/keepalived/keepalived.conf file on the standby server as follows, where:
| <email_address> | Specifies the email address used to send a notification message in the event of a failover. |
| <smtp_server_IP_or_hostname> | Specifies the IP address or hostname of the SMTP server used to send the notification message. |
| <db_cluster_virtual_IP> | Specifies the virtual IP address for the database cluster. |
| <eth0 | eth1 | eth2 | ...> | Specifies the network interface to bind to the virtual IP address. Choose the interface you want to use. |
| <path to notify_master script> | Specifies the path to the notify master server script. Deactivates the PostgreSQL service on the primary database server in event of failover. |
| <path to notify_backup script> | Specifies the path to the notify backup server script. Alerts the secondary database that the primary has failed and switches the server from read-only to active. |
NOTE Replace all existing content so that your file contains only the following entries.
! Configuration File for keepalived
global_defs { notification_email {}
notification_email_from <email_address>smtp_server <smtp_server_IP_or_hostname>
smtp_connect_timeout 30
router_id CCC_DB_MONITOR
}
vrrp_instance VI_1 {state BACKUP
interface <eth0 | eth1 | eth2 | ...>virtual_router_id 51
priority 100
advert_int 1
authentication {auth_type PASS
auth_pass PASSWORD
}e
virtual_ipaddress {<db_cluster_virtual_IP> dev <eth0 | eth1 | eth2 | ...>
}
notify_master /root/<path to notify_master script>
notify_backup /root/<path to notify_standby script>
}
4.Enter the following command on both of the PostgreSQL database servers to configure the firewall (iptables) to allow multicast:
iptables -I INPUT -i eth2 -d 224.0.0.0/8 -j ACCEPT
5.Start keepalived on both of the PostgreSQL database servers, beginning with the primary:
systemctl start keepalived
6.Restart postgresql on both of the PostgreSQL database servers, beginning with the primary:
systemctl restart postgresql-10
Testing keepalived
You can verify that keepalived is working by performing the following tasks on both database servers:
>view the logs in /var/log/messages .
> run the following command to see if the virtual IP is bound where you expect it to be. In normal operation, the virtual IP is bound to the primary database server only:
ip addr show <eth0 | eth1 | eth2 | ...>
NFS Server Setup and Configuration
For detaled steps involved in NFS server setup and configuration, refer to Deploying CCC in HA Configuration .
CCC Application Server Setup and Configuration
Setting up and configuring the CCC application servers involves performing the following tasks on each server used to host the CCC application. Refer to the Setting up a CCC Server section for detailed procedures describing how to perform these tasks.
To set up and configure the CCC servers
1.Install and initialize the root-of-trust HSM, as described in Creating a Root of Trust. The root-of-trust HSM must be a Thales Luna Network HSM partition.
2.Install the CCC application server software. Refer to Installing CCC. You need to perform the following tasks:
a.Install the Java JDK.
b.Install the CCC server software.
3.Run the CCC server configuration script (config.sh) to configure the Crypto Command Center application server. Refer to Configuring CCC for a detailed procedure.
•when creating the certificate signing request, you are prompted to enter the server common name. This is the address of the HAProxy server. If you specify an IP address, you will be warned of a mismatch between the server's actual IP address and the HAProxy IP address. To avoid this issue, use a fully qualified domain name for the HAProxy server.
•when prompted for the IP address of the database server, enter the virtual IP address for the database cluster, as configured in Setting Up Keepalived On the PostgreSQL Servers. Both Crypto Command Center servers must point to the same virtual IP.
HAProxy Server Setup and Configuration
In an HA configuration, users connect to CCC through a server running the HAProxy load balancer. HAProxy accepts client requests and routes them to any of the active CCC servers in a round-robin fashion.
HAProxy is configured to use SSL in pass-through mode, which is supported in HAProxy 1.5 or higher only. In addition, you must configure HAProxy to use "sticky sessions", so that once a client logs in using a certain CCC server, all further requests from that client session will be sent to that same CCC server. Without sticky sessions, the client will be asked to log in again every time they are routed to a new CCC server.
To set up and configure the HAProxy server
NOTE The following section describes a sample script for the haproxy.cfg file. The exact parameters of your haproxy.cfg file may be dependent on your systems requirements. It is recommended that you refer to the HAProxy documentation for more information on customizing the configuration file for your specific networks needs.
1.Install the CentOS distribution for your server architecture:
a. CentOS is available for download from http://www.centos.org. It is recommended that you install only the base software (the Minimal installation option) to avoid installing unnecessary software that could present a security risk. Refer to the CentOS documentation for detailed installation instructions.
b.After the installation is complete, reboot the system.
c. Log in as root and enter the yum update command to install the latest updates.
2. Install HAProxy:
a.Log in as root and set the permissions for the session:
su root
umask 0022
b.Install HAProxy:
yum install haproxy
3.Edit the /etc/haproxy/haproxy.cfg file to configure the HAProxy server:
a.Update the "Main Frontend" section to replace the default entries with the following entries, which will instruct HAProxy to route incoming SSL connections on port 8181:
frontend https-in
mode tcp
bind *:8181
default_backend app
b.Update the "Static Backend" section by commenting the following entries:
# backend app
# balance roundrobin
# server static 127.0.0.1:4331 check
c.Update the "Round-Robin Balancing" section to replace the default entries with the following entries, which enable sticky sessions and describe the CCC servers that will handle incoming requests:
backend app
mode tcp
balance roundrobin
stick-table type binary len 32 size 30k expire 30m
acl clienthello req_ssl_hello_type 1
acl serverhello rep_ssl_hello_type 2
tcp-request inspect-delay 5s
tcp-request content accept if clienthello
tcp-response content accept if serverhello
stick on payload_lv(43,1) if clienthello
stick store-response payload_lv(43,1) if serverhello
server ccc1 <ccc1_IP_or_hostname>:8181
server ccc2 <ccc2_IP_or_hostname>:8181
NOTE Selinux should be set to permissive mode to achieve the intended results. If this is not permissible by your companies policy then you will need to make alterations to the haproxy.cfg file.
Many more options are available; see the HAProxy documentation for details about the specific requirements of your server and network configuration.
4.Enter the following command to allow connections to the HAProxy server on port 8181:
iptables -A INPUT -p tcp --dport 8181 -m state --state NEW,ESTABLISHED -j ACCEPT
5.Restart the HAProxy service:
systemctl restart haproxy
6.Verify that you can connect to CCC through the HAProxy server:
https://<haproxy_server_ip_or_hostname>:8181